13 Essentials for the Modern Hiker – A Realistic “10 Essentials”
This article proposes a more realistic 13 Essentials that will better keep the modern hiker safe. This is because the Classic 10 Essentials (first proposed in the 1930’s) need an update for the 21st Century given the realities of a modern day hiker.
- First, a major conceptual trap of the traditional 10 Essentials is that they are all gear. I would counter that the two most important “essentials” are actually skill and knowledge items: 1) good trip planning and 2) the skill of staying found.
- Second, why should there be only 10?
- Third, why do none of the 10 Essentials take advantage of 21st century technology?
- And finally, some 10 Essentials are a bit arcane & don’t match the skills & habits of the modern hiker.
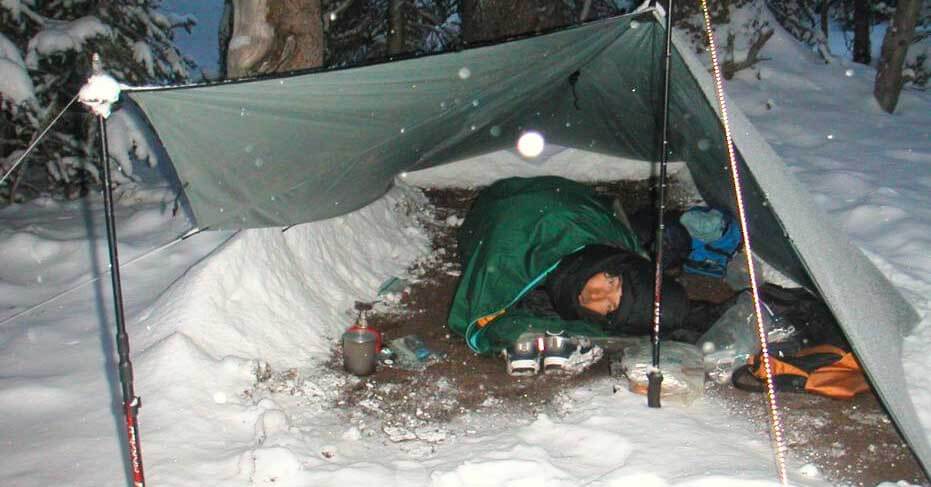
Lead photo: A “freak” summer blizzard in the Wind River Range. I was super grateful to have all my warm clothing, a bivy sack and 1/2 lb tarp. And even more appreciative I had the skills and knowledge to use them.
The 13 Essentials for the Modern HikerMy revised “essentials” are to help people be prepared for emergency situations outdoors. As such, it’s a good idea to bring them whenever you are in the backcountry—whether it’s just a long day hike, or a multi-day off-trail backpacking trip. The following 13 Essentials favors a pragmatic approach to bringing the right gear. First and foremost, it relies on your best piece of gear, what’s between your ears.
|
1 Trip Plan
Use what’s between your ears. More problems arise from poor planning and lack of information about a hike than from not bringing the right gear. So, whether you’re day-hiking or backpacking you should:
- Do your research on hiking distances, trail conditions, campsites and water ability. Good examples of this type of research are: Map kiosks/Information Centers at major trailheads or park publications like the excellent Zion Park Map and Guide, or guide books. Much of this info is now online.
- Then make an honest/realistic estimate of how far you’ll hike each day. Be conservative. You don’t want to end up stranded somewhere because you only hiked ¾ of the distance you expected. And in case you end up short, have a backup camp area with a water source.
- Get a weather report for your trip and then plan and pack gear for those conditions! Since 90% of hikers or backpackers take 90% their trips for 3 days or or less, this weather report should be quite accurate. My favorite weather app for both smartphone and desktop is Weather Underground.
- And once on your trip, you also need to watch the weather and be prepared to deal with “freak” weather. This is especially true in high western mountains where a summer blizzard is always possible. Even the lower elevation Appalachian Mountains can have some cold and severe weather in the warmer months. Usually park info sites will let you know what sorts of extreme weather might be possible. [Note: This does not necessarily mean going overboard with gear—just taking the right gear.]
- Leave a copy of your trip intineary with someone. See: How to make and use a Trip Itinerary.
2 Staying Found
Staying Found is the key navigation skill that experienced navigators always use but never mention.
| The highly effective, “Staying Found” approach to navigation is within the capability of all hikers. |
Good navigators rarely get lost because they have a good idea (Trip Plan) in their head of where they are going and what to expect. That is, they are vigilant and observant while they hike—always comparing what they see on the trail against the plan in their head. They continually monitor their progress and check for upcoming trail junctions, lakes, stream crossings, a steep climb, a section of bog & other features to confirm that they are on the right track. If they stray, they quickly identify & correct it. You should do likewise. It’s your first and best navigation “tool.”
3 Navigation Tools (not always paper map and compass)

(left) 21st century navigation tool: Gaia GPS App running on an iPhone. (right) Traditional nav tools: A fully featured compass with declination adjustment and paper USGS topographic map underneath. Both have pros and cons.
Important Note: I respectfully suggest that people read the Navigation Tools & Electronics Appendix carefully before commenting on this important topic. In particular, it covers the strengths and weaknesses of navigational tools, their proper use and the ways they can fail (yes, map & compass can “fail” too).
For Navigation – Take the tools you can actually use!
The first question that requires an honest answer is, “what navigational tools can I actually use?” Like having a bicycle but not knowing how to ride it, navigational tools (like a compass or USGS topographic map) without the knowledge to use them properly are not tremendously useful. It might even be dangerous if your are relying on them to navigate and keep you safe, but under false assumptions about your skills.
Topographic Map and Compass
If you are skilled with a map and compass, then take them. They are reliable, light, effective, inexpensive and don’t require batteries, or cell phone signal [I bring them on every trip.]
Alternatives to Topographic Map and Compass
But if you aren’t confident using a topographic map and compass there are alternatives. You might consider using tools that you are more familiar with and easier to operate— ones that you can reliably use in the field. Two options are:
- A Simple Hiking Map like the Zion Park Map and Guide and using Staying Found Navigation as described above. This is your first and best strategy even when you bring other navigational tools!
or - A Smartphone GPS App with dowloaded, Off-line Maps that does not need cell signal! (A quick test with your phone in airplane mode can determine if your App & maps work offline.)
A Smartphone GPS App Might be a Better Navigation Tool for Some Modern HikersMany traditionalists insist that a paper topographic map & compass are mandatory. But frankly, many modern recreational hikers may not have the map and compass skills to be able to rescue themselves using them. But they do have a lot of practice and skill navigating with their smartphones. And practice and familiarity are the key for successful use of a navigational tool! Therefore, properly used* a Smartphone GPS App might be a better option for some. [*Please see: Navigation Tools & Electronics Appendix for a caution and advice about using electronics in the backcountry, especially battery life management, backup batteries, and not relying on cell coverage.] |
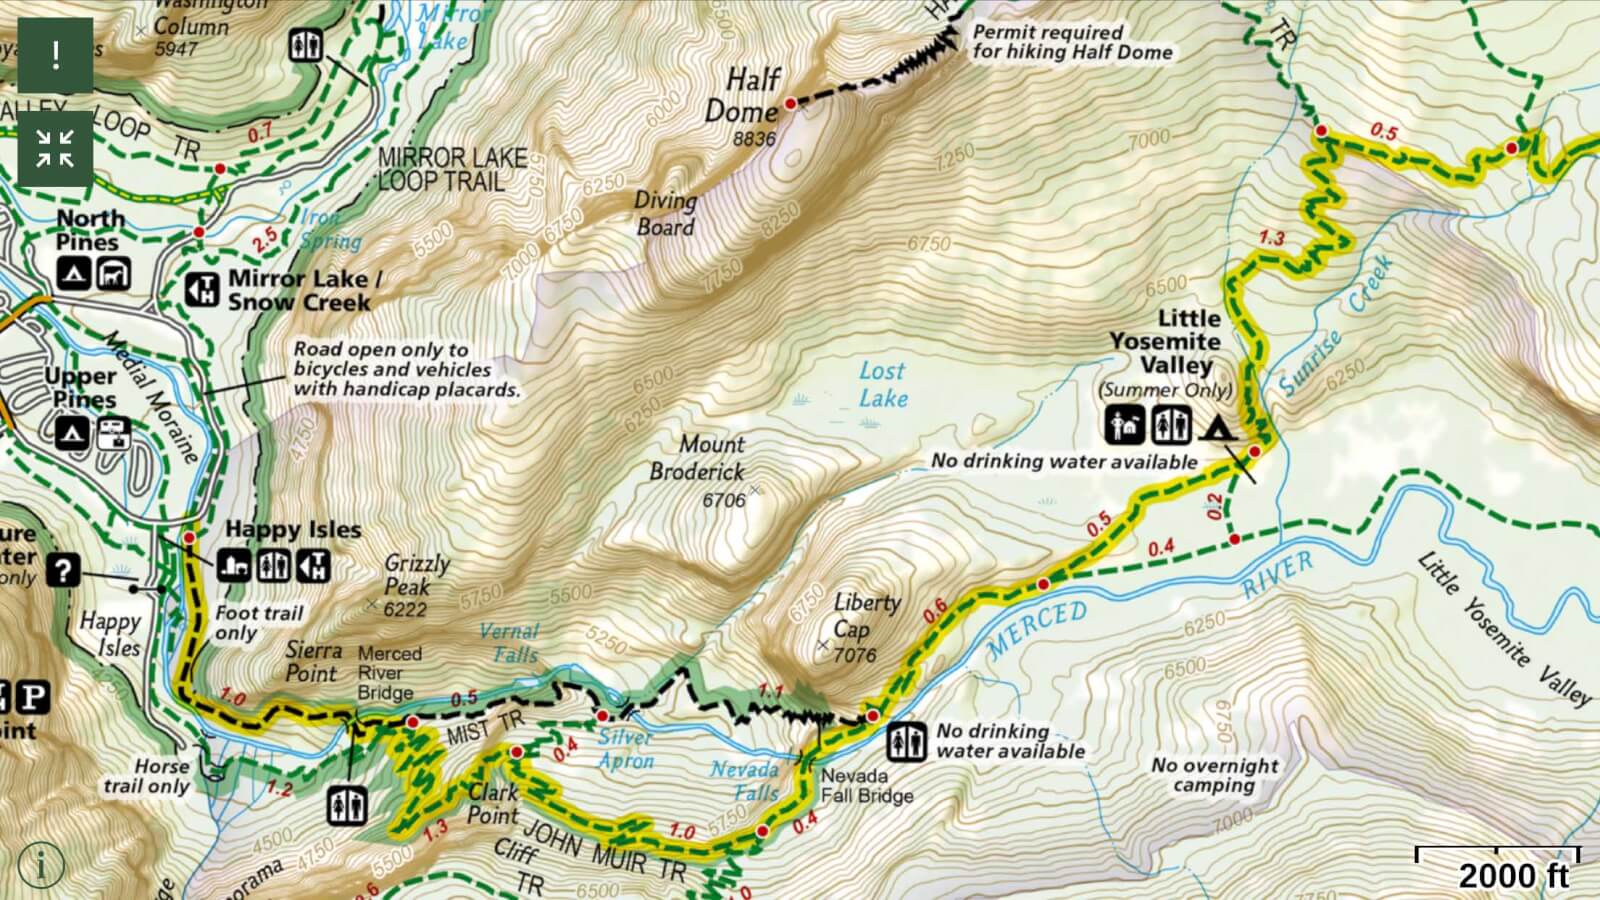
Start of the JMT in Yosemite. Screen shot of NG Trails Illustrated Map using Gaia GPS on an iPhone. The beauty of a smartphone GPS App like Gaia GPS is that you have many map sources at your finger tips at no additional cost and weight. E.g. NG Trials Illustrated, full USGS 7.5′ TOPO maps, Satellite Imagery, and other specialized maps. [click to enlarge and see full map detail]
4 – Protection from Sun and Bug Transmitted Diseases, Like Lyme
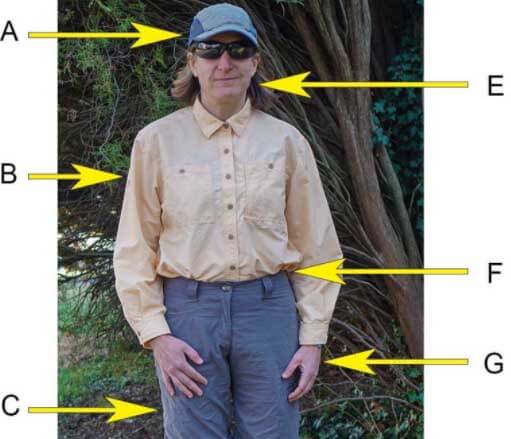
Full-coverage clothing is best for both sun and bug/disease prevention.
In addition to sun protection, I am adding bug protection to your basic trail needs. 2017 is forecast to be the worst year for tick/Lyme disease, and it’s only going to get worse in other parts of the US. Other diseases like Zika are also on the rise.
Your first and best option for sun and bug protection is appropriate full-coverage clothing like this. While chemical/skin applied sunscreen and bug repellants work (Picaradin Lotion is the most effective and long lasting without the problems associated with DEET) they are not nearly as long lasting or effective as sun & insect protective clothing and a good sunhat. And yes, wear those sunglasses. For more reading, see my piece on the Best Clothing & Repellants to Protect Yourself from Lyme and Zika.
5 – Insulation (extra clothing)
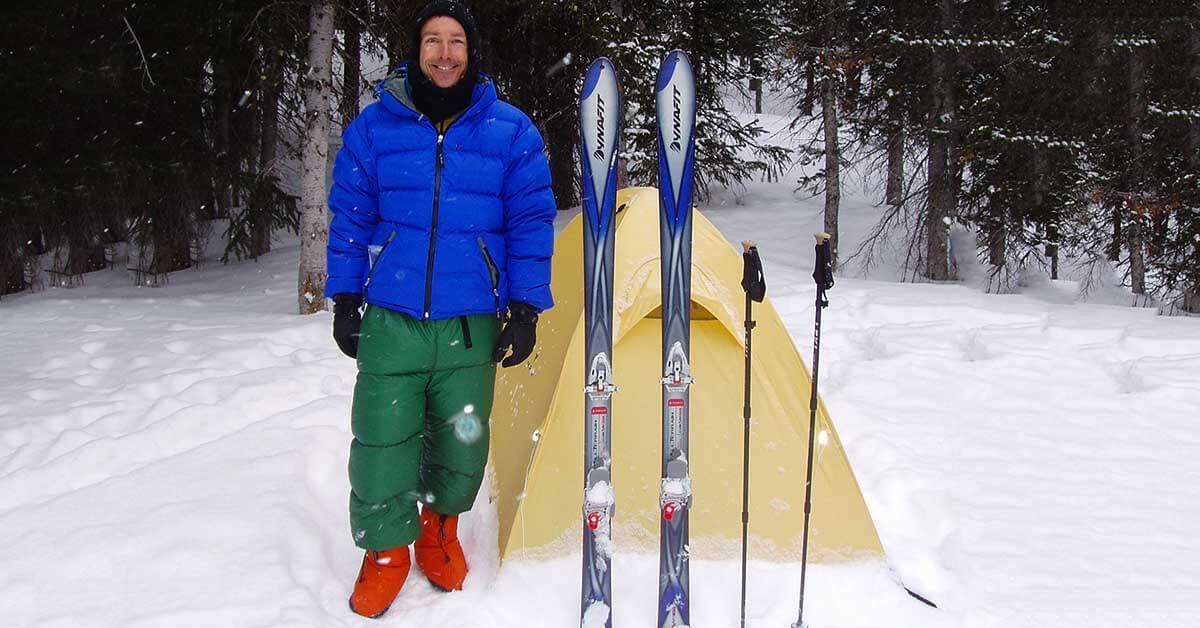
My warm clothing gets used on almost every trip. A good Down Jacket has saved my ass on numerous occasions such as a freak snowstorm on a summit, where I needed to stay warm enough to hike down to shelter and warmth. It’s also essential to keep an injured person warm until help arrives. Other invaluable pieces of warm clothing are a light rain jacket, warm hat and gloves like these.
While backup clothing is good, it’s usually best to first make the most of the clothes you are actually wearing. Towards that end, here’s a good piece on how best to use the clothes you are wearing: Top Mistakes Using the Layering System – How to Stay Warmer and Drier.
6 – Headlamp – A Good One!
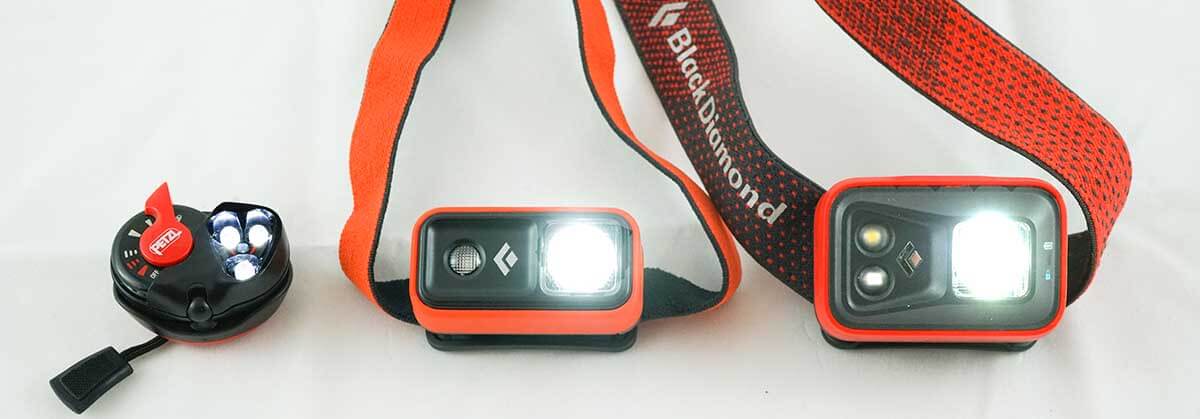
You need a seriously bright and long lasting headlamp to make an emergency retreat or exit. An example of a good one is the Black Diamond Spot Headlamp (right). The Black Diamond Ion (center) is marginally OK but would be better for following behind someone with a brighter light. On the left, the Petzl e+LITE Headlamp while low-weight and great for camp, is not bright enough for hiking.
If an emergency retreat or exit is necessary, your headlamp should be bright enough and last long enough that you can safely hike and navigate all night. To do that, you need a seriously bright and long lasting headlamp— putting out a beam of 50-60+ meters for ~12+ hours. A headlamp like this is likely in the range of 3 to 4 ounces. Examples: Black Diamond Spot Headlamp (Note: you only need one this strong for a party of hikers. The others following behind the leader can use smaller lighter headlamps, e.g. Black Diamond Ion.) And a spare set of batteries is always an excellent idea.
7 – Emergency Shelter
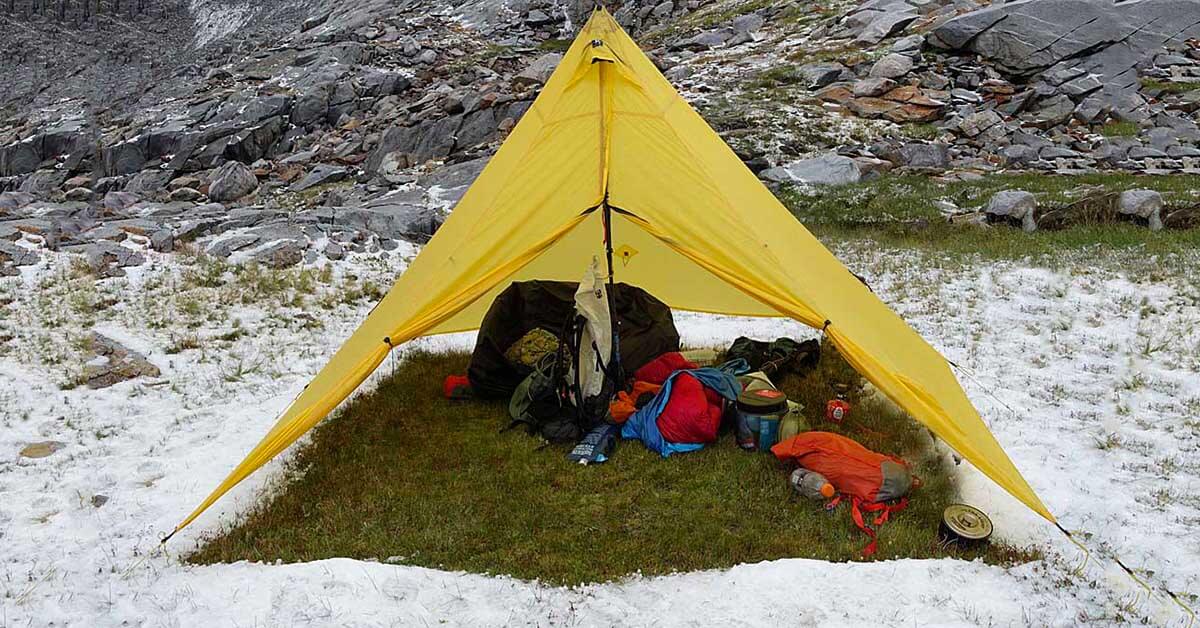
Tarps & pyramid tarps provide tremendous shelter at a fraction of the weight & cost of a traditional tent. As such, they are light enough to be used as both a primary and/or emergency shelter. [Yes, another summer storm. This time the High Sierras.]
True bivy sacks like these also make good emergency shelters and even the light emergency bivy sacs are OK. I am not a big fan of the paper thin, mylar emergency blankets as they can’t really be staked out to provide a true shelter like a tarp. That being said, they are certainly better than nothing.
8 – First Aid Kit
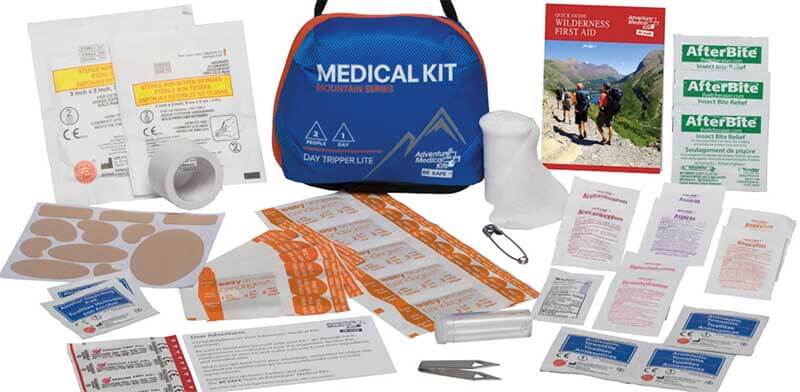
I prefer to assemble my own 3 oz First Aid Kit (see detailed list below) as I can do a better job for less weight than pre-packaged ones. My kit includes bandages, tape, gauze, wound wipes, antibacterial lotion, and OTC med’s like Tylenol, Benadryl, Sudafed, Nexium, Imodium. I also carry some Rx meds like antibiotics. But you can also buy a pre-packaged First Kid Kit like one of these.
Most of the injuries I have treated have been scrapes and cuts (abrasions and lacerations) and all I had to do was stop the bleeding (direct pressure, always) and clean it up and dress the wound. I rarely get blisters since I train in the same shoes and socks that I backpack in. Even so, I carry Leukotape Tape and tincture of benzoin to treat hot spots and mild/early blisters.
A small first aid guide/booklet (often included in kits) is a good idea. Or even better, take a Wilderness First Aid Course at REI, or from NOLS or Landmark Learning.
First Aid Kit | Detailed List
- Pain, fever inflammation | Naprosyn (Aleve), Ibuprofen, or Tylenol (fever) In ziplock pill bag available at pharmacies | 0.4 oz
- Foot/blister | Gauze + Leukotape Tape For taping over blisters, or pre-blister areas | 0.3 oz
- Foot/blister | Tincture of benzoin in micro-bottle. For getting tape or Bandaids to REALLY stick! | 0.2 oz
- Wound care | Bandaids + gel blister covers Assorted sizes – your preference | 0.5 oz
- Wound care | Antibact. packets + wound wipes. Wound cleansing, infection prevention | 0.4 oz
- Wound care | (12) 4×4″ gauze pads + 1 roll gauze Use duct tape to hold in place (from above – Repair Items)
- OTC meds | Benadryl, Sudafed, Nexium, Imodium, caffeine tablets. All in tablet/pill form | 0.4 oz
- Rx meds | Personal Dr’s Rx meds | 0.4 oz
- Pain serious | Dr’s Rx Painkiller. For serious injury, tooth abscess, etc. | 0.2 oz
- Storage/org | Bag Poly 5×8 to hold 1st Aid Kit 0.2 Keep size down. Can only put in what can fit in bag.
9 – Hydration (prudent amount of extra water)
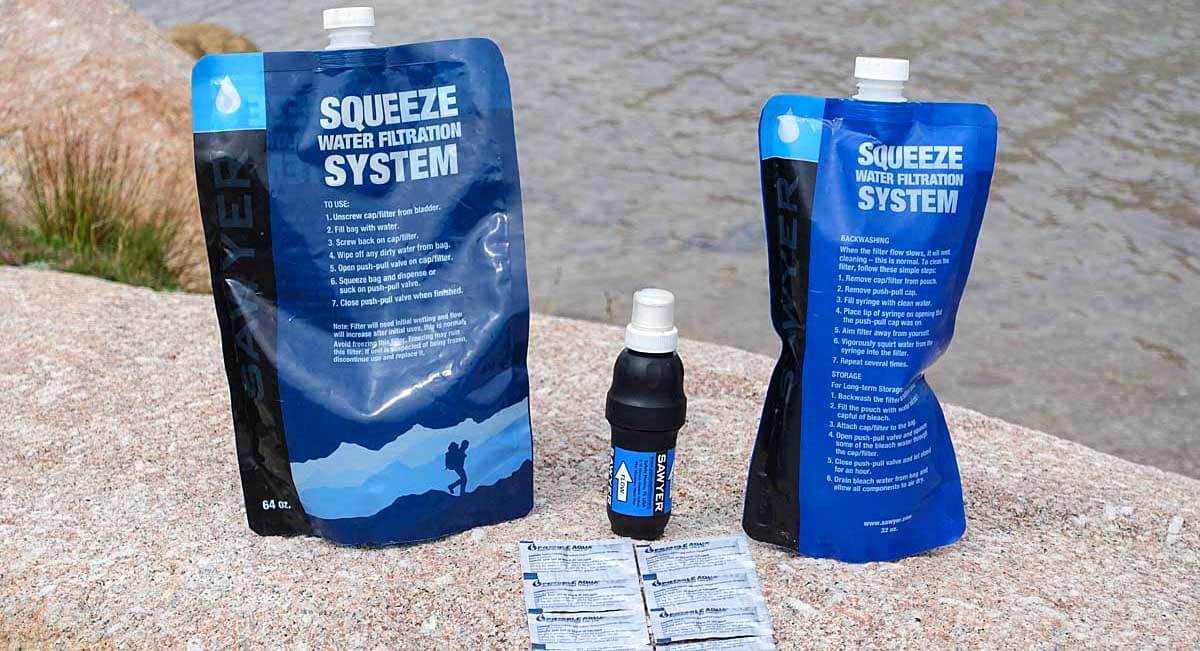
A light, inexpensive, fast and effective water purification and hydration system: Sawyer Squeeze Filter and Water Treatment Tablets
Yes, bring a prudent amount of extra water because human beings don’t do well without it. For hiking in the desert, extra water would likely be right after Navigation Tools on the essentials list. But for most hiking and backpacking in the US, water is usually available every few hours. With a filter like the Sawyer Squeeze you can drink immediately at water sources. This means both quick, effective hydration/purification and less water to carry. An even lighter alternative (and backup system for a filter) are Water Treatment Tablets.
You may be drinking more water than you need: The healthiest hydration strategy is to drink when thirsty. The saying “If you are thirsty, it’s already too late” and “If your urine is yellow, you are dehydrated” are myths. In fact, over hydration (hyponatremia) is becoming more of a risk than dehydration. I’ve extensively researched this topic with experts in sports hydration here: “The Best Hydration – Drink When Thirsty.”

In cooler temps and/or where water is plentiful you may not need to carry as much extra water. Drink from the source, & you’ll likely not be thirsty by the time you reach the next water source. [But do know where your next water sources are.]
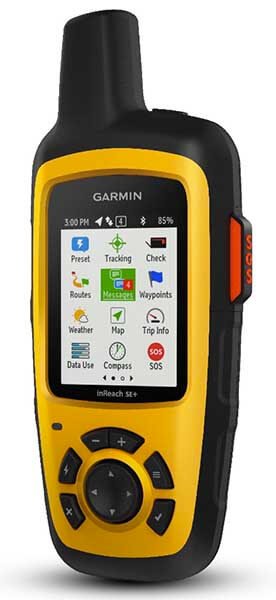
10 – SOS Device (satellite based, like inReach or SPOT)
This is #10 because as noted earlier, prevention (having a plan, intelligently executing it), & having the right stuff (items 3 through 9) is your first & best way to stay out of trouble.
But even with the best planning and execution, stuff like a serious fall, an on-trail appendicitis, serious concussion, or a heart attack can happen. A SOS Tracking Device is the best and most reliable way to summon help in such an emergency. Two-way devices like a Garmin inReach allow you to get medical advice to care for and treat the injured party before help arrives. And they are a big help to arrange/coordinate a helicopter rescue potentially saving a life. For one thing, the EMTs know the exact nature of the emergency and come fully prepared. Read more on selecting SOS/Tracking Devices and their use.
Note: Another benefit of two-way devices like a Garmin inReach is to get in-the-field weather reports.
As of 2023, we recommend ZOLEO Satellite Communicator is our SOS device of choice.
11 – Nutrition
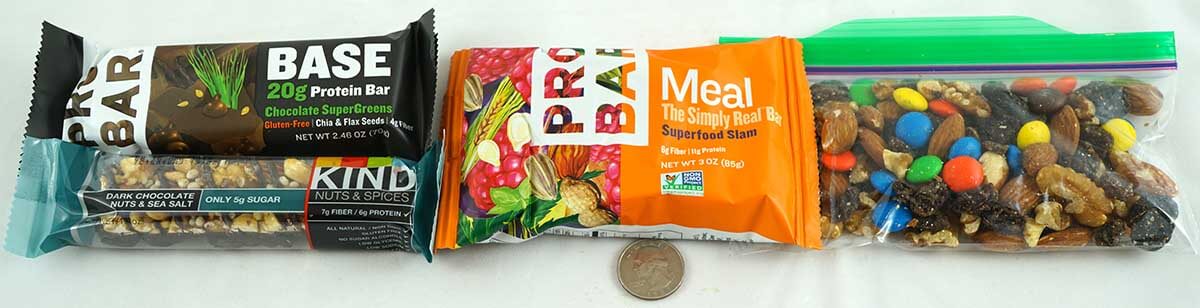
[Note: for a long day hike, 1 to 1.5 pounds of this nutritious food should work for most people]
It makes sense to bring an appropriate daily amount of food that is high in nutritional value and low in weight. (See: “How much daily food should I take?“) But unlike water, your body can go without food for much longer. Therefore, going overboard on too much extra food vs. a prudent amount is a trade off. Think of what other more useful gear for your safety you could bring for that same weight. For example, more warm clothes, a better shelter or an SOS device might contribute more to your safety. That being said, my favorite (extra/backup) foods are usually a high calorie energy bar, and homemade mix of dried fruit, nuts, and a few dark chocolate M&Ms. They are simple, fast, and don’t require cooking.
12 Repair Kit and Tools

While a repair kit is nice to have, I’m not sure it is a true essential. But it’s light so no big deal. I maintain my gear, inspect it before each trip and then treat it with care on the trail. Therefore, while I do carry a small repair kit, I rarely use it. And when I do it’s not for what I would consider an “essential” repair.
I carry a small pair of school scissors (technically part of my first aid kit) which are far more useful than a knife and they can be transported on an airplane. I also have duct tape, needle and dental floss, a few cable ties and a small tube of krazy glue and one of Aquaseal, along with a some Gear Aid Tenacious Tape. All together they weigh less than 3 ounces. For non-do-it-yourself folks, Gear Aid also has a nice pre-packed Repair Kit altho I wouldn’t take all of the items. And if you own a NeoAir sleeping pad, consider NeoAir patch kit.
13 – Fire (lighter/matches/fire-starters)
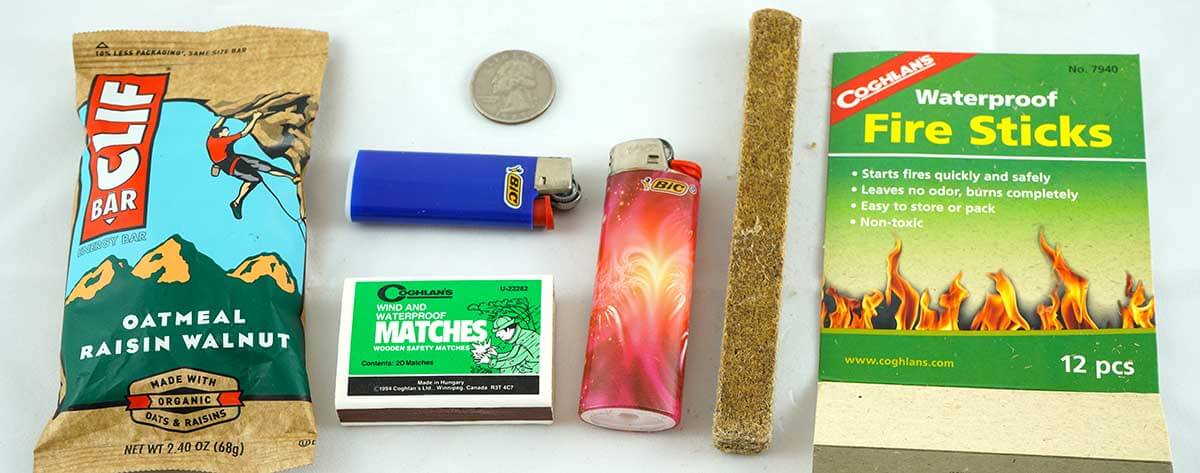
(right) Coghlans Fire Sticks are one of the easiest and safest fire starters to use. (center) A standard lighter is a first choice but Storm Matches are a good backup. (left) Most energy bar wrappers (mylar) also make great fire starters. And best of all I usually have a number of them in my trash bag.
While I do carry these fire starting items, they are last on this list. To this point, in over 40 years of hiking I have yet to use them in a dire emergency situation. Yes, I have started a fire a few times (where legal) to warm up and dry out a lot faster than getting into my sleeping bag in dry clothes—but this was more a comfort and convenience than an emergency. In contrast I’ve used my warm down jacket and my tarp a number of times for what I would consider to be an emergency or close to it. But my favorite fire starters, a lighter and energy bar wrapper (mylar), are already packed every trip so I have them by default.
Appendix – Navigation Tools & Electronics
A Critical Caution for Electronic ItemsNeither an electronic GPS App with maps, or a paper TOPO map will figure out the best off-trail route for you. In both cases you’ll need to understand what they show you. That is, you’ll need to be able to tell where things like impassible cliffs are, etc. And you still need to make in-field assessments of the best route while you hike off-trail.
Taking all this into account, electronic items are still serious tools that can do things that non-electronic tools cannot. |
Pick the Right Navigation Tools for YOU!
I’ve used USGS 7.5′ Topo maps and a traditional compass to navigate for over 40 years. Much of this off-trail, in difficult to navigate areas. They worked then and they still work now. BUT that doesn’t mean a traditional compass is the best navigational tool for all people.
I suggest that there is no perfect navigation tool. All have strengths and weaknesses. In the end its a personal choice. Select the right tools for you—tools that you have the skills to use and meet the navigational requirements for your trip. And whatever tools you decide on, you do need to know how to use them AND you’ll certainly want to bring a backup.
Paper Maps & Compass
a) Can I “use” a map and compass?
This is the first thing you should consider when deciding on the right navigation system for you. For example, can you can orient your map and compass to true north (taking into account declination), always find your location on the map, take a bearing to a point you want to navigate to, and then use the compass to sight and follow that bearing, taking into account elevation contours (reading Topo lines) and other physical features depicted on the map to make an informed decision on the best route. If not, you might want to 1) learn how to really use a map and compass and/or 2) consider a smartphone GPS App (or even a traditional GPS unit if you already have one).
b) What if you want to learn how use a map and compass?
If you want to learn map and compass skills, great. But to keep your newly learned map & compass skills sharp and effective, you’ll need to use them on a frequent basis. [Note: after teaching many people map and compass navigation, I’ve noticed a low retention rate for those that don’t regularly practice their map & compass skills each year.]
c) All types of navigation tools can fail – even maps
Contrary to what most say, paper maps and traditional compasses can “fail.” First, as stated earlier, many people are not proficient with them. This is a failure of sorts since the map and compass won’t deliver their intended function—and there are no backups to fix this. In addition, maps are accidentally left on a rock, they easily blow away in the wind, they mysteriously creep out of pack and pants pockets, and they can get ruined by water. A couple of times a year I pick up somebody’s full map-set that I found in the middle of the trail. Finally, compasses can be lost, misplaced or damaged (yes, I’ve had clients break a compass).
Smartphone GPS Apps
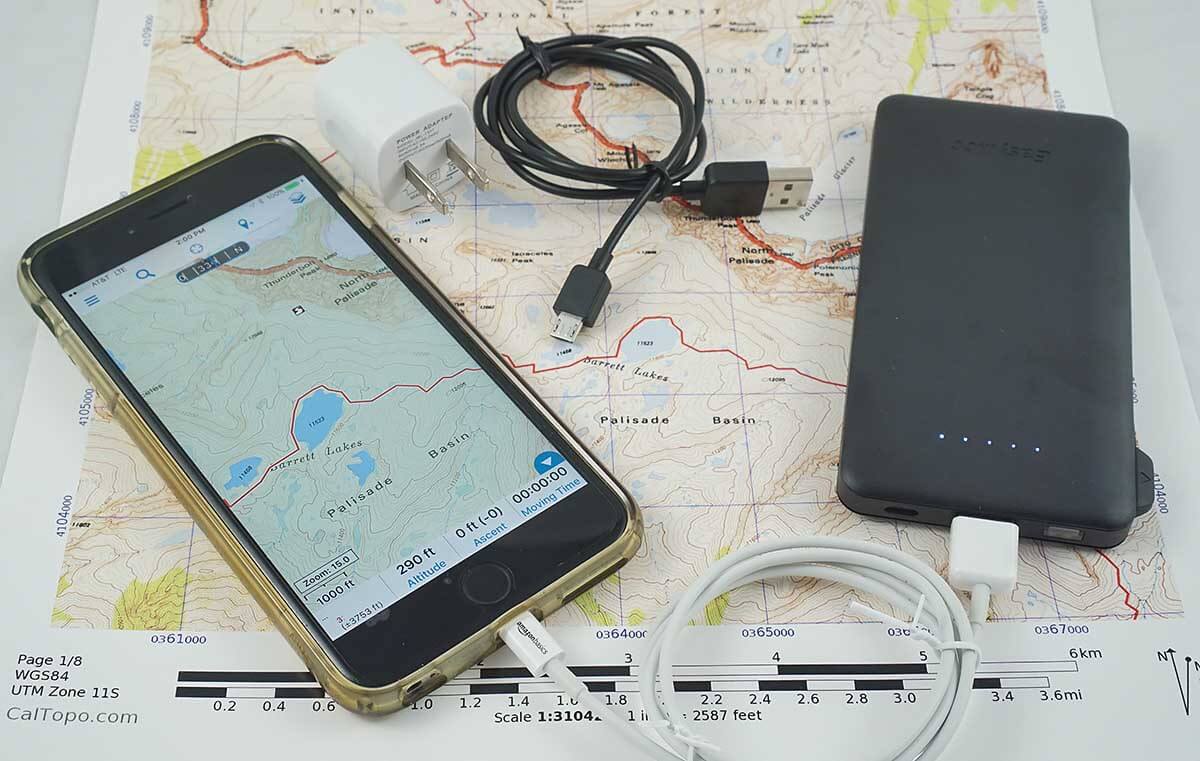
The EasyAcc battery on the right will recharge the iPhone 6 Plus two times. (The wall charger and micro-USB cable [top center] are only needed if you’ll have access to electricity mid-trip). See more in Best Lightweight Backpacking Electronics Gear.
Smartphone GPS apps (and traditional GPS units) work far better in low visibility conditions like white out and in the dark. I have navigated off of more than a few complex summits in complete whiteout with a GPS.
Finally, a big advantage of the smartphone GPS App is the maps are free and instantly downloadable. You can get superbly detailed maps for your hike in a matter of minutes. I’ve downloaded them from my motel room. In contrast, getting and/or printing paper maps is far more costly, time consuming and cumbersome (USGS 7.5 min Topo map are harder and harder to get).
Electronic Navigation Tools are not as unreliable as “experts” claim
- In five years of intense backcountry use my close hiking partners and I have never broken an iPhone or the GPS App. We’ve taken our iPhones on numerous packrafting trips in Alaska, winter rafting down the Grand Canyon, technical Canyoneering in Utah, climbing in the Wind Rivers and the Sierras, long hikes in the U.S.A, Turkey, Australia, Europe, and a canoe trip down the length of the Mighty Mississippi River. All without incident. No failures. No dead batteries.
- But as a backup, at least one hiking partner carries another smartphone with GPS App & offline maps. (sometimes even an alternate App and mapset).
- We do not need cell signal to use our GPS App.
- We get around 7 days of use before we need to recharge it—see more about iPhone/smartphone battery management.
- And a light USB battery gets us a couple more charges if we need them. The same USB battery charges all our other electronics like headlamps, cameras, and Garmin inReach. See more about field batteries for recharging electronics.
Always Bring a Backup Battery!It’s critical safety precaution to make sure your electronics are always available for use. My three favorite lightweight and high capacity USB backup batteries are:
|


