

")
Recommendations for the lightest weight and most user-friendly backpacking tent
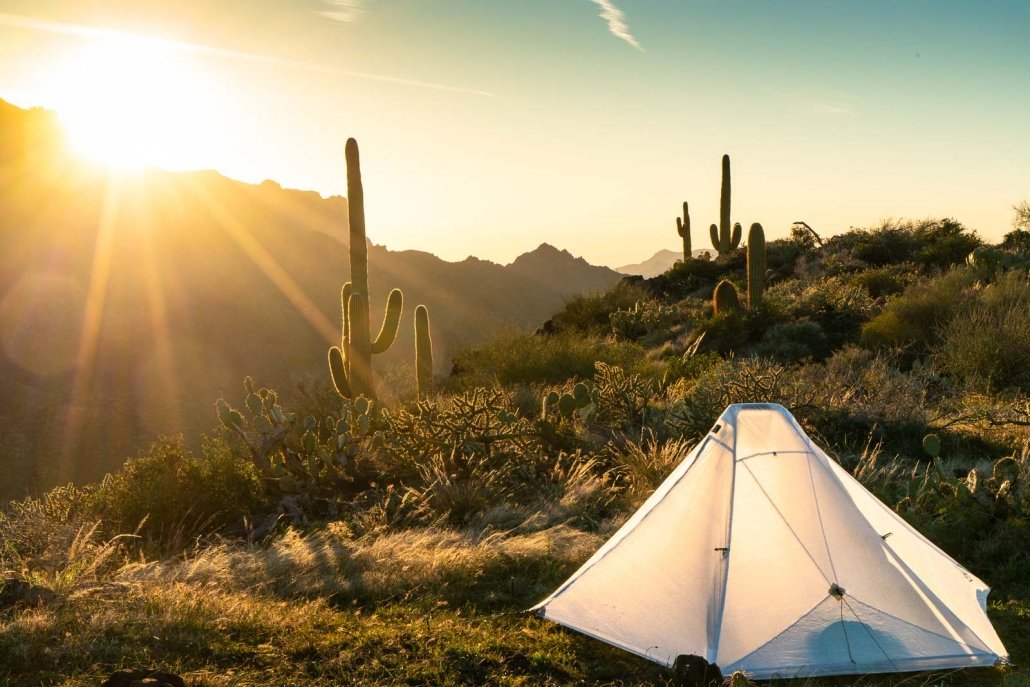
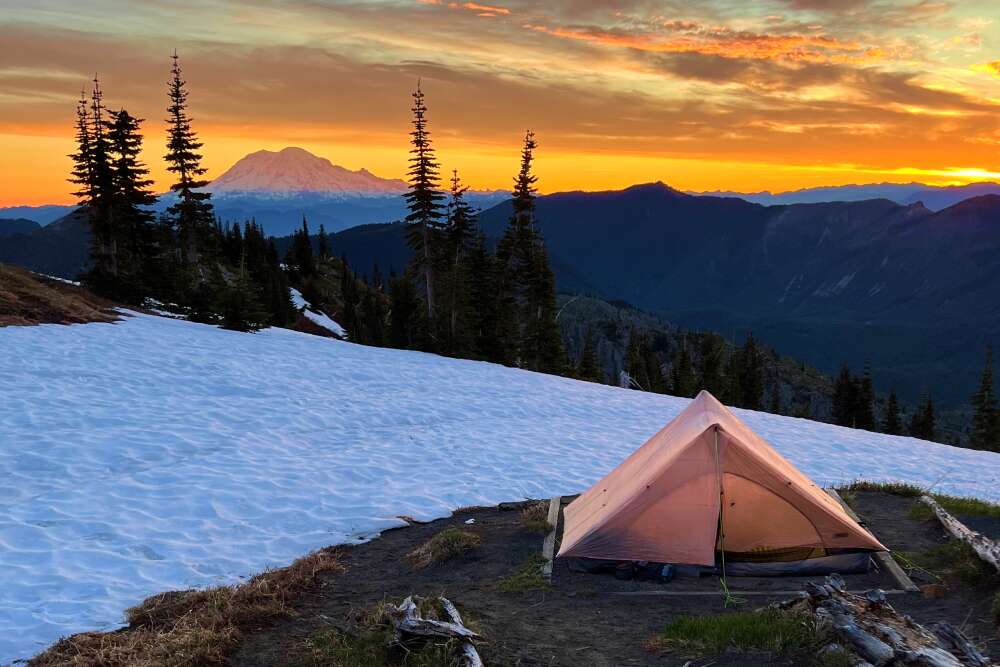
A backpacking tent is the single most important piece of gear you will carry. A top tier model will protect you from the elements, reduce the weight and volume of your backpack, and provides ample living space to camp comfortably. An ultralight tent, in particular, can have such a big impact on quality of life on the trail, that we believe it is the first item you should upgrade to, and the most splurge-worthy in one’s entire kit.
We’ve been testing lightweight and ultralight tents for over 25 years all over the world in all sorts of conditions — from Alaska to the PCT, from the desert southwest to Patagonia. We’ve got you covered when it comes to picking the best backpacking tent or ultralight tent for your needs.
In this guide, we evaluate 2P backpacking tents based on the following criteria: weight, price, size, materials, features, design, user-friendliness, sturdiness, and backcountry performance. And while you’re here, don’t miss our companion guides to 1 person tents, 3 person tents, 4 person tents, backpacking tarps, pyramid tents, or our 9 lb Ultralight Gear List.
You make Adventure Alan & Co possible. When purchasing through links on our site, we may earn an affiliate commission at no additional cost to you. Here’s why you can trust us.


Best Backpacking Tent Quick Picks
Best Freestanding Lightweight Backpacking Tent ↓
- Best Freestanding: Big Agnes Copper Spur HV UL2
- Best Semi-Freestanding: Big Agnes Tiger Wall UL2
- Most Bomber: SlingFin Portal 2
- Best Value: REI Co-op Half Dome SL 2+
- Best Under $200: REI Co-op Trailmade 2
Best Non-Freestanding Ultralight Tent ↓
- Best Ultralight: Zpacks Offset Duo
- Best Ultralight: Durston X-Mid Pro 2+, DCF
- Top Pick: Hyperlite Mountain Gear Unbound 2P
- Best Value: Gossamer Gear The Two
- Best Pyramid: Mountain Laurel Designs DuoMid XL
Best Backpacking Tent Comparison Table
Mobile users rotate device for full-width table
| Tents | Price ($) | Weight (oz) | Interior Area (ft²) | Int Area/Pound (ft²) | Height |
| MLD DuoMid XL | 785 | 16.0 | 65 | 65 | 59 |
| Durston XMid Pro 2+ | 794 | 19.4 | 32.5 | 26.8 | 49 |
| Zpacks Offset Duo | 799 | 19.6 | 31.4 | 25.6 | 48 |
| HMG Unbound 2P | 699 | 24 | 28.1 | 18.7 | 48 |
| Gossamer Gear The Two | 320 | 24 | 26.3 | 17.5 | 43 |
| Big Agnes Tiger Wall UL2 | 450 | 35 | 28 | 12.8 | 39 |
| Big Agnes Copper Spur HV UL2 | 530 | 43 | 29 | 10.8 | 40 |
| SlingFin Portal 2 | 560 | 46 | 27.5 | 9.6 | 44 |
| REI Co-op Half Dome SL 2+ | 329 | 63 | 33.8 | 8.6 | 42 |
| REI Co-op Trailmade 2 | 179 | 68 | 31.7 | 7.5 | 40 |
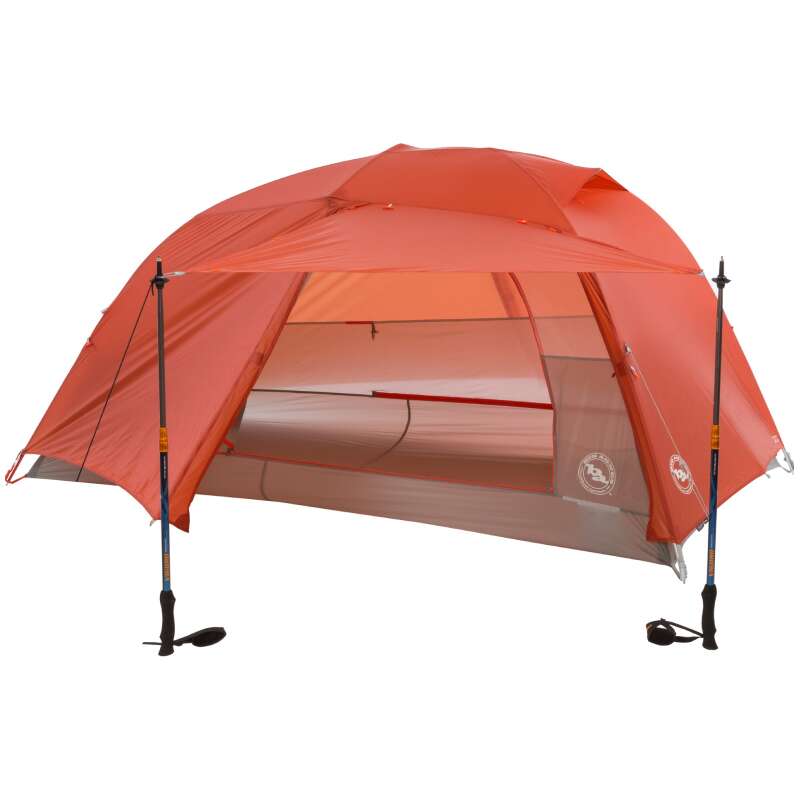
Big Agnes Copper Spur HV UL2 Tent
If you want the best overall and most highly rated freestanding backpacking tent of all time, choose the Big Agnes Copper Spur HV UL2 (shop now). Compared to similar options, it’s smarter, taller, lighter, better ventilated, and more livable. Copper Spur handles all types of weather with ease. During warm rain, open the massive vestibule awnings to let a breeze in. On cold stormy nights, the near-vertical sidewalls and fully lofted ceiling create a excellent living area. Read more in our full-length Big Agnes Copper Spur Review.
- Price: $530
- Weight: 2 lbs, 11 oz
- Material: Sil-Nylon
- Interior: 29 ft² | Vestibule: 18 ft² | Interior Area/Pound: 10.8 ft²
- Length: 88″ Width: 52″/42″ Height: 40″
- Pros: Lightweight. Freestanding. Good headroom. Easy Setup. Awning. Internal pockets. Vents. Comes with stakes. Large vestibules.
- Cons: Expensive. Not ultralight.
Construction and Features
As gear reviewers, we tend to be unimpressed by most bells and whistles and prefer simple ultralight tents. But we make an exception for the Copper Spur’s features, especially the innovative awning vestibules which helps ventilate and create good vibes when you’re stuck inside during daytime rain. We prefer them open in all but the nastiest of weather, in which case each vestibule offers 9 sq ft of gear storage, notably larger than average.
We are also huge fans of the interior pocket array, especially the “3D Bin Mezzanine” at the foot end, which in conjunction with sidewall and ceiling pockets, easily keep all of your gadgets organized and accessible.
The frame is a sturdy and well-designed cross-bar-plus-spreader, a famously simple and storm worthy construction. The poles are pre-bent to create superbly vertical sidewalls, which maximizes the perceived space and livability inside the tent. Setup is as easy and intuitive as one could hope; literally anyone can figure it out. As backpacking tents go, user experience and livability are so high that we think this would also be a great small 2 person tent for car camping.
At 2 lbs 11 oz, it’s a bit too heavy to be considered ultralight, which is really our only dig against it, aside from the high price tag. But that said, it’s still very lightweight overall, and significantly lighter than the average backpacking tent.
Verdict
Add it all up and you get, what we consider to be the best freestanding backpacking tent that money can buy. It’s just such a smart design with so many great lightweight features. The Copper Spur HV UL 2 is great for beginners and experts alike. This is one helluva great tent.
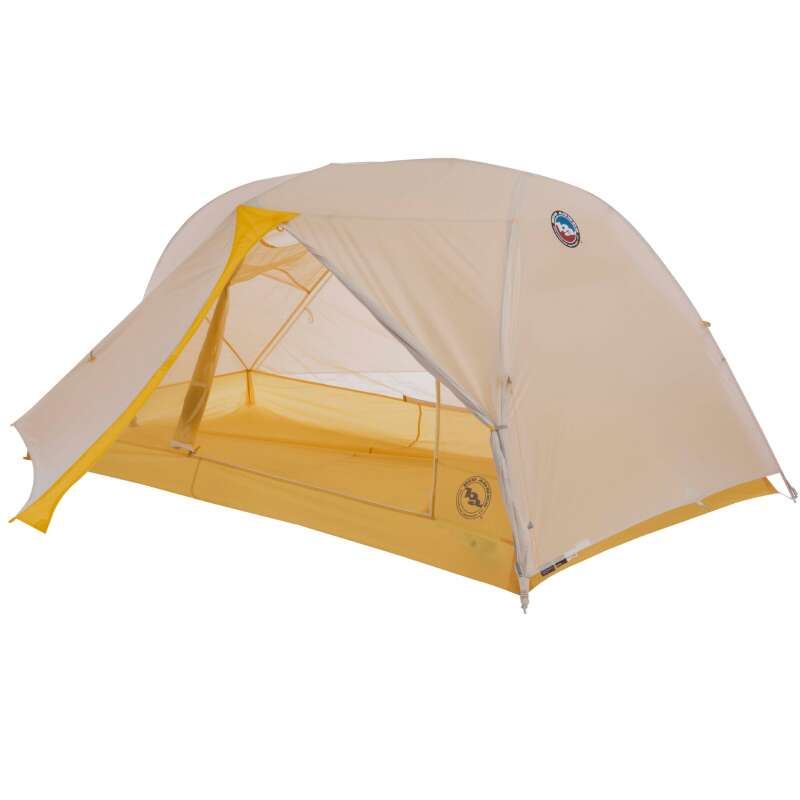
Big Agnes Tiger Wall UL 2 Tent
The Big Agnes Tiger Wall UL2 is most notable for its impressive area-to-weight-to-price ratio. Tiger Wall offers backpackers the same livability and features of a tent that’s twice as heavy, and $100 more expensive. Shop now.
- Price: $450
- Weight: 2 lbs, 3 oz
- Material: Coated sil-nylon ripstop
- Interior: 28 ft² | Vestibule: 16 ft² | Interior Area/Pound: 12.8 ft²
- Length: 86″ Width: 52/42″ Height: 39″
- Pros: Very lightweight. Great value. Fully featured. Internal pockets. Comes with stakes.
- Cons: Semi-freestanding. Not ultralight. Modest wind-resistance. Ground sheet recommended.
Construction & Features
The Tiger Wall achieves its phenomenal lightweight performance thanks to the semi-freestanding architecture. An 8.7mm DAC Featherlite aluminum pole traces from foot end, over the center where it is bisected by a spreader bar, and forks to meet the head-end corners. The foot end corners do not have pole support and much be tensioned off with stakes to achieve a proper pitch. It’s a tremendously low asking price to achieve its incredibly low weight and high performance.
While this weight-saving architecture is very effective at its primary goal, it does leave the tent wanting for a bit more sturdiness and structural integrity. We would describe the Tiger Wall UL2 as fully adequate when faced with everyday backpacking conditions and lightly-to-moderately stormy weather. But for strong wind in particular, we don’t recommend Tiger Wall.
Turning inwards, Tiger Wall has great livability thanks to the steep side walls and head end, full-size vestibules, and four internal mesh pockets. All of those elements help to compensate for the slightly-smaller-than-average 28 ft² interior floor plan. Notably, we prefer Tiger Wall to the NEMO Hornet because it has more useable headroom.
Verdict
The semi-freestanding pitch and average-but-not-exceptional wind resistance are small prices to pay for a tent this light and livable. Tiger Wall is about as close as one can get to ultralight without ditching the convenience of poles. This is truly an exceptional backpacking tent for a great price and we recommend it highly.
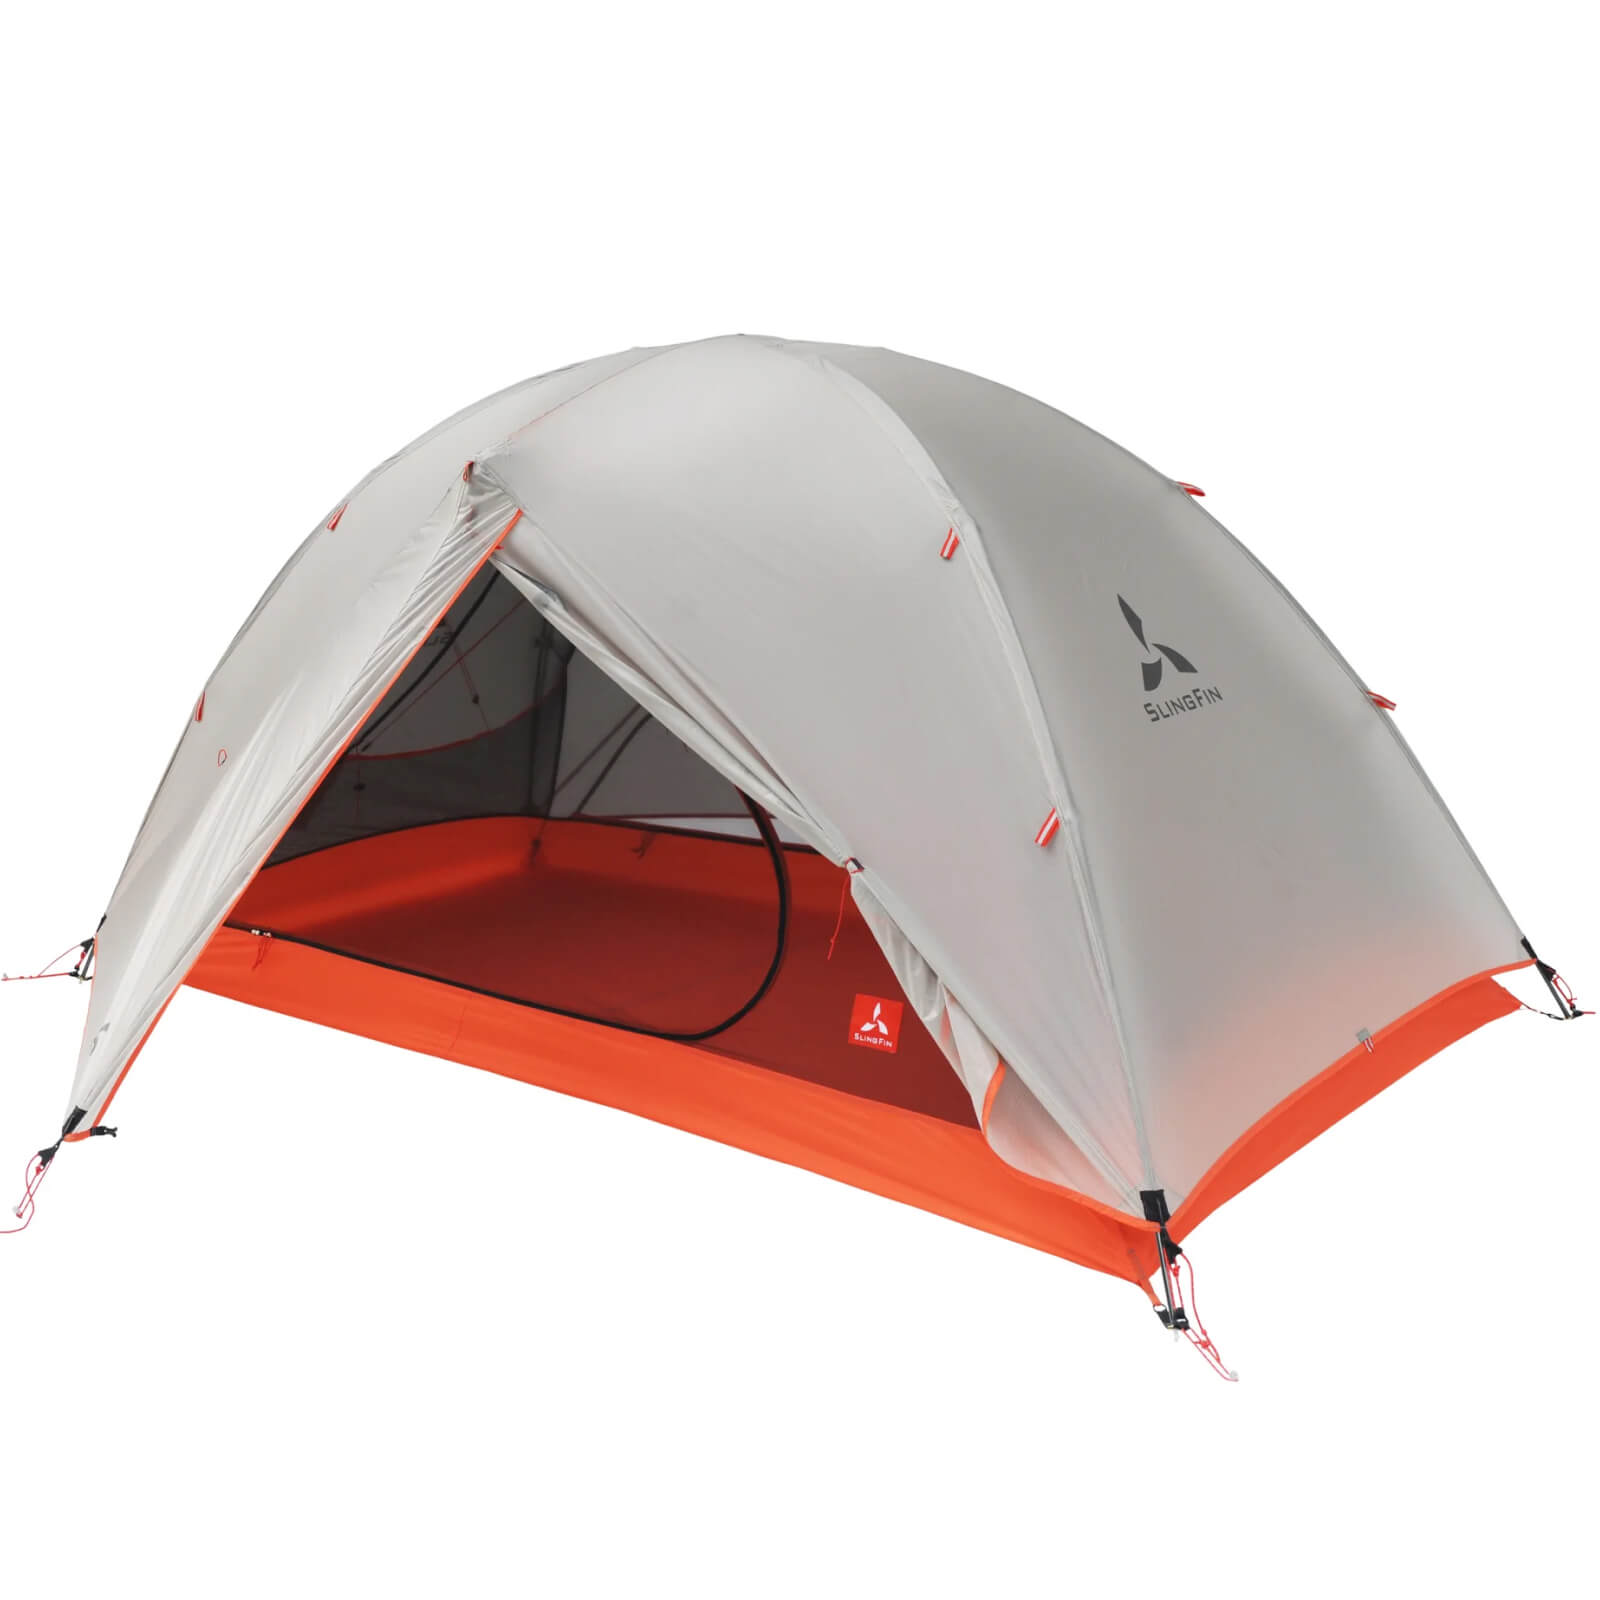
SlingFin Portal 2 Tent
If you’re hiking into a storm, we recommend the SlingFin Portal 2 (shop now). It’s the sturdiest sub-3-pound freestanding backpacking tent we know of, and it’s capable of handling gnarly conditions like high winds and snow-loading. Read more in our full length SlingFin Portal 2 Review.
- Price: $560
- Weight: 2 lbs 14 oz
- Material: Sil-Nylon
- Area: 27.5 ft² | Vestibule: 16.8 ft² | Interior Area/Pound: 9.6 ft²
- Length: 85″ Width: 51/42 Height: 44″
- Pros: Extremely sturdy & wind-resistant. Excellent headroom. Lightweight. Lots of internal pockets. Comes with 10 stakes.
- Cons: Not ultralight. Expensive. Smaller floor plan.
Construction & Features
The Portal 2 was clearly designed by engineers. The heavy duty x-pole design, ceiling spreader, and many tie out points are supplemented by innovative internal guy lines that reduce structural distortion due to wind shearing.
We consider it to be a 3+/4- shoulder season backpacking tent, and it is the perfect companion during spring and fall. While not a true 4-season tent, Portal comes closer than any other sub 3-pound model.
What’s more, this backpacking tent is no slouch when it comes to creature comforts. With generous headroom thanks to a much-taller-than-average 44″ ceiling, condensation vents, and a litany of interior pockets, the Slingfin Portal 2 is a very livable tent. Add in the full size vestibules and it’s quite pleasant to camp in.
Portal 2 is constructed with SlingFin’s top of the line Sil/Sil 10D ripstop nylon. The double silicone coating outperforms Sil/PU in terms of waterproofness, stretch reduction, strength, and UV-resistance.
Verdict
The Slingfin Portal 2 is an excellent, highly-livable backpacking tent to add to one’s quiver for camping in stormy, windy, snowy conditions. What’s more, it’s lightweight and packs down small. This brilliant, well-engineered design comes highly recommended.
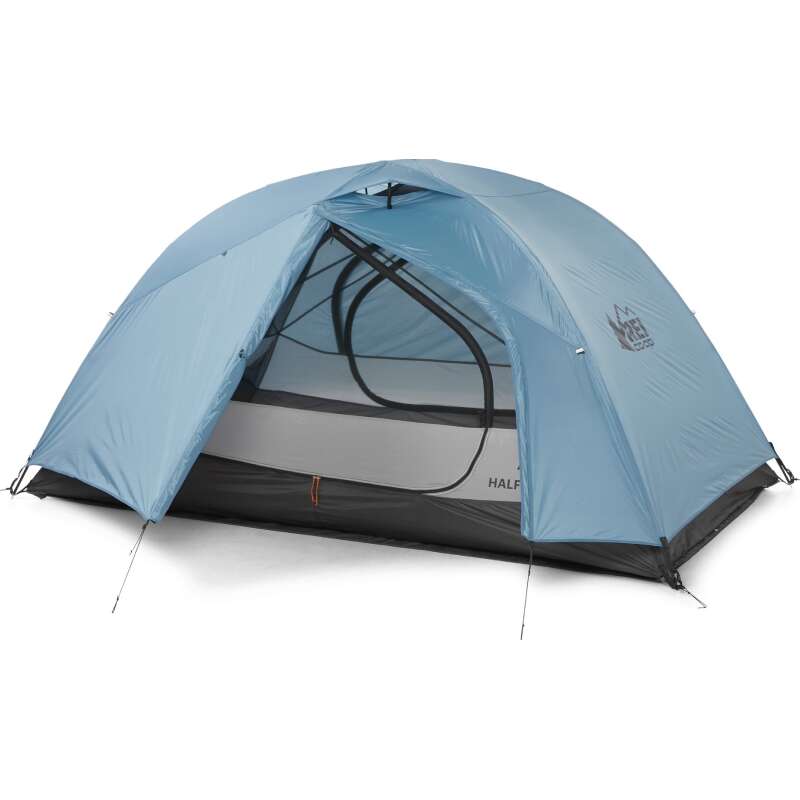
REI Half Dome SL 2+ Tent
The REI Co-op Half Dome SL 2+ Tent (shop now) is perhaps the best-selling backpacking tent of all time thanks to it’s incredible versatility, performance, and hyper-spacious interior, all relative to a very modest price. Half Dome’s value is simply best-in-class. And no matter where and how you choose to camp in the front or backcountry, this tent will keep you comfortably protected.
- Price: $349
- Weight: 3 lbs, 15 oz
- Material: Sil-Nylon, 40D floor, 30D fly
- Area: 33.8 ft² | Vestibule: 22.5 ft² | Interior Area/Pound: 8.6 ft²
- Length: 90″ Width: 54″ Height: 42″
- Pros: Affordable. Versatile. Freestanding. Very spacious. Good headroom. Easy setup. Fully-featured. Comes with footprint & stakes. Vents.
- Cons: Heavy-ish
Construction & Features
Half Dome’s sheer size calls out the loudest. With 33.8 ft² of interior floor plan, it is the largest of any 2 person backpacking tent we’ve reviewed, more than wide enough for two wide sleeping pads and 7.5 feet long to boot. Add onto that a whopping 22.5′ of vestibule space (also above average) and a 42″ ceiling height plus spreader bar. This is truly a tent you can comfortably hang out in that feels big inside.
The x-bar pole structure is storm-worthy and classic for a reason, it just works. What’s more, these poles are pre-bent to create even more verticality on the side walls, adding to the perception of livability. It is also extremely user-friendly, beginner-friendly, and easy to set up.
Half Dome has a solid set of features including an array of internal mesh pockets and hang loops which create excellent internal storage. We love the rainfly vents, and also rolling up both sides of the vestibule for maximum airflow on warm days. And it even comes with its own stakes and footprint to protect against abrasive surfaces. Plus REI’s generous warranty!
Okay, it’s not all gravy. At 3.9 lbs minimum trail weight, it is the heaviest backpacking tent in our buyer’s guide, and the heaviest tent we would considering packing for typical 3-season backpacking. But we have very high standards in that regard. In actuality, 3.9 lbs is fairly average when you take a zoomed out view of the entire backpacking tent marketplace.
Verdict
If you want a quiver-of-one tent that is spacious and comfy for car camping while also being compact and mid-weight for backpacking, then Half Dome is the perfect crossover tent for you. And at $349, you won’t have to break the bank on it either. This tent has so much to offer in terms of value, versatility, and livability that there’s no doubt as to why it’s such a best seller.
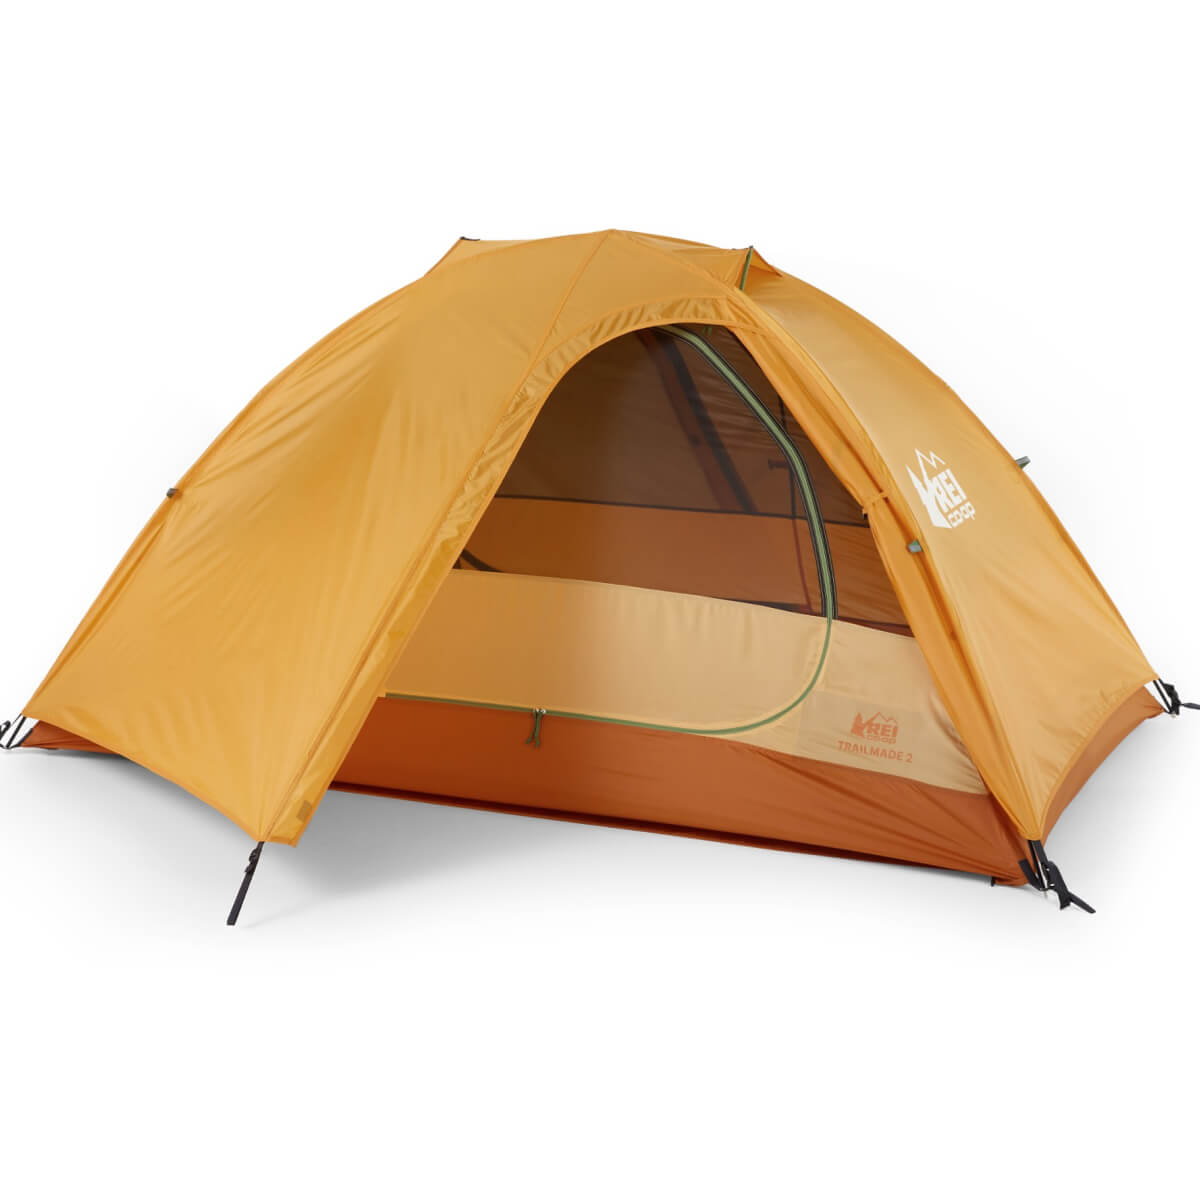
REI Trailmade 2 Tent
The REI Co-op Trailmade 2 with footprint is about as much backpacking tent as you could possibly hope to get from a reputable outdoor brand for under $200. REI has really upped their backpacking collection lately, and they’ve been especially dominate in the budget backpacking tent department thanks to the Trailmade Collection. Shop now.
- Price: $179
- Weight: 4 lbs, 4 oz
- Material: Coated Polyester floor and fly.
- Interior: 31.7 ft² | Vestibule: 19.1 ft² | Interior Area/Pound: 7.5 ft²
- Length: 88″ Width: 52″ Height: 40″
- Pros: Very affordable. Spacious floor plan. Freestanding. Vents. Complimentary footprint & stakes. Internal pockets.
- Cons: Heavy. No spreader bar.
Construction & Features
There is literally nothing fancy about the Trailmade 2. Structurally speaking, it’s built with a cross pole aluminum frame, no spreader bar, and with unspecified coated polyester fabric.
Perhaps where this backpacking tent shines the brightest is it’s spaciousness relative to cost. At nearly 32 sq ft of interior space, it’s the second largest in our guide and well above average. The 52″ width in particular is exceptional, with more than enough for room for two wide sleeping pads.
Trailmade is not exactly feature-rich. There are some interior pockets, and like many small 2 person tents in this class, it comes with a footprint and stakes. But beyond that, there just isn’t much else to write about. But within the sub-$200 tent category, having two doors and two vestibules is in and of itself a feature, perhaps the best of all.
We nod to Trailmade as the pinnacle of entry level tent design. It is versatile and comfortable enough for car camping, and just lightweight enough for backpacking.
Verdict
The combination of its larger-than-average interior with a significantly-less-expensive-than-average price tag makes the Trailmade 2 a killer value, and an excellent entry-level backpacking tent.
Zpacks Offset Duo
The Zpacks Offset Duo is a tier-1 ultralight backpacking tent by virtue of its incredibly spacious floor plan, excellent headroom, and sub 20 oz weight. And it’s all thanks to the magic of Dyneema Composite Fabric, its ingenious offset trekking poles pitch, and an end strut. Learn more in our full length Zpacks Offset Duo Review.
- Price: $799
- Weight: 19.7 oz
- Material: Dyneema
- Interior: 31.4 ft² | Vestibule: 12.5 ft² | Interior Area/Pound: 25.6 ft²
- Peak Height: 48″ | Width: 50-44″ | Length: 94″
- Pros: Ultralight. Spacious length and width. Excellent headroom. Best-in-class materials. Durable floor. Vents. Magnetic door roll-ups. Sturdy in wind.
- Cons: Very expensive. Not freestanding. Small vestibules.
Construction & Features
Starting with interior length and width, this tent is simply more spacious than the competition for seemingly no weight penalty. Compared its predecessor the Duplex, which is the baseline for which all ultralight tents are compared to, Offset Duo is 5″ wider, and 4″ longer for just one ounce of additional weight. That’s an incredibly favorable exchange – adding enough extra space to store packs and gear inside instead of in the vestibules where rodents might nibble them.
What’s more, the offset trekking poles and end strut combine to add massive amounts of extra ceiling space over both the foot and head end, and especially the area directly above where users sit up. While this does not technically increase length/width, it does increase usable area of length and width, which increases the perception of “livability” that campers will experience inside. Further improving the user-friendliness are peak vents, waterproof zippered storm doors, and magnetic door roll-ups. This tent is a joy to use.
Offset duo is constructed with best-in-class Dyneema Composite Fabric, which never stretches or sags due to wetness. It is extremely durable and waterproof. An adjustable 6″ tall bathtub floor blocks splash and secures the edges. It is adorned with storage pockets on both sides. While the tent is single-walled, mosquito proof mesh completely encloses the structure and L shaped doors prevent bugs form drifting in.
If we have one complaint, it’s that compared to the average backpacking tent, Offset Dou has smaller than average vestibules. However, the interior floor plan is so large that they’re hardly missed.
Verdict
Offset Duo is our pick for best overall 2P Zpacks tent currently in production, and one of the very best tier-1 performance ultralight shelters money can buy. We love how the offset trekking poles add headroom, and hope to see more end struts in the future.

Durston X-Mid Pro 2+
The Durston X-Mid Pro 2+ is an innovative, high-performance ultralight tent famous for its asymmetrical pitch, voluminous interior, exceptionally large vestibules, and limited availability due to constantly selling out. The + designation indicates an allowance for two wide width rectangular sleeping pads, and in our opinion, makes it superior to the base model. This ultralight tent is truly top tier.
At time of publication, our preferred DCF floor version is back-ordered, but the woven sil-nylon floor version is available.
- Price: $794
- Weight: 19.4 oz
- Material: DCF .55 fly (custom DCF floor)
- Interior: 32.5 ft² | Vestibule: 23 ft² | Interior Area/Pound: 26.8 ft²
- Length: 90″ Width: 52″ Height: 49″
- Pros: Ultralight. Very spacious. Easy pitch. Best vestibules. Best-in-class materials. Sturdy in wind. Innovative asymmetrical geometry. Sturdy.
- Cons: Frequently unavailable. Single-wall. Very expensive. Not freestanding. One side of head-end wall always has less headroom.
Construction & Features
What sets the Durston X-Mid Pro 2+ apart from similar top tier options is its asymmetrical pitch. Unlike other trekking pole shelters, the X-mid’s ridgeline runs diagonally across, rather than perpendicular to, the lengthwise direction. The result is a parallelogram-shaped interior floor plan that offers a larger than average 32.5 ft². Combined with 49″ ceiling and two massive 23 ft² of vestibule space, X-Mid is far more spacious and livable than your average ultralight tent.
Compared to base model, the “+” designation indicates a width boost, up to 52” from 46”, which allows for two 25” wide sleeping pads. The height is also increased from 46” to 49”. This tent is luxuriously large and in-charge!
Setup is easy, aside from the large floorplan which usually requires a 3P-sized tent pad. But you need only stake out the four corners, which further differentiates it from other trekking pole shelters typically requiring 6-8 stakes. Optional guy out points are available for when the wind howls. You also get magnetic door roll-ups, peak vents, and dual interior pockets.
Aside from infrequent availability, our biggest knock is how the asymmetrical structure means one camper gets a bit less headroom than the other. The side wall farther from the head end trekking pole is lower angle, increasing the likelihood of brushing against wet rain fly.
Verdict
X-Mid’s innovative geometry and attention to detail has created a truly exceptional, industry-disrupting ultralight tent in a wide-pad accommodating chassis with a massively livable interior. We’re thrilled to see the Durston brand grow, and recommend this tent highly whenever it’s actually in stock.
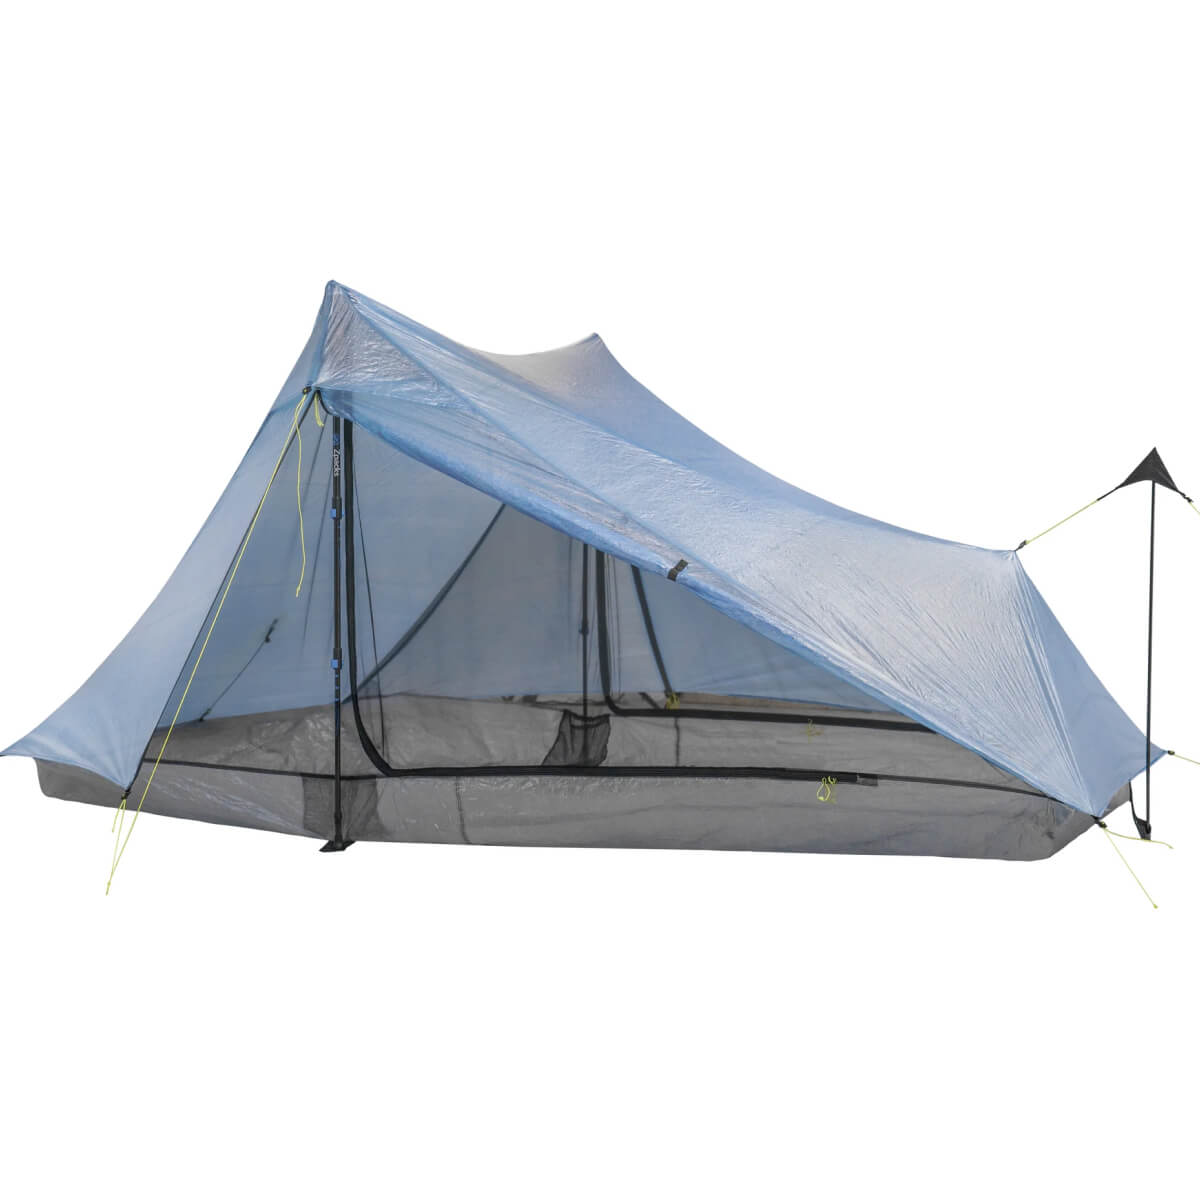
Hyperlite Mountain Gear Unbound 2P Tent
The HMG Unbound 2P (shop now) is a top-of-the-line, trekking-pole-supported Dyneema ultralight tent designed for thru-hiking and long distance backpacking. Unbound immediately evokes similarities to the beloved Zpacks Duplex series, only it comes with a suite of upgrades including zippers, magnetic door toggles, vents, reinforced guyout points, and slightly wider footprint.
- Price: $699
- Weight: 24 oz
- Material: Dyneema
- Area: 28.1 ft² | Vestibule: 15 ft² (estimate) | Interior Area/Pound: 18.7 ft²
- Length: 90″ Width: 48″ Height: 48″
- Pros: Ultralight. Best-in-class materials. Magnetic doors. Vents. Reinforced guyout points.
- Cons: Expensive. Non-freestanding. Translucent.
Features & Construction
Constructed with Dyneema, Unbound 2P is fully waterproof, seam-taped, sturdy, and doesn’t sag when wet like cheaper sil-nylon or sil-poly alternatives. When properly tensioned, this trekking pole-supported shelter is sturdier than most freestanding models.
The floor plan is your typical 28.1 ft², but the 48″ ceiling is well above average. Look closely at the reinforced lines bisecting the sidewalls. These allow for a healthy amount of tension on the guyout lines which further expand the usable headroom and make Unbound all the more livable.
Peak vents and the gap between top of bathtub and bottom of the fly keep this tent fairly well ventilated. But like all single-wall tents, Unbound exposes campers to brushing against wet condensation on the interior ceiling. We recommend sleeping with at least one door open when conditions allow. All four doors can be opened for max air flow without losing tension. The vestibules are large enough to store packs and open close with waterproof YKK zippers and magnetic roll up toggles.
Verdict
The Unbound 2P is of signature HMG quality and reaffirms their commitment to thru-hikers by delivering a spacious Duplex alternative fully decked out in user-friendly features. We’re thrilled to see Hyperlite add this tent to their quiver, and we hope you do too!
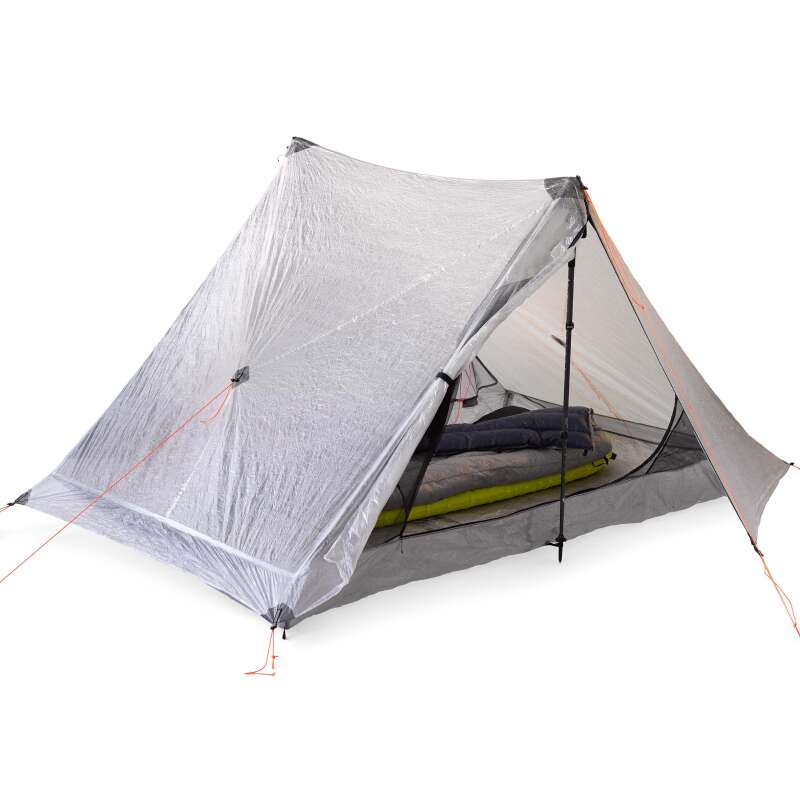
Gossamer Gear The Two Tent
Weighing only 1.5 lbs and costing $320, Gossamer Gear The Two is the best deal on an ultralight tent, and nothing else even comes close in terms of price-to-weight-ratio (shop now). Unlike more expensive ultralight tents made with Dyneema, The Two utilizes classic ripstop sil-nylon to save cost and reduce packed volume.
- Price: $320
- Weight: 23.5 oz
- Material: Sil-Nylon
- Area: 26.25 ft² | Vestibule: 20.0 ft² | Interior Area/Pound: 17.5 ft²
- Length: 84″ Width: 48/42″ Height: 43″
- Pros: Ultralight. Exceptional value. Large vestibules. Packs down small. Comes with own stakes.
- Cons: Small floor plan. Non-freestanding. Single-wall condensation/can sag when wet.
Construction & Features
The Two is your classic dual-apex ridgeline trekking pole shelter. Tension ‘er off properly and it will give you sturdy protection in harsh conditions; poor staking and loose guylines will yield saggy, flappy results.
The interior is approximately a 7’x4’ rectangle, narrowing by 6″ at the foot end. While that’s on the smaller end for a 2P tent, the fact that it can still fit a pair of wide tapered sleeping pads is nice, and the vestibules are larger than average for gear storage which helps compensate. Nonetheless, we recommend using it as a palace for solo camping, or for two-to-average sized campers. Taller/larger bodies should look elsewhere.
What makes The Two so appealing is its low price tag relative to its low weight, which is in part due to the use of cost-saving-but-still-good-performing 10d seam-taped sil-nylon fabric construction. While this fabric is the industry standard, many of The Two’s direct competitors are constructed with ultra-premium Dyneema, which performs a bit better but is significantly more expensive.
Both doors on both sides can open and close independently without giving up tension on the ridgeline. This helps immensely with ventilation, and we recommend keeping at least one door open as frequently as possible. A ridgeline clothesline and two interior pockets round out the feature set.
Verdict
All in all, this is a great ultralight tent at a great price, and an excellent entry point into reducing carried weight. We recommend Gossamer Gear The Two as the best value among all ultralight tents, and it easily outperforms significantly more expensive freestanding backpacking tents. No wonder it has 100+ 5 star reviews.
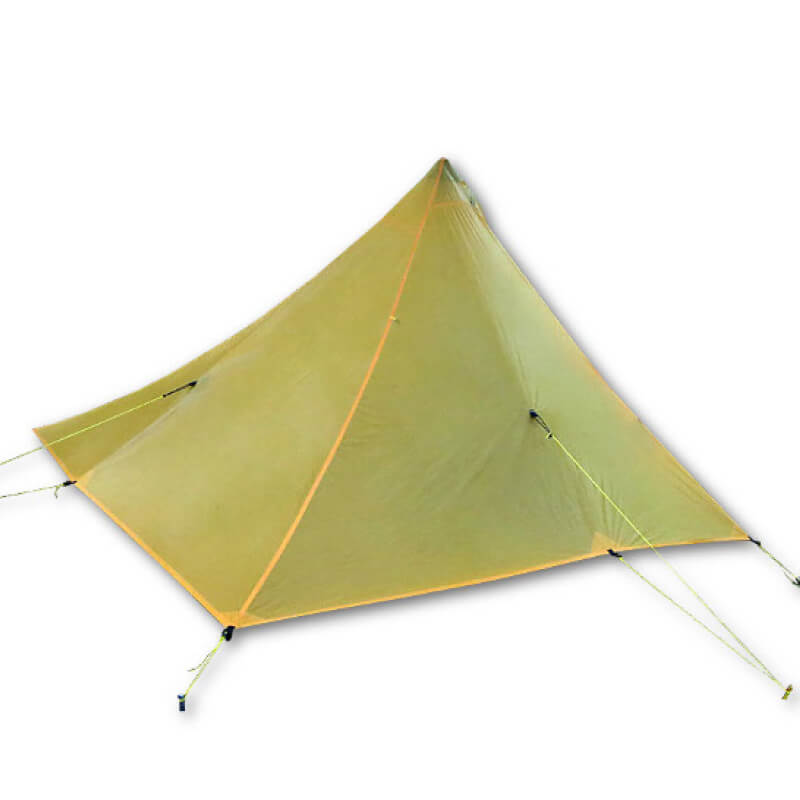
Mountain Laurel Designs DuoMid XL
The Mountain Laurel Designs DuoMid XL in Dyneema is an ultralight marvel. Like all pyramid shelters, it’s lighter, larger, and stronger than any traditional tent or tarp tent, and also our favorite pyramid design on the market thanks to its offset pole structure. Shop now.
- Price: $785
- Weight: 16.0 oz
- Material: Dyneema .75
- Area: 65 ft² | Vestibule: 0 ft² | Interior Area/Pound: 65 ft²
- Length: 110″ Width: 90″ Height: 59″
- Pros: Ultralight. Bomber wind resistance. Very spacious. Best-in-class materials. Peak vent. Offset pole does not separate partners.
- Cons: Not bugproof. Not freestanding. Floorless. 7-10 week lead time. Single wall. Expensive. Not freestanding. Perfect pitch has a learning curve. Floorless. Single wall condensation. Not inherently bugproof. Inner nest+floor sold separately.
Construction & Features
Due to its pyramid design and the use of 0.7 oz DCF fabric, DuoMid XL is totally bomber and capable of handling 4-season winds and snow loading. Yet it weighs only a pound! This is a great 4 season tent for fastpacking and bikepacking — we’ve used this ultralight tent for two weeks in Patagonia and above the Arctic Circle!
What sets the DuoMid XL apart from most other pyramids is the off-center trekking pole placement, which allows two partners to sleep side by without a pole in the middle. This also creates a protected vestibule-like space at the entrance which other pyramids lack. And the square footage per pound is off the charts massive, nearly unbeatable.
The biggest downside with using pyramids as backpacking tents is that they are not intrinsically bug-proof and are floorless (though this less of an issue in winter). While this can be addressed by adding in the modular InnerNet bug-mesh-plus-bathtub-floor-insert, it pushes an extra 12 oz and $315, downgrading the weight class from super ultralight, to the heavier end of the ultralight spectrum (total 28 oz).We will also note that the area within about a foot of the permitter is very sloped and short. While it is excellent for storing gear, it isn’t space that can be occupied by people, so the actual interior area feels a bit smaller than stats imply.
Verdict
The MLD DuoMid XL makes for an excellent ultralight tent whenever bug pressure is low and weight savings/storm-worthiness are at premium. What a tent!

Pro Tips & Buyer Info
By Alan Dixon
How Much Tent Do You Need?
Liveable Area – Why Tent “Volume” Matters for a Backpacking Tent
The standard floor area for a backpacking tent (28 ft2) is a good starting point for estimating the “livable area”but it’s far from telling the whole story. That is, two tents with the same floor area can have dramatically different amounts of livable area. Increasing the height of the tent and adding top spreader bar(s) make tent walls more vertical.
Combined, these design changes significantly increase livable area making it far more pleasant to spend time in the tent. To illustrate this we’ll use two tents in this guide as examples.
Nemo Hornet Example
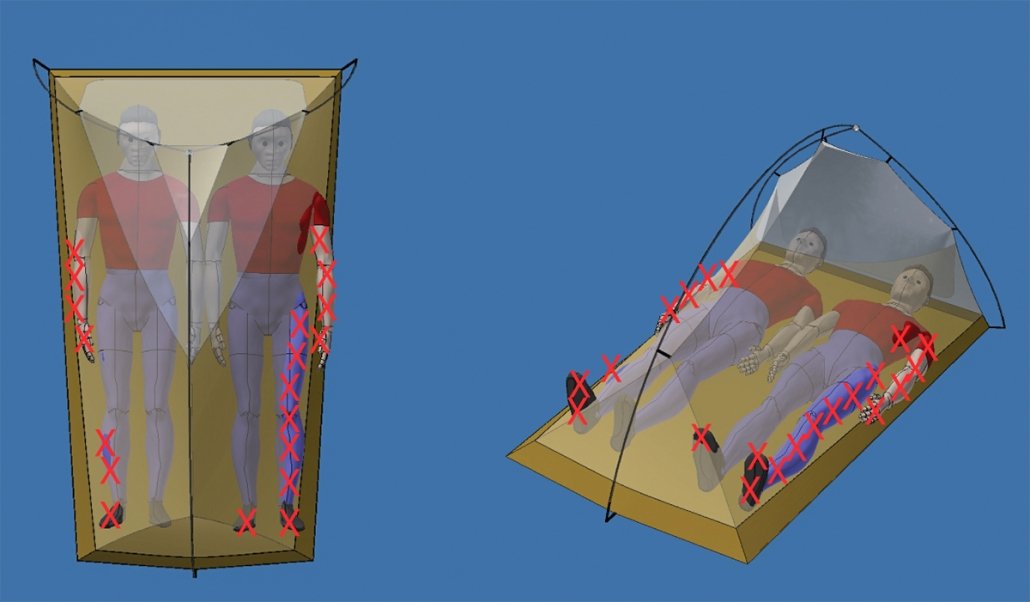
Low Volume Tent Example. Red Xs indicate where sloping walls and low ceiling reduce the tent’s livable area. Illustration used with permission of SlingFin. You can read their full blog post here.
Here we have for example the sleek Nemo Hornet 2p ultralight tent with 27.5 ft2 floor area for the main tent body. But the Hornet’s low 39 inch peak height and slanted sidewalls (tent lacks a spreader crossbar at the peak or foot of the tent) make it better suited for sleeping than hanging out in (some even consider this a large person’s solo tent).
REI Quarter Dome Example
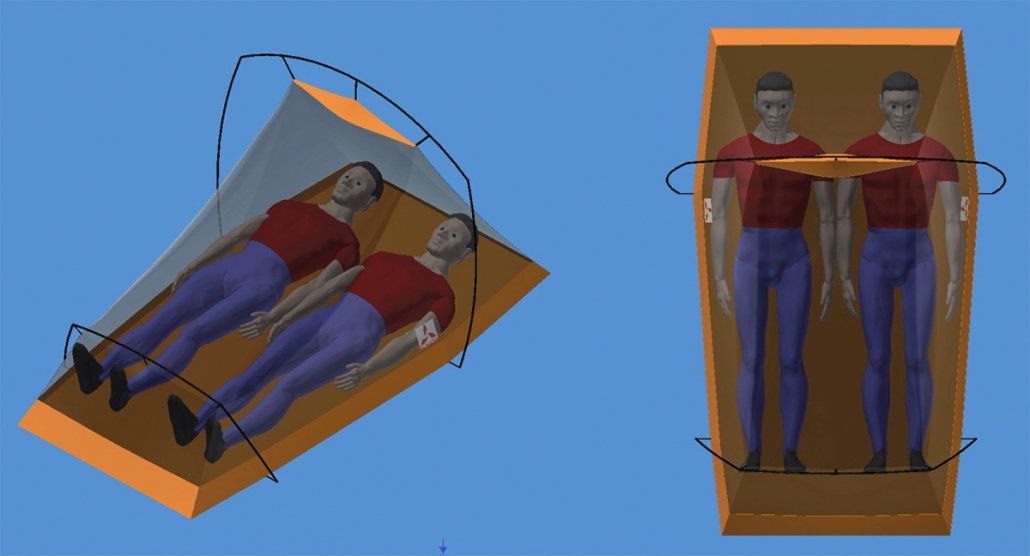
High Volume Tent Example. No red Xs here. Illustration used with permission of SlingFin. You can read their full blog post here.
Second, we have the REI Quarter Dome, showing the main tent body. But it has a higher, 43 inch peak height and a spreader bar at the peak of the tent, and another at the foot end to make its walls more vertical for much of the tent body. In addition, the more generous peak height is maintained over more of the tent’s floor area. This makes it possible for two people to sit upright in much of the tent. This is a tent that you can side by side in, or play cards sitting up — a tent that you can spend more time in.
Actually, neither tent is better
Which is better just depends on what your priorities are. While the greater “livable area” for REI Co-op Quarter Dome 2 Tent is attractive, it weighs 1.4 lbs more or 75% more than the Nemo Hornet 2p. So if you like room and intend to spend more time in your tent than just sleeping (maybe even one mosquito buzzing around is too many, or you are in a rainy area) then the extra weight may not matter as much.
On the other hand, if you intend to hike much of the day, or spend most of your camp time outside of the tent only using it to sleep, then the Nemo might be a more attractive choice. And if you are hiking solo and like lots of room, you might get the Nemo Hornet 2p as a light and spacious on person tent. Or for two people who want more space, the upgrade to the The Big Agnes Tiger Wall UL3 Tent might make sense.
PRO TIP | How to Beat Mosquitos

Even though most backpacking tents have bug netting, nobody really wants to be in tent-jail the entire time you are in camp trying to avoid the mosquitoes. And if you are using an ultralight tent without bug netting this is even more important. Here are some tips to beat the bugs.
Campsite selection matters
Ten or 15 minutes scouting for a good camp may save you hours of misery. Mosquitoes and other flying insects that bite are fairly predictable. They like wet areas with little or no wind. So avoid camping near wet and boggy areas. Instead try and find a higher and drier ridge or other well drained area that will have less bugs.
Try standing around in your prospective campsite for 5 minutes or so before committing and pitching your tent. If they are going to be bad you’ll know by then. And if it’s not windy, try and find a place that gets more wind — again a higher place with fewer trees or shrubs that will catch even slight breezes.
Even during the height of mosquito season in Alaska we were usually able to find breezy area, like a bluff above a river, where we could eat dinner outside the tents and with our shoes off.
Hatching trends throughout the season
In western mountains the mosquito hatch moves up in altitude as the season progresses going to nearly zero by August in most areas. Before then the mosquito hatches are worst at a certain altitude and you can avoid camping there if possible. Finally, bug pressure may go down substantially in the late evening.
In more arid climates they usually settle down once the temperature drops at the end of the day, and especially after dark. We’ve cowboy camped (no tent, faces exposed) many a night when the mosquitoes were buzzing around during the day, but dwindled to nearly zero after dark.
Sometimes you can’t beat the bugs
And yes, if you are in the Boundary Waters in July, you’ll need a backpacking tent with full bug netting. An ultralight tent without mesh would not suffice. But we find those instances the exception rather than the rule. Most times we can get away with a tarp our pyramid shelter without the netting.
Increase Weather Resistance By Choosing A Good Campsite
Even a so-so backpacking tent will usually perform great when pitched properly in a good campsite
Wind, Rain, and Cold
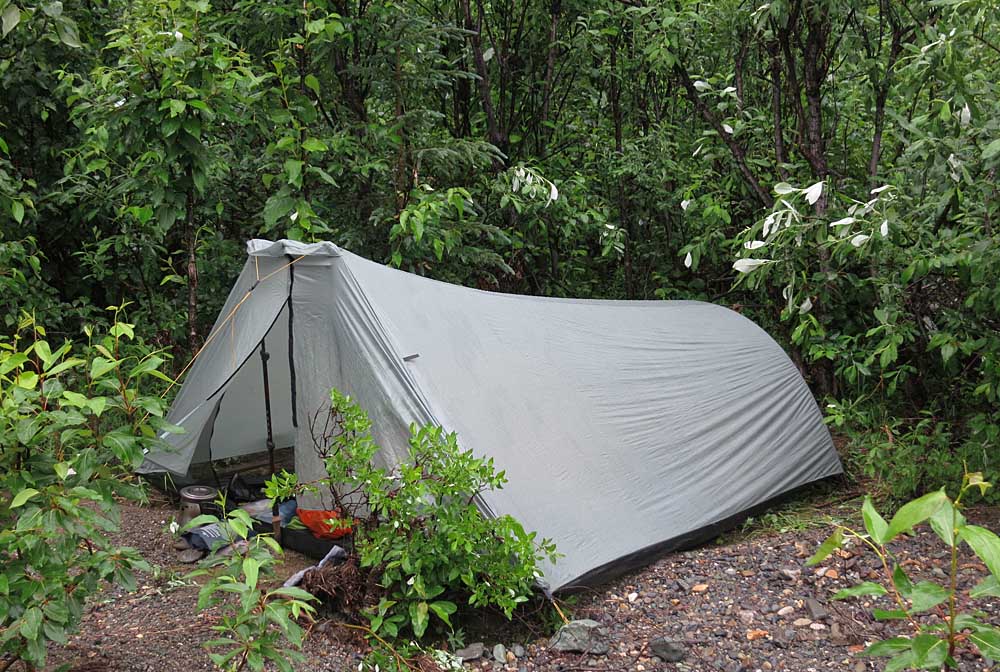
While those catalog photos of a tent on a picturesque lakeshore with a tree nowhere in sight look great — they are horribly exposed places to be in bad weather! So do yourself a huge favor and pitch your backpacking tent in a protected area — preferably in the trees! But if not the trees, behind a large rock, a small hill, a line of shrubs, or anything that can break the wind.
Trees do a number of things to protect you from wind, which is extra important if you have an ultralight tent supported by trekking poles.
- Trees block the wind: which keeps you a lot warmer (reduces convective heat loss). It also lowers wind load and stresses on your shelter and tent stakes. You don’t need a bomber tent if you are protected in the woods.
- Trees keep you warmer: Trees prevent radiant heat loss. They reflect the day’s heat back to the ground at night in the same way that a cloudy sky makes it warmer overnight.
- Trees keep you drier: Camping in the trees can shield from light rain, and is also less prone to the heavy dew and condensation of exposed campsites. The worst place for dew is in a treeless meadow at the bottom of a canyon. The best place to be is in the woods on a flat area a few hundred feet above the canyon bottom.
- Trees provide shelter anchors: for tarps, shelter tie-outs, and hammocks. Far more secure than stakes in the ground. Just a few good tie-out to trees will make any tent a lot more stable.
Finally, make sure that your backpacking tent is not in an area where water will pool-up or stream through underneath in the event of a heavy downpour.
Leave No Trace (LNT) Ethics
Current Leave No Trace (LNT) Ethics have you discreetly camping out of sight in the trees [e.g. all campsites in Rocky Mountain Park fit this criteria]. Camping out of sight is a favor to fellow backcountry travelers sharing the area with you — rather than advertising your presence to everybody for miles around. Then everybody can view that beautiful lake or meadow without any human presence to mar their experience.
In addition, you should try and camp on hard, durable surfaces whenever possible. [Your park reg’s likely have you camping away from lakes, streams, and trails as well.] One of the biggest downsides to ultralight tents that pitch with trekking poles is that you cannot use them on solid rock – the hardest and most durable of all surfaces.
Key Information for the Backpacking Tent Buyer
& Tent Terminology Explained
What You Get by Spending More For An Ultralight Tent
At this point with backpacking gear, spending more often means a lighter tent without losing durability. More expensive ultralight tents are often constructed with DCF (formerly Cuben) or other pricier fabrics with a light weight and high durability. More expensive tents will often last longer, have a better space-to-weight ratio for livability, and have more features such as multiple doors and vestibules.
Be a smart shopper though: Are you paying a higher sticker price for a fancy name brand? Or will a tent from a lesser-known company provide the same durability and quality? Be sure to understand the specs (volume, material, weight) and read reviews for livable space and setup tips before buying. You can often save money without sacrificing too much in the way of construction quality.
Area Per Pound of Tent Weight
This a key factor to evaluate and compare tents. Our area per pound of tent weight gives you a good idea of how light a tent really is. That is how much volume/livable space do you get for each pound of tent weight. For the tents in this guide these range from around 10 ft2/lb for the more budget oriented tents, to near 40 ft2/lb for the lightest ultralight tents.
That is the best ultralight tents are 1/4 the weight for the same livable area. And pyramid tents are amazing at around 64 ft2/lb!
Backpacking Tent Weight Explained
Your tent can be one of the heaviest items in your pack, relative to overall base weight. Your tent is one of your “big three” items (pack and sleep system are the other two), and is a constant in your base weight. For a freestanding tent, you are carrying a tent body, a tent fly, poles, and stakes. But! Pairs of hikers can often split up a tent to distribute the weight.
For freestanding tents, it’s easy to divide the fly and tent body, and choose who carries the poles. This comes with a weight penalty vs. non-freestanding ultralight tent of (usually) two pounds or less per person, if the two-person backpacking tent is between 3-4 pounds. Most hikers should aim for carrying no more than 2.5 pounds of shelter weight per person.
Ultralight tents may or may not be able to be divvied but they’re often so light, it hardly matters.
Tarps and single wall ultralight tents are a great way to reduce shelter weight, as you use trekking poles instead of tent poles to set them up, and you’re likely already carrying the trekking poles. Single wall ultralight tents combine the tent body and tent fly, resulting in significant weight savings and some two-person single wall tent models weigh a scant one pound.
Packaged Weight vs Minimum Weight
You’ll see references to packed weight and minimum weight (or trail weight) on many manufacturers and retailers sites. Packed weight is referring to how much the entire tent package weighs when you purchase it, including tent body, fly, poles, stakes, guy lines, compression sacks or stuff sacks, and anything else included in the package. Basically, how much it weighs when it shows up at your door.
Minimum trail weight can vary in what it’s referencing, but typically means the weight of the tent body, fly, and poles… the basics of what you need to pitch the tent. You’ll likely need stakes and some guy lines as well, so you can assume the actual weight of what you’ll be carrying is somewhere between minimum weight and packaged weight — but with good stakes, closer to the minimum weight.
Backpacking Tent Durability (Denier)
Ultralight tents have to be treated with care. Regardless of price and quality, if the denier of your tent walls and tent floor go down, the durability goes down too, and the tent is more prone to ripping or punctures. For tents with floor material under 30D, be very aware of where you set it up, and avoid roots and sharp rocks. We recommend a footprint or Polycro sheet to help protect the tent floor.
“Denier” is the term used to describe the thickness of the tent fibers. One strand = 1 denier. So a 20-denier (or 20D) fabric has 2/3 the density of a 30D fabric. Many backpacking tents will have a higher-denier fabric on the floor of the tent vs. the wall. Durability in material matters too. A 20D  DCF tent wall will wear differently than a 20D nylon tent wall.
Backcountry Weather Protection
There are a few things to consider with weather protection in a tent: precipitation from above, and soaking through from below. Some tents don’t come fully seam sealed, and you’ll have to apply waterproofing and seam sealing yourself.
For other brands, this is an add-on option. Be sure you know your tent is fully weather-proofed before you take it out for the first time. You can also get “wet from the inside” due to condensation see more on this in Ventilation below.
For super weight savers, sleeping under a tarp with no bug net and no bathtub floor means less weight to carry, but also less protection from the elements. A fully enclosed tent with a bathtub floor and bug netting carries more of a weight penalty, but comes with increased protection. Four-season tents are shaped differently than three-season tents.
Their steeper walls allow them to deal with snow loading better, and not accumulate heavy snow on their tops. Four-season tents have less mesh, and seal in heat better. This also means they accumulate condensation more.
Ultralight Tent Ventilation
Condensation management and ventilation is important to take into consideration when choosing a backpacking tent. Some models and styles vent better than others, but it also has to do with how you set your tent up and your site location. For double walled tents will do well with managing condensation.
The potential for excessive condensation is a downside to single-wall ultralight tents, but it’s starting to be addressed in different models. Backpacking tents like the REI Flash Air 2 with two mesh side walls, and doors on each side will vent better than single wall models with limited openings and solid rear walls.
Backpacking tent models with doors on both sides allow for cross ventilation options, which is key to avoiding condensation. Opening a door or vents will help prevent condensation buildup, and choosing a high, dry site.
Venting your tent helps prevent condensation buildup because the flow of air helps move water vapor outside of the tent. The warm air inside is continually pushed out, replaced by cooler air, and helps keep the temperature equal (or as equal as possible) inside and outside the tent.
Interior Space: Floor Area, Peak Height, and Walls
Interior space (or “livable” space) means the space you’ll be sleeping in, changing clothes in, and ultimately will be able to determine how comfortable you’ll be existing in this space, whether or not you share it with another person. The steepness of the walls and peak height of the roof also contribute livable space.
A wall with a slant from floor to peak means less shoulder room, while a backpacking tent with a spreader bar across the top and more vertical walls equates to more shoulder space and sitting-up space without hitting yourself on the steeply pitched walls.
The standard floor area for a tent (square footage) is a good starting point for estimating the “livable area” but it’s far from telling the whole story. Approximately 28 sq ft is average for an ultralight tent, while traditional backpacking tents tend be closer to 30 sq ft.
For example, two tents with the same floor area can have dramatically different amounts of livable area. Increasing the height of the tent and adding top spreader bar(s) and/or pre-bent poles can make tent walls more vertical. Combined, these design changes significantly increase livable area making it far more pleasant to spend time in the tent. For example the Big Agnes Copper Spur has a significantly more livable area than the Nemo Hornet 2p.
Number of Doors
For a two-person tent, two doors are ideal for many pairs of hiking partners. Having two doors eliminates crawling all over one another for midnight bathroom breaks, and gives each person their own side. However, two doors mean two zippers, which adds to the weight of the tent. This can be a matter of convenience and comfort over weight.
Many soloists cutting weight are happy with one door, either on the side or the front of the tent because it’s less extra material, and also less chance of construction failure with seams and zippers. As noted two doors give you are better ventilation options and is a superior option overall.
Storage: Vestibules and Interior Pockets
Having a larger vestibule doesn’t just mean more space: it means you can save the inside of your tent from getting drenched with wet gear on rainy outings. The more space you have in a vestibule, the more you can leave your soaked gear outside of the while still having it be protected. Look for a vestibule at least 7 ft2, and for two-person tents, two vestibules are really nice.
While interior pockets aren’t critical, they are really nice for organizing small items such as headlamps, ear plugs, small electronics, and other items that can get lost in piles of gear at night. A pocket or two at the head of the tent for quick access is great, and an overhead pocket can make a nice place to have a headlamp turned on to illuminate the entire shelter before you go to sleep. Vestibules are very important for ultralight tents which sometimes have smaller interior floor plans and require campers to put backpacks outside.
What Is A Freestanding Backpacking Tent? Is an Ultralight Tent Freestanding?
Freestanding backpacking tents are the “classic,” full-featured, easy-to-pitch tents most people are familiar with. There are not currently any freestanding ultralight tents weighing less than 2 lbs. Once you insert the poles, freestanding tents can stand on their own without being staked out… no fly required.
They are also double walled, having both an inner tent with breathable fabric walls, mosquito netting and bathtub floor, and separate outer rain fly (waterproof fabric). This allows you to avoid setting up the fly for better views and ventilation when it’s not raining.
And when you do have the rain fly up and it begins to condense, the walls of the inner tent keeps you and your gear away from the fly’s wet inner surface. The downside is that freestanding models are heavier than ultralight tents with non-freestanding designs, and might have more limited livable room. High quality aircraft grade aluminum poles can significantly increase cost.
Why you should still stake out freestanding tents
“Freestanding” is a bit misleading, and does not necessarily mean that you do not need to stake out these tents. In reality, it is a good idea to stake out any tent or shelter, freestanding or not. While the main body (less rain fly) of a freestanding tent will stand on its own without stakes, it is still better to stake it out.
We have seen more than a few un-staked tents blow a considerable distance in strong winds, sometimes resulting in tent damage and lost gear (thus our recommendation to find a good campsite that avoids exposure to strong winds). And if you add a rainfly over your freestanding tent you will need to stake out the vestibules.
And most important, you will always get a better/tauter and much stronger pitch if you stakeout the corners and other points as necessary.
Freestanding tents do have an advantage for Leave No Trace. When the winds are light, you can pitch them on hard, durable surfaces such as solid rock with a minimum of anchor points (although you may need to use a few rocks to anchor things like the vestibule tie-outs). In high winds and at an exposed campsite, this is not a good idea.
In comparison, most ultralight tents are non-freestanding and require the use of your trekking poles to support them, and also need to be staked out be fully pitched. Since poles are the heaviest part of tent, this design strategy often saves multiple pounds of weight.
Backpacking Tent Poles and Stakes
Sturdy, lightweight stakes make tent pitching faster and more secure. It’s not a bad idea to replace the stakes your tent came with.
For pitching in rocky ground and other difficult areas, we prefer inexpensive but bomber AnyGear 7075 Aluminum Tent Stakes. They have only a single notch at the head, making them extremely resistant to bending and damage when pounding in with a rock. And they have a pre-attached cord to make them easier to pull out. ‘Y’ stakes have greater holding power than most stakes so they’ll hold your tent more securely. You can get similar ‘Y’ stakes, MSR Ground Hogs, at REI.
Freestanding tents come with their own set of poles, usually collapsible single-hub or double-hub. Both styles will be hollow poles of varying weight, material, and durability, with elastic holding them together. A single-hub pole set will unfold and snap together with one central cross-point. Other models have a separate spreader bar or other components you’ll have to attach and configure.
Tarptents and single-wall shelters utilize trekking poles for structure and stability, but some have a roof spreader bar for more shoulder room and interior space.
Footprints and Backpacking Tent Care
When storing a backpacking tent, it’s imperative to make sure the tent is clean and entirely dry. Don’t crumple it into a stuff sack, rather fold it carefully and store it flat to help prevent degradation of waterproofing and seam sealing. This is especially important for thinner ultralight tents.
If your backpacking tent floor is 30D or better, then you can likely skip a footprint or Polycro sheet altogether. It’s durable enough if you pitch it carefully. On the other hand, many lighter tents and single-wall tents have 20D or even 15D floors. In this case, you should seriously consider protecting it with a footprint or Polycro sheet.
We recommend skipping the manufacturer’s footprint, which is heavy and can be expensive. Instead, use a 2 to 3.5 oz Polycro Footprint to protect the floor of very light tent floors. We recommend putting a $11 Gossamer Gear Polycro Footprint or MLD UL FOOTPRINT under this type of shelter.
This multilayer, cross-linked polyolefin film weighs less than 4 oz and is much stronger and more durable than the typical painter’s plastic sheet you’d get at a hardware store. It’s also ~ 1/2 the weight and 12% the cost of a footprint from the tent manufacturer. It should last for months of use. When it starts to wear it can easily be replaced by another $9 footprint.
Best Backpacking Tent Conclusion
Thank you for reading our guide to the best backpacking tents and ultralight tents, where we hope you’ve found the perfect shelter. We’ve been testing tents for decades and are sure that any one of these will serve you well for years to come. Happy hiking!


 Zoleo vs inReach Messenger vs Mini 2 Best Satellite Comms 2024
Share this entry