The WanderLuxe Hammock Ultralight Kit is an ultralight, complete hammock camping setup, including bug net hammock, tarp, suspension, and stakes. If you want the very lightest and best hammock kit on the market—including a high-tech tarp and premium insulation with the top and bottom quilts—the WanderLuxe is the only game in town.
For much of the US hammock tent camping is fantastic & arguably the best way to sleep in the backcountry. This is true anywhere with trees—nearly all of the eastern US & much of the Mountain West.
The Hammock Gear Wanderlust Complete Kit for Hammock Tent Camping raises the bar for an ultralight, low cost, easy to use, complete hammock kit. It has the some of the best thought out features and easy to use components/hardware we’ve seen…
Kammok with their Mantis UL Hammock Tent, brings modern Hammock Tent camping into mainstream camping, backpacking and thru-hiking culture as viable option to traditional tent camping.
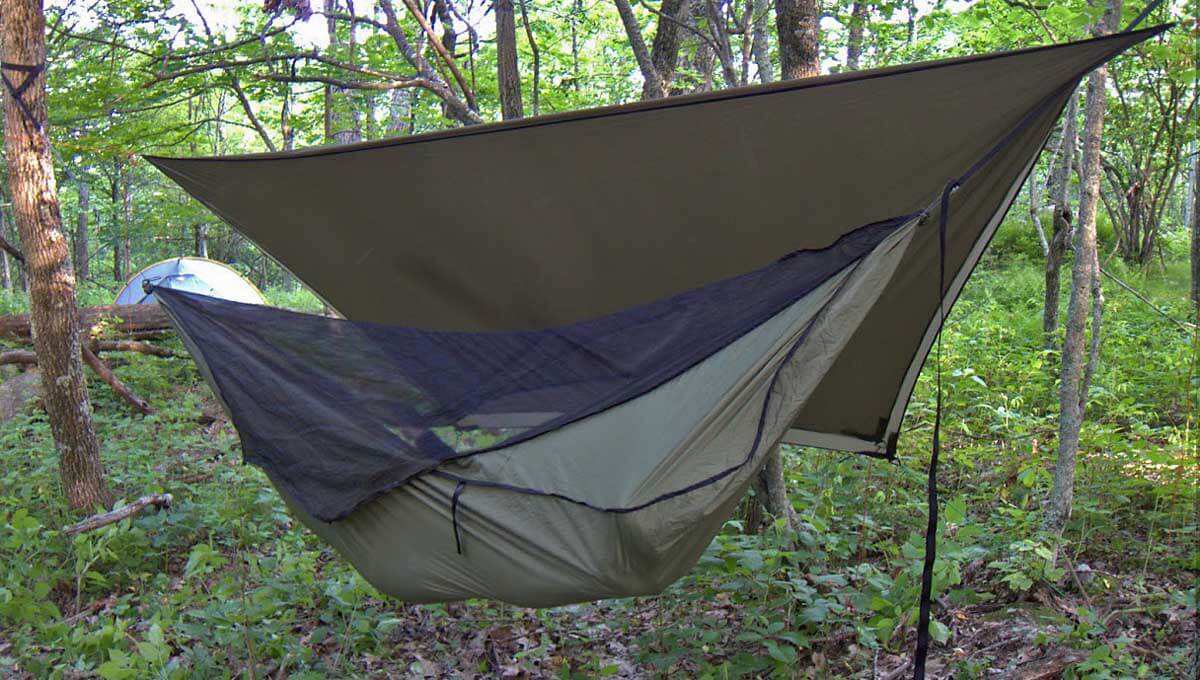
One hammock can do it all—and well! The Chameleon, works in all conditions from hot, bug-infested jungles to bitter cold winters of the Northeastern US. In the following “Review of Dutchware Chameleon Hammock,” I discuss what makes it possibly the best multi-season hammock. The review concludes with a Comparison of the Chameleon Hammock to its nearest Competitors.
Overview
Over the past few months, my wife and I tested a near-production model of the new Dutchware Chameleon Hammock (currently on Kickstarter) in a wide range of environmental conditions: from the hot buggy, disease-infested tropical jungles of South America to camping in the snow at 15° F in the Mid-Atlantic winter.
Why we (and possibly you might) prefer hammock camping
For those of you unfamiliar with hammock camping, know that it is our preferred method of camping in areas like the Appalachian Trail. See more on “Why hammocks are best for the East Coast and other wooded areas.” And more on this in our 9 Pound Lightweight Backpacking Gear List.
| SECTION | TOTALS | Lbs | |
|---|---|---|---|
| Clothing in Pack (not usually worn) | 2.4 | Rain jacket, warm jacket, gloves, etc. | |
| Backpack and Gear Packaging | 1.9 | Backpack, stuff sacks | |
| Sleeping Gear & Tent/Shelter (conventional tent) | 2.8 | best in high Western Mountains & treeless areas | |
| Sleeping Gear & Shelter – (hammock) | 2.8 | best in East Coast and other wooded areas e.g. AT | |
| … | Click here to see the complete 9 pound Gear list | ||
What’s Good About the Dutchware Chameleon Hammock
- The modularity/versatility of the hammock. The Dutchware Chameleon Hammock works in almost all environmental conditions by easily mixing and matching components. All without a weight or functional penalty.
- New (patent pending), 2-way separating zipper that opens in the middle on both sides in any location. This innovative zipper is the key to the Chameleon’s modularity and versatility.
- Low wait times (less than a week?) for a custom made hammock to your spec. with your choice of fabric weights, colors, widths, covers, parts etc.
Oh, and it is very light. My version of this hammock is a smidge over a pound (17.5 oz) including suspension!
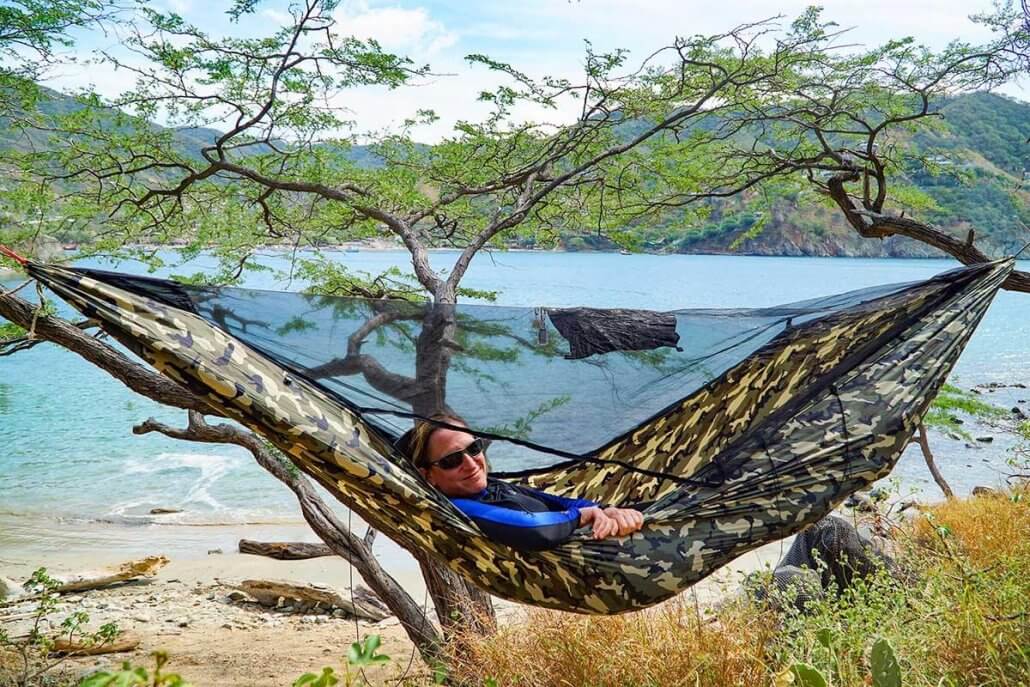
Swap in the bug net top cover for the solid cover and you have an excellent hammock for hot buggy weather. [Picture in South America along the Colombian coast at the end of a 4-day trek into the jungle.]
The Details: Review of Dutchware Chameleon Hammock
Specifications
17.5 oz (500 g) Hammock body in Hexon 1.0 fabric, bug net cover, and my personal 2.5 oz Kevlar suspension
22.5 oz (640 g) same but with included Dutchware Beetle Buckle Suspension (7.5 oz with two carabiners)
24.0 oz (680 g) same hammock but with solid top cover in Hexon 1.0 fabric
(Bug net cover is 4.0 oz. Solid top cover in Hexon 1.0 fabric is 4.7 oz.)
1) Modularity and Versatility
The Chameleon has three separate and interchangeable parts
- Main hammock body (huge choice of fabrics!)
- Interchangeable top covers; a mesh cover for hot buggy weather and a vented solid cover for colder weather. And unlike other hammocks, you do not have to pick a right-hand or left-hand lay! Just flip your top cover and you instantly change the lay direction
- New buckle suspension system with an optional spreader bar for hanging hammocks side-by-side from the same tree.
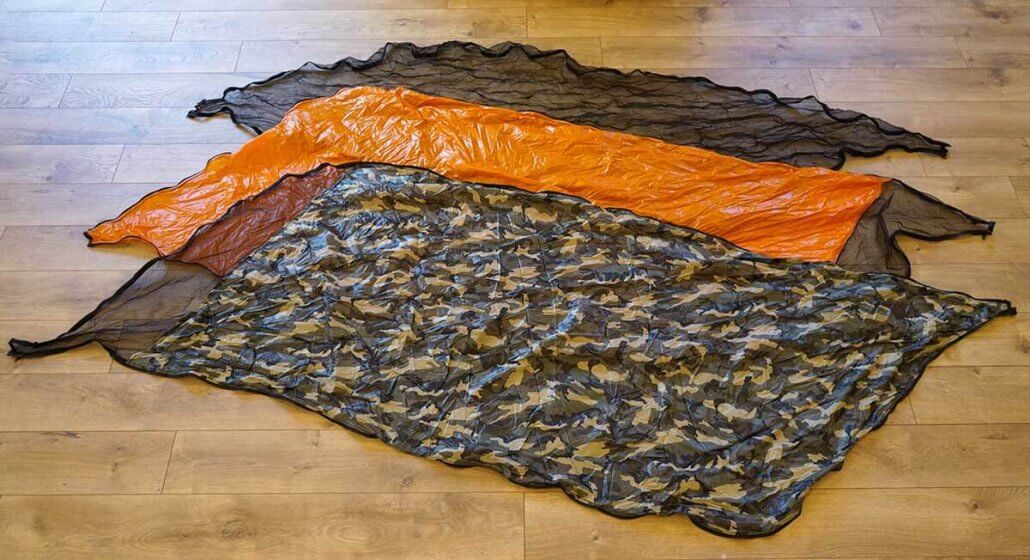
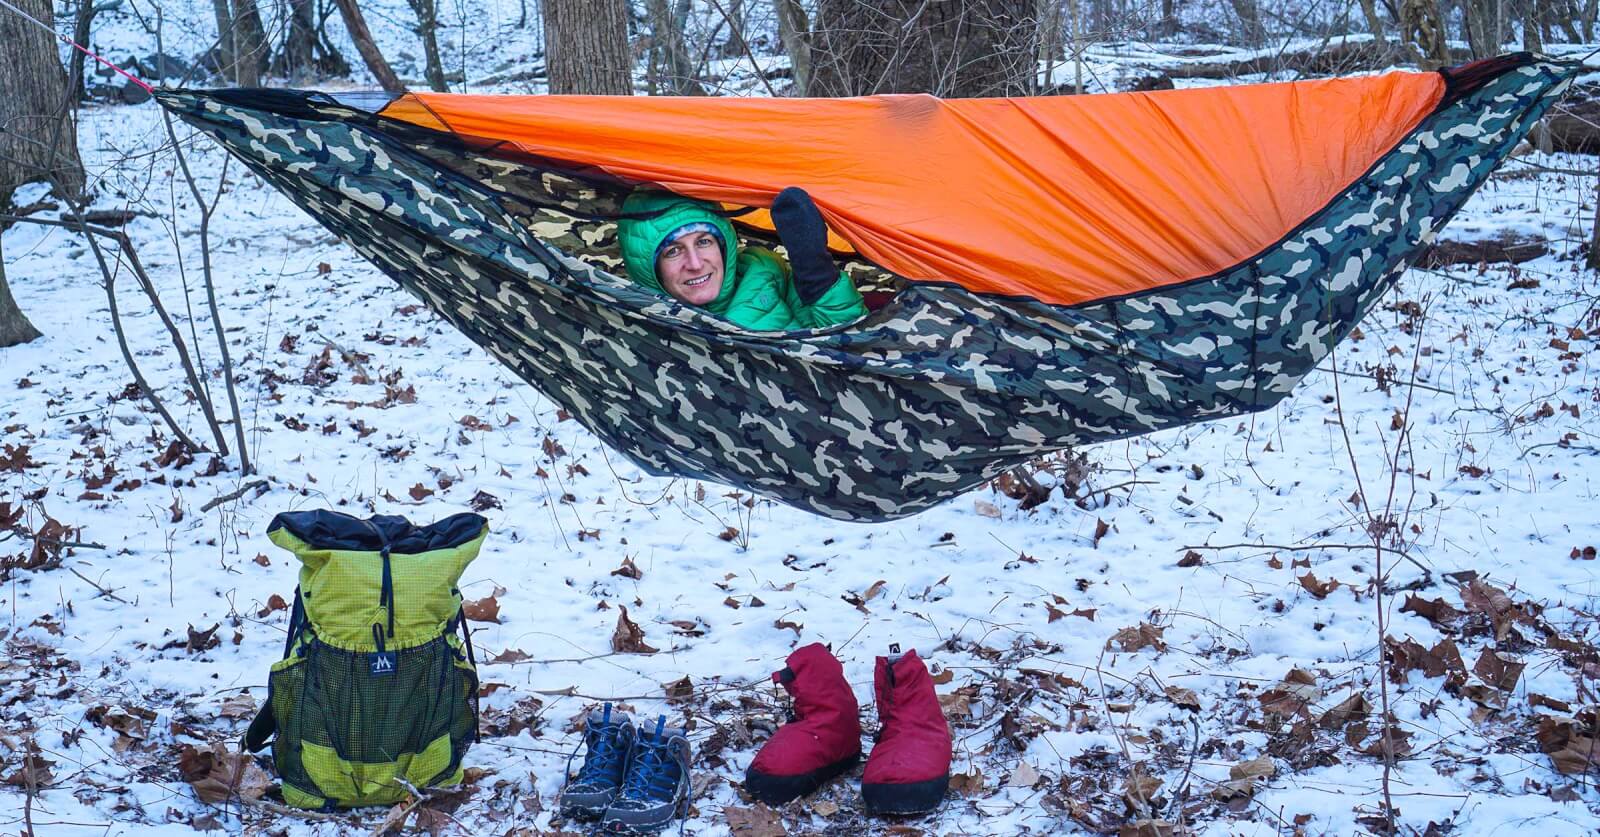
All top covers can quickly be exchanged, rotated and/or flipped to meet your needs. Almost any of a huge selection of fabrics can be selected in any combination for both the body and the solid top cover of your Chameleon. [Back to front: mesh bug cover, orange solid cover, and camo solid cover. The solid top covers retain heat, block wind and essentially turn your hammock into a warm, winter bivy sack with a face vent.]
Mix and Match Component to Meet your Needs
To adapt in different environmental conditions, all of these parts can be purchased individually, or in any combination. If you purchase additional components later, they will fit perfectly with your current components. Even if you buy a wider hammock body it will still mate with your original top covers!
- Dutchware might also be called “House o’ Outdoor Fabrics,” for their huge selection of colors and weights — all high quality fabrics. Almost all of these fabrics can be selected in any combination for both the body and the solid top cover of your Chameleon.
- You can buy a Chameleon with a netting top cover in the spring. And in the fall purchase a vented solid cover for the colder weather of late fall and winter.
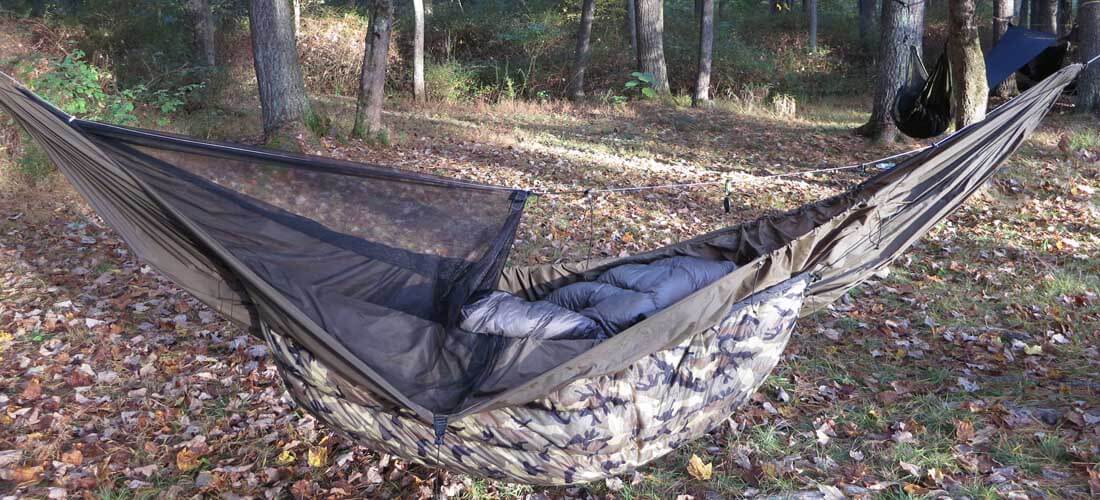
- In my case, I have one bright orange solid cover for fun when camping with my wife, and another camo cover for stealth camping by myself (it mates to my camo hammock body).
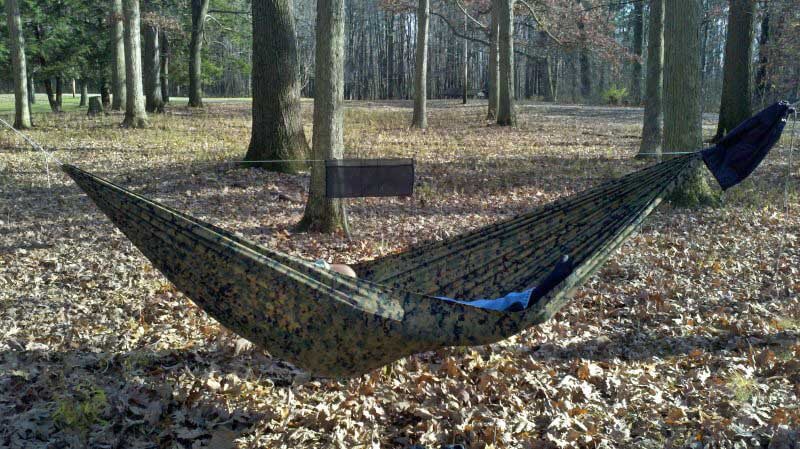
- Finally, you can use the hammock without a top cover, my favorite option for most spring and fall camping in the Mid Atlantic!
Solid Top Covers are Great in Cold Weather!
Most people are familiar with mosquito netting hammock covers for bug protection. But many are less familiar with the reasons/advantages of using a solid top cover in winter.
- The solid top cover retains heat and BLOCKS WIND, essentially turning the hammock into a winter bivy sack with a face vent. This retains your body heat in a sheltered envelope formed by the hammock body and top cover combination.
- The top cuts down on convective (wind-driven) heat loss. But the mesh vent, located where you breathe out humid air, also vents excess moisture that might condense inside the hammock and get your down quilt wet. Finally, the top cover is itself breathable, also reducing condensation in cold weather.
- A solid cover also means that in below-freezing conditions I rarely, if ever set up my tarp. This saves the time and hassle of setting up and taking down a tarp. And possibly more important for someone with cold hands, it is one less chore to do that requires the dexterity of ungloved hands. (It only takes a few minutes working ungloved at 20° F to wreck some major hurt on my hands!)
2) New 2-way, toothed, separating zipper (patent pending) designed by DutchWare
This zipper is two-directional. You can both rotate it 180 deg and flip it 180 degrees and it still works. This is a big deal! Overall, my favorite parts of this new and unique 2-way separating zipper are:
- I can get out of whatever side of the hammock I want. It opens on both sides (and at the same time) and in any position along either side.
- I can slide my hands down either side of the hammock at night to check-on/adjust my under-quilt.
- Chameleon toothed zippers mate perfectly with other zippers, e.g. other Chameleon components. [*Coiled zippers (used for almost all backpacking zippers) do not pair well, even with identical zippers.]
- Finally, this zipper allows me to flip the top cover to change the lay of the hammock. This is nice when my wife and are hammock camping side by side and want to coordinate lays.
*Virtually all zippers on backpacking gear are coil zippers. If you try and mate coil zippers, for example, to zip together two identical sleeping bags, they won’t mesh well. As you zip, you’ll get a bit of warping and strangeness. This is because the coiled zippers come in matched pairs, and were never intended to be mated with other zippers, even if they are exactly the same type.
3) Low Wait Times for Custom Gear
It often seems like you have to pick your poison with backpacking gear.
- You can custom order the exact gear you want from a cottage manufacturer but then wait 4-8 weeks for it to be made and delivered.
- You can pick an off the shelf item (usually some compromise/deviation from your ideal choice) and get it in around a week.
With the Chameleon, you can have both custom gear and quick delivery. This is assuming that Dutchware continues to deliver Chameleon Hammocks with similar speed as its Netless and Half-Wit Hammocks. [In early February, I talked with Dutchware and they estimate that once in production they should be able to finish and ship a Chameleon in less than a week.]
4) Comparison of the Chameleon Hammock to its nearest Competitors
There are other manufacturers of similar hammocks. Some of these hammocks also have an interchangeable mesh and solid covers. But before I start comparing I want to be very clear that all the hammocks below are great hammocks with established performance and dependability. You would not go wrong buying from any of the three companies below.
I own and like hammocks from all three companies. I know Brandon Waddy of Warbonnet and Tom Hennessy. They both produce excellent hammocks that have widespread use and great reputations. And Tom is rightfully considered the man responsible for modern asymmetrical backpacking hammocks as we know them (and has the patents to prove it).
| Hennessy Hammocks | Hammock includes rainfly. Available off the shelf from retailers like REI. |
| No solid top cover option. Integrated bug net cover only opens on one side. Bug net not removeable. No color choice. | |
| Warbonnet Blackbird XLC | Solid top cover option. Integrated “storage shelf” on one side, and “extended footbox” on the other. 1 week wait. |
| Single zipper only opens in only one location. RH lay only. Limited color choices. | |
| Dream Hammock Sparrow | Zipper opens on both sides of the hammock (but only in center). Solid top cover option. Many fabrics and colors. |
| 4 week or longer delivery time. |
The main difference between the Dutchware Chameleon and these hammocks
None of the other hammocks offer a 2-way separating toothed zipper that both rotates and flips 180 degrees, mates perfectly with other zippers and opens anywhere on both sides. This is what allows fully interchangeable components, allows you to open the zipper on both sides in any location, and to change from Right Hand to Left Hand lay in the field, in just a few minutes. The Dream hammock Sparrow comes closest to the Chameleon with a coil zipper system that opens on both sides of the hammock, but only in the middle. Actually it has four zippers (two on each side that meet in the middle).
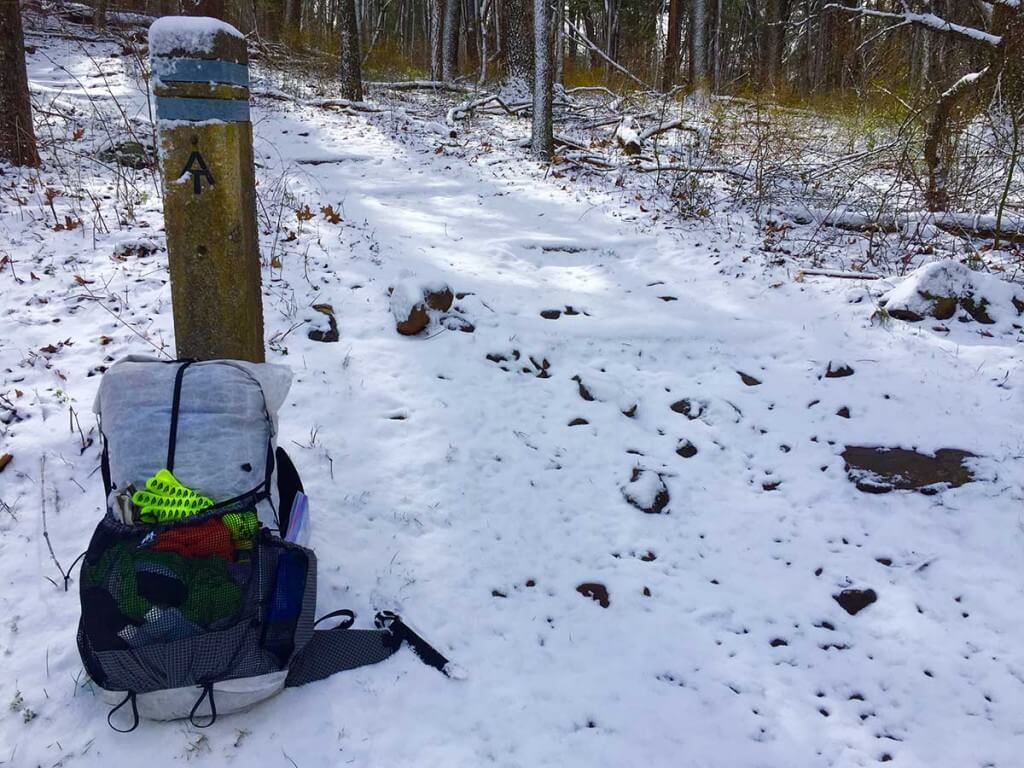
That’s the total weight of everything in my backpack—gear, food, water, and stove fuel. I used that 10 pound backpack to hike 100 miles (plus a few more) of the Appalachian Trail through Shenandoah National Park in 3 days. No fair weather hiking, it was more late winter than early spring conditions—rain, sleet, light snow and hard freezes at night. I think I am very close to dialing in a Light Pack that is also supremely efficient at covering long trail miles*.
But more important, I thoroughly enjoyed myself. I was warm, happy and comfortably cruising along one of the most spectacular ridge lines on the east. The kooky weather made for great entertainment and some spectacular views. (Scan through the photos below for a few of them.)
| * Anyone can adopt the techniques I used to reduce wasted time and become a more efficient hiker. Even if long trail miles is not your goal, this gives you more time to enjoy the great views, take photographs, fish, or get some extra swimming in a lake rather than fiddling with your gear. |
And just to be clear: My 34 miles/day average on the AT through Shenandoah National Park is far from super speedy. The fabulous Heather (Anish) Anderson averaged 42 miles per day on her record setting, unsupported AT through-hike last year. And my guess is that each year, more than a few hardy through-hikers cover the Park in 3 days as well. Nonetheless, I’m happy with my hike given the unusually cool and wet weather and short daylight hours of early April.
This a three part series:
- My 2007 attempt to section hike the 102 miles of the AT Trail through Shenandoah National Park in three days (I came up short)
- My March 2016 plans: Practical Light Gear List Appalachian Trail to use better gear and techniques
- And this April 2016 report of my successful completion of the 102 miles of the AT in SNP in three days.
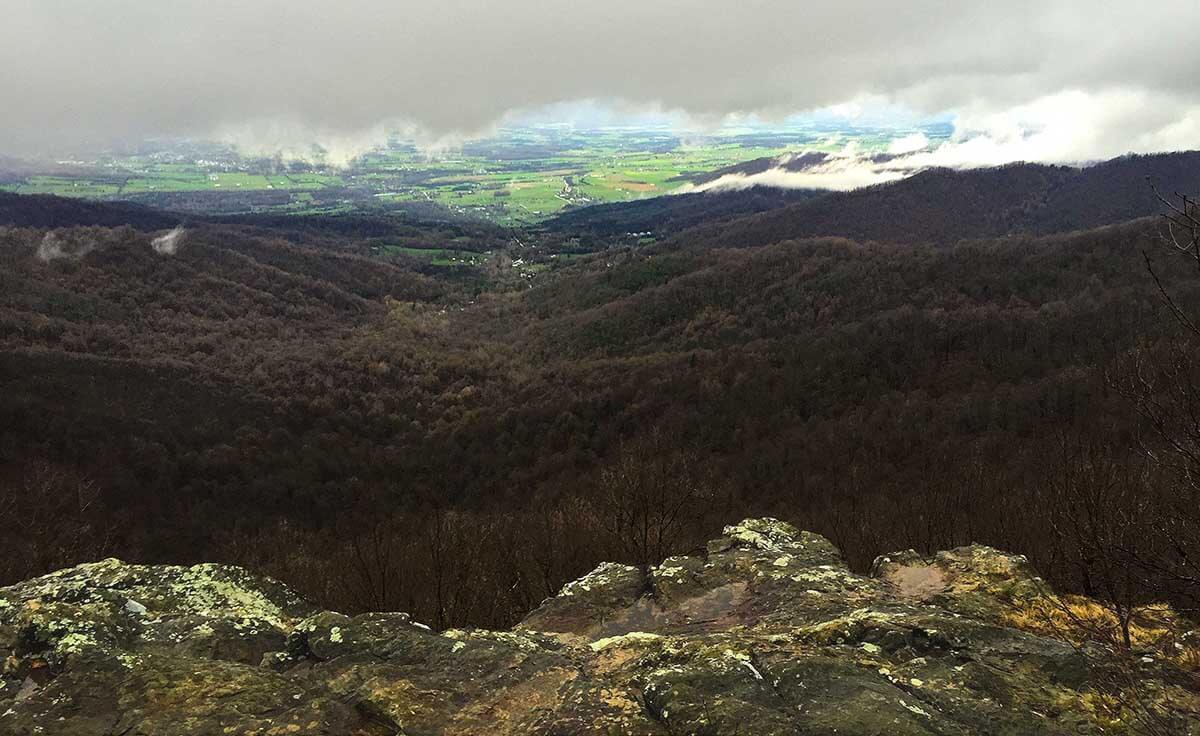
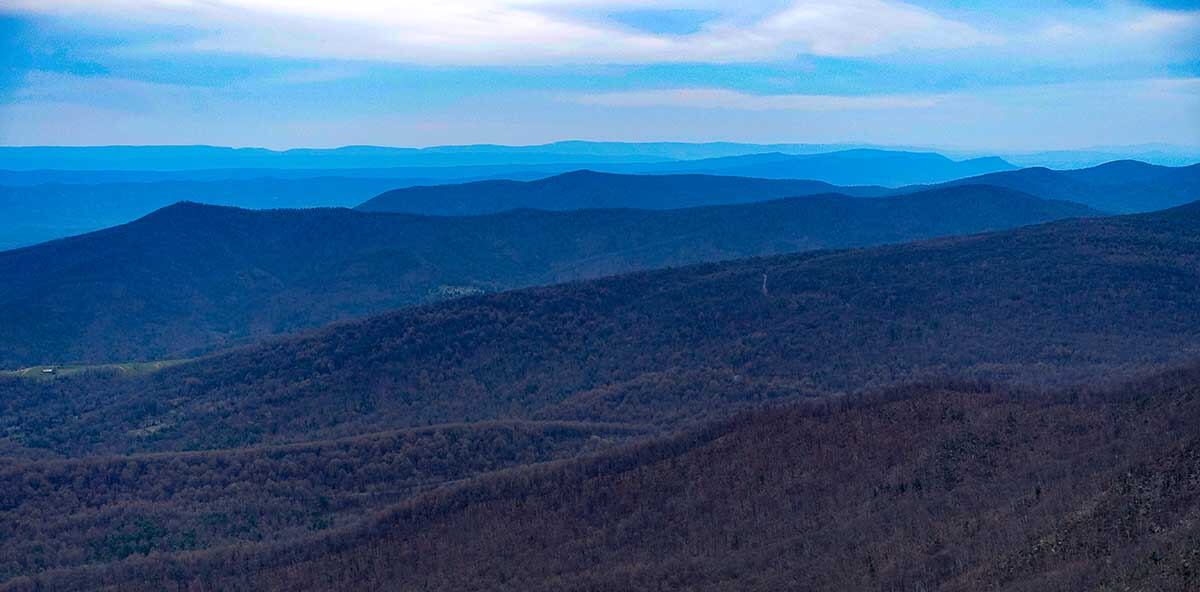
Lots of kooky weather created some spectacular views. That’s the Shenandoah Valley almost 3,000 feet below me.
Why it Worked this Time – 10 Pound Backpack to Hike 100 Miles
In previous posts, I’ve discussed coming up short in my 2007 attempt to section hike the 102 miles and 22,000 feet of elevation gain of the Appalachian Trail through Shenandoah National Park in 3 days. So what were the keys to succeed this time even though the weather was more challenging:
- Focus on efficiency—no wasting time: Running out of daylight was the major reason why I came up short in 2007. Minutes matter. Less wasted time equals more time to hike in the limited daylight of early spring. Just a few minutes wasted per hour adds up to 10 miles over 3 days.
- Gear: I chose practical but light gear, with a focus on zero fiddle-factor (= no time wasting).
For a full discussion of this as well as the gear list see: Practical Light Gear List Appalachian Trail - In this post I discuss two major gear choices, my 11 oz backpack and my 2.8 lb sleep system, and how they contributed to the efficiency (lack of time wasting) of my hike.
- Adjustments for crap weather: As they say, “when we make plans Nature laughs.” Here’s the last minute gear adjustments I made for unusually wet and cold trip weather: Major Adjustments for Cold Weather
- Shakedown trip: Two weekends prior, Alison and I did a 3 day Early Spring Backpacking Trip in cold and wet conditions with the gear I intended to use on the hike. On that trip we put in a hard and fast 22 mile day. In addition, in previous winters I tested my very cold weather hammock gear at 12°F (-11°C) so I had a tried and true light winter hammock quilt system ready to go.
- Food: I used my usual 3-day-trip strategy—bring a small amount of very high calorie and nutritious food. I ate a huge breakfast before I started hiking on day 1, and a huge dinner when I came out on day 3. To save time, I ate much of my food while walking. See: Best Backpacking Food – simple and nutritious – veggie and omnivore friendly
- Water: I drank when thirsty following current advice from experts in the field of sports hydration. The AT with its frequent springs and streams lends itself to a drink at source and not carry water strategy. I was not thirsty between water sources. But more important, I spent less time collecting/purifying water and making fewer side trips to springs (= more time to hike). I felt healthy and fine and woke each day ready to hike another 34 miles. See: Drink When Thirsty – Myths and Facts about Hydration.
- Training: Listed next to last, but certainly among the most important contributors to trip success. It was critical to be in good hiking shape from the get-go; I didn’t have the luxury of hiking 850 trail miles to season-up, like North Bound through-hikers that started at Springer Mountain, GA. I followed my own 2 day a week training schedule, Quick and Efficient Training for Backpacking. I couldn’t, in training, match my longest expected day (36 miles with 15,000 feet of elevation change). I did my best with a a few fast and hilly 20+ mile hikes pre trip.
- Fun: And last but certainly most important is enjoying the trip. Yes, I had fun. Sometimes more “fun” than I wanted, but for the most part I thoroughly enjoyed myself. The Blue Ridge put on a spectacular show with weather fronts rolling through. With more time, I would have happily picked up food in Waynesboro and kept on heading south.
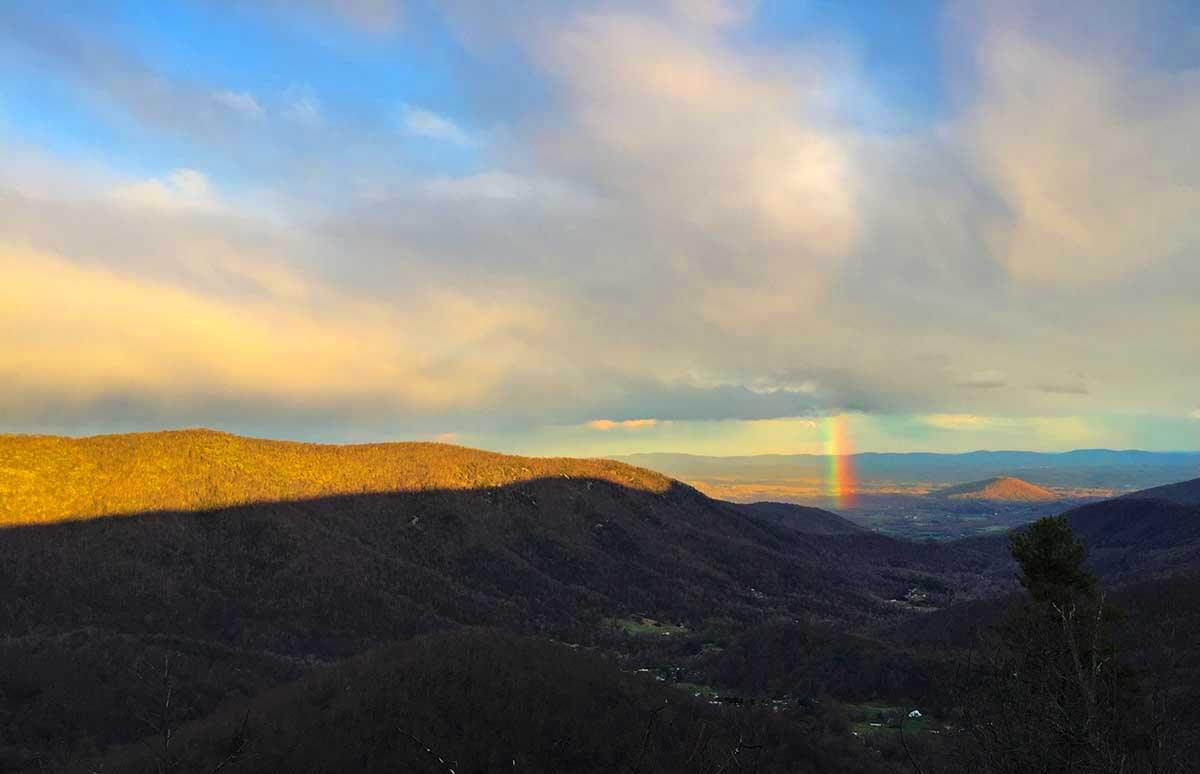
Rain sometimes brings dramatic views. A late evening squall passes over me, heading east towards Washington DC. It’s nowhere near as warm as it looks. Much of the squall was horizontal sleet.
Efficiency – No Time Wasting
Running out of daylight was the major reason why I came up short in 2007. While you can hike in the dark under headlamp it is neither as fast nor as efficient as hiking in daylight. Rather, you have to slow down to miss rocks and other irregularities in the trail. In addition, it is much harder to follow the trail after dark. It is also easy to loose the trail—and re-finding the trail is a huge loss of time. That’s why all the speed records on the AT are done in the middle of the summer with the most daylight.
Minutes matter. This overarching goal trumps everything else. Less wasted time equals more time to hike in the limited daylight of early spring. Just a few minutes wasted per hour can add up to 10 miles over 3 days. So I did whatever I could do with gear choices and technique to be hiking as much as possible during each hour, and spending the least amount of time stopped or fiddling with things.
Note: time wasting has far more universal impacts than just trying to make trail miles. For instance, if you’ve just spent a lot of money and your precious vacation time to take a big trip, wouldn’t you rather spend your time enjoying the great views, taking photographs, fishing, or getting some extra swimming in a lake rather than fiddling with your gear? I will cover this topic, “Backpacking Time Wasters and Time Savers” in an upcoming post.
Gear – 10 Pound Backpack to Hike 100 Miles
This is not a fringe gear list. I want to be safe. I hate being wet, cold and uncomfortable. I want a good night’s sleep. This gear list does all of that. In fact I’d wager that I am warmer, more comfortable, have more living area, and sleep better than most campers. For a complete discussion on gear selection and a Complete Gear List see my previous post: Practical Light Gear List Appalachian Trail.
Each minute of daylight hiking time is precious and once squandered cannot be recovered. As such I chose practical but light gear, with a focus on zero fiddle-factor (time wasting). If gear was lighter but took away from my hiking time (or sleeping time) it was out. I’ll use my backpack and sleep system selection rationale as examples.
Backpack
- The Mountain Laurel Designs Burn Backpack’s Cuben Fiber construction is plenty durable. I don’t have to waste time trying to handle it gently, or to not scrape it against brush or rocks. (vs. the single rear pocket, no hipbelt, 3.8 ounce spinnaker fabric pack I used in 2007)
- The Burn’s numerous pockets save time as I rarely need to take the pack off to get what I need. Most often, I can do this while continuing to walk. From the two side pockets and two shoulder strap pockets, I can instantly access my most-used-gear and all of my day’s food. Rainwear is in the rear pocket and accessible in less than 10 seconds. Most days I don’t need to go into the main pack-bag during the day—which is good since that’s a lot of time wasted.
- The Cuben Fiber main pack-bag with a roll top closure is virtually waterproof. Combine that with stowing my quilts and down jacket in Cuben Fiber stuff sacks and I don’t need to do anything different when it rains, just keep hiking. So my backpack is always packed the same, regardless of weather. No messing around taking on and off pack covers (imperfect rain protection anyway) or fussing with pack liners, both of which are a pain and waste time.
- It has a simple and light hipbelt capable of supporting at least 15 to 20 pounds.
Fortunately, in previous winter trips I had tested my very cold weather hammock gear down to 12°F (-11°C). So I had a solid and very light winter hammock quilt system ready to go. One I had complete confidence would give me a great night’s sleep.
Sleeping System
- Getting a good night’s sleep was essential to putting in back to back long days on the trail. My body needed rest to recover and get up and do it all over again the next day. Any impediment to getting my recovery was “time wasted.” This was arguably more important than wasted hiking time.
- I need a light sleep system that I know will give me great sleep every night! One that I will relax and start to doze off minutes after I lie down and know that I will sleep soundly for the rest of the night.
- For me on the AT this is clearly an 8 oz hammock paired with warm down quilts and a cuben fiber tarp. Read more here: Hammock camping article. Hammock Camping Part I: Advantages & disadvantages versus ground systems
- Another advantage of a hammock on the AT, hammock camping equates to more miles hiked at the end of the day vs. sleeping on the ground.
- Why? Sleeping in a hammock dramatically increases suitable campsites on the AT. With a hammock all I need to camp is two trees—the ground below is largely irrelevant. That means I can hike until dusk without the risk of being in un-campable terrain. (Since much of the AT is sloped and rocky it’s not suitable for ground camping.)
- So if I were ground sleeping I would likely need to stop hiking sooner than dusk to camp. I.e. I need to stop at the last shelter or campground that I could comfortably make before dark. Thus I might miss an hour or more of available daylight to hike.
Blue Ridge at dawn
Adjustments for Challenging Weather – when we make plans Nature laughs
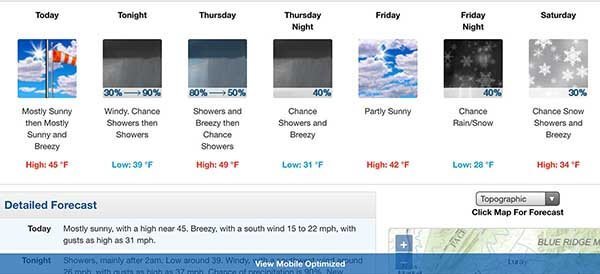
I was hoping for pleasant spring conditions—sunny and in the 60s during the day with crisp sleeping temps in the 40s at night. Unfortunately, this was the weather I got. It would be even colder than this at higher elevations along the Blue Ridge in the park with temperatures likely dropping into the low 20s and rain becoming wind-blown sleet. Life is like that sometimes.
My major changes were:
- do the hike in 3 vs. 4 days
- take warmer, +20F hammock quilts but with trimmer dimensions to save weight
- take a bit warmer clothes; a down jacket vs. down vest, and to add a light fleece shirt that I wore the whole hike.
Click here to see Major Changes for Winter Wx full page, as a Google Sheet
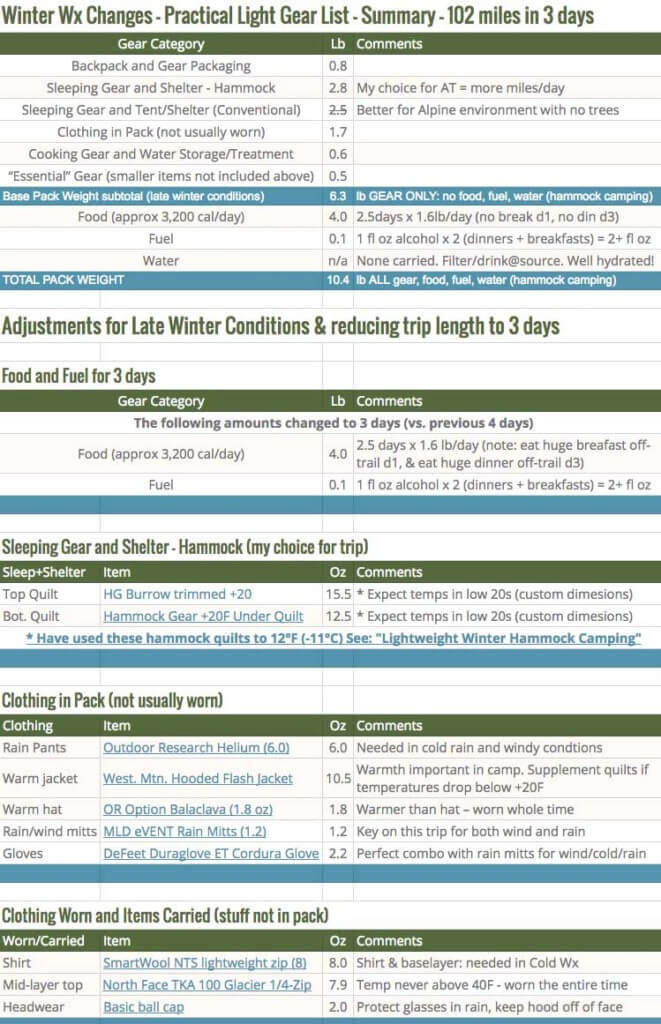
Click on table image above to see it full page with working links.
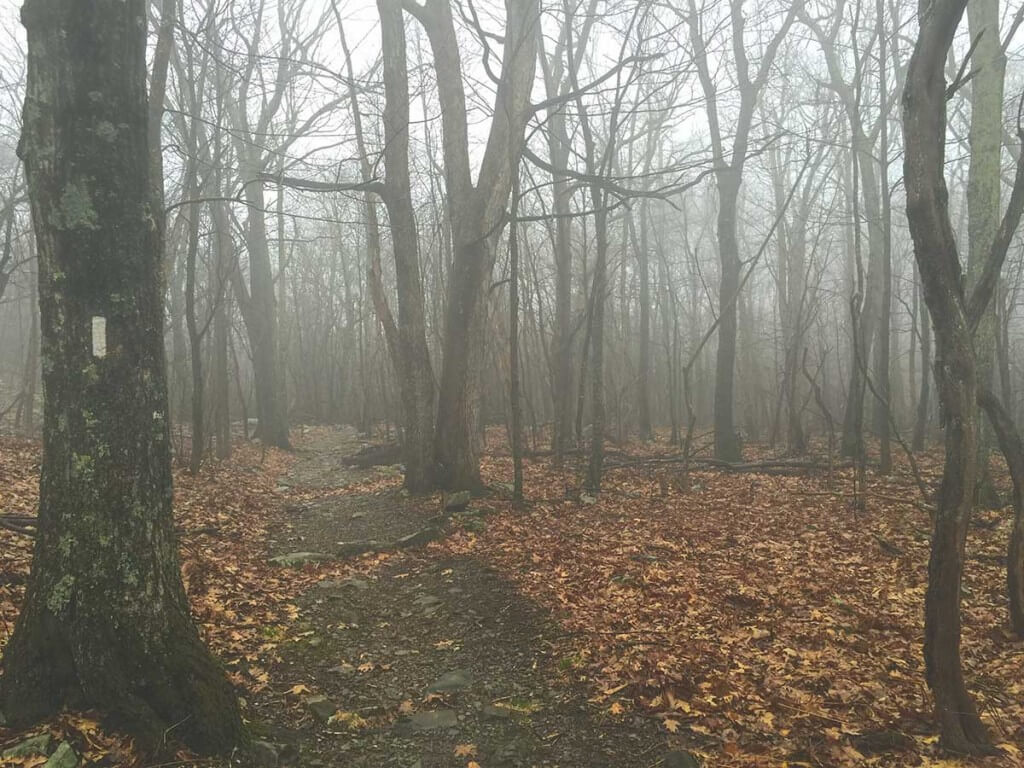
Mostly rain and mist all day along the ridge
Original (non winter modified) Practical Light Gear List
For a complete discussion on gear selection and a Complete Gear List see my previous post: Practical Light Gear List Appalachian Trail.
Original (non winter modified)5 Pound Practical Light Gear List
Click here see it full page, as a Google Sheet
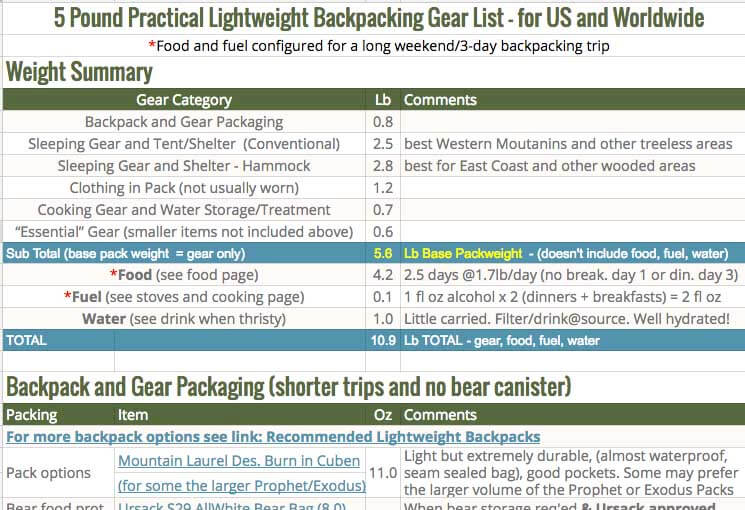
. Click on gear list table image to see full gear list sheet
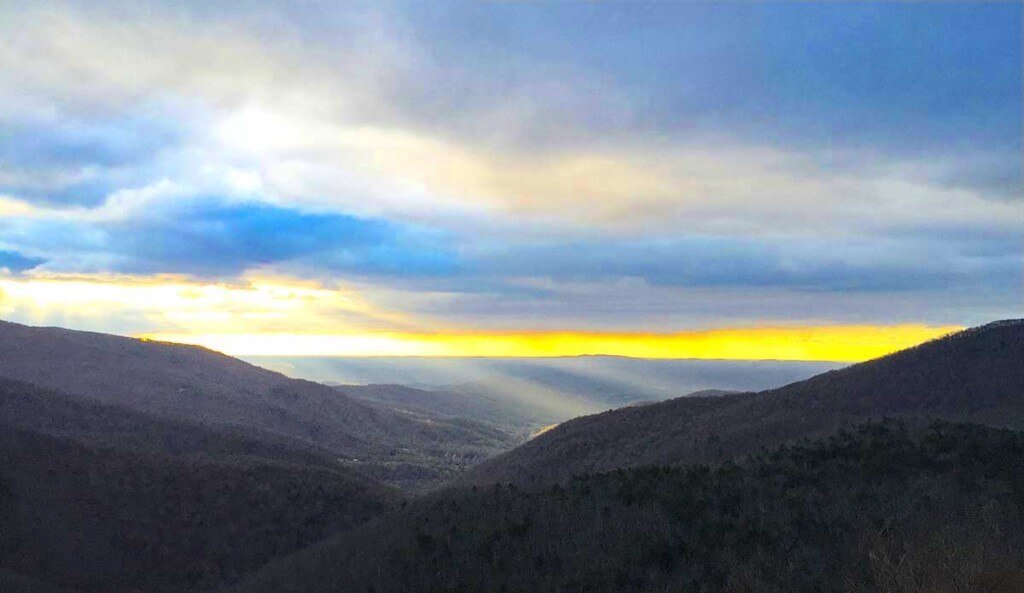
Another stunning sunrise on the Blue Ridge.
Water – Drink to Thirst

Drink to Thirst: Collecting water from springs right by the trail saves time. Drinking at the source with a Sawyer Filter means that I don’t have to carry water. I found I could easily hike to the next trailside water source without becoming thirsty.
Shakedown Trip – test out gear and legs
Shakedown trip: Two weekends before Alison and I did a 3 day trip in cold and wet spring conditions with the gear I intended to use on the hike. We got 35 degree rain, and hard freezes at night. My gear performed well and I made only a few adjustment prior to the Shenandoah. We also did one hard and fast 22 mile day to see test fitness, leg strength and endurance.
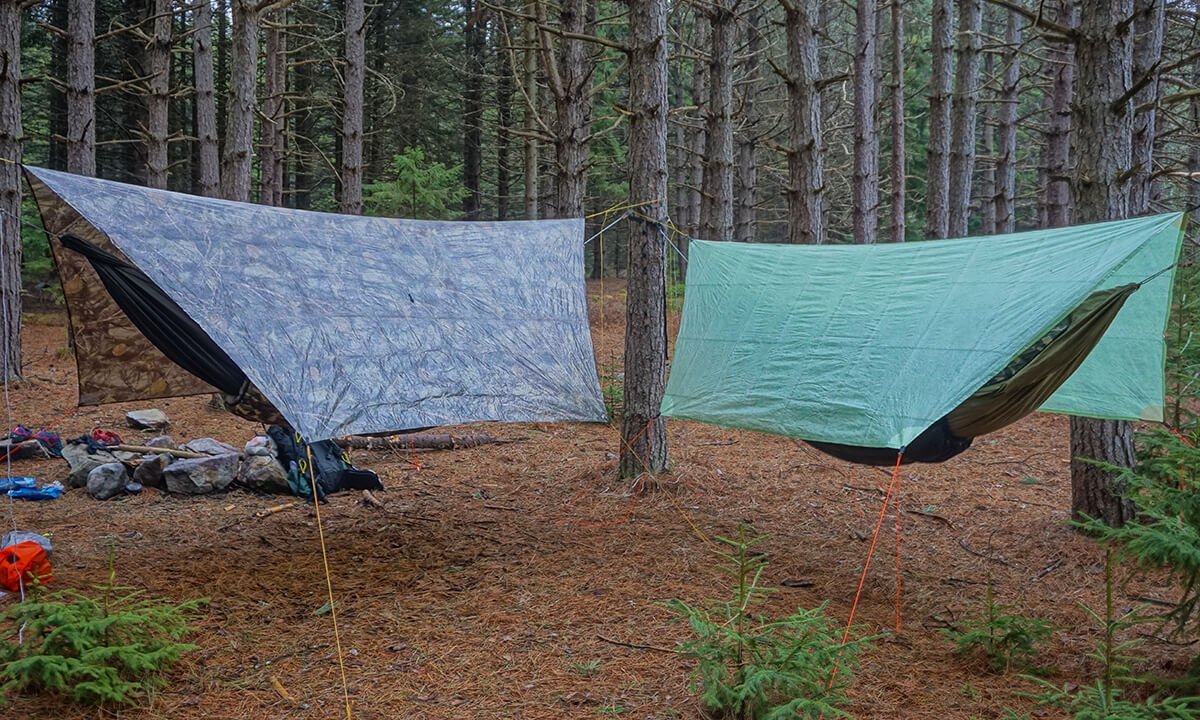
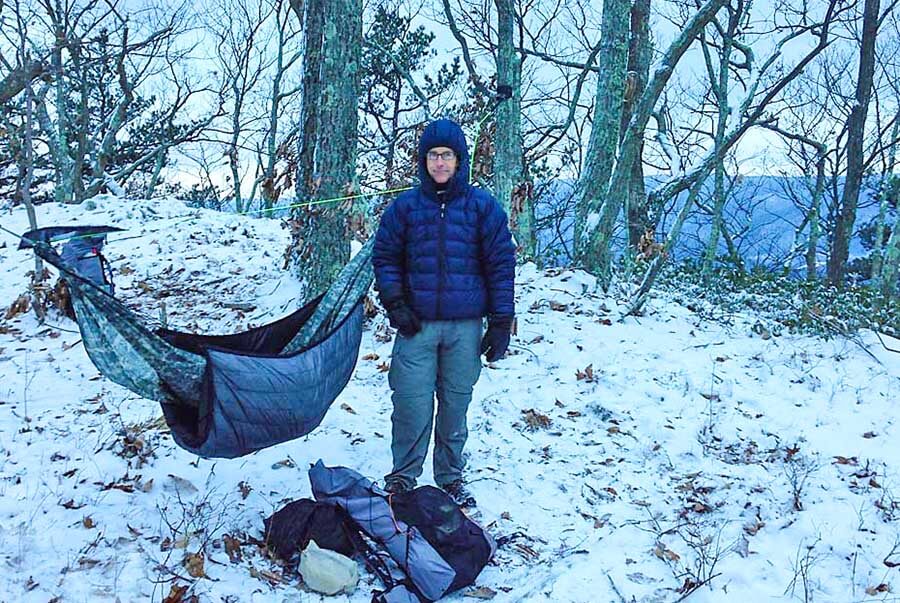
Gear testing on a shakedown trip: Warm and snug in our hammocks sheltered in grove of pines. It was 35 degrees spitting rain when we went to bed and dropped to 25 degrees by the next morning. My hammock setup is on the left: Dutchware Netless Hammock with Dutchware suspension/hardware, Hammock Gear (HG) top & bottom quilts, and HG Cuben Hex Tarp.
Parting Shot – 10 Pound Backpack to Hike 100 Miles
And yes, there was sunshine on this trip.
This is an excellent Method to Manage Hammock Tarp Doors. It’s fast and simple to use. It keeps the tarp doors neatly and securely out of the way in dry weather or when you are getting in and out of the hammock. But it quickly secures the tarp doors if needed—like when a rain storm quickly moves in. This is a great do-it-yourself DIY project—instructions are below.
I learned about this Method to Manage Hammock Tarp Doors from David Meck of Hammeck at a fall hammock hang along the Appalachian Trail in PA. After the hammock hang, David kindly sent me some photos of his setup. (BTW my wife, Alison currently uses an Envy-S Hammeck.)
If this post interests you you might also like these two gear lists that feature hammock camping:
Practical Light Gear List Appalachian Trail (5-6 lb) and 8 Pound – Appalachian Trail Gear List and this three part intro to hammock camping: Hammock Camping Part I: Advantages & disadvantages versus ground systems
This is a Great DIY Project
Materials
- These Safety Side Release Buckle clips
- 15 to 25 feet of 3/32″ shock cord or the more available 1/8″ shock cord works too
- And a bit of 3/32″ (2.4mm) cord like: Nite Ize Reflective Cord, Lawson Reflective Cord or other reflective 3/32 (2.4mm) cord in a bright color. The Lawson is also my favorite for tarp tie-out line. [REI carries this slightly heavier 1/8″ (3mm) Reflective Utility Cord which will also do.]
Notes
- You need to appropriately alternate male and female clips ends. Clips need to correctly mate in both open-and-stowed position (Picture 1), & in the closed position (Picture 3 & Picture 5) .
- Use about 3 ft. of shock cord attached to each clip. This is a starting point as tarps are different.
Instructions – Method to Manage Hammock Tarp Doors
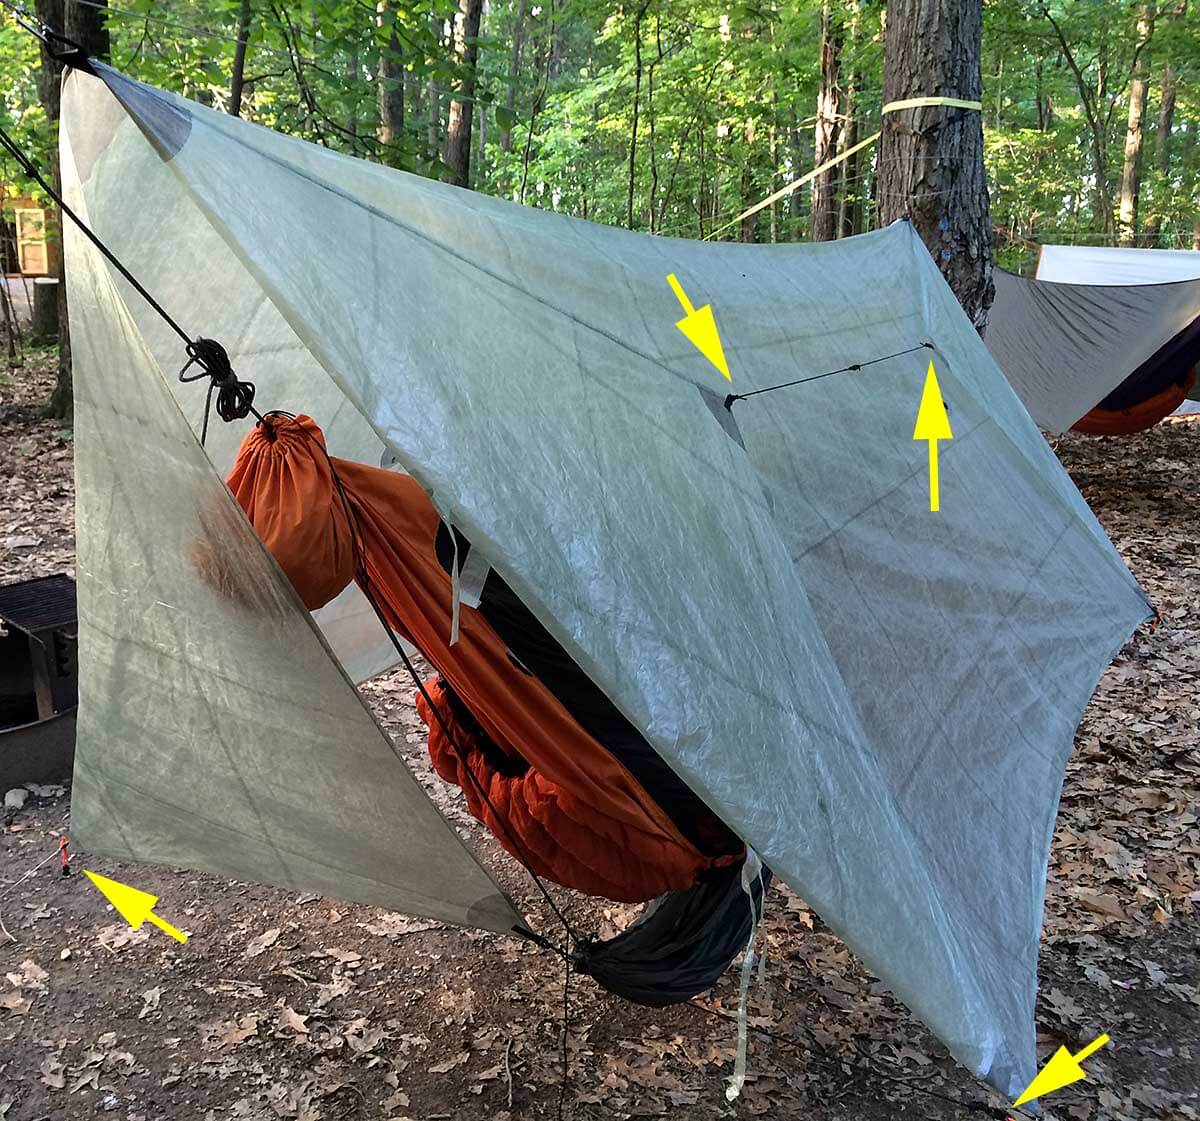
The instructions on how to setup this “Method to Manage Hammock Tarp Doors” are in the photo captions below. The tarp pictured is a Hammock Gear Standard Cuben Fiber Tarp with doors
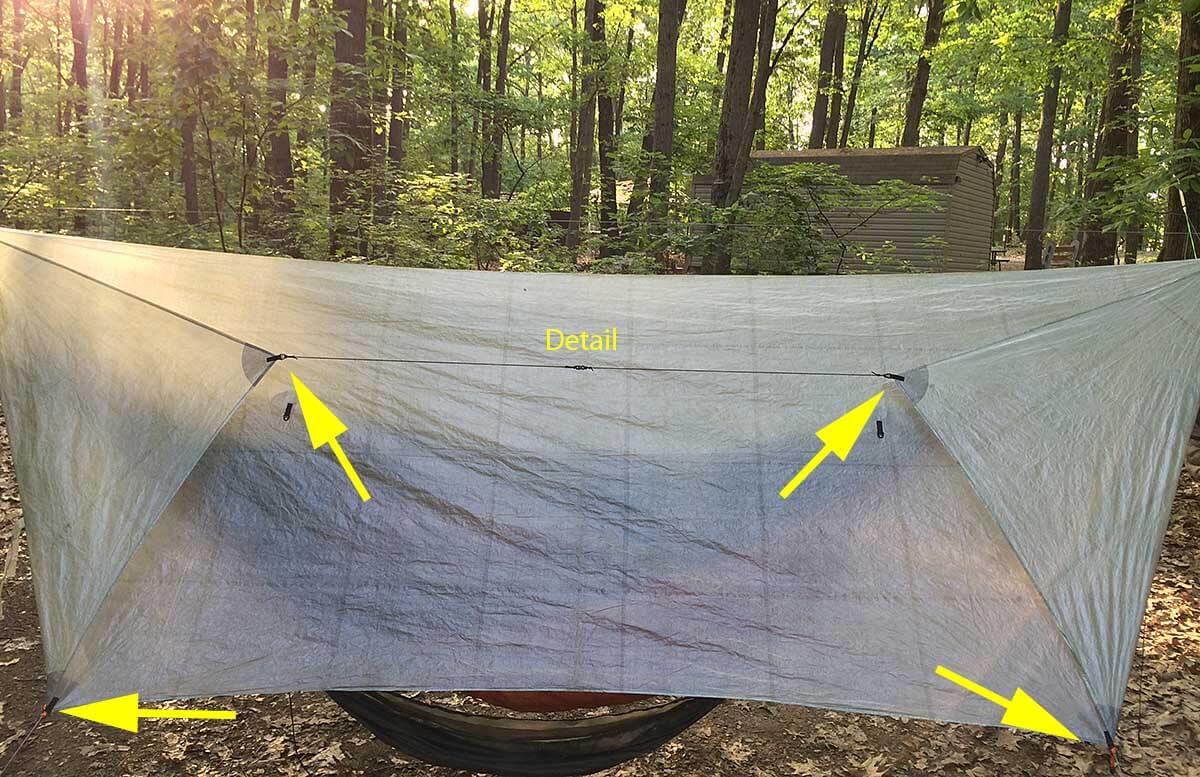
Photo 1: This shows the attachment points for the door cordage and hardware. On the top, each door corner’s D-ring has about 3 feet of shock cord tied to it with a clip at the other end. The two door clips fasten to each other in the middle, “Detail,” to secure the doors in the open-and-stowed position. The bottom two arrows indicate where clips are attached to lower D-rings (these are used to secure the doors in the closed position). [Photo D. Meck]
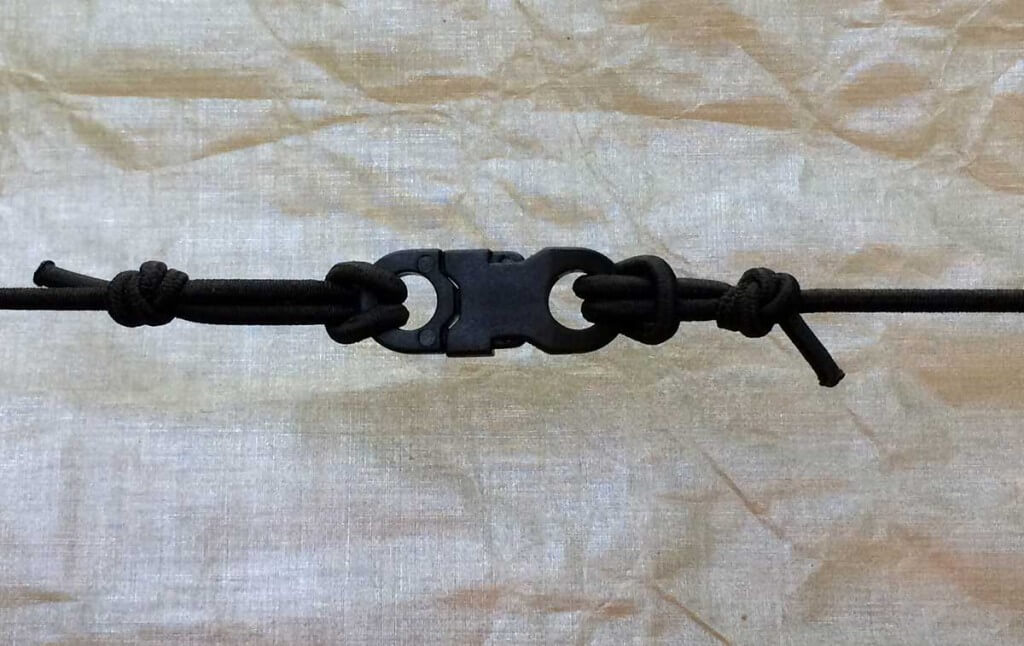
Photo 2: Detail of Photo 1 showing the Safety Side Release Buckle clips securing the doors in the open-and-stowed position. Note that you need to make sure you have the right female-male connections to work in both open-and-stowed position (Picture 1), & in the closed position (Picture 3 & Picture 5). [Photo D. Meck]
This shows the left door closed and attached to the mating clip on the opposite side of the tarp (yellow arrow on lower right). On the lower left arrow you can see the hanging clip for the opposite (right) door that is currently in the open-and-stowed position. In the upper right you can see the two right-hand-side doors clipped in the open-and-stowed position. [Photo D. Meck]
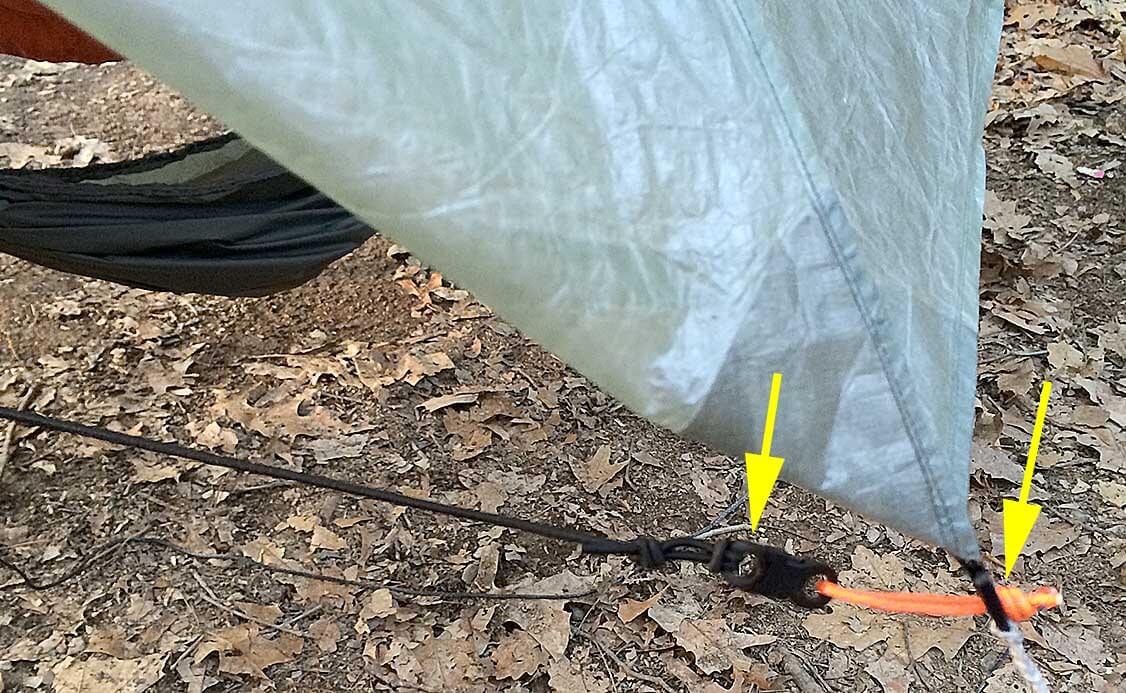
Photo 4: Detail of Photo 3 showing the shock cord and clip from the left (left arrow) door secured to the clip in the lower right. [Photo D. Meck]
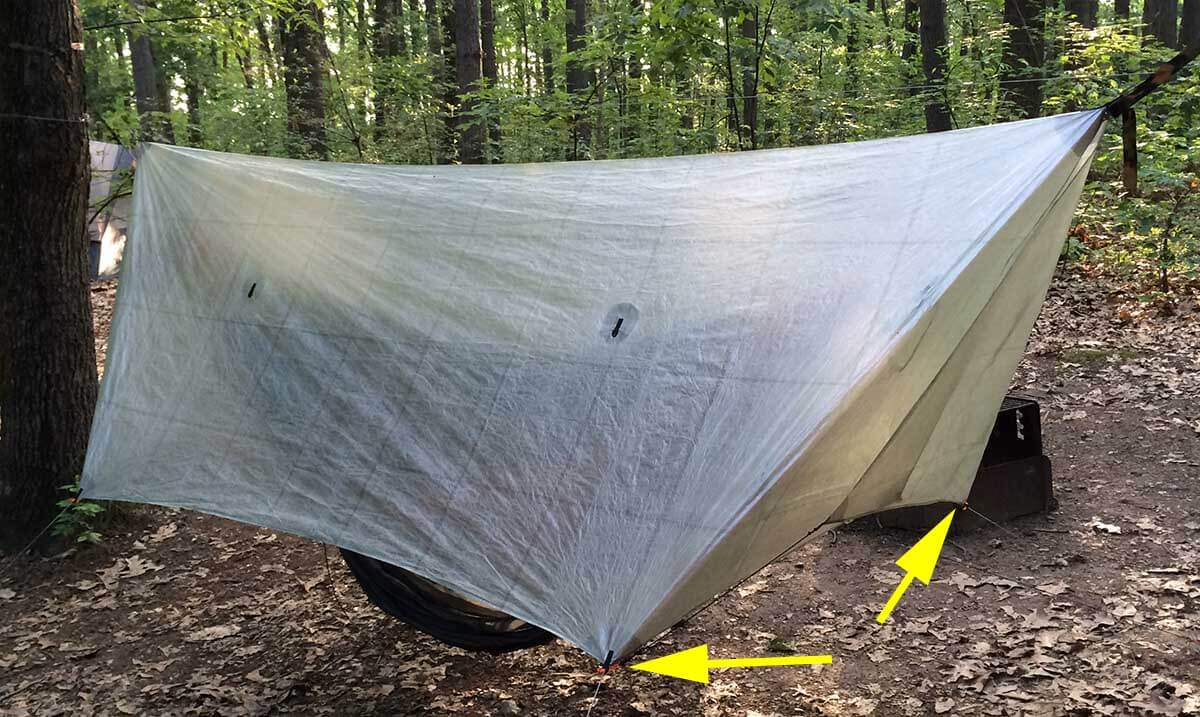
Photo 5: Shows both doors closed and secured to clips on the opposite tarp side (yellow arrows). [Photo D. Meck]
“In locations where trees are readily available—nearly all of the eastern United States plus a fair amount of the Mountain West—hammock camping is likely your best sleep option.”
This is the introductory post of a three part series
- Part I: Advantages and disadvantages versus ground systems
- Part II: Types of hammocks, and spec comparisons to ground systems
- Part III: Helpful tips and resources for a virgin hammock camper
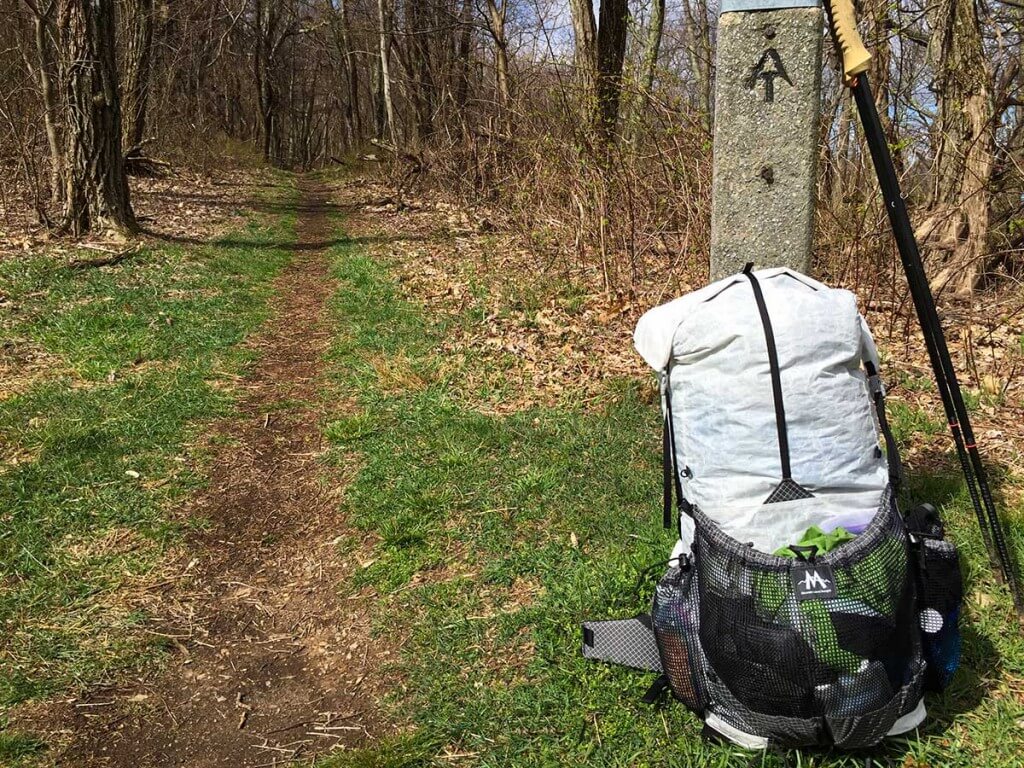
Lead Photo above: Unlike ground systems, hammocks enable hiking long distances each day without sacrificing camp comfort or sleep quality. Above, the Dream Hammock Darien UL weighs just 13 oz, including bug netting, hanging hardware, gear organizer, and stuff sack.
Hammock Camping is the best choice for the most east coast backpacking
In 3-season conditions and in locations where trees are readily available — which includes nearly all of the eastern United States plus a fair portion of the Mountain West — I belive that a hammock is the best overall sleep system. This is especially true for mileage-driven backpackers because they need not make two critical sacrifices often demanded by ground systems:
- Camp earlier than otherwise preferred due to limited campsite availability, and
- Carry heavy camp gear (e.g. plush air mattress) to improve camp comfort and sleep.
I make this claim as an experienced backpacker who has happily ground-slept for decades. My motivation for hammock camping was curiosity, not dissatisfaction with ground sleeping. The more experience I acquired, however, the more obvious it became that hammocks were a more practical and efficient system, especially in the eastern US.
The primary advantage of hammock hammock camping
In locations with ample trees of sufficient strength, the primary advantage of hammock camping is the huge increase in suitable campsites. In Shenandoah National Park, for example, most of the terrain is rocky and steeply sloping; the number areas suitable for ground camping (i.e. flat; and free of rocks, roots, and vegetation) is very limited. Moreover, many of these areas have developed into crowded, heavily impacted campsites.
Shenandoah’s unsuitable terrain — and its overused campsites — is made completely irrelevant by a hammock, which can be setup in almost all areas of the park. So long as I can find two trees that are 12-18 feet apart, I can setup a hammock without any regard to the surface below it, even on, say, a wet and rocky 15-degree slope.
With the huge increase in suitable campsites, a hammock system gives a hiking-inspired backpacker the option to hike dawn-to-dusk (or some variation thereof) without the risk of getting caught in a stretch of un-camp-able terrain. In turn, this flexibility equates to a great number of hike-able time, which ultimately equates to hiking longer distances. I believe this increase in hike-able time will typically outweigh the slight weight increase of a hammock system versus a ground system, if there even is one.
A Jacks R Better bridge hammock pitched on a 15-degree hillside along the AT, hardly a suitable campsite for a conventional ground system. In a hammock, the terrain underneath has no effect on sleep quality.
Other advantages of hammock camping
Besides improved campsite availability, hammock systems have other advantages over ground systems:
Camp comfort and sleep quality
Many people find sleeping in a hammock more comfortable than sleeping on the ground, or at least as good. A better night of rest allows me to recover better and hike more the next day. Unlike a ground system, this increase in sleep quality is not in opposition to a lightweight pack.
A hammock is also an excellent camp seat, without the need to bring a dedicated camp chair.
Fast Setup
Oftentimes I can setup a hammock faster than a ground system. When camping on the ground, I must first scope out a suitable area and then clear it of rocks and other debris. In contrast, setting up a hammock involves clipping two nylon straps around trees — a process that takes an experienced hammock camper just a minute or two.
Reproducible and consistent setup
Hammocks can be consistently set up the exact same way, night after night. In contrast, the ground experience changes nearly every night due to ground sloping, ground cover, and surface abnormalities. Therefore, it’s easier to master the setup, and I can reliably sleep the same way each night.
Leave No Trace
It is easier to practice Leave No Trace (LNT) with a hammock:
- With more campsite options, hammock campers can avoid further impacting popular campsites.
- Hammocks do not crush or smother the plants below them.
Note: To avoid impacting trees, wide tree-straps should be used. Almost all backpacking hammocks are sold with this type of strap.
Solitude
With greater campsite availability, I can get away from habituated camping areas to find peace and quiet, and a better night of rest. Hammocks are a blessing to those that do not desire the crowded social scene at most Appalachian Trail (AT) shelters and other popular camping areas. And when better campsites exist — more aesthetic, more protected, less buggy, etc. — I can utilize them.
Water Availability
Many times it is faster and more convenient to camp near a water source, like if I am hiking on a ridge where water sources are sparse. With a hammock, I can camp near these water sources even if there are no suitable ground campsites nearby.
Protection against rain and ground water
When it’s raining and/or when the ground is wet, a hammock system is superb. The tarp keeps me protected against rain, and the hammock can be used as a dry bench seat while I am cooking or relaxing in camp.
Many people find sleeping in a hammock far more comfortable than sleeping on the ground, regardless of the terrain underneath. In keeping with Leave No Trace principals, the hammock will leave the ground cover and leaves almost completely undisturbed. Pictured: Warbonnet Blackbird Hammock with Edge Tarp.
Real and potential disadvantages of hammock camping
Hammocks are not flawless, and there are a few obvious limitations:
- To be optimally set up, trees of sufficient strength are required; and,
- They are designed as a 1-person shelter.
Hammocks may also potentially have some less obvious drawbacks:
Weight
Comparing the weight of a hammock system against a ground system is difficult and complex. Both systems have several popular designs and configurations — Which systems should be compared? And how could we ensure that the systems being compared offer a comparable user experience, in terms of camp comfort, sleep quality, and environmental protections?
That said, generally speaking, hammock systems are slightly heavier than the lightest ground (tent) systems. But given the aforementioned difficulties of this comparison, this slight difference is not significant enough to be a solid disadvantage for hammocks. And the hammock systems that I use are far lighter than almost all conventional tent setups you’ll see on the trail.
Initial Learning Curve
Through long association and use, most backpackers are intuitively familiar with how to setup a ground system. Not to mention that most people use a ground system at home — a standard bed.
Conversely, most backpackers do not understand the first thing about backpacking hammocks. There is a bit of an art to setting up a hammock and sleeping in one. Thus, learning to hammock camp may initially take more time. As noted earlier, however, there is nothing terribly difficult about setting up a hammock, and in the long term it is probably faster to set up a hammock than a ground system.
Sleeping comfort
Yes, I know this was listed as an advantage earlier, but…
- Some sleepers object to even a slight banana bend, which can be mostly but not entirely solved by a wide asymmetric hammock or by a bridge hammock.
- Some people feel slightly squeezed in a hammock. In general, bridge hammocks feel a bit tighter than gathered end hammocks.
Cold comfort
While ground sleepers need to insulate their underside (against the ground, usually through a closed-cell foam or air mattress), hammock campers are even more sensitive to cooling from underneath, especially if there is wind. Even in 60-degree temperatures, convective (air current) heat loss can be significant under a hammock.
Most hammock campers will need to have effective insulation underneath their hammock, in addition to the conventional topside insulation (i.e. sleeping bag). This can be a properly installed sleeping pad, but this ground-inspired product does not translate well to hammocks, and under-quilts are widely preferred. In extreme cold temperatures, a full-sided tarp to block the wind is also very helpful.
Some knowledge and skill are required to correctly use an under-quilt and to correctly pitch a tarp. Once mastered, sleeping warm presents no major difficulties.

If there is any wind, a large well-pitched tarp is important to staying warm and dry in a hammock. Here the large Warbonnet Edge Tarp is pitched tightly against the hammock body, thus protecting the hammock and sleeper from wind and convective heat loss. Picture by Andrew Skurka; Pisgah National Forest, NC.

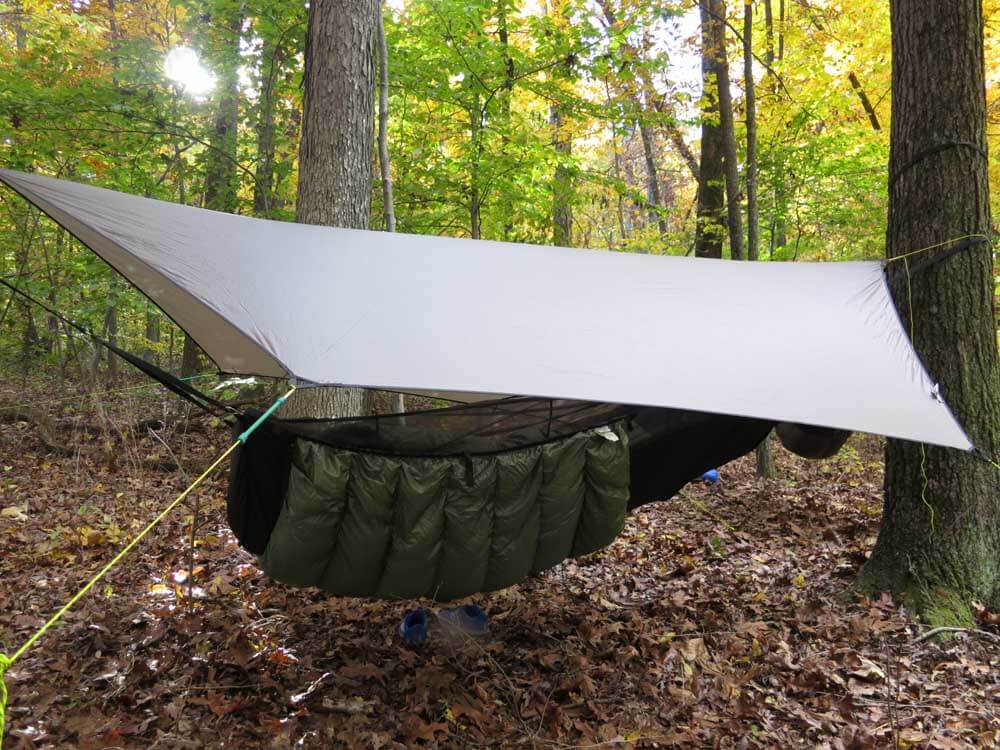
In less windy or rainy conditions you can use a higher and airier tarp pitch. Notice the under-quilt, which like a topside quilt will help to reduce convective heat loss.
Really Cold Hammock Camping
And finally, hammock camping works quite well even in in very cold weather. I’ve comfortably slept down to around 10° F in a 3 lb (1.3 kg) hammock setup (hammock, top quilt, under quilt, tarp and suspension). That’s way lighter than most tent, sleeping bag, ground pad setups!
A 9 ounce hammock: This Gear List suggests using a hammock, which on the AT has significant comfort and performance advantages vs. a tent.
A three season (spring, summer, fall) Appalachian Trail Gear List
This gear list is fine tuned to the climate and terrain of the Appalachian trail rather than the more generic 9 Pound – Full Comfort – Lightweight Backpacking Gear List which is intended to cover most of the lower 48. For instance, the AT Gear List suggests using a hammock vs. a tent, since trees are plentiful along the AT, whereas flat, rock-free places to setup a tent and sleep on the ground are scarce. For more on hammocks see: Hammock Camping Series – Part 1 – Advantages of Hammock Camping.
If you aren’t interested in hammock camping, the list also includes and alternative options for traditional (ground) camping. Since most folks will be sleeping in AT shelters it doesn’t make much sense to carry a tent, which will go unused most nights. To save weight, just carry a light tarp in the low probability that there is both no room in the shelter and that it will rain. For more conventional tent & sleeping bag options see: 9 Pound – Full Comfort – Gear List.
This gear list is suitable for most backpackers on most 3-season trips (possibly 3+ season) along the Appalachian Trail (In some instances, you may wish to fine-tune this list to your particular trip needs and/or backpacking style by selecting suitable optional or alternate gear in this list.) I’ve also tried to list a number or items available from major retailers like REI, e.g. the excellent and reasonably priced Outdoor Research Helium II Rain Jacket at only 6.4 ounces!
Appalachian Trail Gear List – Summary with Weights
| SECTION | TOTALS | Lbs | |
|---|---|---|---|
| Clothing in Pack (not usually worn) | 2.3 | Rain jacket, warm jacket, gloves, etc. | |
| Backpack and Gear Packaging | 1.3 | Backpack, stuff sacks | |
| Sleeping Gear, Hammock, Tarp | 3.1 | This Gear List suggests using a hammock, which on the AT has significant advantages vs. a tent. See Advantages of Hammock Camping | |
| Alternate Sleeping Gear – Tarp Camping (alternate to hammock camping) |
3.3 | Since most folks will be sleeping in AT shelters it doesn’t make much sense to carry a tent, which will go unused most nights. | |
| Cooking Gear and Water Storage/Treatment | 0.8 | Stove, pot, cookware, water “bottles” & purification | |
| “Essential” Gear | 0.8 | Maps, SOS device, first aid kit, headlamp, knife sunscreen and small items not included in above | |
| BASE PACK WEIGHT (BPW) | 8.3 | BPW = all items in pack = all items above, less “consumables” (water, food and fuel) |
|
| 1 Pint of Water | 1.0 | Average amount carried when hiking (water plentiful) | |
| Food – for a long weekend – 3 days, 2 nights | 3.8 | See Backpacking Food “…reduce food weight” | |
| Fuel | 0.2 | 4 fl-oz alcohol = 3.2 oz wt | |
| Total of Consumables | 5.0 | Water, food, and fuel | |
| TRAIL PACK WEIGHT (BPW + consumables) | 13.3 | For a long weekend – 3 day trip | |
| Clothing Worn and Items Carried (not in pack) | 4.3 | Not included in pack weight: clothing worn on the trail, hat, shoes, trekking poles, stuff in pockets, etc. | |
| Camera Equipment Gear List (new page) | Details for Serious Lightweight Backpacking Cameras | ||
Detail of Gear List Items
Clothing in Pack (not usually worn)
| Clothing | Item | Oz | Comments |
|---|---|---|---|
| Rain Jacket | Outdoor Research Helium II (6.4) | 6.4 | From REI: less expensive than many at this weight |
| RainJacket (alt) | Patagonia Alpine HOUDINI (6.0) | Light! Minimal with tough fabric. Pricy | |
| RainJacket (alt) | Ultimate Direction, Ultra Jkt 5.9 | Light, great ventilation options, built-in mitts | |
| Rain Pants | Outdoor Research Helium | 6.0 | Light. Not insanely expensive |
| Rainpants (alt) | Rain chaps or rain kilt (2.0 oz) | For trips with low probability of rain, or warm rain | |
| Mid-layer top | North Face TKA 100 Glacier 1/4-Zip | 7.9 | For use as a mid-layer (and as a “windshirt”) |
| Windshell | Don’t bring anymore | If cold & windy, will layer rainjacket over my fleece | |
| Warm jacket | West. Mtn. Hooded Flash Jacket | 10.5 | Warmth Important for rest stops and in camp. |
| Warm pants | Western Mountain. Flash (6.5) CampSaver is one of the few places to get these great pants | For colder weather. Or folks that run cold in camp | |
| Warm hat | OR Option Balaclava | 1.8 | Warmer than hat – great for quilt w/o hood! |
| Warm hat | Mtn Hdw Power Stretch Balaclava | 1.2 | Warmer than hat – great for quilt w/o hood! |
| Liner gloves | DuraGlove ET Charcoal Wool (2.5) | Great liner glove – light, warm, durable! | |
| Camp gloves | Glacier Glove fingerless fleece (2.0) | 2.0 | Dexterity at camp chores or climbing in cold weather |
| Rain Mitts | ZPacks Challenger Rain Mitts (1.0) | 1.0 | For intermittent use. Expensive. |
| Rain Mitts (alt) | MLD eVENT Rain Mitts (1.2) | 1.2 | For intermittent use. |
| Rain Mitts (alt) | Outdoor Research Revel (3.5) | For constant use: waterproof, durable, grip palm | |
| Spare socks | DeFeet Wolleators or SmartWool PhD Light Mini |
1.8 | Will bring to wash & switch between pairs |
| Sleeping socks | DeFeet Woolie Boolie (3.0) | No day use; sleeping and dry camp only | |
| Sleeping top | Patagonia long sleeve Cap LW (3.5) | Dry/clean for camp. Only bring in very wet climates | |
| Sleeping bot. | Patagonia Capilene LW (3.4 oz) | Dry/clean for camp. Only bring in very wet climates | |
| Sleeping (alt) | Terramar Thermasilk top & bot | Inexpensive alternative to expensive base layers | |
| TOTAL | 2.3 | Lb |
Backpack and Gear Packaging
| Packing | Item | Oz | Comments |
|---|---|---|---|
| Pack opt 1 | Mountain Laurel Designs 3500ci EXODUS (17 oz) | 17.0 | No frame. Almost all Dyneema. Very little mesh. Ideal for AT and shorter trips. [award winner] |
| Pack opt 1 | Hyperlite Mountain Gear 2400 Windrider (28 oz) | For those that want a frame. Light, super durable, seam sealed bag, good carrying capacity, good pockets. More $ [award winner] | |
| Pack (alt) | Gossamer Gear Gorilla 40 (26 oz) | Has frame. Durable. Right volume for AT. Record setting pack. | |
| Pack (alt) | Osprey Exos 38 Pack (34 oz) | Mainstream commercial pack, readily available | |
| Waterproofing for pack | 2x Gossamer Gear Pack Liner (1.8) (alternate: a trash compactor bag) | (1) liner for sleeping bag and insulating clothes (1) liner for everything else |
|
| Food storage | Quart-sized HD freezer bag | 0.5 | For storing organizing ‘todays’ snack food |
| Food storage | Aloksak OP Sak 12.5″ x 20″ (1.0) | control food scent – attract less animal attention | |
| Bear canister | Bear Vault BV500 (41) or Wild-Ideas Weekender (31) | (when reg’s require) Wild-Ideas is lighter but pricy. Bear Vault is a better value | |
| Stuff sacks | For sleeping bag, clothes, etc. | 2.0 | Silnylon: keep gear organized, clean, protected |
| Map sleeve | Gallon-sized freezer bag | 0.5 | Gallon: fewer map folds & shows more map area |
| Eyewear case | padded nylon sleeve + Ziplock bag | 0.4 | No need for a heavy rigid case |
| TOTAL | 1.3 | Lb |
Sleeping Gear and Hammock Camping Setup
| Sleep+Shelter | Item | Oz | Comments |
|---|---|---|---|
| Hammock Shelter Setup – For more on hammocks see: Hammock Camping Series (for conventional ground sleeping options see “Alternate Camping with a Tarp” below. |
|||
| Hammock | Dutchware Half-Wit (with Hexon 1.0 fabric ) |
12.5 | Light, all essential features & bug protection. Value! (weight includes kevlar/whoopie suspension) |
| Sleeping Quilt | Hammock Gear Burrow “+30” | 14.5 | (+40F + 2 oz over fill = “+30F”) Great value |
| Under Quilt | Hammock Gear Phoenix “+30” | 14.0 | 60″ long: (+40F + 2 oz over fill = “+30F”) Value |
| Tarp | Hammock Gear Cuben Hex Tarp | 7.0 | Hammock specific tarp (wt incl. ridgelines & guylines) |
| Tarp (value) | Hammock Bliss XL Rain Fly (18.0) | Inexpensive and serviceable hammock tarp | |
| Stakes | 8 MSR Groundhog Y-stakes .5oz ea | 4.0 | Hold better than skewer stakes. Red easier to find! |
| Guylines | 3mm MSR Reflective Utility Cord 2.4mm reflect cord (8×4-ft lines) | 1.0 | 2 to 3mm – all work well – diameter your preference |
| TOTAL | 3.1 | Lb | |
Alternate Camping with a Tarp (if not Hammock Camping)
Since most folks will be sleeping in AT shelters it doesn’t make much sense to carry a tent, which will go unused most nights. To save weight, just carry a light tarp in the low probability that there is both no room in the shelter and that it will rain. For more conventional tent & sleeping bag options see: 9 Pound – Full Comfort – Gear List.
| Sleep+Shelter | Item | Oz | Comments |
|---|---|---|---|
| Sleeping Bag | Hammock Gear Burrow Quilt “+30” | Pers fave. Great value! (with 2 oz over fill = “+30F”) | |
| Sleeping Bag (alternate) | Western Mountaineering SummerLite (19) | 19.0 | Conventional +32 sleeping bag. Light, warm, highest quality, long loft retention |
| Sleeping Pad | T-Rest NeoAir X-lite “Women’s” | 12.1 | Perfect size for most. Warm. Super comfortable! |
| For more shelter options see: Recommended Tents, Tarps, and other Shelters | |||
| Tent (alt) | TarpTent ProTrail – 1 pers (26oz) | Full rain & bug protection for one person (has floor) | |
| Tent (alt) | Big Agnes Fly Creek UL 1 (33 oz) | REI: Freestanding tent for those who feel they need it | |
| Tent/Shelter (alternate) | MLD Grace Duo Tarp Silnylon (15) Cuben (7.8) | 15.0 | Pers fave for many trips: Huge coverage. Low weight. Great ventilation and views. |
| Bivy | MLD Superlight Bivy (7.0) | Perfect with tarp. When bringing will cowboy camp under stars most nights | |
| Ground cloth | Gossamer Gear Polycryo M (1.6) | 1.6 | Not needed with a bivy or shelters with a floor |
| Stakes | 8 MSR Groundhog Y-stakes .5oz ea | 4.0 | Hold better than skewer stakes. Red easier to find! |
| Guylines | 3mm MSR Reflective Utility Cord 2.4mm reflect cord (8×4-ft lines) | 1.0 | 2 to 3mm – all work well – diameter your preference |
| TOTAL | 3.3 | Lb | |
Cooking Gear and Water Storage/Treatment
| Cook/Water | Item | Oz | Comments |
|---|---|---|---|
| Bottles | Sawyer 64 oz Squeezable Pouch | 1.5 | For collecting treating water in camp – dry camps |
| Bottles | Sawyer 32 oz Squeezable Pouch | 1.0 | Use during the day (note: Platypus doesn’t fit Sawyer) |
| Purification | Sawyer filter (3.0) | 3.0 | To drink on the spot – greatly reduces water cary |
| Purification | Chlorine Dioxide tablets | 0.5 | For treating 2L bladder in camp |
| Cookset | Trail Designs Toaks 900ml Pot, Sidewinder Ti-Tri, 4fl-oz fuel bottle | 5.3 | Lightest, most practical cookset on the market. Zelph StarLyte Burner stores unburned fuel. |
| Cookset (alt) | Jetboil Zip Cooking System, Jetpower 100 Fuel Canister (18.5) | EZ to use. Much heavier than the alcohol stove cookset. Not “green” with non-recyclable canisters. | |
| Pot (bargain) | Open Country 3 Cup Pot (3.8) | As good as a titanium pot but only $16 | |
| Cookset(cheap) | TD $40-$50 pot/cookset option | Stay tuned: Working on what this will be | |
| Fuel container | Boston Round Bottle 4 fl-oz (0.8) or TD Fuel Bottle Kit |
(5 fl-oz act. cap) use squirt spout top for and medicine cup accurate dispensing | |
| Ignition | Standard (not micro) BIC lighter | 0.2 | Larger is easier to use with cold hands |
| Mug | Snow Peak Ti Single 450 Cup (2.4) Fave: MLD 475 Ti mug (1.3oz) |
1.3 | Eat breakfast & have coffee at same time |
| Bowl/Mug (alt) | Ziplock 14 fl-oz bowl (0.6 oz) | Pers fave: “mug” and/or bowl. Cheap, light, available | |
| Mug (alt) | Starbucks “$1,” 16 fl-oz cup (1.6oz) | Readily available, inexpensive, reasonably durable | |
| Utensil | Plastic spoon with big shovel | 0.3 | spoon handle cut to fit in pot |
| Coffee brew | MSR MugMate Coffee Filter (1.0) | For using ground coffee (and not Starbuck’s VIA) | |
| TOTAL | 0.8 | Lb |
“Essential” Gear (smaller items not included in above)
| Essentials | Item | Oz | Comments |
|---|---|---|---|
| MAPS | 11X17 Custom Maps in ZipLock | 2.0 | Mapped with CalTopo and printed at Kinkos |
| Charging | 6000mAh Anker batt + cable (5.1) | for longer tips (~1.5 iPhone6 charges) | |
| SOS/Tracker | Preferred: inReach SE (6.9) | 2-way communication (a big deal!), visible GPS coordinates, and trip tracking+SOS | |
| SOS/Track (alt) | SPOT Gen3 (4.8) | Disadvantages: only 1-way com, no vis. GPS coord. | |
| GPS & Comm | Iridium 9555 SatPhone (9.7 oz) or Iridium GO! |
Make no mistake: voice communication is still the gold-standard for high risk trips | |
| Optics | ROXANT 7×18 monocular (2.0) | Light: scouting/route finding, decent, inexpensive | |
| Optics (alt) | MINOX BV II 8×25 binoc’s (10.8) | Scouting, much better wildlife observation, value | |
| Pen/pencil | Fisher Space Pen Stowaway | 0.2 | To mark up maps, take notes about trip |
| Toothbrush | GUM 411 Classic Toothbrush | 0.4 | Full head. minimal handle (but not cut in 1/2) |
| Toothpaste | Travel size 1/2 full | 0.7 | |
| Toilet paper | Whatever is on the roll at home | 1.0 | TP only for polish, use found materials first |
| Soap/sanitizer | Dr. Bronners | 0.5 | Dr. Bronner’s – repackaged into small bottle |
| Sunscreen | small plastic tube about 1/2 full | 0.5 | for face & hands: most of body covered—large hat |
| Lip balm | Bert’s Bees or similar | 0.2 | Minimal wt for dedicated lip balm |
| First Aid Kit | Meds, wound/injury, foot care | 3.0 | See detailed list at bottom |
| Headnet | Sea to Summit Head Net (1.2) | Mosquito netting – don’t take on most trips | |
| Insect repell. | Repel Pen Pump Insect Repellent Sawyer Maxi-DEET Spray (0.5) |
Convenient size; effective. Sawyer preferred. | |
| Foot care kit | Bonnie’s Balm in small balm jar | 0.5 | In case of wet feet. Never get blisters. |
| Compass | Suunto M-3D Compass (1.6) | 1.6 | Lightest compass with declination adjustment |
| Knife/scissors | Wescott blunt tip school scissors | 0.9 | More useful than knife – OK for plane carryon |
| Knife | Gerber L.S.T. Drop Point (1.2 oz) | Can cut bread and salami – very light for 2.6″ blade | |
| Knife (alt) | Spyderco Ladybug Knife (0.6) | 2″ blade – one of the lightest functional knives | |
| Firestarter | Bic Mini Lighter + trash | 0.2 | Energy bar wrappers are great fire starter |
| Light | BD Ion ii headlamp (45g) | 1.6 | 2 AAAs + headband. Bright, efficient dimmable LED (slide/touch operation a bit wonky, so not for all) |
| Light (alt) | Fenix LD02 w spare battery (1.0) | Best mini light available, attach to hat brim with clip | |
| Repair | Tenacious patch, duct tape, glue | 0.2 | Also consider NeoAir patch kit, and Aquaseal |
| Finance/ID | ID, CCs, and cash in snack ZipLock | 0.2 | More secure on me than left in car |
| TOTAL | 0.8 | Lb |
Clothing Worn and Items Carried (stuff not in pack)
| Worn/Carried | Item | Oz | Comments |
|---|---|---|---|
| Shirt | SmartWool Micro T Short-Sleeve | 4.5 | Light, comfortable. On trail, in shade. No need for sleeves. (put on fleece for cold/windy Wx) |
| Shirt (alt) | SmartWool NTS lightweight zip (8) | Shirt & baselayer: for colder weather | |
| Pants | RailRiders X-Treme Adventure (16) | Pers fave. Very durable, no velcro on pockets! (Use Code RRAAB21 to get 10% off your first RailRiders order) | |
| Pants (alt) | REI Sahara convertable pants (14) | 14.0 | On trail, in shade: will hike in shorts most days. Ex Officio and many others make similar pants |
| Underwear | Patagonia briefs | 2.0 | Dry fast, will rinse/wash most days |
| Bra | Lighter, quick drying spots bra | Not an expert on this one! | |
| Shoes | Inov-8 ROCLITE 295 (20oz) | 20.0 | Pers fave. Light, sticky rubber, durable, low heel rise |
| Shoes (alt) | Brooks Cascadia (25 oz) | Very popular trail shoe for LW backpackers | |
| Shoes (alt) | Lightweight trail running shoes | Most non-Goretex trail running shoes that fit well | |
| Socks | DeFeet Wolleators or SmartWool PhD Light Mini |
1.8 | Wolleators are pers fave. Light, thin, warm, simple, durable |
| Gaiters | Dirty Girl gaiters (1.2 oz) | I rarely find the need for gaiters | |
| Headwear | Nylon Ball Cap | 2.0 | Mostly shade on AT. No need for killer sun protection |
| Watch | Suunto Core with positive display | 2.2 | compass, altimeter, multifunction timepiece. No GPS |
| Watch/GPS | Garmin Fenix 3 Sapphire (3 oz) | Accurate trip track: GPS, compass, altimeter, time | |
| Sunglasses | Rx and non-Rx (polarized) | 1.0 | http://www.zennioptical.com/ for cheap Rx options |
| Glasses | Zenni clear Rx glasses (1.0 oz) | Great glasses! for $20 or so. But 2-3 week delivery | |
| Camera | Canon S120 + extra battery (8 oz) | Balance of wt, size, image qual; less $ than RX100 | |
| Camera (alt) | Sony RX100 or Sony a6000 | See Serious Lightweight Backpacking Cameras | |
| GPS/Comm | Iphone 6+ Ziplock baggie (7.5) | 7.5 | Primary GPS & map source (not leaving in car!) |
| Poles bargain | Cascade Mountain Tech Carbon | 15.2 | Pers fave. 1/3 price but equal to the best poles |
| Trek Poles | REI Carbon Power Lock (16 oz) BD Carbon Alpine (18 oz) |
Stiff, light, travel-friendly, won’t break off-trail/rough terrain (readily available) | |
| TOTAL | 4.3 | Lb |
First Aid Kit (detail)
| First Aid | Item | Oz | Comments |
|---|---|---|---|
| Pain, fever inflammation | Naprosyn (Aleve), Ibuprofen, or Tylenol (fever) | 0.4 | In ziplock pill bag available at pharmacies |
| Foot/blister | Gauze + Leukotape Tape | 0.3 | For taping over blisters, or pre-blister areas |
| Foot/blister | Tincture of benzoin in micro-bottle | 0.2 | For getting tape or Bandaids to REALLY stick! |
| Wound care | Bandaids + gel blister covers | 0.5 | Assorted sizes – your preference |
| Wound care | Antibact. packets + wound wipes | 0.4 | Wound cleansing, infection prevention |
| OTC meds | Benadryl, Sudafed, Nexium, Imodium, caffeine tablets | 0.4 | All in tablet/pill form |
| Rx meds | Personal Dr’s Rx meds | 0.4 | |
| Pain serious | Dr’s Rx Painkiller | 0.2 | For serious injury, tooth abscess, etc. |
| Storage/org | Bag Poly 5×8 to hold 1st Aid Kit | 0.2 | Keep size down. Can only put in what can fit in bag. |
| TOTAL | 3.0 | Oz (included in “Essential” Gear) |
“In locations where trees are readily available—nearly all of the eastern United States plus a fair amount of the Mountain West—a hammock is likely the best sleep system.”
This is part of a three part series
- Part I: Advantages and disadvantages versus ground systems
- Part II: Types of hammocks, and spec comparisons to ground systems
- Part III: Helpful tips and resources for a virgin hammock camper

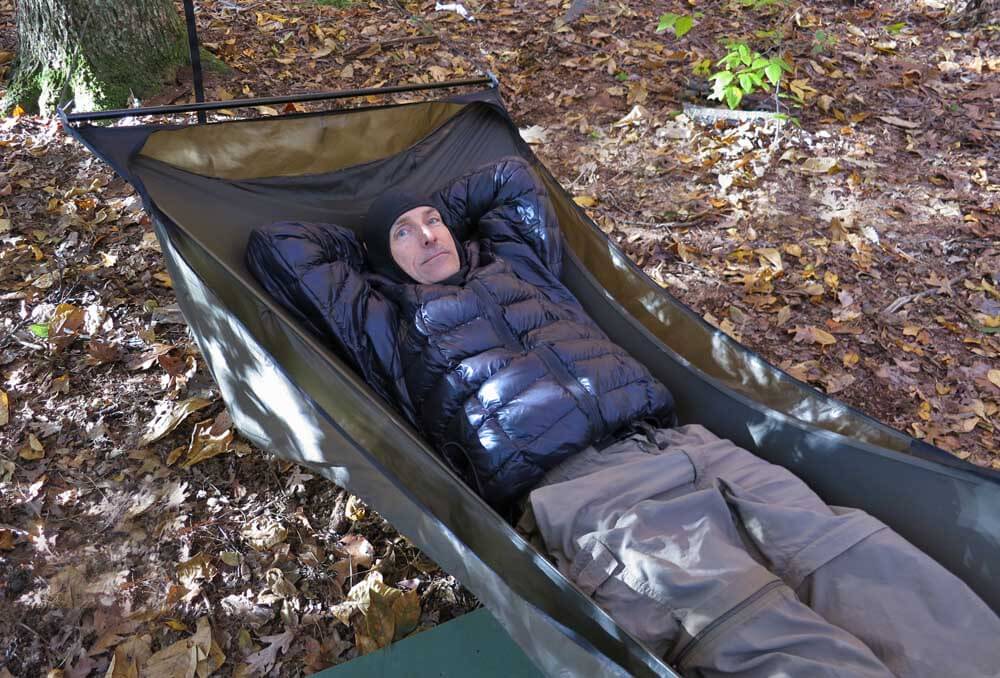
Hammock camping in cold weather is an advanced skill, perhaps even more so than ground camping in the same weather. For beginner hammock campers, test your system on low-risk, short-term outings first in order to develop your skills and know-how. Note the full-length under quilt for winter temps. Photo by Jack Tier of Jacks ‘R’ Better.
Shopping tips: How to assemble a functional hammock system
The hammock
Buy your hammock from a manufacturer that specializes in backpacking hammocks. Make sure it is designed for nightlong sleeping, not just afternoon napping.
A few light hammock models use smaller dimensions that may confine you. For example, the Grand Trunk Nano-7 Hammock, and the BIAS Weight Weenie Micro 52 Hammock are both only around 50-52 inches wide, versus the 65″ wide of the Warbonnet Blackbird. Shorter and/or narrower hammocks also limit your ability to sleep flatter on a diagonal to the hammock’s center-line.
Even a light hammock should be full sized and functional. The 12 oz, $75 Dream Hammock FreeBird is a full 11 feet long and 60 inches wide.
Some campers pushing into the 175+ lb weight range are fine with lighter hammock body fabrics (e.g. 1.0-1.1 oz nylon). Other campers in the 175+ lb weight range feel that these lighter hammocks do not give enough body support even if they are technically within the hammock’s weight range, and therefore opt for 1.7-1.9 oz or heavier hammock body fabrics.
The tarp
Buy a tarp with adequate coverage. To sleep warm and dry in a hammock you need to keep wind and rain away from your hammock body. Smaller diamond or asymmetric tarps, e.g. the Hennessey Hyperlite Rainfly, affectionately known by some as a “napkin tarp,” may not provide adequate protection from blowing rain, or from the cooling effects of wind. While a few ounces heavier, a more pragmatic choice may be a larger hammock-specific “hex” tarp. A fairly standard hex size is a 10.5-foot ridgeline with an 8.5-foot width.
Due to spreader bar width, bridge hammocks may require a wider tarp than gathered end hammocks. (Pictured Warbonnet Ridge Runner hammock)
Due to the large tarps typically used with hammocks, some campers have opted to go with Spinnaker or Cuben fabric tarps to save weight. Compared to sil-nylon, Cuben fiber weighs half as much, but costs 2-3x as much (about $250-300 for a hammock tarp).
The under-quilt
Buy a good under-quilt for your hammock. Its performance will be much superior to a ground pad, even if you have a double-layer hammock to properly control the pad.
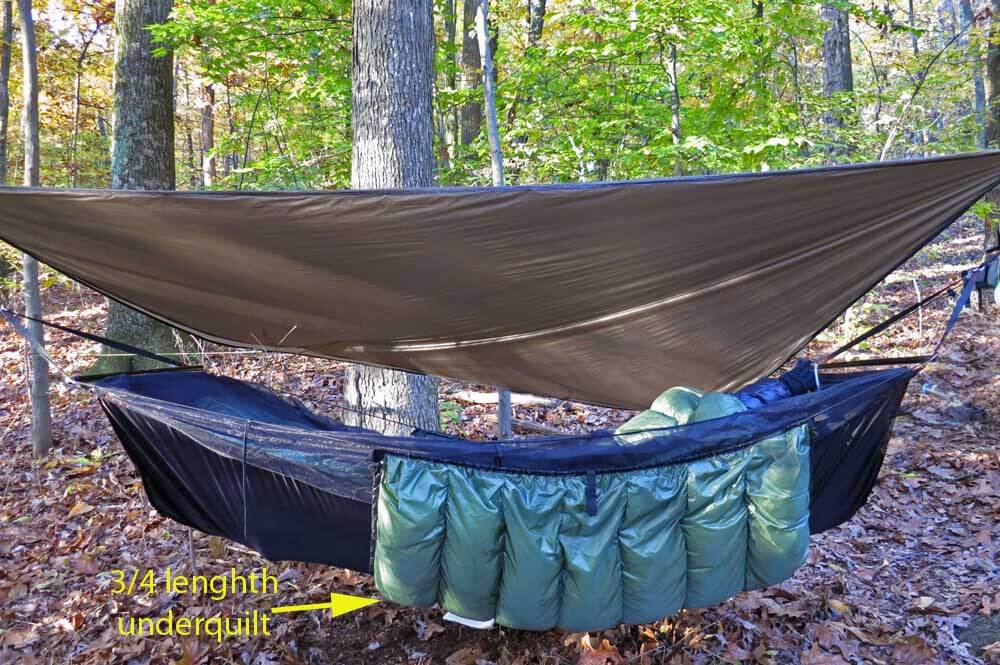
A good under quilt will make a critical difference for warmth and comfort. Some use a 3/4 length quilt and use a small pad under their feet, typically a foam sit-pad (which I prefer). Others opt for a full length under quilt.
The top quilt
Buy a top quilt when you can afford one — they are much more hammock-friendly than conventional mummy bags. In the interim you can use an unzipped mummy spread out like a quilt.
Suspension systems
Avoid fussing about exotic suspension systems and hanging hardware. The basic webbing suspension systems supplied by manufacturers like JRB and Warbonnet are excellent — inexpensive, easy to use, and strong. At most, they weigh a few more ounces than more expensive exotic suspension systems.
Drip lines
If you own a gathered end asymmetric hammock, make sure you have drip lines, or place a carabiner on the suspension system near the attachment to the hammock body. Otherwise, water will run down the suspension and into your hammock. Bridge hammocks do not share this problem.
Some Great Hammock Choices
In addition, I’ve listed key hammock manufactures and purchasing resources below. I own and like hammocks from all these companies. I know all their owners personally. They produce excellent hammocks that have widespread use and good reputations. Most also offer all the hammock accessories you might need, top quilts, under-quilts, tarps etc. Give them a call if you have questions on how to equip or comment below and I’ll try and answer.
| Company | Hammock | Oz | Comments |
|---|---|---|---|
| Dutchware | Chameleon | 17.5* | Light & Superbly Versatile. Adaptable to every season from humid summer days to winter use. Full review here which also compares it to Hennessy and Warbonnet hammocks. [5 day turnaround time.] |
| Hennessy | Hyperlight Asym Zip | 22 | Tom Hennessy is considered the man responsible for modern backpacking hammocks as we know them & has the patents to prove it. This is their lightest hammock & available at REI. |
| Warbonnet | Blackbird | 22 | A longtime hammock manufacturer. Blackbird is their most popular hammock. A well thought out and functional design. [Only 1 week wait] |
| Jacks ‘R’ Better | Bear Mountain Bridge Hammock | 32† | Another veteran hammock Co. The Jacks ‘R’ Better hammocks use a bridge design that gives a flatter lie than the gathered-end (traditional) hammocks above. [Almost all JRB stuff is off-the-shelf and ready to ship.] |
| Dutchware | 11 ft Netless | 8.0* | Ultralight and only $42! It’s my favorite hammock for littel to no bug pressure (much of Spring and Fall). Simple and functional. [Only 1 day turnaround time.] |
| AntiGravity-Gear | Quicksilver UL | 10.4 | Another inexpensive, light, no nonsense, netless hammock that comes with a very light suspension system. |
| Hammock Gear | All hammock accessories | n/a | Great supplier of everything else you need for hammocks. Top quilts, under-quilts, tarps etc. Some very light gear and some great values including their $150 Econ +20F down quilt. |
* Weights are approximate, and unless noted include MFR’s suspension (cord to hang hammock and wide tree straps to protect trees—important for LNT!). Dutchware Chameleon and Netless hammocks weights are with my own Kevlar tree straps.
† approx. 24 oz if you can use your trekking poles as the spreader bars.
Hammock-specific How To resources
The Ultimate Hang: An Illustrated Guide to Hammock Camping, by Derek Hansen, is an excellent and comprehensive book for hammock camping. And the Kindle version is only $3.99.
Hammock Forums is the largest online resource for information on hammocks. Like any large internet forum, its well intended members offer an incredible wealth of information. Also, as with any large internet forum, there is a smidge of less-than-perfect information, plus a couple of folks who are hanging in a different planetary orbit.
Warbonnet Outdoors has two useful how-to sections on its website: Hammocks 101 and setup videos.
Hennessy Hammock also has very good how-to videos.
Dutchware Product’s amusing videos are fun even if you don’t buy his stuff, though he does design some good products too.
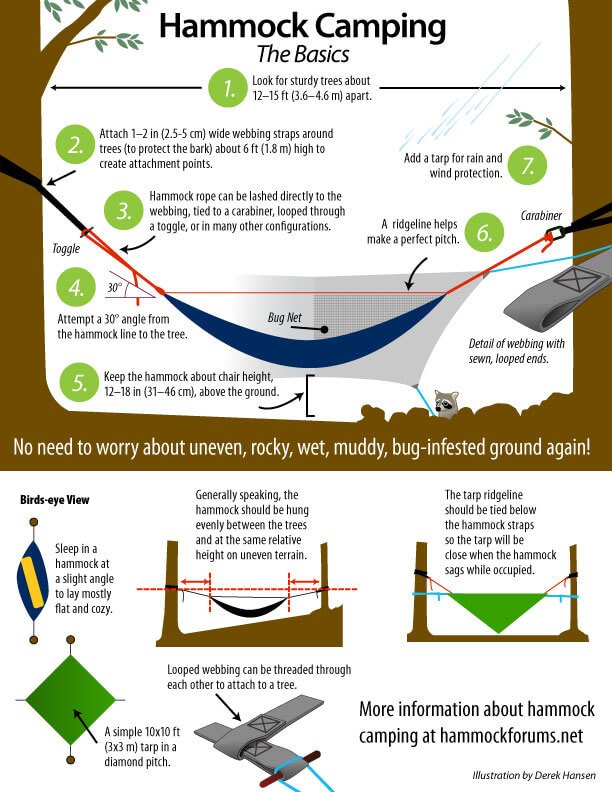
Hammock Camping — The Basics
Derek Hansen, author of The Ultimate Hang, is an advanced hammock camper and excellent illustrator. If you have learned nothing else from this 3-part series, study Derek’s illustration below.
What critical tips for first-timers are missing?
If you are a veteran hammock camper and feel that I missed some important tips — in this post, or one of the first two — for first-time hammock campers, please submit it as a comment, below.