Based on extensive field and lab testing, I believe that the Trail Designs Kojin Ultralight Alcohol Stove is the best alcohol stove system for ultralight backpacking (when paired with a Caldera or TriTi Cone). The new Kojin stove is incredibly fuel efficient and easy to use but best of all it boils water fast! And that’s rare for an alcohol stove. As such, the Kojin stove has earned its place in my pack as “most favored stove.”
You make Adventure Alan & Co possible. When purchasing through links on our site, we may earn an affiliate commission at no additional cost to you. Here’s why you can trust us.
Highlights of Trail Designs Kojin Ultralight Alcohol Stove
Fast boil times. Just over 5 minutes to boil a pint! And that’s ripping fast for an alcohol stove.
(Faster than the previous stove I used, the Standard Zelph Stove1.)
Fuel efficient. Uses less than ½ fluid oz (13.8) ml to boil a pint.
[Many (most?) alcohol stoves use approximately twice that amount of fuel, especially when windy.]
No wasted fuel waiting for stove to burn out. No need for precise fuel measurement and waiting for the stove to burn out. Just pour an ounce of fuel in. When the pot boils, snuff the stove out and cap it. Unused fuel is saved and ready for your next cooking session.
Safe. Fuel will not spill out of stove. (fiber filler material captures alcohol fuel). Great for safety. You really don’t want to spill alcohol fuel.
What are the Advantages of an Alcohol Backpacking Stove?
Material: Aluminum body with proprietary fibrous filler
Dimensions: 62mm diameter x 22mm thick, 2.4 in x 0.87 in
Fuel Capacity: 40 ml, ~1.3 fluid ounces
Fuel efficiency*: ~14 to 15 ml to boil a pint at 70°F/20°C at sea level
Time to Boil 16 oz*: ~5.5 to 6 minutes – with wide bottom pots of 0.9 to 1.3 liters
Operating temp: I’ve used the stove to 12°F (-11°C). Stove lit right up & boiled water without difficulty
* when paired with a Trail Designs Caldera or TriTi Cone. Note: While the Kojin is primarily for use with the Caldera/Ti-Tri systems, it can also be used in conjunction with your own pot stand and wind screen.
The Details – Kojin Ultralight Alcohol Stove
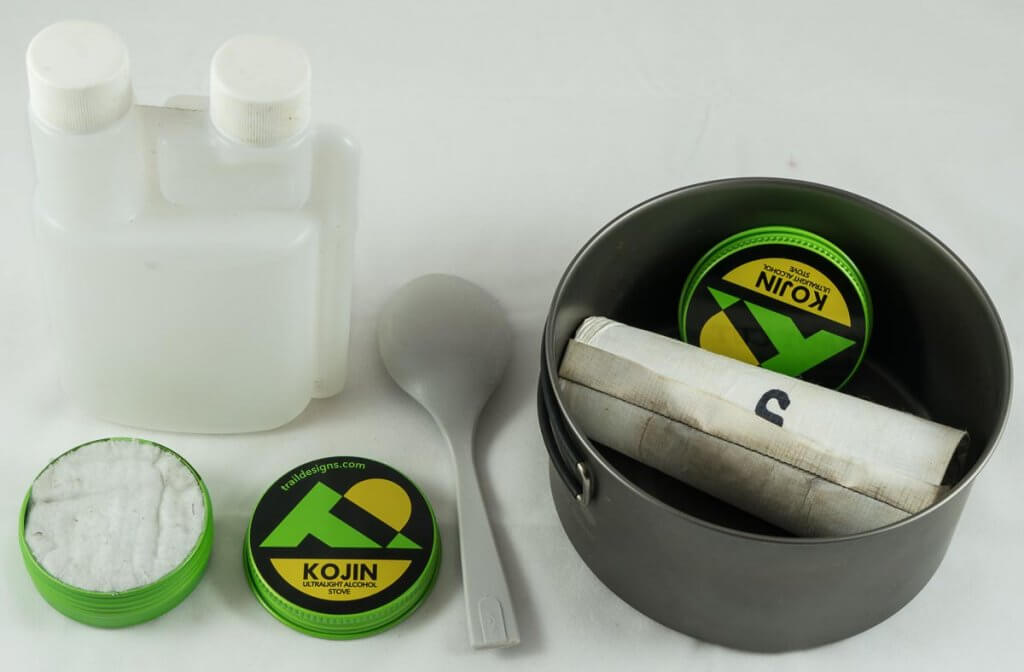
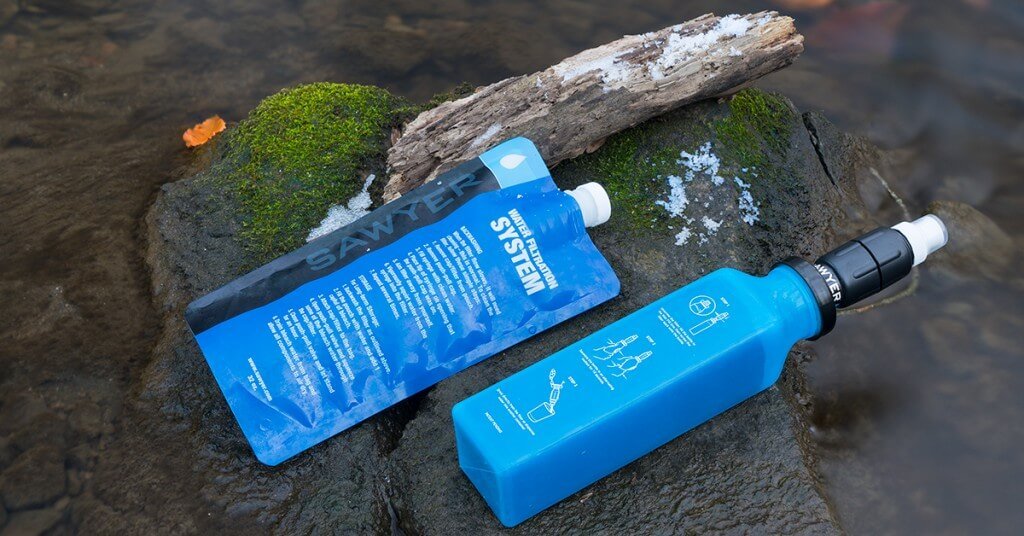
Starting bottom right and moving left: The Kojin Stove easily fits into the Toaks 900 Pot, with room for a TD Ti-Tri titanium cone, spoon, lighter and matches. On the left is the Kojin stove showing its white, fibrous filler material and screw on cap that seals the stove. Finally (upper left) is a twin reservoir fuel bottle that makes measuring alcohol fuel a breeze. Best fuel bottle on the market!
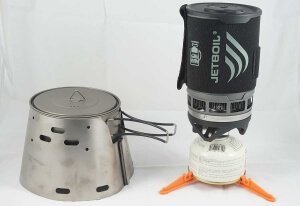
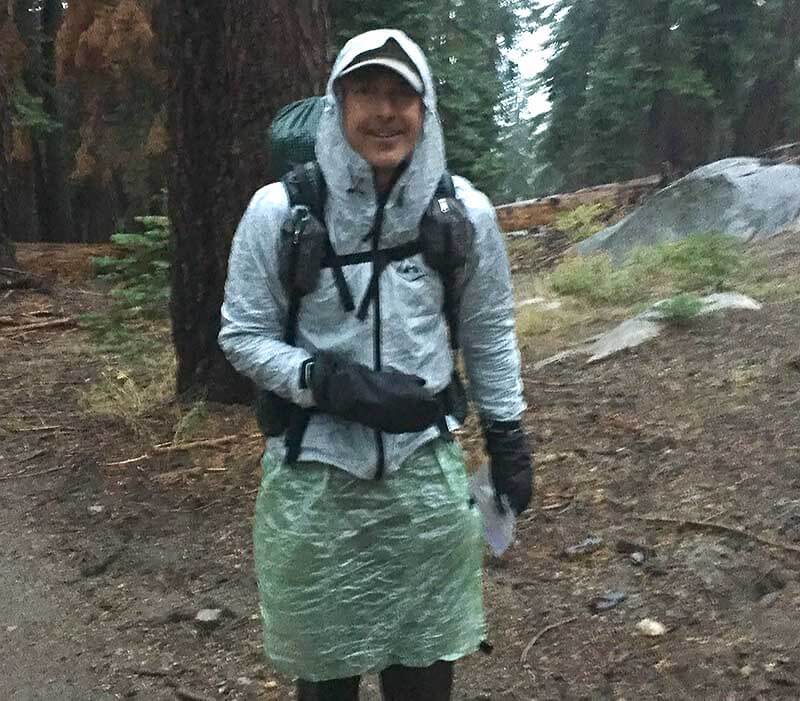
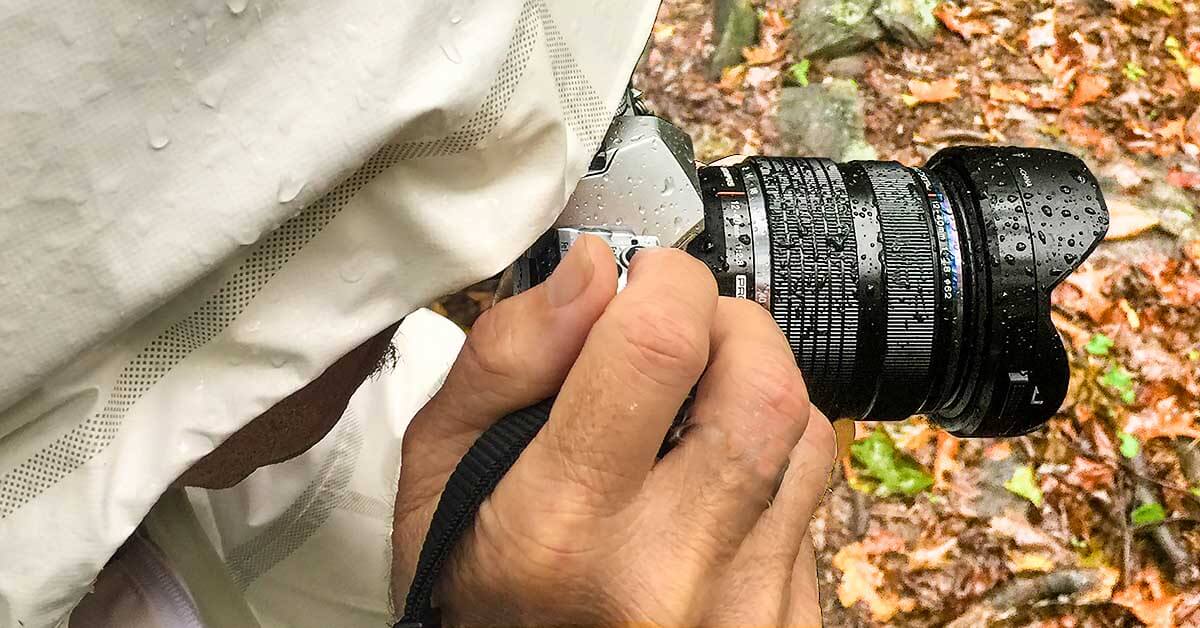
Trail Designs Kojin Ultralight Alcohol Stove is composed of an aluminum screw top “pill case” style housing. Inside is a proprietary, white fibrous filler that acts both as a wick and as a fuel stabilizer to prevent spills. You can turn the stove on its side and the fuel won’t drain out. It is designed by Trial Designs to be used inside their Caldera or TriTi Cone systems. [See lead picture for an example of a TriTi Cone system.]
Note: pour fuel slowly into the stove’s fiber compound. If you pour too fast some of fuel may run over the side before it completely absorbs in to the fiber compound. I find that the stove is most easily filled using the Liberty Mountain Twin Neck Fuel Bottle (see right). With a squeeze the bottle easily measures out 1/4 or 1/2 oz of fuel. And a flip top spout on the reservoir side is great for precise pours. I find that its 8+ oz capacity works for a 7-day trip (at least for me). A testament to the stove’s efficiency.
After that put the stove in the cone and carefully light it with a match or lighter [some light the stove an then put the cone over it]. When your water boils take your pot off the cone and blow the stove out (it isn’t hard). Then you can gently place the cap loosely on the stove being careful not to touch the hot stove [but don’t screw it down]. This prevents heated fuel from rapidly evaporating.
After the stove has cooled sufficiently to safely handle! (~ 5 minutes) you can screw the cap down to seal the stove and save the fuel for your next cooking session.
Which Pot Works Best?
While the Kojin Stove will work with many pots and stoves, I find it works optimally with wide bottom pots of 0.9 to 1.3 liters. E.g. Evernew and Toaks 900 and Toaks 1300 pots (the Toaks Pots are a particularly good value). With these pots you get fuel efficiency of 15 ml fuel to boil a pint or better! And the fast burn rate of the stove, and wide heat transfer are of the pot bottom gives you fast boil times. You can buy these pots at Trail Designs or Amazon.
Compared To?
All of the stoves below are similar in weight (15 to 17g) and work well with the TD Caldera or TriTi Cone system. They are discussed below from left to right:
On the left is my well used May 2017 prototype stove. After a ton of use it still works great. The cap shows the grey sealing material.
Next is the production Kojin Ultralight Alcohol Stove. Mostly cosmetic changes, altho the finish on the production version makes the cap easier to screw on and off. I find this stove excellent for solo use. But it’s also my stove of choice for my wife and I to share where we use it with a Toaks 900 or Toaks 1300 pot.
1 Then the Standard Zelph Stove with the steel mesh covering its proprietary filler compound. The Zelph is a good stove with similar fuel saving properties. But a smaller surface area and the steel mesh slow the Zelph’s heat output for slower burn times. And I find the plastic sealing cap (green) tends to loosen up over time and not seal as tightly.
Finally the Classic Trail Designs 12-10 Stove. Still a great stove and it boils a bit faster than the Kojin (but it’s close). It also holds more fuel so it’s better if you boiling a lot of water/cooking for multiple people. Downsides are: 1) the stove won’t easily fit in a pot with a sidewinder cone like the Kojin and Zelph stoves. 2) you can’t save fuel—you have to let the stove burn out after it boils. And 3) you have to use stakes, inserted into sidewinder cones to raise the pot up in the cone for optimal operation. So in my opinion, the Kojin is a far better stove than the the Classic 12-10.
What could be Better
The filler material doesn’t absorb fuel quickly as you pour it in. If you pour too fast some will run over the sides. Having a slight lip on the stove above the filler material would fix this. [Right now the filler material is flush with the top of the stove]. Workaround, for now, is to use a flip spout cap on your fuel bottle. This will give you the control necessary to easily fill the stove. Again, the Liberty Mountain Twin Neck Fuel Bottle is the best for this purpose.
I could wish for a bit more capacity than 40 ml. My biggest problem is over filling the stove after 3 to 4 uses. At that point I don’t really know how much remaining fuel is in the stove, and I can over fill if I don’t watch carefully. Even 50 ml capacity would be a help. Again the work around is to pour carefully from the spout of the Liberty Mountain Twin Neck Fuel Bottle.
Conclusion
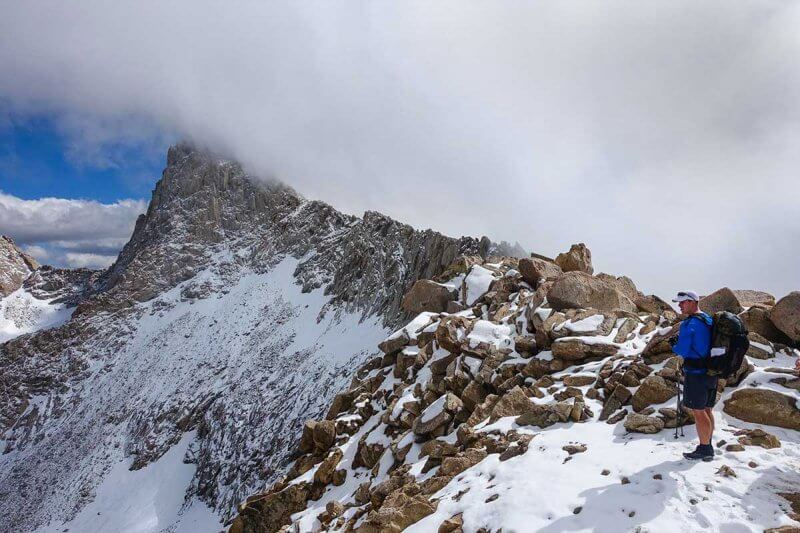
Since the first prototypes in May 2017, I’ve been field (and lab) testing the new TD Kojin Ultralight Alcohol Stove. After many weeks of use in the field, the stove has performed almost flawlessly. This included using it down to near single digit temperatures at 11,000 feet in the Sierras. The Kojin stove lit right up in the morning with no issues and quickly boiled my water. Because of this, the Kojin stove now goes on every trip with me — whether I am traveling solo or with my wife.
I used the Kojin stove in near single digit temperatures at 11,000 feet in the Sierras. The stove lit right up in the morning with no issues and quickly boiled my water.
9 Pound Full Comfort Lightweight Backpacking Gear List
A 9 pound pack is all you need to be safe and warm. So, if you want to lower your pack weight but retain all the convenience and comfort of “traditional” backpacking, look no further than this Lightweight Backpacking Gear Checklist.
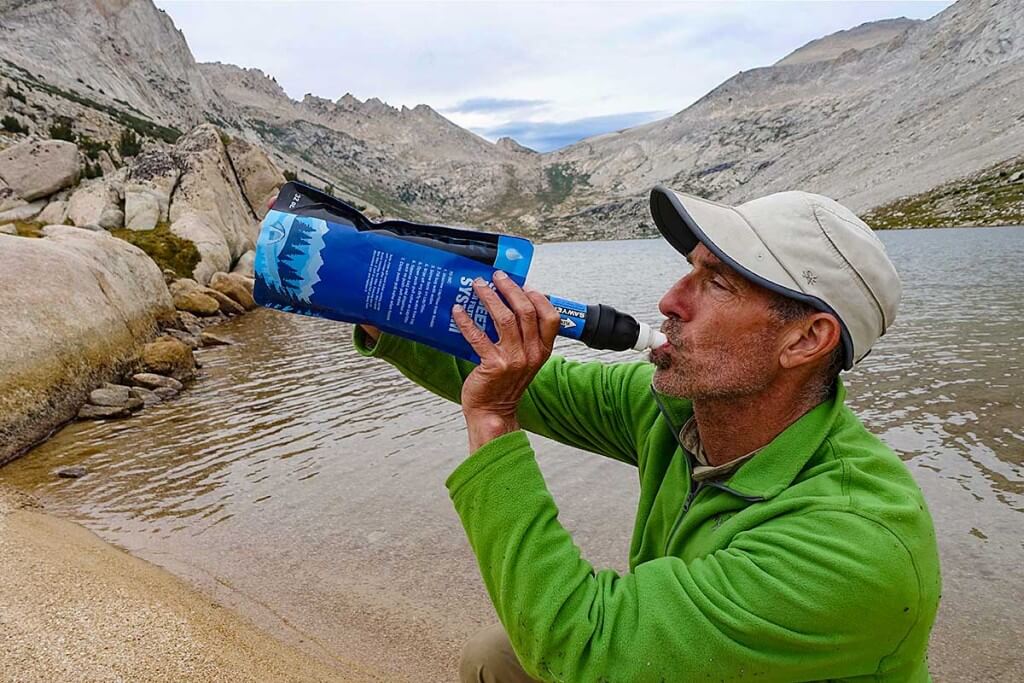
Viruses, pesticides & harmful chemicals in water are a concern for international hikers, and even areas in the US! Sadly, until recently there were no inexpensive & lightweight water purifiers that could handle all these contaminates. But a few months ago Sawyer solved this dilemma with their new Sawyer Select S2 Water Purifier Bottle. It removes viruses, bacteria, protozoa, harmful chemicals, and pesticides. Best of all, it does this in an inexpensive and easy to use bottle weighing only 10 ounces.
What’s Great About It
The combination of removing protozoa, bacteria, and viruses and pesticides, and other harmful chemicals (and even heavy metals like lead & mercury) is what sets the Sawyer S2 and S3 purifiers apart from all others. Few if any purifiers can remove all these contaminants, and certainly not at their low cost and weight. And surprisingly, you can start drinking purified water in just 10 seconds. It’s that easy!
The Sawyer Select S2 Water Purifier Spec’s
Removes 99.99% of viruses, 99.99999% of bacteria, 99.9999% of protozoa, cysts, chemicals & pesticides
Reduces chemicals to 0.5 parts per billion, up to 40 times lower than the EPA’s maximum rec. level
Reduces pesticides to 0.01 ppb, up to 400 times lower than the EPA’s maximum rec. level
Weight dry: 9.2 oz (260 g) on my scale — wet after use 13.0 oz (270 g)
Time to treat 10 sec. Time to drink from bottle immediate. Time to squeeze ~30 sec. for 20 oz capacity.
Note: The S2 Purifier has only been out a few months. As such this is an initial/short term review . Longevity and long term use has not yet been tested/determined.
The Sawyer Squeeze Filter (and Sawyer Mini) both eliminate protozoa and bacteria. But they don’t eliminate viruses, chemicals, pesticides, or heavy metals. And they don’t improve the taste or odor of the water. The Sawyer S2 eliminates all of these with the exception of heavy metals. (You have to upgrade to the S3 for heavy metal removal.) On the plus side, the Sawyer Squeeze has a much longer useful life, is much lighter, and costs less than the S2.
TIP:Soon you can convert your current Sawyer Squeeze Filter into a Sawyer Select S1, S2, or S3 Purifier by purchasing just the bottle and foam. This will save you $15 over the full system. [bottle & foam only option currently not available but Sawyer says they are coming soon] See more here…
Pump Filters that remove viruses like the MSR Guardian Purifier are quite expensive and heavy ($350 and over a pound). And even then the MSR Guardian Purifier does not eliminate chemicals, pesticides, or heavy metals. Note: most other less expensive pump water purifiers also do not eliminate viruses in addition to not removing chemicals, pesticides, or heavy metals. E.g. the bestselling MSR SweetWater Microfilter Water Filter and Katadyn Hiker Pro Clear Microfilter.
Chemical treatments don’t eliminate harmful chemicals, pesticides, or heavy metals. They are also not 100% effective in turbid water. The Sawyer Select S2 Water Purifier Bottle is much faster. Water is purified & drinkable in 10 seconds. In comparison, chemical treatments can take up to 4 hours to fully purify water. And you have to carry that water around with you until it’s fully treated. That means you’ll unnecessarily carry 2 to 6 pounds of water in your pack. Finally, chemical treatments leave a taste & some hikers don’t like introducing chemicals into their body.
UV sterilization e.g. the SteriPEN eliminates protozoa, bacteria, and viruses in a few minutes. But it doesn’t eliminate chemicals, pesticides, or heavy metals. Another downside: UV pens don’t have a good reputation for battery life & treatment capacity in the field. Finally, UV doesn’t work well with muddy, turbid water. In this case, you’ll have an added step of pouring your water through a pre-filter before using the SteriPEN.
How Does the S2 Work?
A new proprietary Adsorption Technology Foam1 is the key to the Sawyer Select S2 Water Purifier and is what sets it apart form the competition. The S2 Water Purifier consists of three main parts:
Flexible silicone bottle that holds proprietary adsorption foam.
Adsorption Foam Purifier Material1. This proprietary adsorption foam is the first stage of purification. It does almost all of the removal of harmful chemicals, pesticides, and viruses (e.g. Hep A, Hep E, Rotavirus, etc.).
Micro Squeeze Filter2 on top of the bottle. This is the second stage of purification. It removes bacteria (e.g. E coli, typhoid fever, cholera, etc.) and protozoa (.e.g giardia, cryptosporidium. etc.); as well as particulate matter & sediment.
1 The proprietary Foam Adsorption Technology used in Sawyer Select S2 Water Purifier (and S1 and S3 filters) was developed by a partnership between Sawyer and Foamulations LLC . It safely removes contaminants like chemicals, pesticides, and viruses (and heavy metals – S3 only). Adsorption filtration is the process in which harmful chemicals and viruses adhere to the surface of the adsorbent foam membrane. They are permanently captured (adhered to the foam) and neutralized.
2 The new Micro Squeeze Filter is the same diameter and the same flow rate as the Sawyer Squeeze Filter but is shorter and lighter. It uses the same 0.1 micron “Absolute Hollow Fiber Membrane.”
How to Use the Sawyer Select S2 Water Purifier
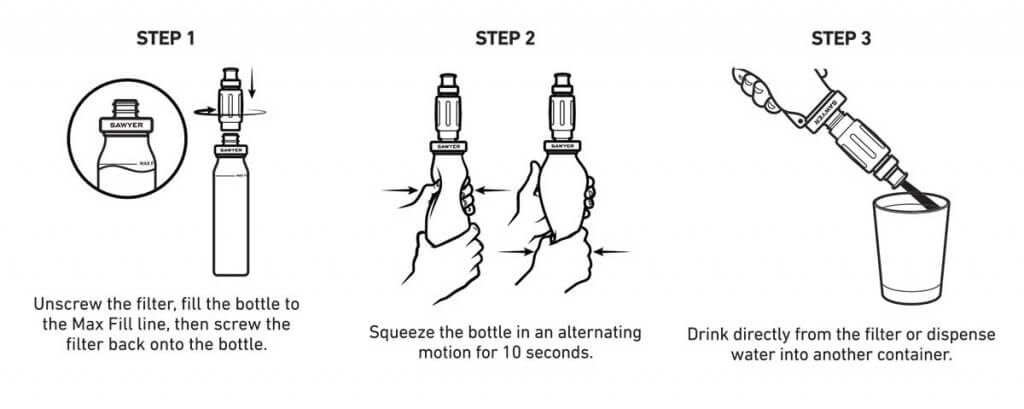
TIP1: The only thing I would add to these instructions is to use something like a widemouth 20 or 24 oz sports drink bottle to accurately pour water into the 0.75″ diameter opening of the S2 bottle. This 1) makes it easier to collect the water from a stream or lake. And 2) it allows you to make a clean pour without having any contaminated water dripping down the sides of the bottle. That way you can immediately drink from the S2 without worrying about untreated water dripping from the side of the bottle and into your mouth. [For fastest filling, it helps to hold the bottle at a slight angle when you pour the water in.]
Use instructions are right on the side of the S2 bottle.
Useful Life, Cleaning and Storage
Useful Life
The S2 bottle and foam filler last for 800 uses. That’s about 125 gallons. After that you can replace just the bottle and foam. Note: this is also an upgrade option for Sawyer Squeeze Filter owners.
Replacement bottle for S1 – MSRP $44.99
Replacement bottle for S2 – MSRP $64.99
Replacement bottle for S3 – MSRP $74.99
The Micro Squeeze Filter on top of the bottle has a useful life similar to the Sawyer Mini Filter’s or about 100,000 gallons (with backwashing as necessary).
S2 Bottle – Cleaning and Storage
A surprise, but the bottle and foam inside need no backwashing or sterilization between trips. Just squeeze out the excess water from the foam and stow the bottle covered with either the Micro Squeeze Filter or supplied white cap. That is, it’s best to keep the foam damp while in storage. Proprietary ingredients in the foam prevent bacteria and mold growth or bad smells developing. The S2 Bottle is not damaged by freezing.
Micro Squeeze Filter – Cleaning and Storage
Sawyer’s recommendations for post trip maintenance are the same as for the Sawyer Squeeze Filter. So while not absolutely required, it’s a good practice after trips to backwash the filter, sterilize it with a weak bleach solution and then let it air dry. This will promote filter longevity and maximum flow rates. [Instructions are on the outside of Sawyer Squeeze pouches.]
The Micro Squeeze Filter must be kept above freezing when wet.Water freezing in the filter can destroy the hollow fiber membrane. The easiest way to prevent freezing is to put the filter in a Ziplock bag and keep it in your pants pocket or other warm area during the day. And/or sleep with it at night.
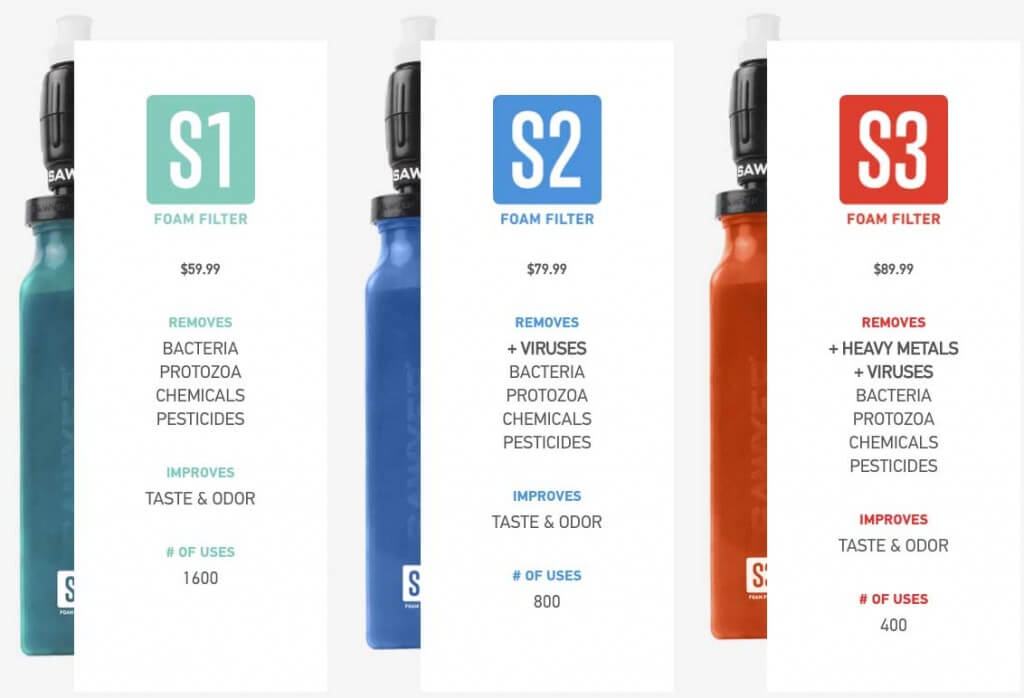
Comparison of the S1, S2 & S3 Water Purifications Systems
The S1, S2 and S3 all have the same components (squeeze bottle, adsorption foam, and Micro Squeeze Filter). What varies is:
Contaminates removed: S1 removes the least and S3 removes the most including heavy metals.
(The exact formulation of adsorption foam is what controls the contaminates removed)
Useful life: S1 lasts the longest at 1600 uses, and S3 the least at 400 uses.
Cost: S1 costs the least at $60 & S3 costs the most at $90.
Drink When Thirsty debunks the many myths about hydration and dehydration like “If you are thirsty, it’s already too late” and “If your urine is yellow, you are dehydrated.” This medically sound and well-researched article suggests that Drink When Thirsty is the best and healthiest strategy for hydration during exercise.
Disclaimers
This post contains affilate links. If you make a purchase after clicking on the these links, a slight portion of the sale helps support this site at no additional cost to you. I am never under an obligation to write page post a review about any product. Finally, this post expresses my own independent opinion.
The manufacturer provided the author a sample of this product for review.
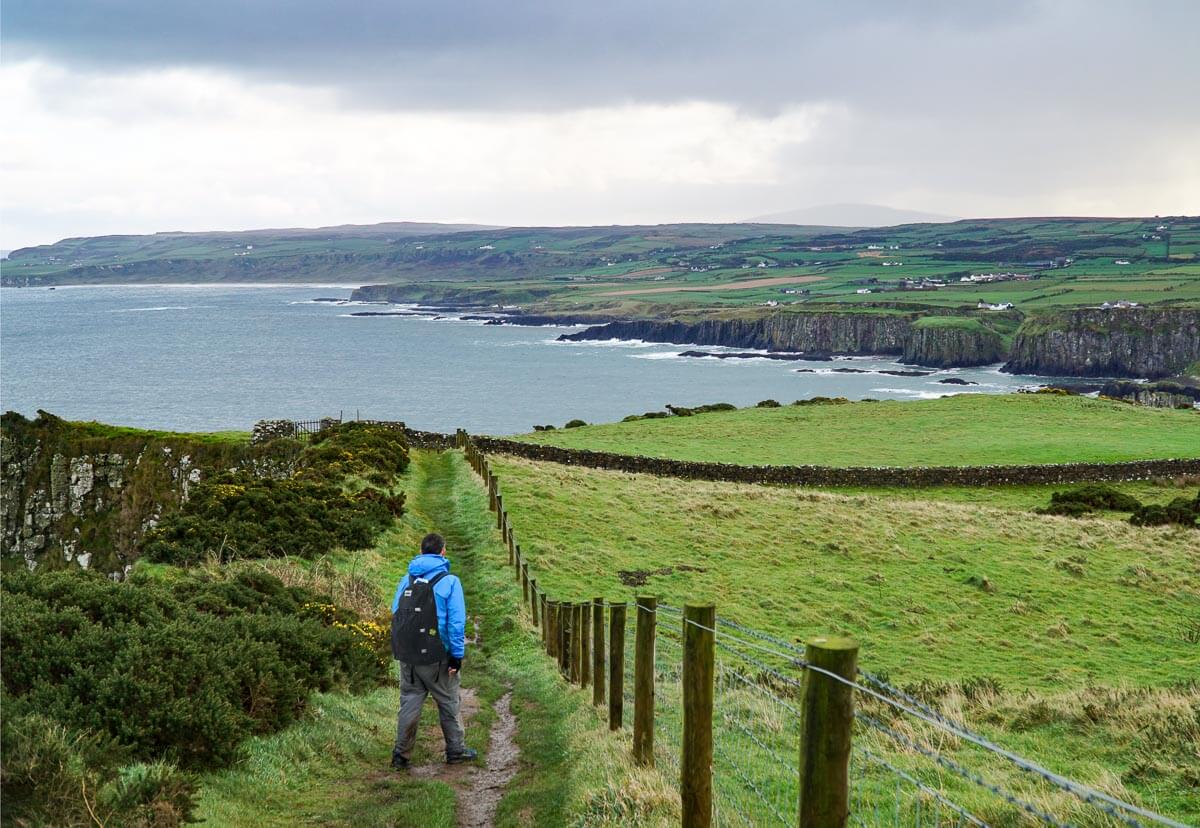
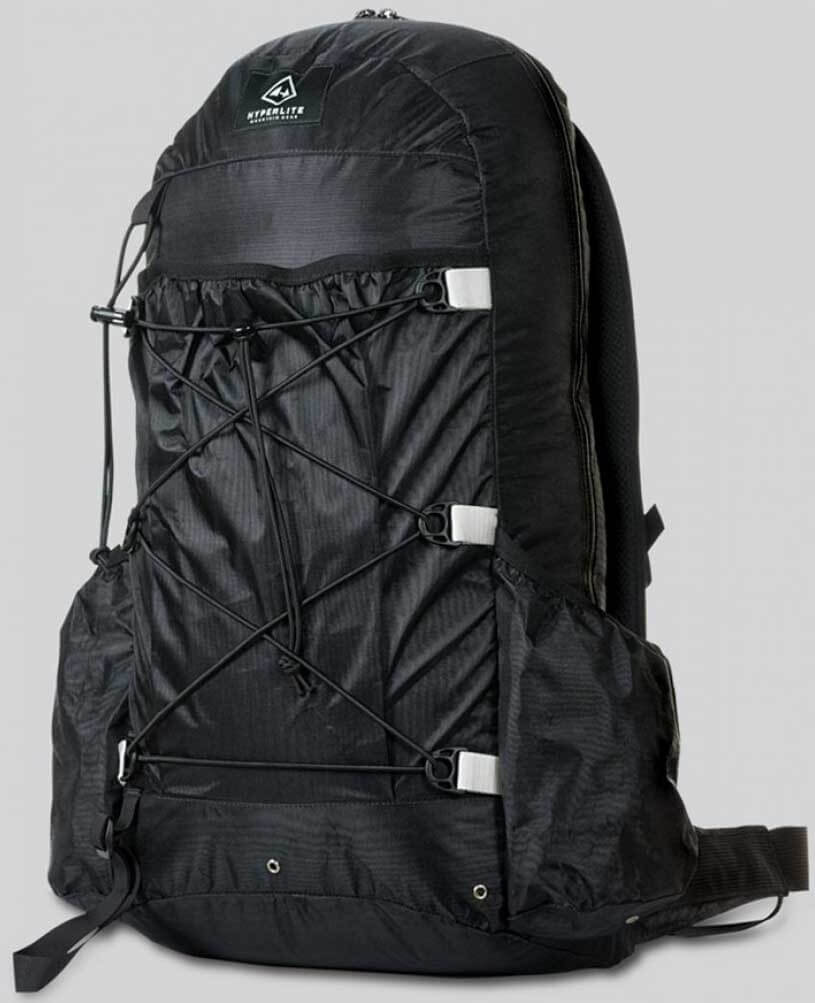
While the Southwest 2400 is our favorite backpacking pack, the Hyperlite Mountain Gear Daybreak Daypack is our favorite pack for every other need. It is the waterproof ultralight daypack that we trust with $5K to $10K of camera gear in rain soaked places like Iceland or the Northern Coast of Ireland. It is our under-seat carry on pack on the plane. Then when off the plane, we can live out of this same pack for a week of hiking in foreign countries. It is an alpine climbing, done-in-a-day pack. We also use it technical canyoneering, skiing for groceries in a winter blizzard, etc. In summary, it may be the best multipurpose ultralight daypack on the market. Oh, and it also won National Geographic Adventure Mag 2016 “Gear Of The Year.”
Alison on the very wet coast of N. Ireland. Her Hyperlite Mountain Gear Daybreak Pack has thousands of dollars of camera gear in it. This despite on and off torrential wind and rain for days on end.
5 Key Features of the Hyperlite Mountain Gear Daybreak Daypack
Skiing out to get food during the the Blizzard of 2016.
It’s nearly waterproof. Important when you’re carrying expensive cameras, electronics or clothing you’re depending on to stay warm, like a down jacket.
It’s tough. The black Dyneema Composite Fabric (DCF), is strong and waterproof, but still light. Pockets are durable, solid fabric.
It’s light.At just over a pound for a 17 liter capacity, it is significantly lighter than most waterproof packs.
Fast gear Access. The clamshell, waterproof top zipper gives faster access to the main pack-bag vs. packs with lids, or roll-top closures. The Daybreak has the perfect combination of external storage: a large bellows back pocket; two side pockets for water bottles, etc.; a nice rear bungie system that you can attach a helmet, crampons or rainwear, etc.; and additional attachment points on both the back of the pack and on the shoulder straps. In summary, you can carry a lot of gear, organize it well and access it quickly.
“Precisely what you need and nothing more.” And finally as with all HMG products the 20 ounce Daybreak Ultralight Daypack epitomizes HMG’s minimal but supremely functional design. As such, they’ve included small details like drain holes for the external pockets, a zippered security pocket for passport, wallet, cash and keys, etc.; and an internal sleeve pocket (I use for maps/papers on-trail and for my 13″ laptop when off-trail/traveling). Oh, and the waist belt is beefy enough to actually handle a decent load!
Walking the Causeway Coast Way in County Antrim, Northern Ireland. We rarely took our rain jackets off! photo: Alison Simon
5 Reasons We Like the Hyperlite Mountain Gear Daybreak Daypack
There are a number of cheaper functional daypacks. We’ve outlined some of our favorite daypacks in 3 lb Ultralight Day Hiking Checklist.So why is the $225 HMG Daybreak Ultralight Daypack our favorite?
When flying we use or Daybreak packs as our under-seat carry-ons. Then when off the plane, we can live out of this same pack for a week of overnight hiking in foreign countries.
First we carry a lot of expensive camera gear and electronics on every trip. A few hundred dollars to keep it dry and safe vs. the thousands of dollars of camera gear seems like a good investment. [In, fact we often use it as a dedicated camera bag/pack on some trips. It’s much lighter and more waterproof than many camera-specific packs that weigh 3 pounds or more.]
Second, we use our Daybreak Daypacks over and over again. As such the cost is very reasonable if you spread it out over many trips per year over a number of years. E.g. the pack goes on international trips (both carry on luggage and on-trail pack), X-country ski trips, surviving temporary immersion when canyoneering, mountaineering, and trips all around the world.
We know that our packs will survive whatever the terrain or weather dishes out. The fabric is strong and durable and up to bushwhacking and abrasion on rocks. It doesn’t have annoying mesh pockets that snag and tear on everything in creation. And we know that the inside of our pack will remain relatively dry. This is especially important to us since we seem drawn to hiking wet and cold places like Patagonia, Scotland, Iceland, and South Island of New Zealand, etc.
It’s excellent external storage keeps our most needed gear easily accessible. This is much faster and convenient vs. diving into the main bag for commonly needed items. The huge, rear pocket and shock cord attachment system are keys for this.
Finally, the packs are amazingly light given how waterproof and durable they are. Greatly appreciated as much when traveling as when we are on the trail.
SPECIFICATIONS – DAYBREAK ULTRALIGHT DAYPACK
Price: $225
Volume:Internal: 1040 cu. in. (17L) Load capacity: Up to 25 lbs
Weight
Small 1.26 lbs | 20.14 oz | 571g
Medium 1.27 lbs | 20.35 oz | 577g Large 1.29 lbs | 20.56 oz | 583g
FEATURES
Large external front pocket, great for hydration/snacks/rain jacket
Removable ice axe attachments
Front shock cord system allows you to lash gear or compress the pack
Two angled side water bottle pockets that are easy to reach while wearing the pack
Clamshell design and long water-resistant YKK zipper allows for wide pack access
Lightly padded 1.5” hip belt with peekaboo pocket to store hip belt when it’s not in use
Internal zippered pocket designed to hold phones/keys/money/etc
Internal sleeve pocket helps to compartmentalize your gear (also fits a 13” laptop)
Bright orange liner makes it easy to see what’s in your pack
Comfortable ¼” padded back panel with chevron-stitched design
Dyneema® Hardline shoulder straps with ¼” foam, spacer mesh and elastic hose keepers
This post contains affilate links. If you make a purchase after clicking on the these links, a slight portion of the sale helps support this site at no additional cost to you. I am never under an obligation to write page post a review about any product. Finally, this post expresses my own independent opinion.
Hyperlite Mountain Gear provided the author a sample of this pack for review.
Many stunning outdoor photos are shot with smartphones. BUT most are no accident. The photographer used good basic techniques & inexpensive gear to get that great photo. The good news is that you too can do this with the 10 following hacks and accessories for better smartphone hiking photography.
The Newest Smartphone Cameras Kick Ass!
The new iPhones (and other high-end smartphones like the Google Pixel) are intensely applying “computational photography” (sophisticated software image processing) to significantly improve photos. This includes dynamic range (ability to handle large differences from the lightest to darkest parts of the photo), color, contrast, texture, and even focus to their photos.
The improvements can be dramatic.So much so, that many times the photos from the new smartphones often look better than photos from much larger “traditional” DSLR cameras. It may take a lot of editing of photos from a traditional camera to clearly see the benefits of a larger sensor. That being said, this article will help you get the very best out your smartphone camera.
The best hiking camera is the one you have with you. For me, that most often is my iPhone. I used my iPhone 6+ to quickly grab a spur of the moment shot of my wife cat napping on warm November afternoon. [And my new iPhone X would have taken an even better photo!]
10 Hacks and Accessories for better smartphone hiking photography
10 Hacks and Accessories for better smartphone hiking photography
For only $25 and some basic technique, you can take far better photos with your iPhone or Android.
Take the photo! Don’t ever think your smartphone camera is holding you back. As hockey great Wayne Gretzky says, “you miss 100% of the shots you don’t take.” The same applies to photography, maybe more so. Grab your smartphone and start shooting. Some of my best photos were taken on a lark. An “I wonder what this will look like attitude” pays off!
Clean your camera lens. It’s likely filthy! That layer of grime will make every photo worse.
Avoid any case covers over your lens (unless absolutely necessary).
Get an App for manual control of your camera.Camera+ is a personal favorite for it’s ease of use and power. It also has decent photo editing capabilities.
For Android: Open Camera (free), Camera FV-5, and VSCO
Note that your Camera App doesn’t need to be complicated or hard to use. All you really want is control over ISO, shutter speed and focus area. This is mostly for shooting off the tripod in the magic light of dawn and dusk. [Ideally, you want to manually set focus and a low ISO (around 32) to get the best images.]
Tip: Get the best quality photo negatives from your smartphone. If you will be doing serious editing of your photos (see #9 below) then use your camera app to also save in RAW format.
Get a small tripod: This eliminates camera shake, and blurry photos in low light.
Get a remote shutter button: This prevents photo blur when you press your camera to take a photo (the camera moves/vibrates while touching it). It’s also fabulous for high quality selfies (e.g. without your face smashed into the phone see more on this below).
Or use the 2 or 10 second timer setting for your smartphone camera
Or a little known free feature: Your iPhone wired headphone set works as a remote shutter button. Just press the ‘+,’ volume up button to take a photo!
Get closer to your subject and fill the frame (if you can).
Closer is almost always better! So walk, scramble or climb closer to your subject.
DON’T USE YOU CAMERA’S ZOOM! (unless you have one of the new dual lens cameras like the iPhone 7+, 8+ or X. Then go ahead and use that ‘2x’ button.)
All your smartphone’s “zoom” function does is pre-crop your photo. You aren’t getting any more pixels or resolution than if you just cropped it yourself. As such, you might just as well have the additional area around your subject in case you want to use it later.
Try and shoot with the sun behind you, or around 90 degrees from the sun (sun to your left or right.)
If you shoot into the sun, light will fall directly onto your camera lens. This will create washed out low contrast photos lacking in color and detail.
If you absolutely need to shoot into the sun… you can try and shade the lens with your hand, but this can be difficult to do and still tap the shutter button. Sometimes a friend’s hand is a big help.
Take a breath and carefully REVIEW YOUR PHOTO after taking it!You’ll likely not get a 2nd chance, so make sure it’s right.
Sharpness: Enlarge your photo and scan it. Is everything you want in focus, especially critical areas like people faces/eyes & foreground detail?
Exposure: Correct overall exposure? Is there some detail in both shadows and highlights?
Dim Light Problems: Any camera shake (overall photo blur) from a low shutter speed? Smudging, poor color and other nastiness from a high ISO?
People: Eyes open? Good expression? Awkward position, clothing malfunction?
Extraneous Objects: Any odd objects in the photos. E.g. trekking poles you left in the foreground, piece of garbage, somebody photobombing, etc.? Also, make sure you didn’t inadvertently cut off something critical like the top of a mountain.
Use a good photo editing app likeSnapseedto dramatically improve the look of your photos. Spending just a few minutes editing can transform a so-so photo to something special. Many of these programs are free and simple to use.
My personal favorite is Snapseed but some apps like Camera+ also have decent editors.
Tip: Use your camera app to also save in RAW format to give you the most latitude to edit your photos. The RAW file has more dynamic range (ability to capture a larger range of lights to darks without losing detail). E.g. clouds and other light objects will still have good detail while the normal (JPEG or HEIF) files will not.
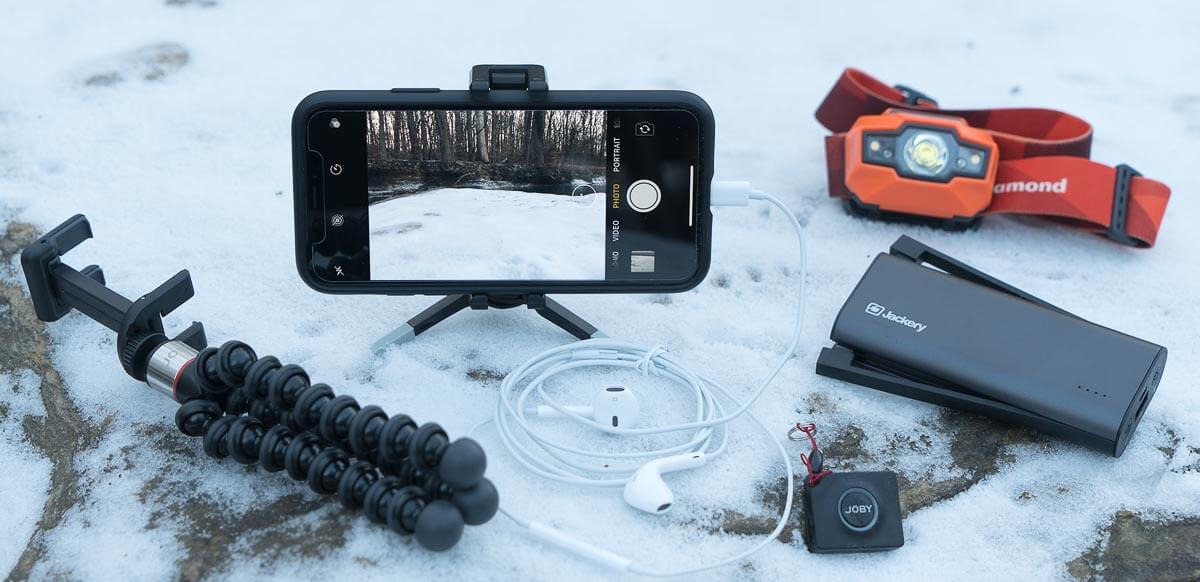
Manage your battery life and carry a backup battery.
Manage your battery life. Nothing is worse than having an incredible photo opportunity in front of you and pulling out a dead smartphone. With good battery management I get 7 days on trail use hiking with my iPhone. Read more on battery management here. The best batteries for charging smartphones are:
The 5 oz EasyAcc 6000mAh USB Battery. The highest capacity for its weight, it charges a smartphone 2 to 3 times. I use it on 7-14 day backpacking trips. It has a built-in micro-USB connector and you can connect a lightning cable to its USB port. So you can charge lightening and micro-USB devices at the same time.
Jackery Bolt 6000 mAh USB Battery. This has faster charging and both micro-USB & lightning connectors. Downside is it has slightly less overall tested (vs. claimed) capacity than the EasAcc.
6 Bonus Hacks
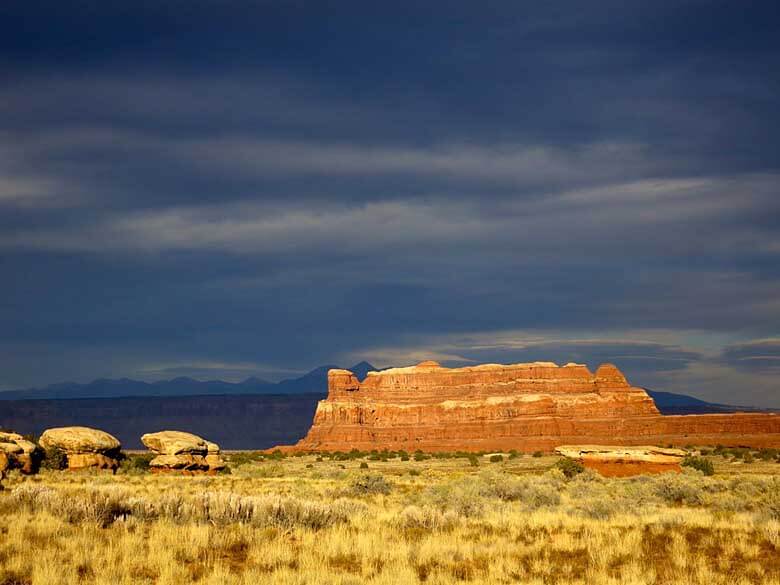
Take the photo! Don’t ever think your smartphone camera is holding you back – I took this shot with a cheap 2011 point & shoot camera but my current iPhone X would have taken a better photo! The major point is that I had a camera and made the time to take the photo.[Pic is Canyonlands UT: An ugly storm of sleet & snow was about to break when a sudden opening in the clouds illuminated the bluff in front of me. I had less than 30 seconds to extract the camera from my pocket, get it out of a waterproof baggie and take the shot before the sun was gone and the heavens opened.]
Take High Quality Selfies.Use one of the small tripods and a Bluetooth Smartphone Camera Remote Shutter. That way you and your friends can easily pose in a picturesque spot many feet from your phone and casually press the remote shutter to take a great photo!
Shoot in the “golden hour” of dawn and dusk.This is when the pro’s shoot. Take the time when you get into camp to scout out some good areas to shoot at dawn and dusk. Then get there with plenty of time to setup and wait for the light show to unfold.
A headlamp is a big help to hike there/setup in the dark, and/or to takedown and hike back in the dark. Use a good Headlamp with a dimming function so you can have low light for not blowing your eyes out when setting but also have a very bright light for hiking.
Protect your smartphone in the field and save weight and money. Rather than bulky, awkward and expensive cases like an OtterBox Case, use the following items:
Pint Ziplock Freezer bag. I highly recommend using a Pint Ziploc Freezer Bag used to protect your smartphone from dust, scratches and water (effective, lighter and less expensive than elaborate waterproof cases! And it works well for other electronics.).
Take dreamy blurred water photos.Using Apples new “LIVE” mode or using an app like Slow Shutter Cam. Note that you WILL need to use a tripod and a remote shutter button to get best results. (see above for gear details).
Final Hack – Improvise a “Tripod” to Stabilize your Camera
You can get much of the benefit of a tripod to stabilize your smartphone by improvising a “tripod.” You can brace your smartphone up against a rock, tree, or even hold it against your trekking pole. Remember to squeeze off that shutter gently! Every bit of stability helps to get a sharp photo.
Or better yet, you can use folded garment (or other prop) on top of a rock, or fallen tree to make an improvised tripod/camera rest. Now that you are not holding the camera, remember to put the shutter release on a 2-second delay for sharpest results. But many times pressing the camera will bump it out of position or knock it over. In this case, use a bluetooth remote shutter release (or for iPhone users, remember that your headphones as a remote shutter button) see details in hacks above.
Additional Reading
Best Backpacking Cameras 2017 – This highly ranked article lays out the best gear and technique for larger, non-smartphone cameras.
This post contains affilate links. If you make a purchase after clicking on the these links, a portion of the sale helps support this site at no additional cost to you. I do not receive compensation from the companies whose products are listed. For product reviews: unless otherwise noted, products are purchased with my own funds. I am never under an obligation to write a review about any product. Finally, this post expresses my own independent opinion.
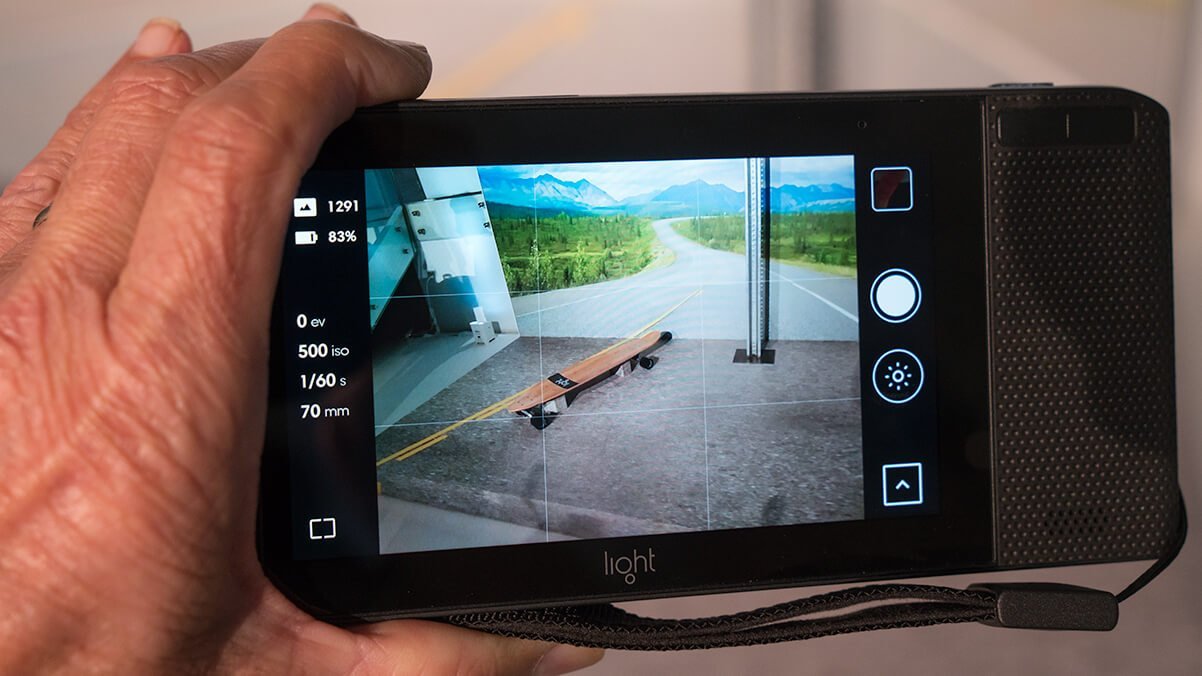
The Light L16 is one of the first “computational” cameras to hit the market. If it works it’s a game changer for high resolution and lightweight photography. Especially for hikers, backpackers, outdoor adventures, travelers or anybody that needs a light, pocketable camera that can produce a 52 megapixel image! And it has the promise of not needing to be traditionally focused. That is, you can determine where and how you want to focus a photo AFTER you take it. So how does the L16 hold up to the hype and high expectations?
The Light L16 is much smaller and lighter than a conventional camera that takes a 50 megapixel photo. And it has a simple smartphone-like interface—not so surprising since it is an Android-based, touchscreen device. This make the L16 much faster and easier to learn and use than all the knobs, dials and nested menus on a conventional camera.
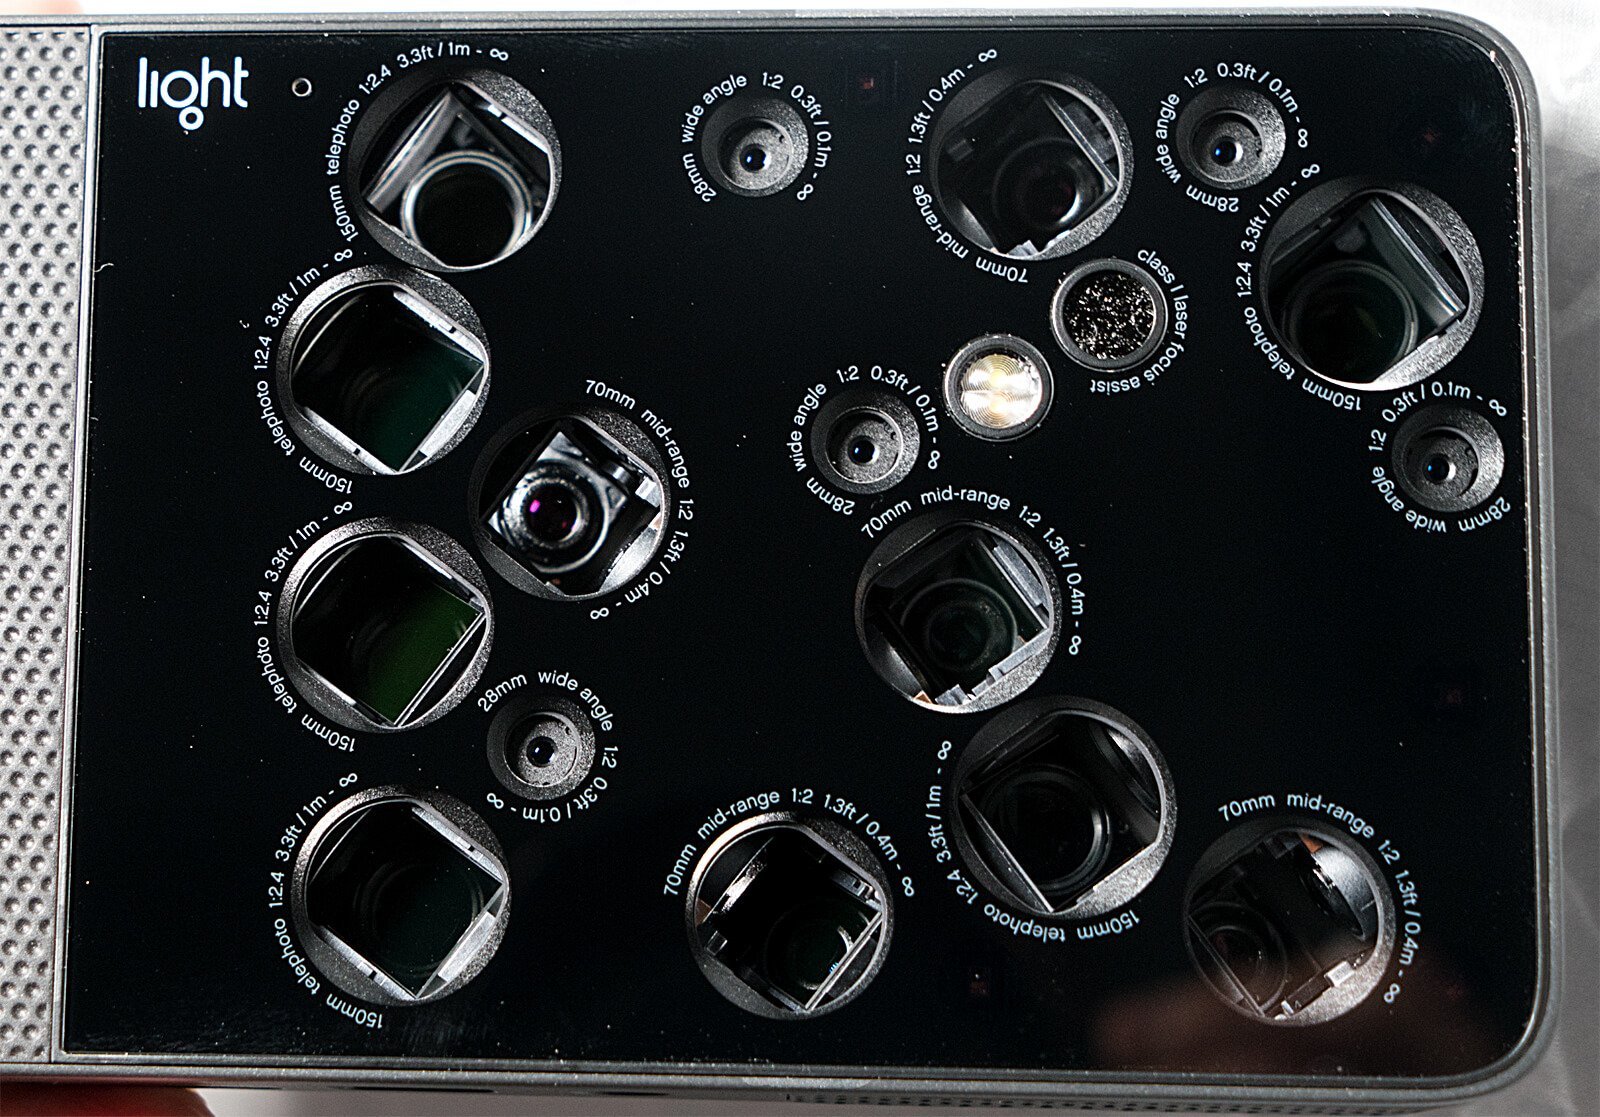
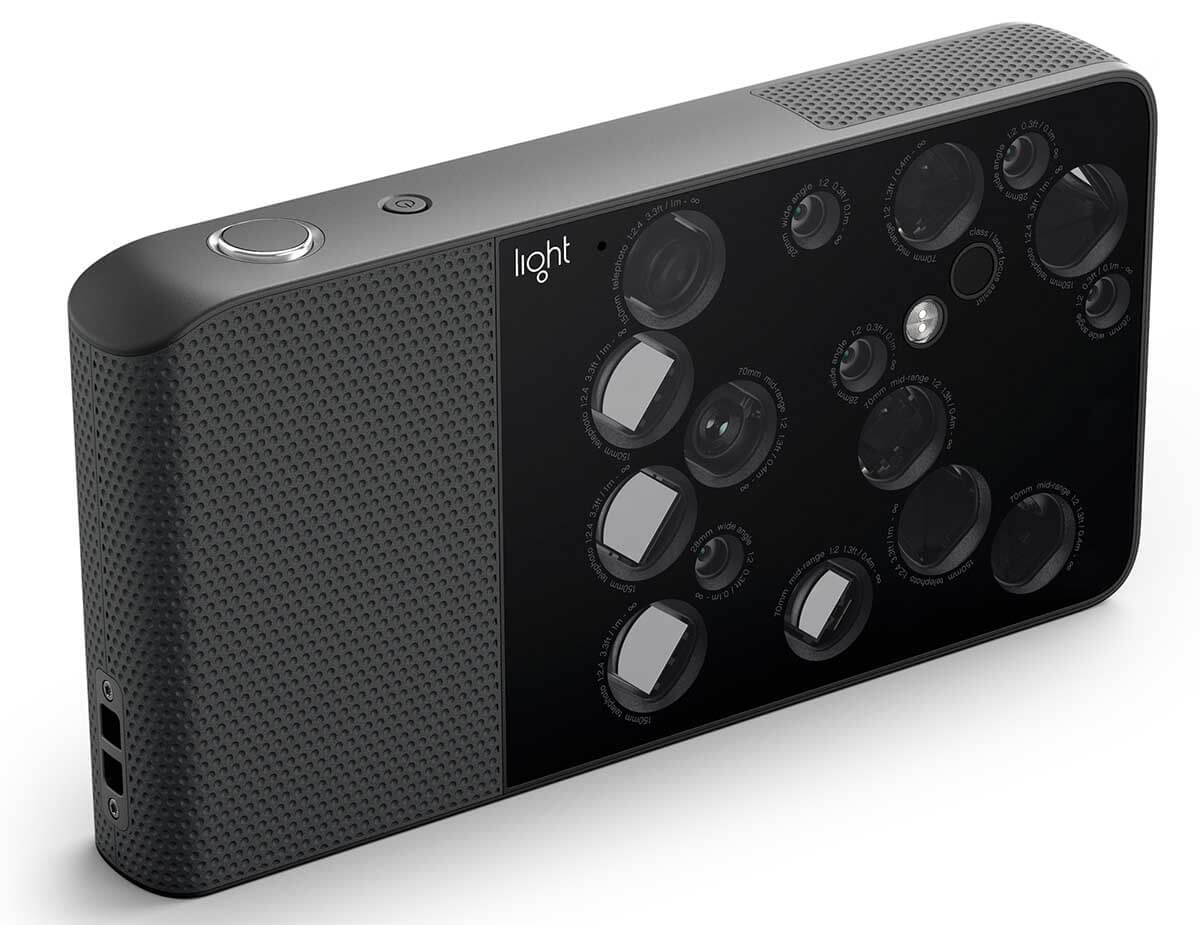
The Light L16 is a completely new approach to high-resolution photography. It’s a computational camera. That is, a camera that combines the information from many small, inexpensive “smartphone” lenses/sensors, arrayed across the front of the camera like spider eyes, into a single high resolution image. This is done by sophisticated, “computational,” imaging software that merges the data from the camera’s 16 lenses of different focal lengths (wide angle, normal/portrait, and telephoto lenses) into a single photograph.
The Light L16 is exceptionally small and low-weight for a 52 megapixel zoom camera. It looks more like a slim smartphone vs. a bulky, awkwardly shaped, conventional camera with a big lens sticking out. It’s half the weight of the lightest comparable conventional cameras with similar resolution and lens zoom range (28mm to 150mm).
To take a single high resolution image competing with much larger cameras, the Light L16 combines the information from many small, inexpensive “smartphone” lenses/sensors, arrayed across the front of the camera like spider eyes. Pictured is the L16’s lens array of (5) 28mm f/2.0, (5) 70mm f/2.0, and (6) 150mm f/2.4 lenses for a total of 16 lenses. The white circle slightly off-center is the camera’s LED flash. [click on image to enlarge]
Hands on First Look at the Light L16 Computational Camera
Last week I got a few hours of hands on use with the new Light L16 camera. Here’s my take after using the camera, looking at it’s post processing software and talking with a some of Light’s technical staff. Note: This was a short time. Some of it in a controlled environment, although I did get some time to wander around New York City at night with the camera and do some street shooting. Fun!
Slim profile and pocketable. (Somewhat larger than an iPhone 8 Plus or Samsung Galaxy)
No moving parts. Fewer failure modes, limited area for dust and water entry.
Can adjust depth of field AFTER taking the shot.
Light says that “Adjust focal plane [the actual place of focus in the photo],” is coming in the next release of Lumen software—maybe a week away. This will be a game changer!
5x “optical” zoom. 28mm to 150mm zoom range (35mm equivalent). This is done with multiple 28mm, 70mm and 150mm fixed lenses arrayed on the front of the camera.
Simple smartphone like interface with touchscreen operation. Fast to learn and use.
Frequent software upgrades vs. a conventional camera.
The Light L16 looks more like a slim smartphone vs. a bulky, awkwardly shaped, conventional camera with a big lens sticking out. At 15 oz it’s half the weight of the lightest comparable conventional cameras with similar resolution and lens zoom range (28mm to 150mm). It has no moving parts, which means far fewer failure modes and limited area for dust and water entry.
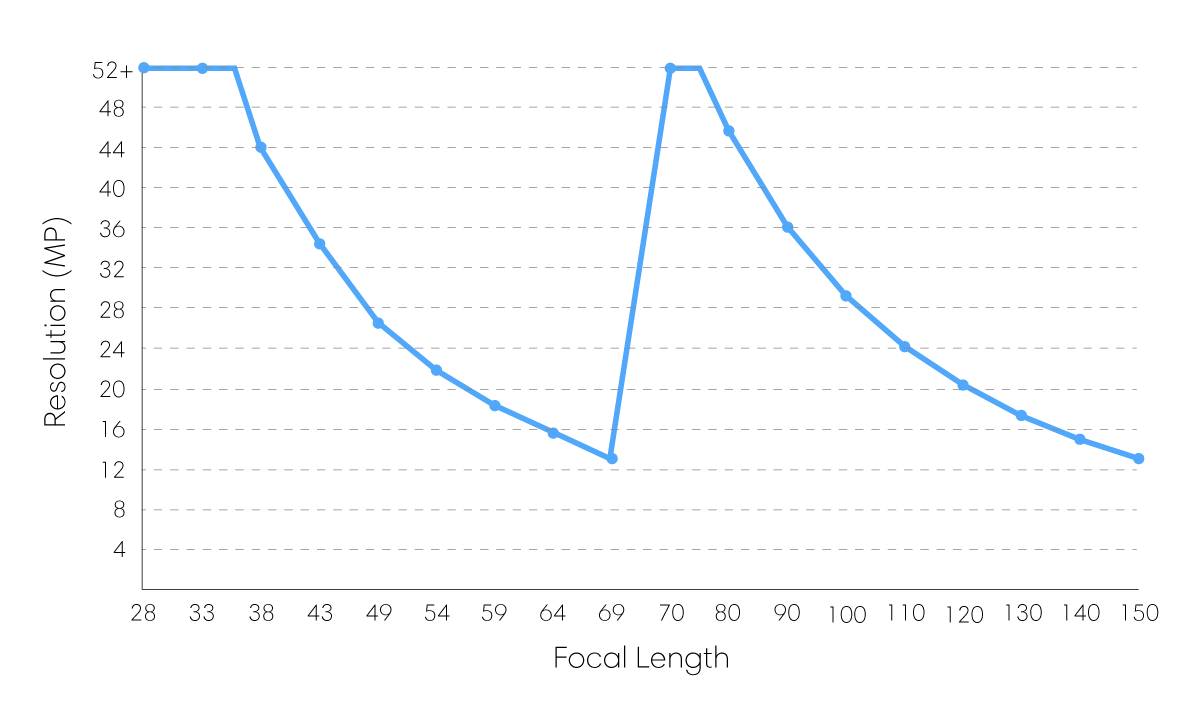
NOT THERE YET and CONS
Full 52 megapixel resolution is only at a few focal lengths. The L16’s “variable resolution” is lower than 52 megapixels at other focal lengths. So the L16 is not quite the same as a fully optical 28-150mm zoom on a conventional camera which has fairly consistent resolution across most of it focal range. According to Light ‘The “ideal” focal lengths to shoot at for maximum size and quality across the entire image are 35mm or 75mm.’ On the bright side, these are respectively excellent focal lengths for landscape and portrait work.
No image stabilization.
Low light, high ISO performance not there yet. Light suggests a maximum working ISO of 800. This makes some sense with the small size of its smartphone sensors. Altho over time Light may be able improve upon this with software. That is, combining/processing the information from all the sensors to reduce noise and improve ISO. After all the sum of the combined area (10) 13 megapixel sensors is the equivalent of a much larger sensor.
The following two above likely limit the camera to tripod only use in low light, including the “golden hour” favored by photographers.
Dynamic range 1 to 2 stops less than competitive conventional digital cameras like the Sony a6500 (claimed by a Light tech rep. to be in the range of 13 stops). This makes sense due to the small size of smartphone image sensors. Again Light.co believes they the can improve upon this via software for reasons similar to the ISO bullet point above.
Video not yet available. When it is, it will be 4K video shot at a single 28mm, 70mm or 150mm (focal lengths at full frame equivalent)
No sophisticated, multi-zone exposure metering. Just center weighted, touch to set focus zone, and manual
No replaceable memory storage, e.g SD cards. Instead has 256 gb of permanent internal memory.
No smart focus, e.g. the camera making an intelligent focus point choice using hundreds of points across the image. Instead, you manually touch the screen where you want focus. If not the camera defaults to focusing on the center of the screen. Focusing can be slow at times.
No exposure bracketing, HDR modes, or similar exposure management features.
No remote control operation, e.g. remote shutter release to avoid camera shake shooting from a tripod.
Camera is always at full aperture. Without ND filters it will be difficult to get long exposures necessary for blurred images, e.g. flowing water.
Built in, non-replaceable battery claimed to get about 500 shots. So you either need to shoot with it tethered to an external USB battery. Or wait 1-3 hours to recharge and use it again. Charging takes 1-2 hours with the Li16’s 15 volt charger, or a 2-3 hours with a conventional USB power source/charger.
No lens hood/shades available. No way to mount specialized filters like neutral density or polarizing.
It has no viewfinder. So, like a smartphone the display can be hard to see in bright light.
Only 25% resolution image preview in the camera (e.g. 13 of 52 megapixels)
Not off-the-shelf: New pre-orders should start shipping on Q1 2018. (2015 pre-orders started shipping in July and continue to ship out…)
SUMMARY
AS of right now the Light L16 has the basic functionality of high resolution camera. In good light and at certain focal lengths, it takes high resolution, ~50 megapixel photos. It’s small, light and easy to use with it’s simple smartphone-like interface. There are no moving parts or items sticking out making it ideal for people on the go (like hikers , backpackers, travelers and outdoor adventurers of any ilk). Just pull it out of your pocket and take good, high resolution photos. And it offers truly new features like adjusting depth of field after you take the picture (and hopefully, in the near future, the ability to adjust focus point after you take a photo). In all, it’s an extremely attractive camera that’s half the weight and far easier to use than a conventional camera!
Even in its current level of deployment/evolution I can see using the L16 for backcountry photography
Shoot off of a tripod, and keep ISO around 100
Shoot at or near one of its prime focal lengths; ~28-35mm, and ~70-75mm
Take my time to get focus right by touching the screen where I want focus
Use timed shutter delay (hoping for a remote soon)
Manually do bracketed exposures if needed
Hand shade lenses as best I can if needed
Carry a backup USB battery
And to be truthful this is how I would normally take a serious photo about 80% of the time anyway.
Where the Light.c0 L16 falls short is that it lacks many of the features and nuances of conventional single lens/sensor digital cameras in the same price range.
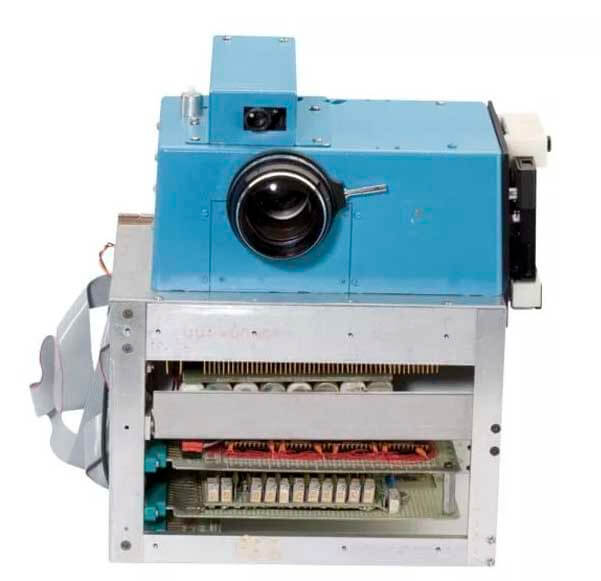
That’s not surprising, since conventional, single-lens digital cameras have been constantly refined and improved for over 40 years (“first” digital camera was a 1975 Kodak prototype by engineer Steven Sasson). The Light L16 has only been in design/development for a few years and in production for a few months. As such, the Light L16 lacks image stabilization, good low light performance (high ISO), multi-zone exposure metering, smart focusing, exposure bracketing, remote shutter release, lens hoods, and a number of other features that are pretty much standard on conventional, high-resolution cameras for serious photography that are in the same price range. Some features like smart focusing, good low light performance, exposure bracketing, and remote control can likely be improved upon or added via software upgrades— a clear benefit of being computational. Other physical features like image stabilization, a non-replaceable battery, non-replaceable memory (e.g. SD cards), and lack of filters and lens hoods will be harder to address (altho third parties could make aftermarket solutions for some, similar to what has happened for smartphones).
Conventional, single sensor, single lens digital cameras have come a long way in 40 years! Pictured is the first digital camera designed by Kodak engineer Steven Sasson in 1975. The camera weighed 8 pounds and had a 0.0009 megapixel sensor (100 x 100 pixels). [Photo – the George Eastman House]
The Verdict is Still Out
As a serious hiker, backpacker, outdoor adventurer, and globetrotter who travels light and wants great photos… I really want the Light L16 to achieve its promise! And it’s the L16’s reliance on software rather than hardware gives me hope. It seems that many of the L16’s current shortcomings and missing features can be improved upon and added over time via their “frequent” software updates. Case in point, I belive that AFTER-taking-a-photo, focus plane adjustment is coming very soon. As I write, a Light representative says “This feature will be available when we release the new version of Lumen in about 1 week.”
I wish Light all the best in quickly addressing many of these issues I and others have raised, to make the L16 the game changing camera it could be. And if it isn’t the L16 v01, it will be v02 or another computational camera. When you reflect on the improvements to conventional digital cameras over 40 years… just think of what 5 to 10 years of development and refinement of computational photography might achieve!
Specifications as of Nov 1, 2017
Approx. dimensions: 6.5 in. (165mm) x 3.3 in. (84.5mm) x 0.94 in. (24.05mm)
Approx. weight: 15.3 oz. (435 g)
Chassis Die-cast aluminum alloy
Grip: Rubberized non-slip grip with a lanyard connection
Screen: 5″ FHD touchscreen
Lenses: 16 individual modules- 5x28mm f/2.0, 5x70mm f/2.0, and 6x150mm f/2.4 (Focal lengths at full frame equivalent)
Sensors: 16 individual 13MP sensors
Minimum focus: 10cm at 28mm, 40cm at 70mm, 1m at 150mm
Storage: 256GBUSB on-the-go compatible
Capacity: 1000+ images
Effective pixels (megapixels): Up to 52 million+ (52+ MP)
Output: File types – JPEG, DNG, LRI
ISO sensitivity: ISO 100-3200
Shutter speed: 1/8000 to 15 sec. Fastest shutter speed 1/8000 Slowest shutter speed 15 sec.
Video (coming soon!): 4K video with 28mm, 70mm or 150mm focal lengths at full frame equivalent
Image processing – L16: 5MP optimized for social sharing
Image processing – Lumen: Process photos, Adjust depth of field, Edit depth, Adjust focal plane (coming soon!), Export photos for further editing
System requirements – Lumen: All systems, 8 GB or more of RAM (16 GB recommended), 200MB of available hard-disk space (1GB recommended), 64-bit processor
Mac: 2012 or newer (recommended) OS X version 10.11 (El Capitan) or higher
PC: 2012 or newer (recommended) Windows 7 with Service Pack 1 or Windows 10
Sharing: Wi-Fi (on-camera browser), Bluetooth to Android or Windows, iOS (coming soon!), Direct social integration (coming soon!)
https://www.adventurealan.com/wp-content/uploads/2017/10/light-L16-front.jpg8001200Alan Dixonhttps://www.adventurealan.com/wp-content/uploads/2023/05/Adventure-Alan-Co-Logo.pngAlan Dixon2017-11-01 17:17:552017-11-01 23:00:20Light L16 Computational Camera – Hands on First Look
Hyperlite Mountain Gear boldly calls their $450 rain jacket THE SHELL, and states “this jacket is unprecedentedly breathable, waterproof, and tough as f*#k for its weight.” To see how well it stands up to the hype & price I took THE SHELL out for two weeks of guiding at 10,000 to to 14,000 feet in the High Sierras. The following Review of Hyperlite Mountain Gear THE SHELL summarizes my findings.
(Lead picture: THE SHELL is roomy, especially in the upper torso, arms, shoulders and hood. To demonstrate this I’m wearing it over my super-puffy GoLite Bitteroot Jacket which is stuffed with over 5 oz of high fill power down—something most snug-fitting 6 oz waterproof-breathable (WP/B) rain jackets can’t do.)
Quick Spec’s
5.8 oz claimed weight M’s medium (6.0 oz measured)
THE SHELL kept me dry in a torrential weather event in the Sierras. It started with snow and sleet and progressed to 35 degree rain for the next 4 hours. In just a few hours sections of trail were 4 to 6 inches under water. When it was all done, I fared much better/drier than the rest of our group. [Apologies for the “phone-quality” photo, but it was dark, pissing down rain and I wasn’t going to get my good camera out.]
Field Testing
We had the full spectrum of late season conditions in the High Sierra. Snow, sleet and sustained 35 degree rain. For 4 days, the low temperature was 13 to 19 degrees, and daytime highs barely rose above freezing. The average temperature one day was only 26 degrees. I used THE SHELL over my fleece as an active layer during this cold snap—and it was breathable enough that I didn’t sweat out. THE SHELL fit well over my super-puffy GoLite Bitteroot Jacket to increase it’s warmth on cold nights (the jacket is un-baffled). And finally the jacket kept me warm and dry in a torrential storm of snow and sleet, changing to sustained 35 degree rain.
The Hyperlite Mountain Gear THE SHELL did everything everything required of it and did it well. It kept me warm. It kept me dry from precipitation on the outside. It kept me from sweating out on the inside due to the eVent breathability (but note that I mostly used it in cold weather). It was small and light, so easily carried and available in the outside pocket of my pack. The roomy, non-constricting, climber’s fit was especially welcome as was the stiff hood brim and the sophisticated adjustment system.
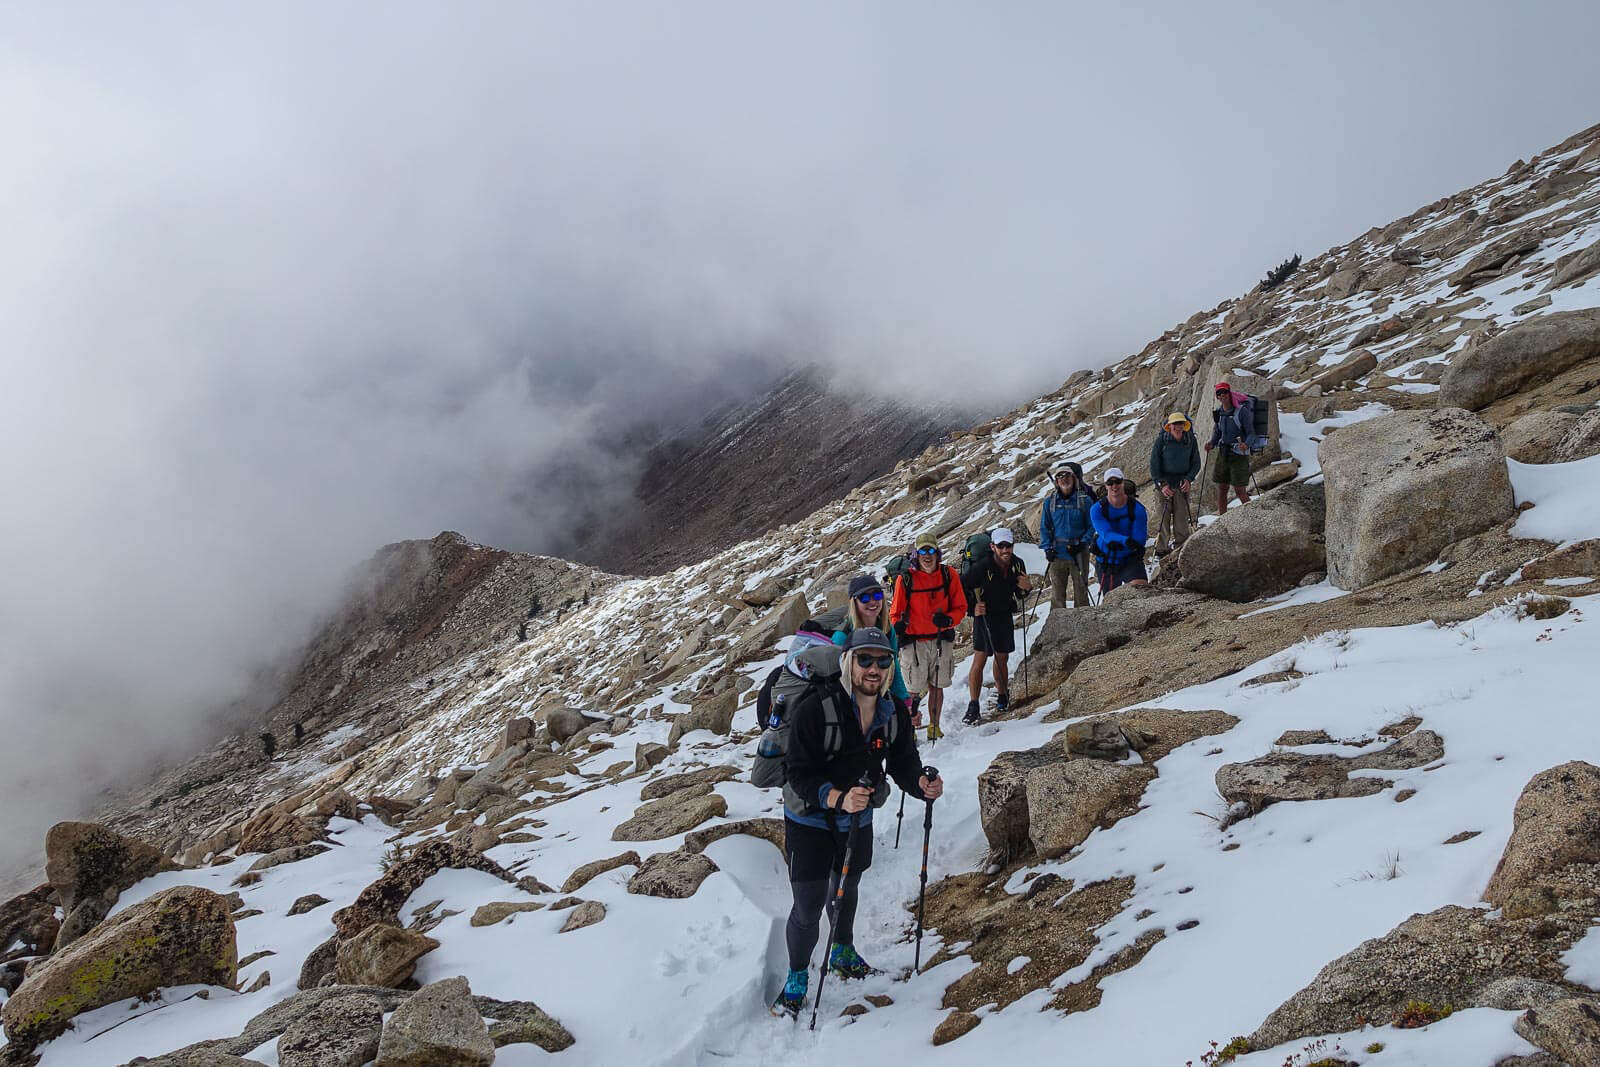
Mid afternoon conditions for my guided group at 11,000 feet during the colder time in the Sierras
Compared To
Patagonia Storm Racer (6.3 oz, $249) is likely the strongest competitor – THE SHELL has more room in upper torso, shoulders and arms; is more breathable, and has more sophisticated adjusters for hoods and sleeves. The outer fabric on the THE SHELL is likely tougher. The Storm Racer is a 3-layer fabric, so the WP/B layer might be less prone to damage from long term use due to a tricot lining. And the Storm Racer has a more useful Napoleon chest pocket vs. the hip pocket on THE SHELL.
Outdoor Research Helium II (6.2 oz, $160) – THE SHELL is has a LOT more room in upper torso, shoulders and arms, has a much longer hem, is more breathable, and has more sophisticated adjusters. It also has a beefier and smoother operating zipper vs. the Helium II’s small coil zipper. Helium II has a more useful Napoleon chest pocket vs. the hip pocket on THE SHELL.
Patagonia Men’s Alpine Houdini (6.5 oz, $199) is closest in roomy fit – Still THE SHELL has a bit more room in upper torso, shoulders and arms. It is more breathable, and has more sophisticated adjusters. It also has a beefier and smoother operating zipper vs. the Alpine Houdini’s small coil zipper which lacks even a metal tab. The Alpine Houdini has no pockets.
Conclusion
Hyperlite Mountain Gear’s THE SHELL comes close to meeting the hype of “this jacket is unprecedentedly breathable, waterproof, and tough as f*#k for its weight.” THE SHELL did all I asked of it and I have few if any complaints. I especially like the roomy fit and its ease of use with all its well thought out adjustments, e.g. the beefy front zipper, and hood and cuff adjusters. So often these are skimpy or not included in minimal rain jackets. As HMG’s new slogan states, “LESS WEIGHT. MORE OPTIONS.” And it’s nice to see some many useful options included in THE SHELL without unduly increasing weight.
After only two weeks of field use, THE SHELL’s long-term durability or “toughness” is still undetermined. And durability for a full-sized, 6 oz garment is a shaky topic—subject to many opinions, interpretations, and expectations. That being said, THE SHELL feels solid and durable for such a large and low weight garment. It shows no obvious signs of deterioration from two weeks of use.
In addition to the outer fabric’s toughness, there is also the durability of the WP/B membrane. After almost 40 years of using WP/B rain jackets I have found that ALL of them, when worn for a long enough with a heavy backpack will eventually leak around the neck shoulders. This is true of both 2-layer and 3-layer fabrics by all manufactures! 2-layer versions leak sooner than 3 layer, but all will eventually succumb to the stresses of a heavy backpack’s shoulder straps.
Please to get me wrong! This is NOT criticism of the WP/B rain jackets or any manufacturer’s products vs. another manufacturer’s. I like them and I use them—mostly the very light ones like THE SHELL! It’s just the reality of the technology. And some of my best loved jackets have remained mostly leak free for a good amount of time. I am hoping the the SHELL joins this group.
Finally, I leave it up to the reader as to whether all this functionality, roomy fit and low weight justifies the $450 price tag…
Manufacturer’s Specifications
WEIGHT
X-Small 0.32 lbs | 5.16 oz | 146g
Small 0.34 lbs | 5.46 oz | 155g
Medium 0.36 lbs | 5.80 oz | 164g
Large 0.38 lbs | 6.14 oz | 174g
X-Large 0.39 lbs | 6.20 oz | 176g
FEATURES
DCF-WPB fabric with Dyneema® and eVent® materials technology
Breathability Rating: 32,000 gm2/24hr
Waterproof Rating: 10,000mm
#5 YKK VISLON® Aquaguard® Zipper
Polartec® Power-Dry® chin guard
VELCRO® adjustable cuffs for additional weather resistance
High collar zipper for additional weather resistance
Front and rear hood shock cord adjustment
Bottom hem shock cord adjustment
Low-profile stuff pocket with waterproof zipper and clip-in point; ideal for climbers
Helmet compatible hood; ideal for climbers, canyoneers, skiers
Stiff hood brim
Performance fit allowing a full range-of-motion for all outdoor activities
Unisex sizing
Disclaimers
Hyperlite Mountain Gear provided me with loaner of this product. I was/am under no obligation to write a review or otherwise promote this product. And this post represents my own independent opinion.
This post contains affilate links. If you make a purchase after clicking on the these links, a portion of the sale helps support this site at no additional cost to you.
Drink When Thirsty debunks the many myths about hydration and dehydration like “If you are thirsty, it’s already too late” and “If your urine is yellow, you are dehydrated.” This article suggests that Drink When Thirsty is the best and healthiest strategy for hydration during exercise.
It turns out that your body’s natural, thirst mechanism (700 million years old) works well to keep you hydrated and healthy during exercise. In fact, the amount of water your body requires is probably far less than what the Sports Drink and Bottled Water companies have been telling us.
People may be drinking too much water…
With all the hype about the risks of dehydration, it is actually over hydration (hyponatremia) that may be more of a risk. People are now having serious health problems from over hydration for endurance races and even hiking in the Grand Canyon—sometimes resulting in death1,2,3. [Note: Since I first published this post it has been shared by numerous Emergency Medical Treatment and Search and Rescue organizations for this very reason.]
You make Adventure Alan & Co possible. When purchasing through links on our site, we may earn an affiliate commission at no additional cost to you. Here’s why you can trust us.
Best Hydration and Purification System – It’s NOT Complicated!
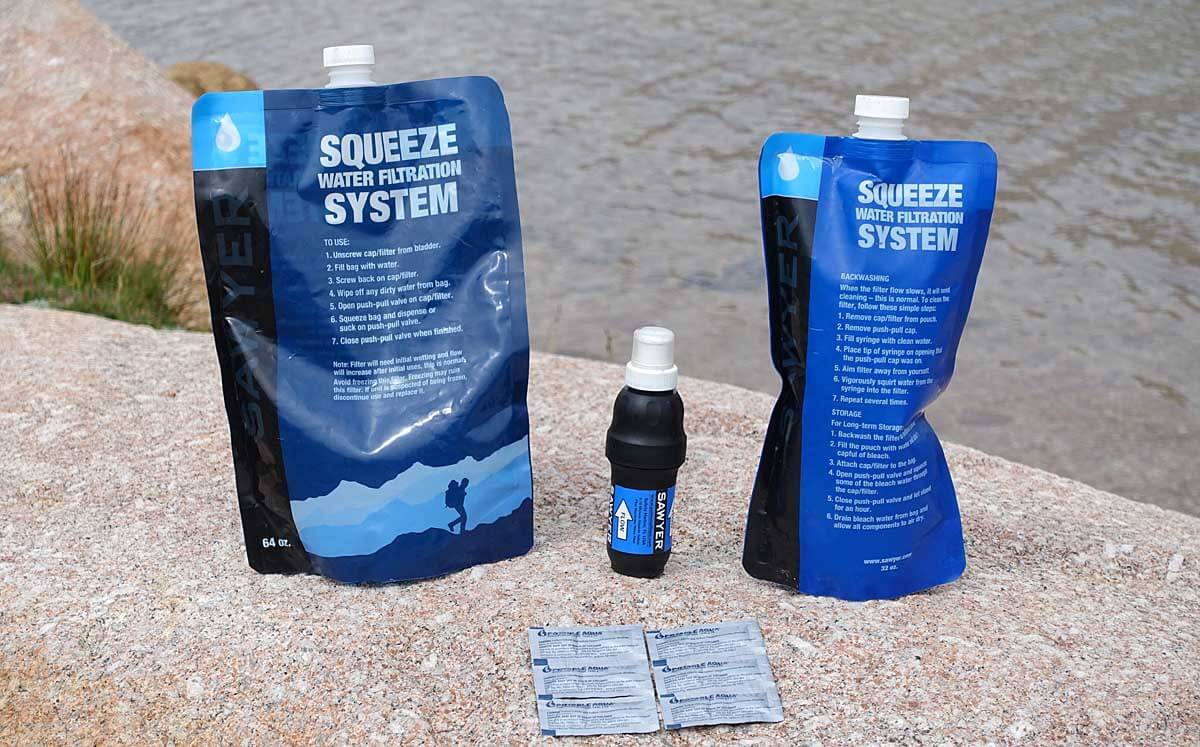
The simple, inexpensive Hydration and Purification System that Alison and use is shown above. When “drinking to thirst,” it has kept us well hydrated — even between distant water sources in the desert.
Sawyer Squeeze Filter: We can drink immediately at water sources. This means both quick, effective hydration and less water to carry when we hike.
Water Treatment Tablets: For fast, efficient water purification in camp. We can treat 3 or more liters of water in less than a minute. And it’s ready to drink 20-30 minutes later.
Drink When Thirsty – Myths and Facts about Hydration
I recently interviewed three world experts in the field of sports hydration (not affiliated with Sports Drink and Bottled Water companies)
Dr. Marty Hoffman, MD, founding member of the Foundation for Medicine & Science in Ultra-Endurance Sports, a member of the Wilderness Medical Society, and professor at the University of California Davis
Dr Tamara , D.P.M., Ph.D., Associate Professor of Exercise Science, Oakland University, Rochester, MI
Myth1 – If you are thirsty, it’s already too late
Correct – Drink When Thirsty
All the experts in sports hydration I talked with adamantly agreed that Drink When Thirsty is the best and healthiest strategy for hydration during exercise*.
As Dr. Hoffman’s puts it: “Drink When Thirsty works for prolonged exercise. Our bodies have a fine tuned feedback system that lets us know when to drink…there is no real danger of dehydration when people have access to water. Thirst kicks in, and people drink.”
This agrees with the recommendation from the Statement of the Third International Exercise-Associated Hyponatremia Consensus Development Conference, 20154 to Drink When Thirsty; “Using the innate thirst mechanism to guide fluid consumption is a strategy that should limit drinking in excess and developing hyponatremia [over-hydration with significant health consequences] while providing sufficient fluid to prevent excessive dehydration.”
Excessive drinking when you are not thirsty increases the risk of hyponatremia, arguably a greater risk than dehydration.
Why do we continue to hear sayings like, “hydrate or die,” “if you are thirsty, it’s already too late,” and stating that “your athletic performance will drop if you don’t drink enough“?
Deborah Cohen, investigations editor for the BMJ [formerly British Medical Journal], wrote up her findings in the 2012 feature article, “The truth about sports drinks5“. This article implies that the sports drinks industry has dramatically increased sales of their products by:
Creating a “disease of dehydration”
Stating that the natural thirst mechanism is inadequate to keep athletes hydrated. [Cohen implies that the evidence for this view is lacking.]
And that this “lack of evidence” is in part due to the close financial and other affiliations between the sports drink companies and the scientists/researchers and supporting institutions that produce the research to support this view.
Cohen’s article gives examples of studies supporting the sport drink companies claims, that when reviewed by an independent panel of experts, are not deemed robust enough to support those claims.
Here are some excerpts from the article
“Sports drinks are increasingly regarded as an essential adjunct for anyone doing exercise, but the evidence for this view is lacking. Deborah Cohen investigates the links between the sports drinks industry [e.g. Powerade (Coca-Cola) and Gatoraide (PepsiCo)] and academia that have helped market the science of hydration.”
‘“The problem was industry wanted to sell more products so it had to say that thirst was not adequate,” Noakes [Professor Tim Noakes, Discovery health chair of exercise and sports science at Cape Town University] says.’
‘Disease mongering is a well documented phenomenon in healthcare6 and Noakes suggests that industry has followed a similar pattern with dehydration and exercise.
“When industry wanted to sell more product it had to develop a new disease that would encourage people to overdrink,” he said adding: “Here’s a disease that you will get if you run. Here’s a product that is going to save your life. That’s exactly what they did. They said dehydration is a dreaded disease of exercise.”’
Myth2 – You need to drink a liter per hour
Correct – Drink When Thirsty
Again, Drink When Thirsty is the best strategy.
Dr. Kristin Stuempfle says that studies7 show that the human body can only process a maximum of 0.8 liters (27 oz) to 1 liter (34 oz) of water at rest. That is not what your body needs—just the maximum amount of water it can process if needed—an important distinction.
That maximum amount of water processed will go down during exercise. According to Dr. Stuempfle our body’s natural response to exercise is to shunt blood from the kidneys and the GI (stomach and intestines) and put it toward motor (leg) muscles, heart, and skin (cooling). In addition, during exercise the body secrets a natural antidiuretic hormone (ADH) to slow urine output. All these combine to reduce your body’s ability to process water.
So if you drink more water than you need during exercise (i.e. not drinking to thirst) then your body is receiving more fluids but has less capacity to handle them. Thus the risk of overhydration, and possibly hyponatremia.
In cooler environments where water is plentiful you may not need to carry any water with you. Drink from the source, and you will likely not be thirsty when you reach your next water source.
Myth 4 – Dehydration is a big problem
Correct – Mild dehydration is not a cause for serious concern
It will not significantly impair performance or health
Dr Hoffman told me: “Even a mild hydration deficit of 2-3 liters is OK (provided you were adequately hydrated at the start of your hike). You may not be happy about it, but it’s not a serious problem.“
Dr Hoffman also told me: “Top ultra runners are still performing well late in the race [100 miles] with a few percent bodyweight loss. They could not perform as well as they do, if percent bodyweight loss and mild dehydration was a big impediment to race performance8,9.”
Myth 5 – If your urine is yellow you are dehydrated
Correct- Urine naturally turns yellow during exercise, even when adequately hydrated
Dr Hoffman says that: “Trying to keep urine clear during exercise will cause over hydration.” There was complete agreement among all the researchers on this point.
Additionally Dr Hoffman said: “[during exercise] urine color is not useful, and should not be used, as an indicator of hydration status…During exercise, because of hormonal influences to retain fluid and blood flow being shunted away from the kidney, urine production should be diminished, so urine color will darken.”
And from Cohen’s article5: “The science of dehydration has led to another widely held belief that is not based on robust evidence—that the colour of urine is a good guide to hydration levels.” And also from Cohen’s article5: “There is a lack evidence for the widely recommended practice of assessing hydration status by looking at the colour of urine,” it suggests.
Myth 6 – Dehydration causes cramping
Correct – Cramping well understood but not likely from dehydration or electrolyte levels
All the researchers I spoke with agreed that cramping is complex, not well understood and likely has multiple causes.
They also agree that dehydration and electrolyte depletion are not likely the main causes.
Dr. Hoffman not only noted that cramping appears to be neuromuscular, but that dehydration or electrolyte depletion does not cause cramping. Dr. Hoffman said this finding has been known for a number of years. In fact, cramping has more to do with neuromuscular nerve misfiring—nerves sending a false signal to muscles to contract and stay contracted, as indicated in research10 by Martin P Schwellnus, UCT/MRC, Research Unit for Exercise, Science and Sports Medicine, Department of Human Biology, Faculty of Health Sciences, University of Cape Town, South Africa.
“DR. SCHWELLNUS proposes that the real cause of cramping is an imbalance between nerve signals that excite a muscle and those that inhibit its contractions. And that imbalance, he said, occurs when a muscle is growing fatigued.”
“There’s the dehydration proposal: you just need more fluid. But, Dr. Schwellnus said, he studied athletes who cramped and found that they were no more dehydrated before or after a race than those who did not have cramps.”
How much water should I Drink/Carry on a hike?
This is the big challenge for backpackers, day-hikers or others that need to carry enough water between distant sources. Unlike Dr. Hoffman’s “There is no real danger of dehydration when people have access to water,” there is a possibility that if we don’t carry enough water between distant sources that we could run out of water and potentially become dehydrated. On the other hand, if we are hiking a long distance between water sources and and decide to carry 5 liters of water we are carrying an additional 11 pounds. This too has serious downsides.
So the big question for hikers and backpckers is
How do you estimate the “right” amount of water to carry between distant sources?
The goal is homeostasis, or to drink the same amount of water as your body uses. But how do we estimate our personal water consumption needs for homeostasis in the field? There is likely no “right or exact” answer to this. Dr. Stuempfle and Dr. Tamara Hew-Butler agree that the following would be a reasonable strategy for individuals to estimate their personal water consumption in the field:
On test day-hikes (or a weekend backpacking trip), Drink When Thirsty and record the amount of water your drink per hour. Try to do this close to the same level of exertion, and temperature and humidity that you will expect on your backpacking trips (or long day hikes).
Use this consumption rate per hour as a starting point for estimating the amount of water you’ll need to carry between distant sources in the field for your longer and more serious trips.
It is best to be conservative (carry a bit more water) until you have tested out and fine tuned your personal water consumption rate over at lest a few longer trips in the field.
Obviously if it is hotter, more humid, you are working harder, or your pack is heavier, you may need more water per hour. But, if it is cooler, less humid, or you are not working as hard, you may need less water per hour.
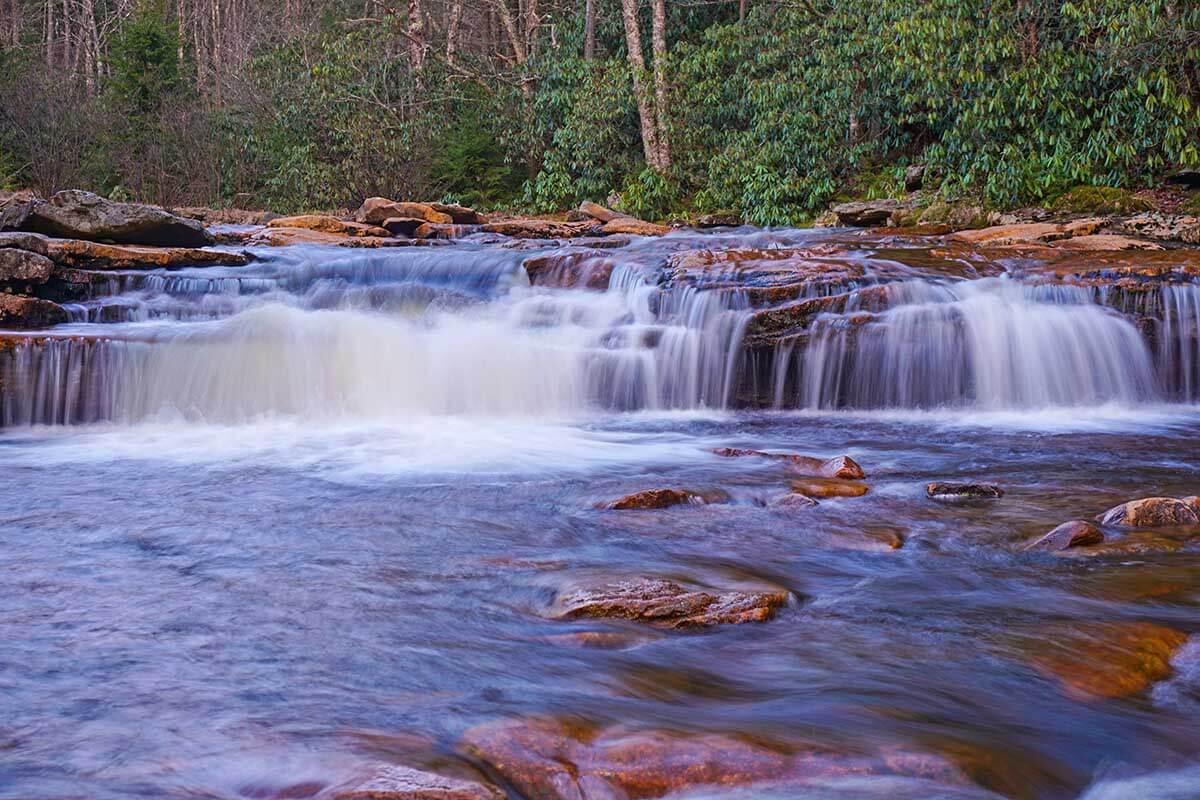
On a personal note, when following Drink When Thirsty I frequently do not carry any water with me in the field (Sierras, Appalachian Trail, etc.). When I drink (using aSawyer Squeeze Filter so I can drink directly at the source), I find that I am unlikely to be thirsty until I reach the next water source. My wife seems to run a bit thirster, and in addition to drinking at water sources, she usually carries somewhere between ½ to ¾ of a liter between sources.
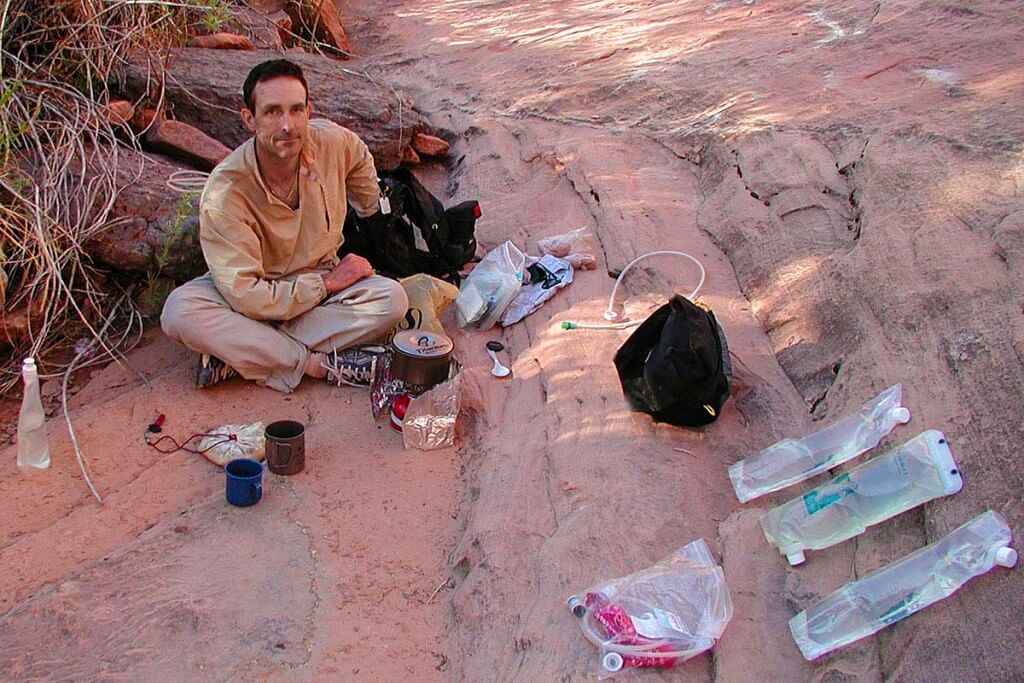
Although I rarely carry water with me, the desert is the exception. This picture is from a drought year in the Southern Utah desert. So an unusually dry time in an already hot and dry place. I have collected a lot of water: for dinner that evening, breakfast the next morning & to carry during the day to our next reliable water source.
The only place we carry large amounts of water between sources is in the Desert Southwest, like Canyoneering in Utah. But even then, following Drink When Thirsty, we carry less water than the “recommended” amounts in guide books and other “authoritative” sources. We pull long days in the desert and feel healthy and fine. But we have years of field experience and comfortably know our personal water needs in the desert.
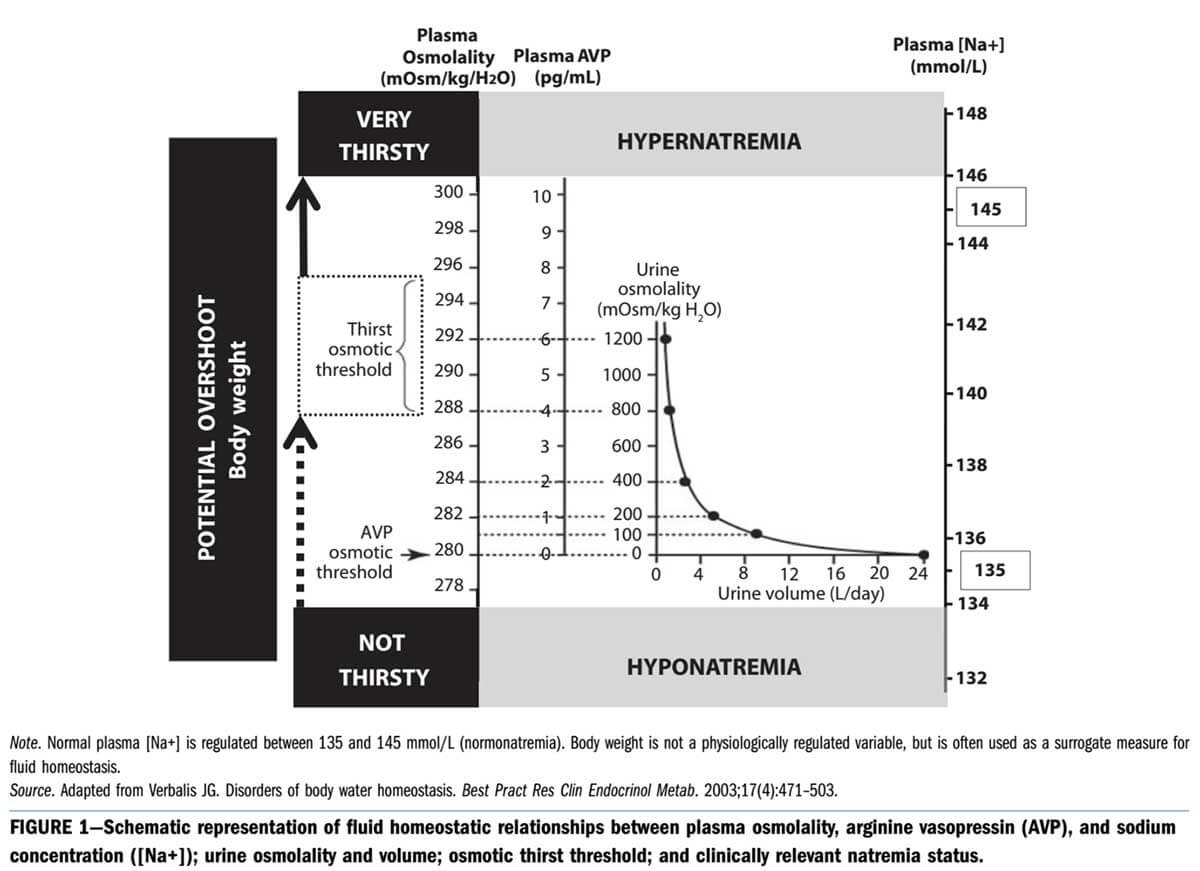
How the natural thirst mechanism works
Dr Tamara Hew-Butler, who has studied the natural thirst mechanism in animals, says it’s been working to keep them well-hydrated for at least 700 million years. The human thirst mechanism functions in two ways:
Brain sensing electrolyte levels11: Your brain has real-time osmosensors that monitor sodium concentrations (more specifically, the amount of osmoles, for which sodium makes up the greatest amount) circulating in the blood. When sodium levels start to rise above normal, your body has a two stage response. The first response, is to slow urine output and therefore water loss (this occurs before thirst is triggered). If sodium levels continue to rise, your thirst mechanism kicks in and you become thirsty. It is important to note that you are NOT dehydrated at this point. All this happens before dehydration becomes an issue. This is your body’s normal mechanism to keep you from getting dehydrated. Dr. Hoffman and Dr. Hew-Butler both point out that as long as folks have access to water, their thirst will cause them to drink and not become dehydrated.
Your heart (actually the main valves) senses blood volume (water): Your heart valves have barorreceptors that can detect a reduction in blood volume (water in the body). This also has a two stage response just the same as the brain’s osmosensor responses. Stage 1 happens at an 8-10% blood volume depletion and triggers an anti-diuretic hormone release which slows urine output and therefore water loss. You are not thirsty at this point. If blood volume continues to decrease, your thirst mechanism kicks and you get thirsty. Again note: that you are NOT dehydrated at this point. All this happens before dehydration become an issue. This is your body’s normal mechanism to keep you from getting dehydrated.
Figure source: 11 – INADEQUATE HYDRATION OR NORMAL BODY FLUID HOMEOSTASIS? – Tamara Hew-Butler, PhD, LETTERS, American Journal of Public Health, October 2015, Vol 105, No. 10, page e6
Summary
Drink When Thirsty, it’s been keeping hominoids well hydrated for millions of years.
References
1 Three Cases of Severe Hyponatremia During a River Run in Grand Canyon National Park – Emily A. Pearce, BS, et al., WILDERNESS & ENVIRONMENTAL MEDICINE, 26, 189–195 (2015)
2 Hiker Fatality From Severe Hyponatremia in Grand Canyon National Park – Thomas M. Myers, MD, et al., WILDERNESS & ENVIRONMENTAL MEDICINE, (2015)
3 Exercise-associated hyponatremia with exertional rhabdomyolysis: importance of proper treatment – Martin D. Hoffman1, et al., Clinical Nephrology, DOI 10.5414/CN108233
8 Race Diet of Finishers and Non-Finishers in a 100 Mile (161 km) Mountain Footrace – Kristin J. Stuempfle, PhD, Martin D. Hoffman, MD, Journal of the American College of Nutrition, Vol. 30, No. 6, 529–535 (2011) page 529
9 Association of Gastrointestinal Distress in Ultramarathoners With Race Diet – Kristin J. Stuempfle, Martin D. Hoffman, and Tamara Hew-Butler, International Journal of Sport Nutrition and Exercise Metabolism, 2013, 23, 103 -109
11 INADEQUATE HYDRATION OR NORMAL BODY FLUID HOMEOSTASIS? – Tamara Hew-Butler, PhD, LETTERS, American Journal of Public Health, October 2015, Vol 105, No. 10, page e5
One hammock can do it all—and well! The Chameleon, works in all conditions from hot, bug-infested jungles to bitter cold winters of the Northeastern US. In the following “Review of Dutchware Chameleon Hammock,” I discuss what makes it possibly the best multi-season hammock. The review concludes with a Comparison of the Chameleon Hammock to its nearest Competitors.
Overview
Over the past few months, my wife and I tested a near-production model of the new Dutchware Chameleon Hammock (currently on Kickstarter) in a wide range of environmental conditions: from the hot buggy, disease-infested tropical jungles of South America to camping in the snow at 15° F in the Mid-Atlantic winter.
Why we (and possibly you might) prefer hammock camping
The modularity/versatility of the hammock. The Dutchware Chameleon Hammock works in almost all environmental conditions by easily mixing and matching components. All without a weight or functional penalty.
New (patent pending), 2-way separating zipper that opens in the middle on both sides in any location. This innovative zipper is the key to the Chameleon’s modularity and versatility.
Low wait times (less than a week?) for a custom made hammock to your spec. with your choice of fabric weights, colors, widths, covers, parts etc.
Oh, and it is very light. My version of this hammock is a smidge over a pound (17.5 oz) including suspension!
Swap in the bug net top cover for the solid cover and you have an excellent hammock for hot buggy weather. [Picture in South America along the Colombian coast at the end of a 4-day trek into the jungle.]
The Details: Review of Dutchware Chameleon Hammock
Specifications
17.5 oz (500 g)Hammock body in Hexon 1.0 fabric, bug net cover, and my personal 2.5 oz Kevlar suspension
22.5 oz (640 g) same but with included Dutchware Beetle Buckle Suspension (7.5 oz with two carabiners)
24.0 oz (680 g) same hammock but with solid top cover in Hexon 1.0 fabric (Bug net cover is 4.0 oz. Solid top cover in Hexon 1.0 fabric is 4.7 oz.)
1) Modularity and Versatility
The Chameleon has three separate and interchangeable parts
Main hammock body (huge choice of fabrics!)
Interchangeable top covers; a mesh cover for hot buggy weather and a vented solid cover for colder weather. And unlike other hammocks, you do not have to pick a right-hand or left-hand lay! Just flip your top cover and you instantly change the lay direction
New buckle suspension system with an optional spreader bar for hanging hammocks side-by-side from the same tree.
All top covers can quickly be exchanged, rotated and/or flipped to meet your needs. Almost any of a huge selection of fabrics can be selected in any combination for both the body and the solid top cover of your Chameleon. [Back to front: mesh bug cover, orange solid cover, and camo solid cover. The solid top covers retain heat, block wind and essentially turn your hammock into a warm, winter bivy sack with a face vent.]
Mix and Match Component to Meet your Needs
To adapt in different environmental conditions, all of these parts can be purchased individually, or in any combination. If you purchase additional components later, they will fit perfectly with your current components. Even if you buy a wider hammock body it will still mate with your original top covers!
Dutchware might also be called “House o’ Outdoor Fabrics,” for their huge selection of colors and weights — all high quality fabrics. Almost all of these fabrics can be selected in any combination for both the body and the solid top cover of your Chameleon.
You can buy a Chameleon with a netting top cover in the spring. And in the fall purchase a vented solid cover for the colder weather of late fall and winter.
In my case, I have one bright orange solid cover for fun when camping with my wife, and another camo cover for stealth camping by myself (it mates to my camo hammock body).
Finally, you can use the hammock without a top cover, my favorite option for most spring and fall camping in the Mid Atlantic!
Solid Top Covers are Great in Cold Weather!
Most people are familiar with mosquito netting hammock covers for bug protection. But many are less familiar with the reasons/advantages of using a solid top cover in winter.
The solid top cover retains heat and BLOCKS WIND, essentially turning the hammock into a winter bivy sack with a face vent. This retains your body heat in a sheltered envelope formed by the hammock body and top cover combination.
The top cuts down on convective (wind-driven) heat loss. But the mesh vent, located where you breathe out humid air, also vents excess moisture that might condense inside the hammock and get your down quilt wet. Finally, the top cover is itself breathable, also reducing condensation in cold weather.
A solid cover also means that in below-freezing conditions I rarely, if ever set up my tarp. This saves the time and hassle of setting up and taking down a tarp. And possibly more important for someone with cold hands, it is one less chore to do that requires the dexterity of ungloved hands. (It only takes a few minutes working ungloved at 20° F to wreck some major hurt on my hands!)
2) New 2-way, toothed, separating zipper (patent pending) designed by DutchWare
This zipper is two-directional. You can both rotate it 180 deg and flip it 180 degrees and it still works. This is a big deal! Overall, my favorite parts of this new and unique 2-way separating zipper are:
I can get out of whatever side of the hammock I want. It opens on both sides (and at the same time) and in any position along either side.
I can slide my hands down either side of the hammock at night to check-on/adjust my under-quilt.
Chameleon toothed zippers mate perfectly with other zippers, e.g. other Chameleon components. [*Coiled zippers (used for almost all backpacking zippers) do not pair well, even with identical zippers.]
Finally, this zipper allows me to flip the top cover to change the lay of the hammock. This is nice when my wife and are hammock camping side by side and want to coordinate lays.
*Virtually all zippers on backpacking gear are coil zippers. If you try and mate coil zippers, for example, to zip together two identical sleeping bags, they won’t mesh well. As you zip, you’ll get a bit of warping and strangeness. This is because the coiled zippers come in matched pairs, and were never intended to be mated with other zippers, even if they are exactly the same type.
3) Low Wait Times for Custom Gear
It often seems like you have to pick your poison with backpacking gear.
You can custom order the exact gear you want from a cottage manufacturer but then wait 4-8 weeks for it to be made and delivered.
You can pick an off the shelf item (usually some compromise/deviation from your ideal choice) and get it in around a week.
With the Chameleon, you can have both custom gear and quick delivery. This is assuming that Dutchware continues to deliver Chameleon Hammocks with similar speed as its Netless and Half-Wit Hammocks. [In early February, I talked with Dutchware and they estimate that once in production they should be able to finish and ship a Chameleon in less than a week.]
4) Comparison of the Chameleon Hammock to its nearest Competitors
There are other manufacturers of similar hammocks. Some of these hammocks also have an interchangeable mesh and solid covers. But before I start comparing I want to be very clear that all the hammocks below are great hammocks with established performance and dependability.You would not go wrong buying from any of the three companies below.
I own and like hammocks from all three companies. I know Brandon Waddy of Warbonnet and Tom Hennessy. They both produce excellent hammocks that have widespread use and great reputations. And Tom is rightfully considered the man responsible for modern asymmetrical backpacking hammocks as we know them (and has the patents to prove it).
Zipper opens on both sides of the hammock (but only in center). Solid top cover option. Many fabrics and colors.
4 week or longer delivery time.
The main difference between the Dutchware Chameleon and these hammocks
None of the other hammocks offer a 2-way separating toothed zipper that both rotates and flips 180 degrees, mates perfectly with other zippers and opens anywhere on both sides. This is what allows fully interchangeable components, allows you to open the zipper on both sides in any location, and to change from Right Hand to Left Hand lay in the field, in just a few minutes. The Dream hammock Sparrow comes closest to the Chameleon with a coil zipper system that opens on both sides of the hammock, but only in the middle. Actually it has four zippers (two on each side that meet in the middle).
Superb zoom lenses & weather resistance set the Olympus OM-D EM-5 II apart as a great backpacking & hiking camera. With the EM-5 II you’ll continue taking great pictures in tough environmental conditions that would shut down other cameras. [Picture above is the environmentally sealed Olympus OM-D EM-5 II and 12-40 f/2.8 PRO lens working in the rain-shadow of hurricane Matthew.]
Note: This Olympus OM-D EM-5 II Camera Review focuses on how well it does as a backpacking and hiking camera. As such, this review criteria differs significantly from mainstream camera reviews like DP Review. See more on what makes a great backpacking camera…
[Photo taken on the Appalachian Trail in the rain-shadow of hurricane Matthew.] With the Olympus OM-D EM-5 II Camera you’ll continue taking pictures in tough environmental conditions that would have had other cameras stowed in your backpack hours ago.
Quick Specs – Olympus OM-D EM-5 II Camera Review
The Olympus OM-D EM-5 II is a weather-sealed, 16 megapixel mirrorless u-4/3 (MFT) sensor camera
Light and sharp Olympus lenses are key to great image quality. Right is the weather and dust resistant 12-40mm F2.8 PRO. When combined with the also weather-resistant EM-5 II camera, you get a setup that can deal with tough environmental conditions. Left is the 9-18 9-18mm f4.0-5.6 lens with an exceptionally wide 18-36mm equivalent range. At only 5 oz and super compact, it’s an engineering marvel.
Excellent zoom lenses exceeding the resolution of most prime (fixed focal length) lenses
Olympus M.ZUIKO DIGITAL ED 12-40mm F2.8 PRO. Fast and weather sealed.
Olympus M.ZUIKO DIGITAL ED 9-18 f4.0-5.6 lens. Exceptionally wide 18-36mm equivalent range. Light and compact!
First-rate, 5-axis in-camera image stabilization works with any lens. This hugely expands the lens options for handheld shooting when backpacking.
Fast focusing
Excellent camera controls (2 knobs and many function buttons) allow you to make essential adjustments quickly and without having to take your eyes off the viewfinder
Highly customizable to your shooting style = faster easier photo taking in the backcountry
Bright large viewfinder with excellent information display options
Fully articulated touchscreen display (great for tripod and video shots)
Nice out-of-camera JPEG images (speeds post-trip workflow and publishing images)
Out of camera JPEG images are really nice and don’t require as much tweaking in a photo editor. This greatly speeds getting photos to publication—the single largest time consumer/bottleneck in the whole photographic production process. [Barn taken at the end of a long hike in the Blue Ridge Mountains of Virginia]
What’s Not so Good about the Olympus OM-D EM-5 II
16 MP vs 24 MP of competitive mirrorless APS-C cameras (but good Olympus zoom lenses close the resolution gap)
High ISO performance ⅓ stop less than APS-C cameras from Sony, Nikon and Canon
u4/3 sensor has slightly lower 5% color depth, and 8% dynamic range than best APS-C cameras like the Sony a6500
Video is not class-leading (but it shoots solid 1080p with excellent image stabilization and focusing, with an articulated touch screen. This is likely the bread and butter for most backcountry video)
Reading the manual and customizing the camera takes time. (But once done you’ll reap the benefits of fast access to your most used controls.)
Handheld @1/6 sec and sharp: Literally shooting in a cave—Luray Caverns, VA. Olympus OM-D EM-5 II Camera with ED 12-40mm f/2.8 zoom lens. [1/6 sec, f/2.8, ISO 400] And the camera’s moisture resistance was great in the extremely damp cave.
Summary – Why the Olympus OM-D EM-5 II is an Excellent Backpacking Camera
To fully appreciate why the Olympus OM-D EM-5 II is an excellent backpacking camera you have to look at the camera, its excellent lenses and features as a whole. As such, it has an unbroken chain of elements to produce excellent final images, even shooting handheld in the challenging situations encountered backpacking. As you can see below, the camera does well in all of the Top 5 Criteria for a Backpacking Camera. [For a full explanation of these criteria see: 5 Most Important Features for a Backpacking Camera (clickable link)]
Top 5 Criteria for a backpacking camera – how the Olympus OM-D EM-5 II does
It has a sharp, wide angle zoom lens.
Both the Olympus ED 12-40 f/2.8 PRO lens and the 9-18 f4.0-5.6 lens yield images approaching the maximum resolution of the camera’s sensor—better than most prime lenses. The 12-40 stands out for being weather sealed, and for having a large aperture (good for low light). The 9-18 is exceptionally wide for dramatic creative angles and taking in large landscapes.
The extremely sharp dust/water resistant 7-14mm f/2.8 PRO Lens and 12-40mm F2.8 PRO lenseshave manual focus activation by sliding the focus ring back. This exposes traditional focus setting marks.
It takes sharp, high quality photos handheld. Especially in the dim light of dawn and dusk.
The Olympus OM-D EM-5 II has excellent in-body stabilization that works for any lens (stabilized or not). This allows for the stabilized use of a vast array of u4/3 lenses. The 12-40mm F2.8 is quite fast for 13 oz zoom lens—great for low light performance.
The camera has quick and accurate auto focusing. In addition, I use its excellent manual focus (with “focus assist”) to get focus exactly where I want it. Its touchscreen is particularly good when focusing and making adjustments when shooting from a tripod—and great for shooting video!
Out of camera JPEG images are quite nice and don’t require as much tweaking in a photo editor. I had little reason to use RAW images.
On the down side, since its micro-4/3 sensor is smaller, the EM-5’s high ISO performance is about ⅓ stop less than leading APS-C cameras.
Essential controls are fast and easy to use. You can take a great photo in a few seconds and move on.
Two large, knurled control dials on the top of the camera due the bulk of the work. Once the program buttons where programmed, I could quickly adjust exposure, aperture, shutter speed, ISO setting, activate manual focus, manage DRO (digital range optimization) or “Shadow Adjust Mode,” timed shutter release, etc. I could adjust all of these in a matter of seconds without taking my eye off the viewfinder.
You can control almost every setting from the top panel of the Olympus OM-D EM-5 II without having to dive into menus. Make sure you do a good job of programming the four Fn buttons to your needs. I usually have the Fn 1 button programmed to switch between Manual and Auto Focus.
It has a bright viewfinder with all essential information displayed on one screen. This is one of the brightest and nicest EVFs (electronic viewfinders) I’ve used. The swivel touch display is also great when operating off of a tripod or shooting video. There’s enough information available that you can shoot and make adjustments without taking your eyes of the EVF.
All essential information is in the display, including a histogram so you can get the exposure right before taking the photo. [Theres also a nice dual level mode to get your photo aligned.]
Light and compact body with ruggedness and weather resistance a plus.
I’ve covered this in a fair amount of detail already. But to summarize, the Olympus OM-D EM-5 II has a rugged metal body. There is little plastic to get scratched or damaged. The EM-5 body is also dust/water resistant. Finally, there are two superb dust/water resistant zoom lenses for the EM-5. The combination of a both dust/water resistant body and lens is very attractive for windy/dusty/gritty desert environments, and damp rainy climates like the Pacific Northwest.
Alert! Unless you really need a single lens solution that includes a long telephoto, I would shy away from the Olympus M.ZUIKO DIGITAL ED 14-150mm F4.0-5.6 II lens that is sometimes bundled with the camera. It’s expensive and has lower image quality than the combination of the 12-42 and 40-150 lenses above.
Micro 4/3 is an open format also used by Panasonic, which along with Sigma (and a few others like Rokinon and Tamron) also makes some excellent lenses.
Also consider the less expensive, but non-weather resistant Olympus OM-D EM-10 II. Most of what is written about the Olympus OM-D EM-5 II is also true of OM-D EM-10 II. That makes the EM-10 II a tremendous value! Both cameras share the same image sensor, electronics and selection of great lenses. For a killer wide-angle backcountry setup for moderate cost and low weight, consider the EM-10 II paired with the compact, wide and very sharp ED 9-18mm f4.0-5.6 lens. This lens is exceptionally wide-angle (18-36mm equivalent) for dramatic perspectives and sweeping landscapes. Compact and only 5 ounces, it is a marvel of optical engineering.
Tips for Using the Olympus OM-D EM-5 II
For sharpest pictures shoot in Aperture Mode, “A” on the mode dial. Set it to the lens’ best aperture (usually around f/4 or f/5.6 for u4/3 lenses).
Program the F1 function button to manual focus. One of the joys and strengths of mirrorless cameras is how quickly and well you can manually focus. With the F1 button you can switch between auto focus and manual in less than a second. (Or just use the manual focus clutch on the focus ring of the PRO lenses)
Use the “Shadow Adjust Mode,” in bright daylight. It will take some of the contrasty sting out of your midday/full-sun photos. Expose for the highlights and let the camera auto-adjust to better expose the shadows.
Use the nice histogram in the display. This will give you a good idea if you are losing shadows or blowing out highlights before you take the photo.
Do take the time to customize the camera to make your most used features quickly accessible via the many function buttons on the camera, and even on some of the lenses. This may require downloading a PDF of the manual and doing some reading but you’ll thank yourself later.
Olympus OM-D EM-5 II vs. the Sony a6000 through a6500 Cameras
Speed and Ease of Use – advantage Olympus
The Olympus’ excellent camera controls (2 knurled top knobs and many function buttons) allow you to make essential adjustments quickly and without having to take your eyes off viewfinder. In comparison, some important Sony adjustments must be made in-menu or using the less than perfect camera back dial. In addition, the Olympus has a much larger and brighter EVF display. The Olympus has a better rear touchscreen display that both rotates and twists. The Sony a6000 and a6300 have non-touchscreen displays that only tilt. (The a6500 has a touchscreen display but it only tilts.)
Camera Sensor and Video – advantage Sony
The Sony 24 MP sensor when combined with the best prime lenses will out resolve the Olympus 16 MP sensor. In addition the larger Sony sensor has slightly better high ISO performance, color depth, and dynamic range. But Olympus wins the resolution battle for zoom lenses. The best Olympus u4/3 zoom lenses have slightly higher perceptual resolution of 10 MP vs. 8-9 MP for the best Sony zoom lenses. The Olympus is a solid but not exceptional video camera, while Sony cameras are killer video machines.
Zoom Lenses and Resolution – advantage Olympus
With their standard kit lenses ( Olympus 14-42 F4.0-5.6 II lens and Sony 16-50mm f/3.5-5.6 OSS) the perceptual resolution of the Sony and Olympus cameras are essentially equal at 6 MP. Even though the Sony has a 24 MP sensor vs. the Olympus 16 MP sensor. This is because the Olympus kit zoom is a higher resolution lens. But the Olympus OM-D EM-5 II has a clear advantage when you need a higher quality/higher resolution zoom lens. There are six u4/3 mount zoom lenses with perceptual resolution of 8-10 MP—at least two are weather resistant. These zoom lenses approach the 12 perceptual MP range of the best Sony E-mount prime lenses. (They even slightly beat the perceptual resolution of the bestSony zoom lenses!) In comparison, there are only three Sony E-mount lenses with perceptual resolution of 8-9 MP—none are weather resistant. These Sony E-mount zoom lenses are nowhere near reaching the 16 perceptual MP range of the best Sony E-mount prime lenses.
Prime (fixed) Lenses and Resolution – advantage Sony
Sony has the perceptual resolution advantage when it comes to prime (fixed focal length) lenses. There are six Sony E-mount prime lenses with perceptual resolution of 12-16 MP. In comparison, there are four u4/3 mount prime lenses with a perceptual resolution of 11-13 MP. This is mostly due to Sony’s larger 24 MP sensor.
Image Stabilization – advantage Olympus (with the exception of the Sony a6500)
Olympus has the advantage with its tried and true 5-axis in-camera image stabilization that works with any lens. This hugely expands lens options for handheld shooting when backpacking. Only the most recent Sony a6500 has camera image stabilization. But this is huge deal for Sony fans that hike and backpack (that is don’t use a tripod often).
Weight with Kit Lens – a draw (with the exception of the Sony a6000)
The Olympus OM-D EM-5 II is 19 oz with its 14-42 F4.0-5.6 II lens kit lens. But the comparable (weather sealed, in body stabilization) Sony camera, the a6500 is about an ounce heavier with its 16-50mm f/3.5-5.6 OSS kit lens. The Sony a 6000 is a svelte 16 oz and about 3 oz lighter than the Olympus.
https://www.adventurealan.com/wp-content/uploads/2016/11/oly-in-rain-phone-02-noring-fb1200-v2.jpg6281200Alan Dixonhttps://www.adventurealan.com/wp-content/uploads/2023/05/Adventure-Alan-Co-Logo.pngAlan Dixon2016-12-09 20:53:102016-12-12 22:03:02Olympus OM-D EM-5 II Camera Review for backpacking & hiking
Alert! as a backpacker you are not well served by mainstream camera reviews like DPReview.
That is, the 5 Most Important Features for a Backpacking Camera are quite different than those for a general use camera in mainstream reviews. Here are the major differences.
CAMERA WEIGHT – In mainstream reviews, the weight of the camera with a sharp zoom lens is not factored into their ratings. In fact, they routinely think that hefty cameras are better!
IMAGE QUALITY HANDHELD – Mainstream review image quality assessment is done with the camera on a tripod using the highest quality (expensive and heavy) non-zoom lenses in the controlled environment of a test facility. While lightweight backpackers and hikers usually shoot in the field, handheld using a single zoom lens. (This saves the weight of a carrying a heavy tripod and multiple lenses.)
DAWN/DUSK PERFORMANCE – A backpacking photographer is further challenged by taking handheld photos in the dim light of dawn and dusk. This is the golden hour when the light is perfect for that great backcountry photo. Unfortunately, these are also conditions particularly vulnerable to images being completely ruined by blur from low shutter speeds and camera shake. This is not well covered in mainstream reviews.
A great backpacking camera is light but equally important, it gives you sharp photos even when handheld using a zoom lens in the low light of dawn and dusk. Pictured the environmentally sealed Olympus OM-D EM-5 ii with 12-40 f/2.8 PRO lens.
5 Most Important Features for a Backpacking Camera – Summary
Surprised you don’t see any point and shoot cameras in here?
In The Point and Shoot Camera is Dead for Hikers, I discuss why I belive the point and shoot camera is dead (or approaching non relevance) for hikers and backpackers. But to summarize:
The point and shoot (p/s) camera is being squeezed into the grave from two sides. 1) on the inexpensive side by constantly improving smartphone cameras. And 2) on the more expensive side by very light mirrorless, interchangeable-lens cameras. If photography is a serious objective of your trip, their near “pro-level” performance justifies their cost/weight vs. carrying just your smartphone.
I am covering very light mirrorless, interchangeable-lens cameras in this post
And I will cover smartphone cameras, accessories, and techniques in a future post.
Top 5 Most Important Features for a Backpacking Camera – Detail
1) Light and compact with ruggedness and environmental sealing a plus
Yes number 1 is weight, but not in the way you might expect. First, this is the weight of the camera with a sharp zoom lens. And second, as long as it’s below a critical weight I don’t worry about it so much. After that, capturing a good photograph is my primary concern. Criteria 2 through 5 below all contribute to getting the best possible photo when backpacking.
For me, the critical weight for a backpacking camera is determined by what I comfortably carry all day mounted to the shoulder strap of my pack. That is around 24 oz (1.5 lb) for camera and lens. And around 30 oz when I need an environmentally sealed camera/lens system, e.g. the Olympus OM-D EM-5 ii with 12-40 f/2.8 PRO lens.
Environment sealing is important in some situations but not others. It adds significant cost and weight to a camera. Dust resistance is probably the most important since blown dust from dry and windy environments is quite common.
If you are hiking on trail and take reasonable care of your camera, ruggedness is not a big deal. On the other hand, if you are bushwhacking, scrambling, or outright climbing and frequently using your camera, ruggedness may be a very good feature.
For me the maximum weight of a camera is determined by what I an comfortably carry all day on the shoulder strap of my pack. Pictured is a Sony a6000 camera with the stellar Sigma 30mm f/1.4 Art lens (22 oz total wt). They are mounted to a Peak Designs CapturePRO on the shoulder strap of my pack. See 15 second video below to see this fast system in action.
2) It has a sharp*, lightweight wide angle zoom lens
This is number 2 for a reason. And one could argue it should be number 1. The lens, not the camera is the limiting factor for image quality. Unfortunately, most light and inexpensive zoom lenses sold with cameras (“kit lenses”) can only resolve 6 to 9 perceptual megapixels of a 24 MP camera sensor! And sharp zoom lenses light enough for backpacking are few and far between. As such, it pays to do your research to find zoom lens and camera combinations that produce the best image quality. *See more on sharp below…
Zoom lenses save weight by not having to carry multiple prime (fixed focal length) lenses. Wide zoom lenses are well suited to the sweeping landscapes of the backcountry and and allow for dramatic perspectives. They speed up work by not having to change lenses. In addition the lens stays on the camera protecting the sensor from dust and moisture.
And for prime lens aficionados, yes there is an argument for them. Two good primes; one wide angle (around 35mm equivalent) for most work and supplemented by a fast and super sharp normal lens is a a great setup. Your feet do a great job of lens zooming! (Or I have used a light zoom supplemented by a fast and super sharp prime lens for critical shots.)
For both zoom and prime lenses make sure you consider 3rd party lenses from the likes of Sigma, Tokina, Tamron, and even Zeiss. Many times these lenses will significantly outperform your your camera’s native lenses. Personally, I’ve had great results from Sigma lenses.
Bottom line: a great camera with a mediocre lens will give you mediocre results.
An example of two sharp wide angle zoom lenses for Olympus’ u4/3 system. 1) To the left of the camera, the compact, wide and sharp 9-18mm f4.0-5.6 lens weighing only 5 oz! 2) On the right the very sharp environmentally sealed, 12-40mm f/2.8 PRO lens. Far left is the sharpest lens of the bunch, the Sigma 30mm f/1.4 prime.
The Olympus ED 9-18mm f4.0-5.6 lens is a great example of a light, sharp zoom lens well suited to backpacking. This lens is exceptionally wide-angle (18-36mm equivalent) for dramatic perspectives and sweeping landscapes. Compact and only 5 ounces, it is a marvel optical engineering.
Camera Shake – the Fastest Way to Ruin a Backpacking Photo
Camera Shake can quickly blur a 24 megapixel image down to essentially zero megapixels!
Lightweight backpackers are particularly vulnerable to camera shake since they take most of their photos handheld. Factors that combat camera shake all involve increasing shutter speed:
First is image stabilization from the lens (or in the camera body—better since it works with any lens). Image stabilization will usually give you an extra 2-3 shutter speeds with little downside.
Second is high ISO performance which uses less light to the sensor for the photo. High ISO performance will usually give you an extra 2-4 shutter speeds with minimal image degradation.
Third is a faster (wider aperture) lens. This might get you 1-2 shutter speeds. Downside is buying a heavier and more expensive lens.
If you combine all three above, you can gain a 5-9x increase in shutter speed with minimal impact on image quality. This is what makes handheld shots possible at dawn or dusk. Even so, bracing your camera against a tree, rock, trekking pole or even using a small, 1-3 oz tripod are all improvements over handheld. All Olympus camera bodies and now the new Sony a6500 have in-body image stabilization.
3) It takes sharp, high quality photos handheld
Especially in situations encountered backpacking like the dim light of dawn and dusk. Contributors are:
Excellent image stabilization (in-camera is preferred.). A tripod is a last resort for most backpacking photos—it’s both heavy, and time consuming.
High ISO performance gives you sharper images in low light, gaining you 2-4 shutter speeds This is with only a slight decrease in image quality. After that, image quality increasingly degrades as you go higher. Note: for handheld shots at dawn or dusk the shutter speeds gained from a & b above, may have more impact on image sharpness than the camera’s sensor and lens!
Fast and light lenses are usually primes (fixed focal length) and will gain you 1-2 shutter speeds. Fast zoom lens with good image quality are very expensive and sometimes weigh more than the camera they are mounted to. But some of these zooms have image quality that equals the best prime lenses. This makes them a tempting option if photography is a major objective for your trip.
Fast accurate focusing on the correct subject is essential to quickly getting sharp photos.
Good DRO (digital range optimization). DRO deals-with the less than flattering, high-contrast light of midday when we take most of our photographs. It automatically brings up shadow detail without blowing out highlights. DRO is faster and easier to use than high dynamic range (HDR) photography which takes multiple images and must be done on a tripod.
Finally but by no means least, good quality JPEGs out of the camera: This greatly speeds getting photos into publication—the single largest time consumer/bottleneck in the whole photographic production process. (I am only going to edit RAW images for the few critical shots that need it.)
Sometimes to get the highest image quality you need a sharp prime and a small tripod. In this case the Sony a6000 camera with the super sharp Sigma 30mm f/1.4 Art lens. At only 22 oz, this camera/lens combo has image quality equal to or exceeding the very best, and much heavier APS-C camera systems.
Bad Focus – Another Way to Ruin a Backpacking Photo
Occasionally the camera’s “smart” auto-focus algorithm fails and puts the focus in the wrong place, leaving your “intended” subject all blurry. And sometimes in the low light of dawn and dusk there may not be enough light or contrast to get reliable focus. In either case, the resulting photo is useless.
A camera with more focus points and a fast, sophisticated focus algorithm is highly desirable. Some of the newer mirrorless cameras like the Sony a6300 and a6500 are rivaling the very best cameras for both speed and accuracy of focusing
Consider using manual focus some of the time. Mirrorless cameras have an advantage with their fast, and easy to use manual focus. A key to this is the “focus assist function,” with auto-zoom and/or focus peaking options. These options make it fast and easy to get sharp focus exactly where you want it. I suggest you program one of you cameras functions button to toggle between auto & manual focus.
Another great “manual focus” option is a touchscreen that allows you to put your finger where you want focus. This is particularly effective when shooting off of a 1-3 oz tripod.
4) It is is fast and easy to use in manual or semi-manual mode
By the nature of backpacking we are moving—we have places to go and other things to do besides fiddling with a camera. That is, we need to quickly take our best photo and move on. To do this:
You should be able to adjust all critical functions without taking your eye away from the viewfinder.
Fast easily accessed controls are key. Ideally at least two knobs on the top of the camera do the bulk of the work. And a number of customizable function buttons do the rest. You use all of these to quickly modify your major camera settings: exposure, aperture, shutter speed, ISO setting, activate manual focus, manage DRO (digital range optimization), timed shutter release, etc. All in a matter of seconds, not minutes.
Small dials on the camera back, critical items buried in nested menus, etc. all slow down picture taking.
A touchscreen, while not essential, has its advantages, particularly when focusing and making adjustments when shooting from a tripod.
5) Bright viewfinder with all essential information displayed on one screen
A Good viewfinder allows for faster photo taking, better photos, and fewer re-takes. That is, the better you see your image and the more information you have before you take your photo, the better the photo.
Cameras without viewfinders are close to non-starters. Rear screen displays are almost impossible to see in bright daylight. And even if visible, the image is usually far too small to see essential details well enough to assess the quality of the picture before taking it.
In the viewfinder, you should be able see all your critical settings (including histogram). This enables you to quickly assess your photo and make the necessary adjustments before you take it.
A good viewfinder also helps with manual focus.
What is Sharp?
Sharp as I use it is the “perceptual megapixels” of the final image. This is a combination of both lens and camera—not simply the native resolution of the camera sensor! As an example, for most 24 MP, APS-C (crop sensor cameras like the Sony a6300 and a6500, Nikon D7200 or Canon EOS 80D) the perceptual megapixel resolution final image maxes out at around 17 MP or around 70% of the native 24 MP sensor resolution, even with the best and most expensive prime lenses.
Almost all of the loss of the camera sensor’s 24 megapixels is due to the lens. Compared to primes, most zoom lenses do worse, with image resolutions well below 50% of the camera’s sensor. Some going as low as 25% or only 6 MP of your camera’s 24 MP sensor. So it’s important to consider the camera lens combination with a major focus on the lens image quality. One could even argue to select your lens first, and get a camera body that works it.
Bottom line: a great camera with a mediocre lens will give you mediocre results.
The lens for this is probably the Rokinon 12mm F2.0 NCS CS Ultra Wide Angle Fixed Lens available in Sony-E and u4/3 mount. Excellent value, fast and reasonably sharp. Manual focus tho, not that it is a big deal when doing astro work, just set it to infinity and go.
The Possible Exception to P/S Death
“Point and shoot like,” 1-inch-type sensor cameras, e.g. the Sony RX-100 series do perform significantly better than the best smartphone cameras. For some their smaller size and lower weight vs. a mirrorless camera is a godsend. As such, they occupy a valid but narrow niche between smartphone cameras and mirrorless cameras. But note that their image quality not quite as good as similarly priced mirrorless cameras that may weigh only a few ounces more. They are too large and heavy to be truly “pocketable.” And finally, their single lens is only about 1/3 as sharp as the best interchangeable camera lenses for mirrorless cameras like the Sigma 30mm f/1.4 Contemporary lens.
How I Carry my Backpacking Camera – or how to get more photos
For me, its all about the speed and ease of taking a photo. Since I changed to using the Peak Designs CapturePRO mounting system on the shoulder strap of my pack, I get 2 to 3 x more photos per trip. More than I ever got with a point and shoot camera in my pocket!
Note in the video how quickly easily I put my pack on with the camera already attached to my shoulder strap. No camera spinning around and twisting up the shoulder strap.
https://www.adventurealan.com/wp-content/uploads/2016/11/em5-handheld-in-field-fb1200.jpg6281200Alan Dixonhttps://www.adventurealan.com/wp-content/uploads/2023/05/Adventure-Alan-Co-Logo.pngAlan Dixon2016-12-02 15:33:172023-04-24 14:00:335 Most Important Features for a Backpacking Camera
We may request cookies to be set on your device. We use cookies to let us know when you visit our websites, how you interact with us, to enrich your user experience, and to customize your relationship with our website.
Click on the different category headings to find out more. You can also change some of your preferences. Note that blocking some types of cookies may impact your experience on our websites and the services we are able to offer.
Essential Website Cookies
These cookies are strictly necessary to provide you with services available through our website and to use some of its features.
Because these cookies are strictly necessary to deliver the website, refusing them will have impact how our site functions. You always can block or delete cookies by changing your browser settings and force blocking all cookies on this website. But this will always prompt you to accept/refuse cookies when revisiting our site.
We fully respect if you want to refuse cookies but to avoid asking you again and again kindly allow us to store a cookie for that. You are free to opt out any time or opt in for other cookies to get a better experience. If you refuse cookies we will remove all set cookies in our domain.
We provide you with a list of stored cookies on your computer in our domain so you can check what we stored. Due to security reasons we are not able to show or modify cookies from other domains. You can check these in your browser security settings.
Other external services
We also use different external services like Google Webfonts, Google Maps, and external Video providers. Since these providers may collect personal data like your IP address we allow you to block them here. Please be aware that this might heavily reduce the functionality and appearance of our site. Changes will take effect once you reload the page.
Google Webfont Settings:
Google Map Settings:
Google reCaptcha Settings:
Vimeo and Youtube video embeds:
Privacy Policy
You can read about our cookies and privacy settings in detail on our Privacy Policy Page.