Dr. Simon Pratt grew up in Seattle loving the outdoors and earned a doctorate in physical therapy from Regis University.
Adventure Alan & Co is made possible by affiliate links. If you make a purchase after clicking, we may earn a commission at no additional cost to you.
Got a question, you may contact Adventure Alan & Co by filling out the form on this page. We want to your feedback, ideas, and suggestions.
 The Best Cheap 25 cent Backpacking Gear is a Pint Ziploc Freezer Bag. These bags are a perfect size and have a ton of uses. I’ve used them to protect my iPhone and other expensive equipment packrafting in Alaska, rafting down the Grand Canyon in winter, and trekking in Patagonia and the rain forests of New Zealand. Surprisingly, they are virtually unknown and you won’t find them on grocery store shelves. But you can purchase Pint Ziploc Freezer Bag here.
Pint Ziploc Freezer Bags are nearly as effective as ALOKSAKs, but far less expensive. At $0.25 each, it’s easy to carry a few spares and replace between trips as necessary. The thick plastic and double zip work well to keep water and dust out while preventing minor scratches. Unless you plan on having your gear submerged for long periods*, they are lighter, and easier to get gear in and out of, and less expensive than fancy waterproof bags or cases that weigh and cost far more. (*Note: If you really need submersible protection; i.e. your phone will be completely under water for some time, then you will need to get a fully submersible rated bag for your phone.)
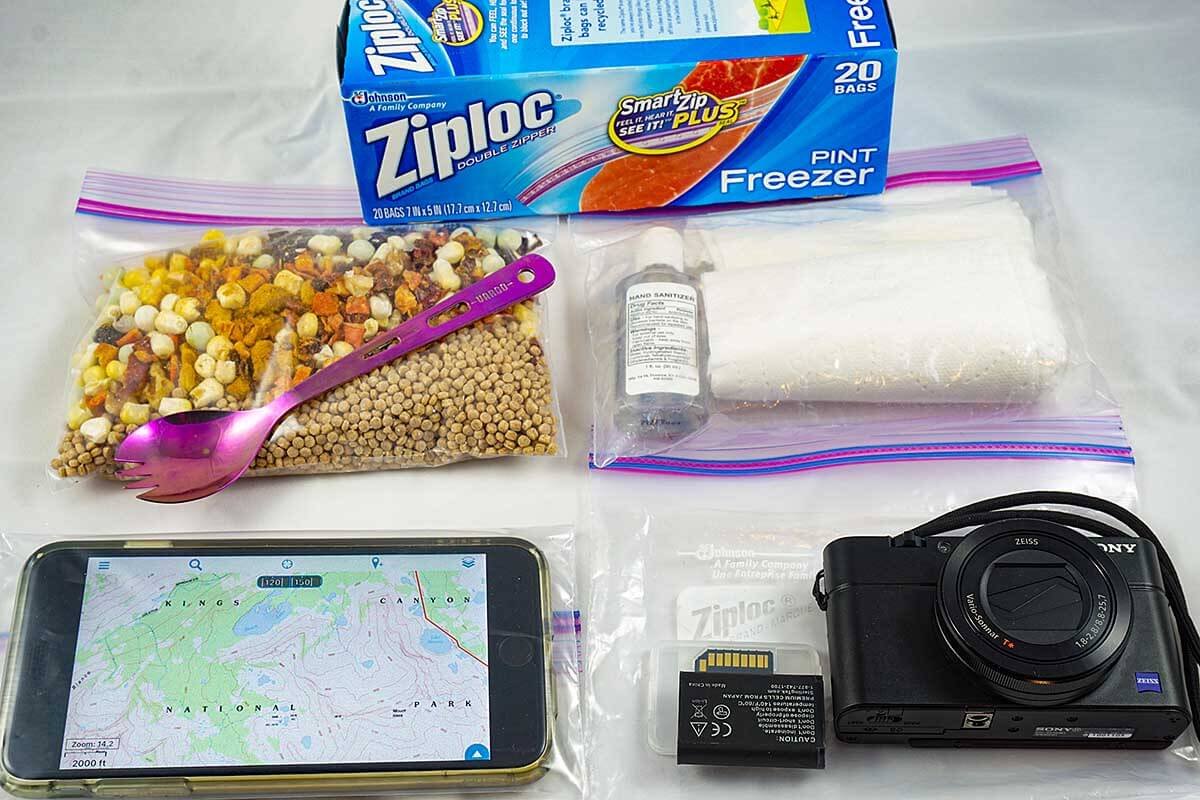
Just a few of the many uses for a $0.25 Pint Freezer Ziplock bag. Clockwise from upper right: 1) store meals, cook in bag & eat from the bag, 2) keeping TP dry in an outside pocket of your pack [normal sandwich baggies are too fragile and leak], 3) protecting expensive cameras/electronics from dust and rain like this $800 Sony RX100 Camera, 4) and my favorite use, protecting my iPhone. Photo shows the proper way to fold the bag for the iPhone for best visablity and touchscreen use.
Many uses for the Best Cheap 25 cent Backpacking Gear
Here are some my uses for $0.25 Pint Ziploc Freezer Bags but there are a ton more. Tell me your uses in the comments!
- Protect my iPhone: see more detail on how I do this below
- Keep the fiddle factor down: Putting like-gear in Pint Ziploc Freezer Bags organizes “gear-chaos.” Quickly finding gear saves time and sanity. E.g. all my first aid kit fits in one baggie. My cables and electronics, spare batteries go in another. My camera stuff, spare SD cards, batteries, bubble level go in another.
- Snacks: One day of snack food goes in one baggie (Pint or Quart size, depending) and is put in the side pocket of my pack for quick access.
- Meals: A Pint Ziploc Freezer Bag is perfect for individual meals. Just re-hydrate in the bag and eat out of the bag. When done, zip it shut and your KP is done. (I use Quart size when Alison and I share meals.)
- Perfect for storing cheese and dried meats like salami, or a potentially leaking bottle of olive oil.
- Protect other electronics and optics, including small cameras, binoculars etc. My Sony RX100 Camera is a bit on the delicate side. I put it in a Pint Ziploc Freezer Bag if it is wet or very dusty (e.g. a windy day in the deserts of S. Utah). I usually leave the bag unzipped and folded over unless conditions are bad.
- My standard travel electronics kit (when trekking worldwide) and even on extended trips in the US—spare charging battery, cables, wall-chargers, outlet adapters all fit neatly in one baggie.
- Map & documents case. I generally don’t use heavy and bulky waterproof mapsets. I normally print my own custom maps and a time and mileage tables on non-waterproof paper. When arranged properly in a Pint Ziploc Freezer Bag or even a quart size, I can keep these in my right hip pants pocket for rapid reference—even in the rain.
- Waterproof TP and hand sanitizer bag. Allows you to keep this easily accessible in an external pocket, even in wet conditions.
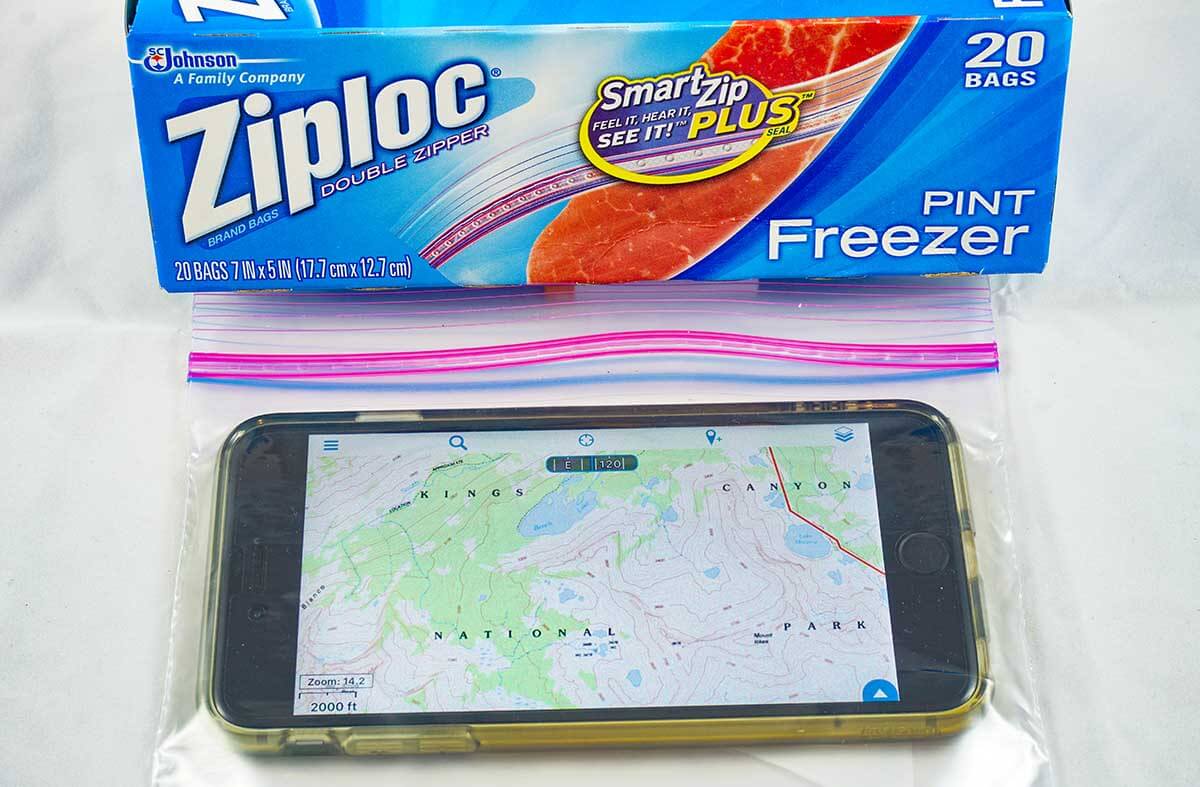
How I use the Pint Freezer Ziplock bag to protect my iPhone
I carry my iPhone in my left hip pants pocket about 95% of the time. Here’s how I keep it protected but quickly usable. First, I use a simple and Light Protective Case with a Screen Protector. Then I put my iPhone in a Pint Freezer Ziplock bag with the phone display on the clear/non-printed side and then fold the extra over so that the display is easily readable and fully touch functional (except fingerprint recognition of the home button). I put the phone in my pocket with the phone display facing against my leg so that it is protected from getting damaged if I bump into something. [Note: make sure that you fold extra bag away from the face of the phone. This prevents the bag from getting hazed by the ziplock closure rubbing against the display side of the bag.] In normal use, I usually don’t zip the bag shut since I am just interested in is protecting the phone from perspiration from my leg and dust. Folding the bag over does just fine for this. The additional benefit of folding and not sealing the bag is that I can quickly extract my phone from the bag to take a photo. Only in heavy rain or when I think I might get a brief dunking, like crossing a stream will I actually zip the bag shut.
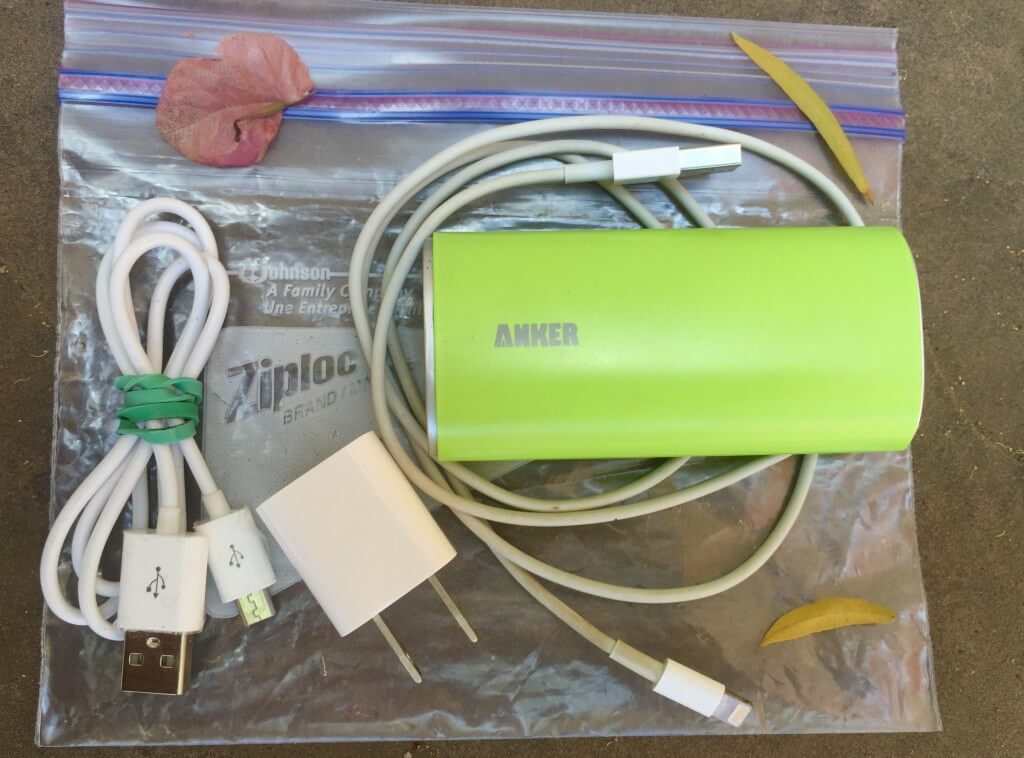
Some of the elements for my light travel electronics kit: A substantial 6400 mAh external charging battery and a lightening cable and a micro USB cable. If traveling, I would add a wall charger (pictured) and a combo Power Adapter Travel Wall Charger (not pictured). All are well packaged and organized in a durable Pint Ziplock Freezer bag.
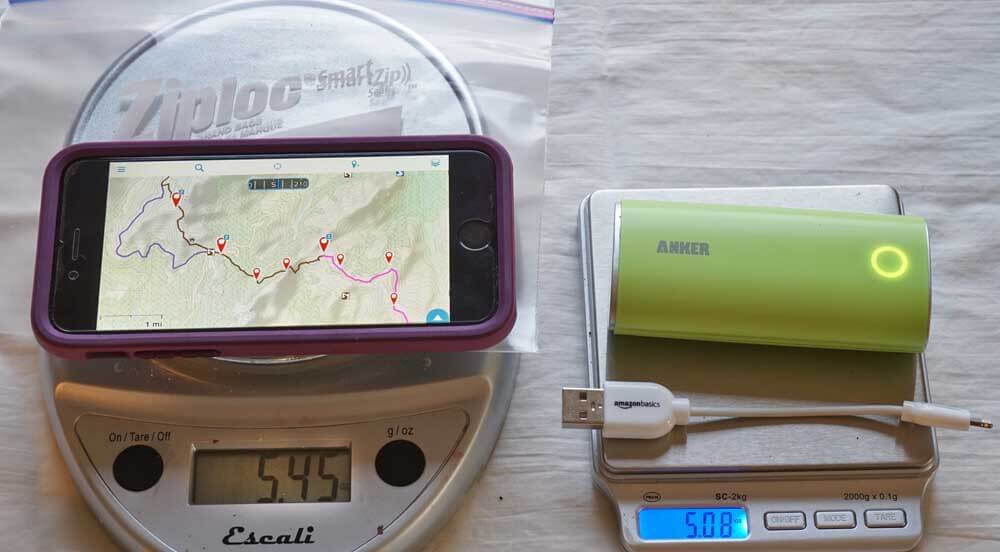
Field use kit: The iPhone 6 in a light but protective case sitting on top of a Pint Ziploc Freezer Bag used to protect the phone from dust, scratches and water (effective, lighter and less expensive than elaborate waterproof cases!). Right: a substantial 6400 mAh external charging battery and a lightening cable.
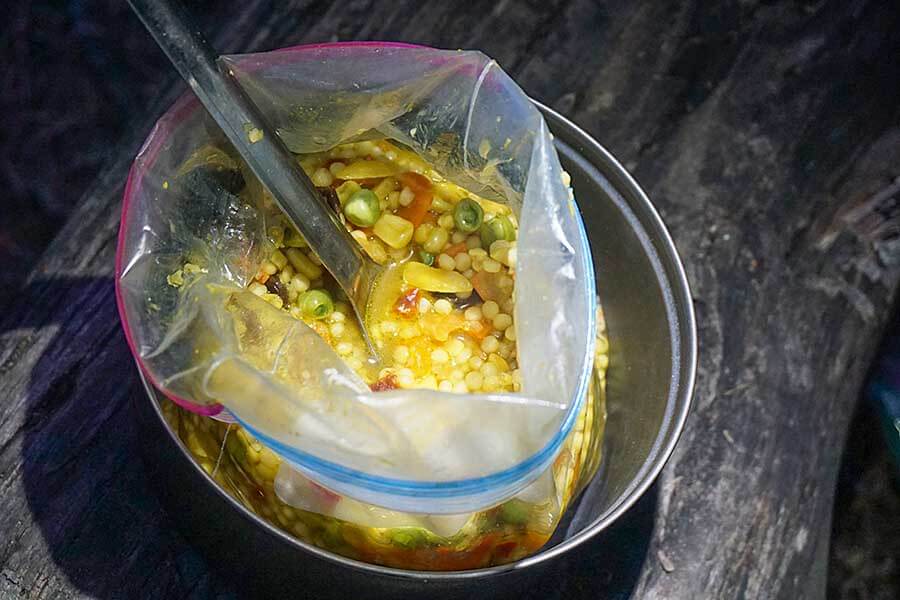
Freezer Ziplock used both for in bag cooking (re-hydration) and to eat from. Zero clean-up after the meal. Zip the bag shut, put it with your trash and you are done. This is especially useful at dry camps or when it’s really cold when washing pots at below freezing is not fun.
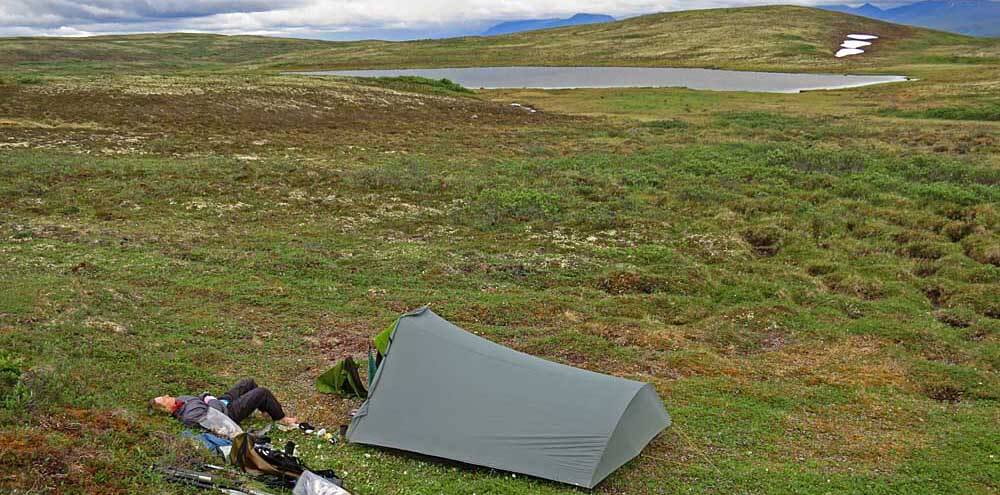
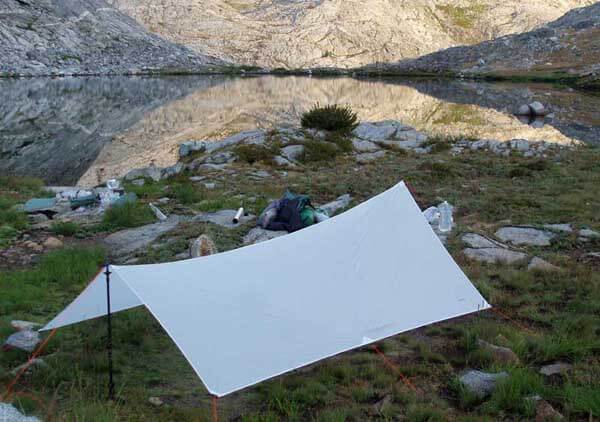
A two-pound TarpTent on the Alaskan tundra
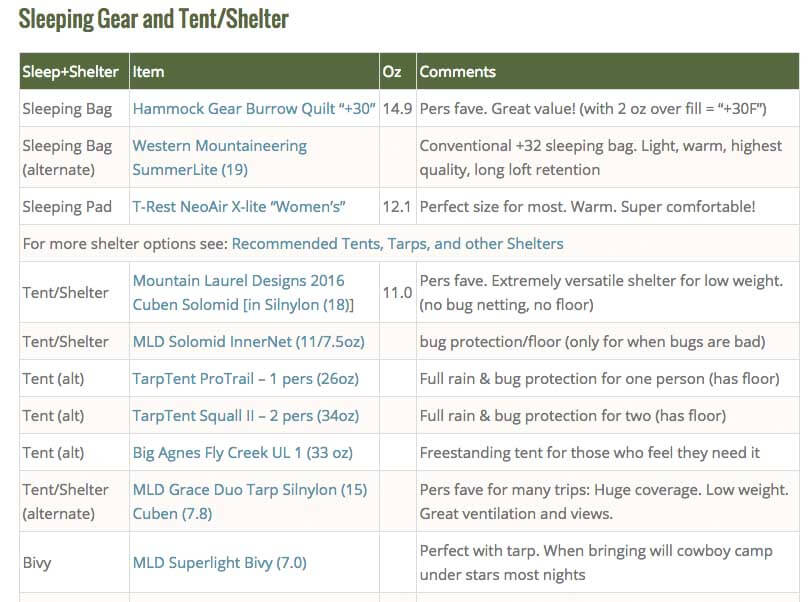
- Look at The tents and shelters listed in my 9 pound gear list. It has recommended Tents and TarpTents in the “Sleeping Gear and Tent/Shelter” section.
- And then take a look at the recommended Tents and Tarp Tents below.
Here are a few suggestions for Tents and TarpTents
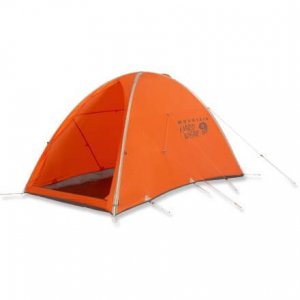 |
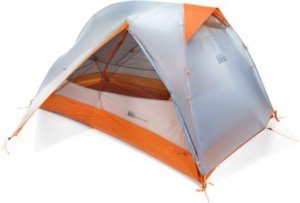
Mountain Hardware Direkt 2 Tent – $550 at REIThis is one of the lightest freestanding four-season tents on the market. While it’s made for fast and light alpine climbing, it could be just as good for fast and light… anything. At least anything where you need to stay out in crazy conditions safely! This tent can be staked out to handle huge winds, and is more comfortable, lighter, and stronger than the previous best-in-class alpine tent: Black Diamond’s FirstLight. |
|
|
|
 |
REI Quarter Dome 2 Tent – $300 at REIOkay, not everyone needs a siege-proof alpine four-season beast of a tent. REI’s long-time favorite Quarter Dome Tent is a great option for those looking for a reasonably priced lightweight free-standing backpacking tent. If ultralight tarps seem too daunting, this will still help you cut weight, weighing just over 3 lbs, but the Quarter Dome remains comfortable with ample head room, and plenty of space for two backpackers. The increased room/livability from extremely vertical walls is what sets tent apart from most of its peers. |
|
|
|
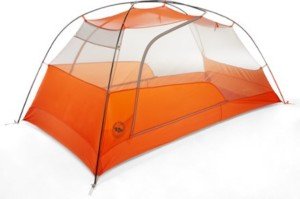 |
Big Agnes Copper Spur HV UL 2 Tent – $450 at REIIf you want to cut a little weight, but keep lots of space, Big Agnes has you covered with the high volume version of their Copper Spur UL 2 freestanding tent. It comes in at 2 lb. 12 oz on the trail, and can be pitched even lighter using just the fly. This is one of the most spacious 2-person tents out there, which is great if you are going to be stuck in your tent playing cards for a while in bad weather, or just prefer highly livable tents. |
|
|
|
 |
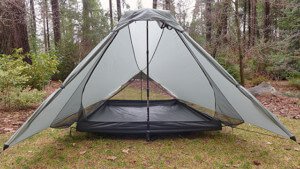
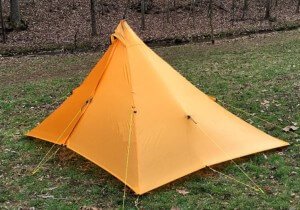
Tarptent Notch 1-Person Shelter – $285Tarptent has been around for ages with a great reputation in the lightweight backpacking community. As the name suggests it combines the best aspects of a tent and tarp. That is, low weight combined with a fully waterproof floor and mosquito protection. The Notch is a great 1-person shelter, that sets up with two trekking poles, and includes a full inner bug netting and a bathtub floor. The Notch will keep you and your stuff dry in a rain storm, and there is ample headroom to sit up and wait out the foul weather from dry comfort inside! The shelter weighs in at 27 oz, which is a fair bit lighter than even the lightest free-standing tents! |
|
|
|
 |
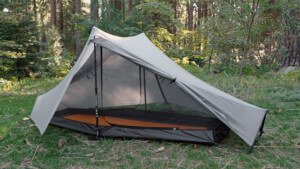
Tarptent MoTrail 2-Person Shelter – $259This is a light shelter with plenty of room for two to sit up side by side and eat dinner looking at the view. This Tarptent MoTrail is more like a traditional tarp setup with a ridgeline held by two trekking poles in the long direction of the tarp. The tarp has a mesh inner, and a Silnylon outer with a Silnylon tub floor to keep you dry even in a total downpour. Inside is space for two people to sleep comfortably without a trekking pole between them. At 36 oz, it’s just over 1lb/person, and it’s less expensive than the 1-person shelters like the Tarptent Notch or MLD Solomid! |
|
|
|
The following Pyramids are fully storm worthy sheltersAll can be ordered with an Inner Nest if you need a floor and bug netting |
|
|
|
|
 |
Mountain Laurel Designs Duomid XL – $365This is the pyramid shelter against which all others are measured. These have been used by thru hikers on the longest treks, deep in the wilderness of Alaska, on glaciers and high peaks, and even occasionally as car-camping tents! The design is flexible, durable, functional, livable, and light at 21 oz for the SilNylon version. It can withstand serious storms, and open up on nice nights. It is spacious and comfortable for two backpackers and their gear. Of course, for the gram counters, this tarp also comes in the much lighter cuben fiber (Dyneema composite fabric) version, weighing in at 16 oz even, and costing about $700 depending on the color of fabric used. Note Asym design: one of the few ‘Mids that allows a couple to sleep side-by side without a center pole between them. |
|
|
|
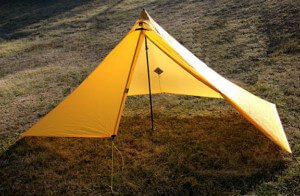 |
Mountain Laurel Designs SOLOMID XL 4.5′ X 9.2′ – $265This is the upgraded version of the shelter Andrew Skurka took on his epic Alaska-Yukon Expedition. It’s a 1-person version of the Duomid with all the same great features, but it’s lighter and less expensive! It fits 1-person with ample room for gear. This SilNylon version comes in at just over a pound (17 oz). The Cuben fiber (Dyneema composite fabric) is a svelte 12 oz, but costs $465. For such a versatile, lightweight shelter, it’s a bargain! Note: new 2017 Asym, single pole design with 70% of the user space behind the one center pole and the front 30% functions as a vestibule. This offset design allows entry and exit in rainy conditions to help keep the sleep side of the shelter dry like the DuoMid XL design. |
|
|
|
Sources for Ultralight and Lightweight Backpacking Equipment
This is only a small sample of the many sources for light equipment. Many other sources can be found by reading through the reviews and technique articles at Backpacking Light www.backpackinglight.com. You can also check out forums/discussions for advice:
- Backpacking Light.com Forums
- WhiteBlaze.net http://www.whiteblaze.net/
General Outfitters & Larger Companies
- REI (largest outdoor retailer in the country)
- Eastern Mountain Sports
- Moosejaw
- Backcountry
- Sierra Trading Post (Good deals on closeouts)
- ULA Equipment (excellent packs and some other equipment)
- Hyperlite Mountain Gear (very light Cuben Fiber backpacks and shelters)
- Sierra Designs (good UL down bags & clothing)
- Campmor (a solid retailer of good gear. often overlooked but shouldn’t be)
- Pro Mountain Sports (carries a bunch of light gear)
- Marmot (clothing & sleeping bags)
- Mountain Equipment Co-op (MEC) (some light clothing & gear – good value)
- Patagonia (in with all the urban-vanity-wear is some very light gear)
- Montbell (light and nice – a bit pricey)
- Outdoor Research (tons of good light stuff)
- Rab (lots of great clothing and sleeping bags)
- Sea to Summit (tons of backpacking accessories: stuff sacks, cooking gear, sleeping pads, etc.)
- Mountain HardWear (clothing and tents)
- My Trail Co (former owners of GoLite will hopefully get up & running near future)
Personal Favorites (mostly small manufacturers)
- ULA Equipment (excellent packs and some other equipment)
- Mountain Laurel Designs (very light backpacks, sleeping quilts, shelters, etc.)
- Hyperlite Mountain Gear (very light Cuben Fiber backpacks and shelters)
- Gossamer Gear (packs, shelters, sleeping gear – formerly GVP Gear)
- Henry Shires’ Tarptents (tents)
- Six Moon Designs (packs & tents)
- Trail Designs (superb ultralight cooking systems)
- Western Mountaineering (superb down clothing and sleeping bags)
- AntiGravityGear (excellent stoves, cook wear, shelter & clothing)
- ZPacks (ultralight Cuben Fiber tents, backpacks, down sleeping bags, rain gear, etc.)
- Inov-8 Shoes (IMO the best lightweight footwear!)
Hammock Gear (mostly small manufacturers)
Note: many hammock quilts & tarps can also be used for regular camping. Many times for less money and equal or better performance to conventional (ground sleeping) sleeping bags and tarps.
- Hammock Gear (light & inexpensive tarps & hammock quilts. can also be used for ground sleeping.)
- Hammeck (innovative, full featured hammocks)
- Dutchware (excellent bargain hammocks & about every hammock accessory, many innovative)
- Loco Libre Gear (quality quilts and good prices. can also be used for ground sleeping.)
- Enlightened Equipment (high quality quilts. can also be used for ground sleeping.)
- Dream Hammock (light custom hammocks, lots of models and options – some exceptionally light)
- Bargain Hammocks:
- Grand Trunk UL Travel Hammock,
- ENO, Eagles Nest Outfitters
- BIAS (Butt in a Sling) Hammocks
Clothing (for manufacturers not listed above)
- Western Mountaineering (superb down clothing and sleeping bags)
- Red Ledge Thunderlight www.redledge.com/ (inexpensive light raingear at Campmor & other stores)
- Rainshield http://www.rainshield.com/ and also availabe s(at the Up North Store)
- Frogg Toggs & DriDucks http://www.froggtoggs.com/ (inexpensive ultralight raingear)
- Ibex www.ibexwear.com/
- Smartwool www.smartwool.com/ (also available through many retailers)
Packs (for manufacturers not listed above)
- Granite Gear www.granitegear.com (also shelters, storage sacks, and other items)
- Osprey www.ospreypacks.com/
- Six Moon Designs www.sixmoondesigns.com (Packs & Tents)
Down Sleeping Bags and Down Clothing (for manufacturers not listed above)
- Western Mountaineering (superb down clothing and sleeping bags)
- Feathered Friends www.featheredfriends.com
- Nunatak www.nunatakusa.com/ (stock and custom down bags and clothing)
Stoves and Cooking
- Trail Designs http://www.traildesigns.com/ (superb ultralight cooking systems)
- Jetboil Stoves (Best backpacking stove, if alcohol is not your thing)
- Basic alcohol stove www.pcthiker.com (Pepsi can stove instructions)
- Vargo http://vargooutdoors.com/ (light titanium stoves, cookware and utensils)
- Snow Peak http://www.snowpeak.com/ (light titanium stoves, cookware and utensils)
At under $700, this is a good example of how you can assemble a great kit of light gear for not too much money—even tho it’s over 10 years old. While much of the gear on this list not the latest model, there are current inexpensive analogs for much of the gear on this list.
| Summary of Weights | |||
| Lbs | Cost | Item | |
| 1.4 | $150 | Sleeping | |
| 1.2 | $80 | Shelter | |
| 1.9 | $106 | Clothes packed | |
| 1 | $144 | Pack & stuff sacks | |
| 1.2 | $31 | Essentials | |
| 0.9 | $47 | Cooking, water, food storage | |
| 7.6 | $511 | Base Pack Weight | |
| 3.7 | $177 | Items worn or carried | |
| 11.3 | $688 | Total FSO | |
| Sleeping | |||
| Oz | Lbs | Cost | Item |
| 17 | 1.06 | $140 | RAB Top Bag |
| 4.8 | 0.3 | $10 | Foam pad 20×45 |
| 1.36 | Total | ||
| Shelter | |||
| Oz | Lbs | Cost | Item |
| 9 | 0.56 | $55 | 6×8 Campmor Tarp |
| 2.3 | 0.14 | 6 aluminum stakes | |
| 15.3 | n/a | Sil Shelter $150 | |
| 2 | n/a | 2 tent poles for Sil Shelter $7 | |
| 1.5 | 0.09 | $15 | 50′ Triptease shelter cord |
| 1.7 | 0.11 | $10 | OR bug headnet |
| 4.5 | 0.28 | Tyvek Ground Sheet | |
| 1.19 | Total | ||
| Essentials | |||
| Oz | Lbs | Cost | Item |
| 2 | 0.13 | Maps & stuff in zip loc | |
| 1.2 | 0.08 | $6 | Compass, basic |
| 1 | 0.06 | Prescription glasses | |
| 0.6 | 0.04 | $20 | Pockt Bright blue LED light |
| 0.2 | 0.01 | Whistle | |
| 4 | 0.25 | Boo boo (1st aid) kit | |
| 1.5 | 0.09 | Sunscreen & chap stick | |
| 1 | 0.06 | Lighter, b’candle, matches | |
| 1.1 | 0.07 | $5 | H2O purify tablets |
| 2 | 0.13 | Jungle juice & Bio Soap | |
| 2 | 0.13 | TP, toothbrush, toothpaste | |
| 1.9 | 0.12 | Duct Tape 1oz, Bandana 0.9oz | |
| 1.4 | 0.09 | Cred card, $$, permit, pen, paper | |
| 1.24 | Total | ||
| Clothes packed | |||
| Oz | Lbs | Cost | Item |
| 7.2 | 0.45 | $35 | Sil nylon rain poncho |
| 8.2 | 0.51 | $25 | Cirrus vest |
| 6 | 0.38 | $20 | Ltwt MTS zip-T |
| 4.8 | 0.3 | $6 | Light Poly bottoms |
| 1 | 0.06 | $6 | Light Poly balaclava |
| 1.3 | 0.08 | $4 | Lt. poly gloves |
| 2.5 | 0.16 | $10 | Trail running socks (spare) |
| 1.94 | Total | ||
| Pack & stuff sacks | |||
| Oz | Lbs | Cost | Item |
| 14 | 0.88 | $110 | Golite Breeze (frameless rucksack) |
| 2 | n/a | Sil Nylon Pack Liner | |
| 1 | 0.06 | $14 | Grn Sil Nylon clothes stuff |
| 1.4 | 0.09 | $20 | Golite sleep bag stuff sack |
| 1.03 | Total | ||
| Cooking, water, food storage | |||
| Oz | Lbs | Cost | Item |
| Oz | Lbs | Cost | Item |
| 0.5 | 0.03 | $3 | Mesh food stuff sack |
| 4 | 0.25 | 50′ food rope | |
| 1.2 | 0.08 | $6 | 2 liter platypus |
| 4 | 0.25 | $20 | Platy 2 L zip hoser |
| 4.5 | 0.28 | $18 | Seychelle inline filter |
| 0.89 | Total | ||
| Items worn or carried | |||
| Oz | Lbs | Cost | Item |
| 30.5 | 1.91 | $35 | Solomon Wind Raid Shoes |
| 2.5 | 0.16 | $10 | Trail running socks |
| 12.8 | 0.8 | $40 | REI convert. pants w belt |
| 6 | 0.38 | $40 | Railriders ecomesh shirt L |
| 2 | 0.13 | $20 | Sun Hat |
| 1 | 0.06 | Prescription Raybans | |
| 2.4 | 0.15 | Watch | |
| 1.3 | 0.08 | $32 | SA Classic knife, Photon, Lanyard |
| 3.66 | Total | ||
| Potential List Changes | |||
| For +20 low temperatures add: | |||
| 15.3 | 0.96 | Sil Shelter $150 | |
| 2 | 0.13 | 2 tent poles for Sil Shelter $7 | |
| 13.4 | 0.84 | PreCip rain jacket M $99 | |
| 2.8 | 0.18 | Heavy Poly Balaclava | |
| 8.1 | 0.51 | Mid wt zip T MTS (REI) | |
| 2.3 | 0.14 | Fingerless fleece gloves | |
| 12 | 0.75 | Marmot DriClime Omni Jacket | |
| 4.1 | 0.26 | Silk Bag Liner: 4.5 w sack | |
| Remove: | |||
| 6 | -0.38 | Ltwt MTS zip-T | |
| 6 | -0.38 | Railriders ecomesh shirt L | |
| 1 | -0.06 | Light poly balacalva | |
| 7.2 | -0.45 | Sil nylon rain poncho | |
| 9 | -0.56 | 6×8 Campmor Tarp | |
| 9.6 | Basic Pack Weight | ||
| 12.4 | FSO | ||
| For unexpected snow add: | |||
| 3.7 | 0.23 | Seal Skins socks M | |
| 2.5 | 0.16 | Minigaiters Trail Racer II | |
| 8 | Basic Pack Weight | ||
| 11.69 | FSO | ||
| For +20 & Possible Snow (above 2 additions combined): | |||
| 9.8 | Basic Pack Weight | ||
| 12.6 | FSO | ||
| For rainier trips. E.g. East Coast. Add: | |||
| 2 | 0.13 | Sil Nylon Pack Liner | |
| 3 | 0.19 | Sil nylon rain chaps (custom) | |
| 7.96 | Basic Pack Weight | ||
| 11.61 | FSO | ||
| If fishing add: | |||
| 6 | 0.38 | GL3 Fly rod w/o case | |
| 5.2 | 0.33 | Fly reel, sci. anglers | |
| 8.5 | 0.53 | All other flyfishing stuff | |
| 8.88 | Basic Pack Weight | ||
| 12.53 | FSO | ||
| If cooking with partner add: | |||
| 3.5 | 0.22 | Snowpeak Giga stove | |
| 6.5 | 0.41 | 4 oz Snow peak fuel (est wt) | |
| 0.5 | 0.03 | Foil Windscreen | |
| 4.3 | 0.27 | MSR Ti Kettle with lid | |
| 1.9 | 0.12 | Evernew Ti Mug | |
| 0.35 | 0.02 | plastic spoons | |
| 1.07 | Additional weight | ||