Cerro Castillo Trek Guide
The Cerro Castillo Trek might be the best trek in Patagonia you’ve never heard of. It rivals drama and beauty of the Torres del Paine W Trek, yet has far less visitors. Why? Well, it just hasn’t been “discovered” yet. The Aysén Region is Chile’s third largest region but also its least populated. Because of this you’ll see far fewer people on the Cerro Castillo Trek than hikes of similar beauty and stature in other areas of Patagonia — like the Torres del Paine Trek, or the Fitz Roy Trek in Argentina’s Los Glaciares National Park. As such, the Cerro Castillo Trek is a fabulous place for adventurers looking for the trail less traveled, and a stunning one at that!
The following is a complete trip guide. It gives a complete route description, distances, hiking times — all the essential information you need to do the trek safely and efficiently. In addition, it has downloadable maps, a GPX file with trails, campsites, and key features, and elevation profiles for each day.
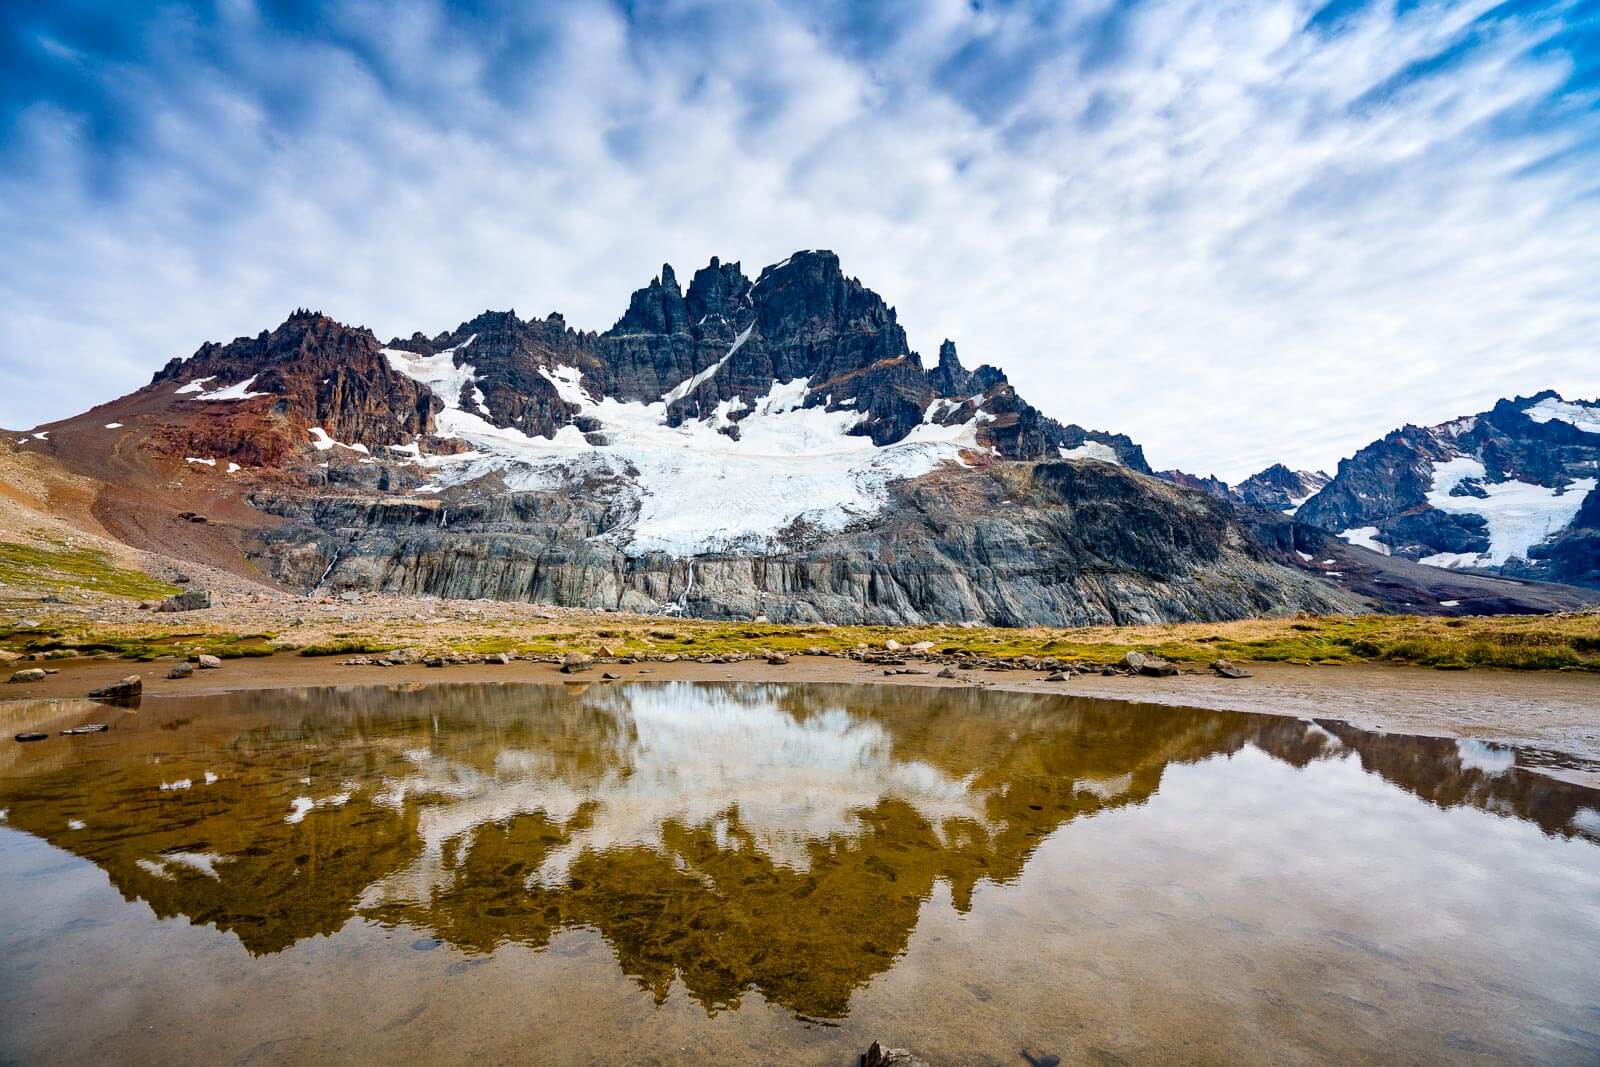
Lead photo above: Cerro Castillo (Castle Peak), the gem of this trek, is a stunning, “ultra-prominent” mountain in the Southern Andes of Patagonia.
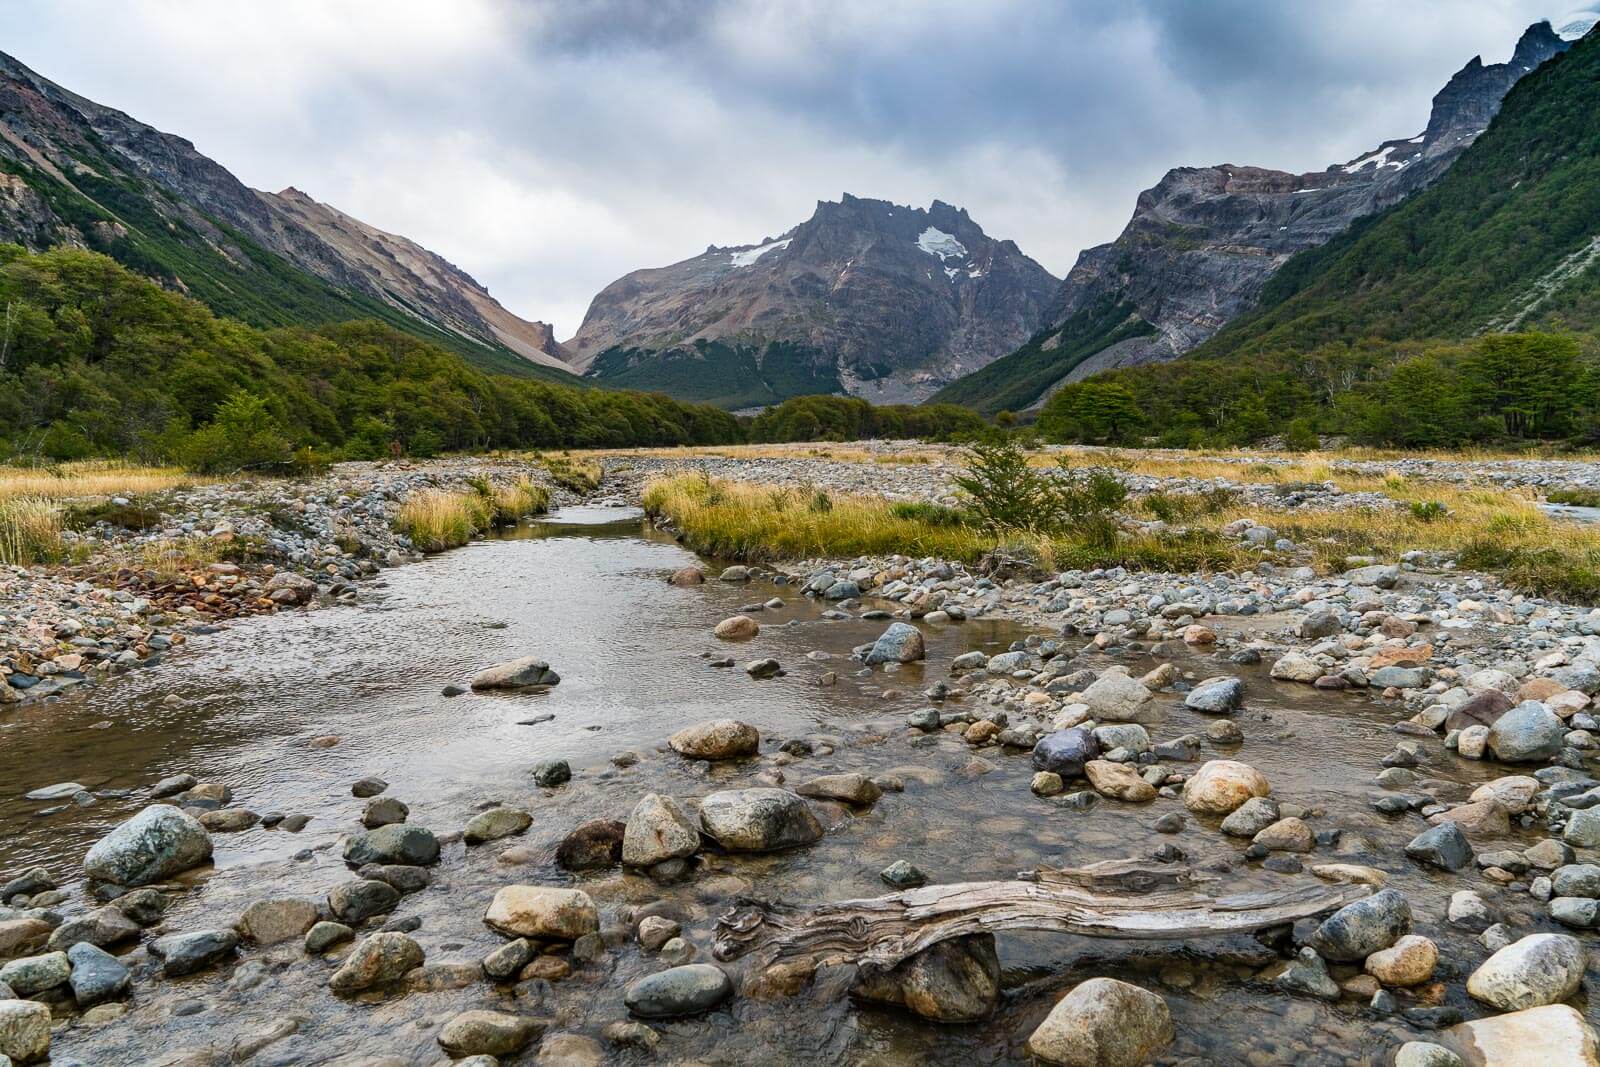
View up Rio Turbio near camp at the end of Day 1. The pass for the next day, El Penon Pass, is the obvious notch center-left.
Trek Details
Highlights – Iconic view at the base of Cerro Castillo competes with the best in Patagonia (e.g. Torres Del Paine). High mountains, glaciers, rain forest, deep mountain valleys, grasslands and an amazing variety of terrain and ecosystems.
Duration – 3 to 4 Days. Moderately fit hikers can easily do this in 3 days.
Distance – 34 miles (54 km) classic route [with a shorter option for 25 miles (40 km)]
Level of Difficulty – Moderate
Route Finding – Easy. Almost entirely on trail. Well signed. Only a few sections over rock where you need to pay attention.
Location – Aysén Region of Chile. Nearest large City is Coyhaique.
Challenges: River wading, log, rock and other sketchy river crossings in high water conditions; brief snow travel (sometimes icy), and the usual Patagonia weather and winds.
Camping – There are designated campsites where you pitch your own tent. Some have picnic tables. There is usually an outhouse (toilet). There are no shelters anywhere on the trek.
Water, Food & Fuel – Water is plentiful along the trail and in camps but there is no treated water. There is no food or other services available along this route. Buy your Food (and stove fuel) in Coyhaique before you go (see “Food, Gear, & Fuel“)
Best Time of Year – December to March, Austral summer, is the best time to do this trek. It’s always a good idea to check the CONAF Site for conditions and possible trail closures before you go, especially in early or late season.
Note about Early & Late Season – Note that early and late season that the weather will be colder with possible snow and that snowpack will be greater in early in the season. In particular El Penon Pass holds a lot of snow in early season, and cold be subject to closure to with a big early or late season snow storm. So check the CONAF site for possible closures.
Entrance Fee – 23,500 CHP per person as of Dec 2018
The start of the climb from Laguna Castillo on the morning of Day 3.
IMPORTANT | New Route Restrictions
Intrepid trekkers have sent us important updated information that we would like to share. This information is good as of March 15, 2019:
- There is now a cut-off time assigned to this trek. Hikers must begin their trek before 1pm. This shouldn’t be a problem as the two buses from Coyhaique (8am and 9am) should get you there in plenty of time. There are even reports of people taking the 8am bus to Villa Cerro Castillo, dropping their excess gear/luggage and same day, catching an 11:30am bus back to trailhead (Las Horquetas) to begin at 12::30pm.
- The main campsite for day 2 has moved. Both El Bosque and La Tetera are CLOSED for ‘recuperacion.’ Your option is to continue to the NEW El Bosque campground, about 20-30 minutes further up the trail from the old El Bosque (i.e. it’s between the old El Bosque and La Tetera). Here, you will be 2.4km from Lago Cerro Castillo. Reports are that the campground is small and late arrivals were forced into non-ideal spaces. But, the campground has benches and a toilet available.
- The “emergency route” is now clearly marked “emergencia” so much easier to not accidentally take this path (unless you want to).
- Updates on bus times. All buses, unless noted, are traveling between Coyhaique and Cochrane, via Villa Cerro Castillo (VCC)
- Buses Sao Paolo leaves Coyhaique at 9am, leaves Cochrane at 6:30am, both arrive VCC between 11:30-12:30pm every day.
- Buses Don Carlos leaves Coyhaique 9:30am, leaves Cochrane 9am, both arrive VCC between 2:30-3:30pm, Mon-Sat.
- Buses Acuario 13 leaves Coyhaique 9:00am (W, F, Sun), leaves Cochrane 6am (Tu, Th, Sat), both arrive VCC 11:30-12:30pm.
- Buses Aguilas Patagonicas leaves Coyhaique 9:30am, leaves Cochrane 7am, both arrive VCC 12:30-1:30pm, everyday
- Buses Eca, between Coyhaique and Puerto Guadal leaves Coyhaique 9:30am (Tu, F), leaves Puerto Guadal 7:30am (Wed, Sun), both arrive VCC 11:30-12:30pm.
The New Patagonia National Park Trek a Nearby Companion Trek
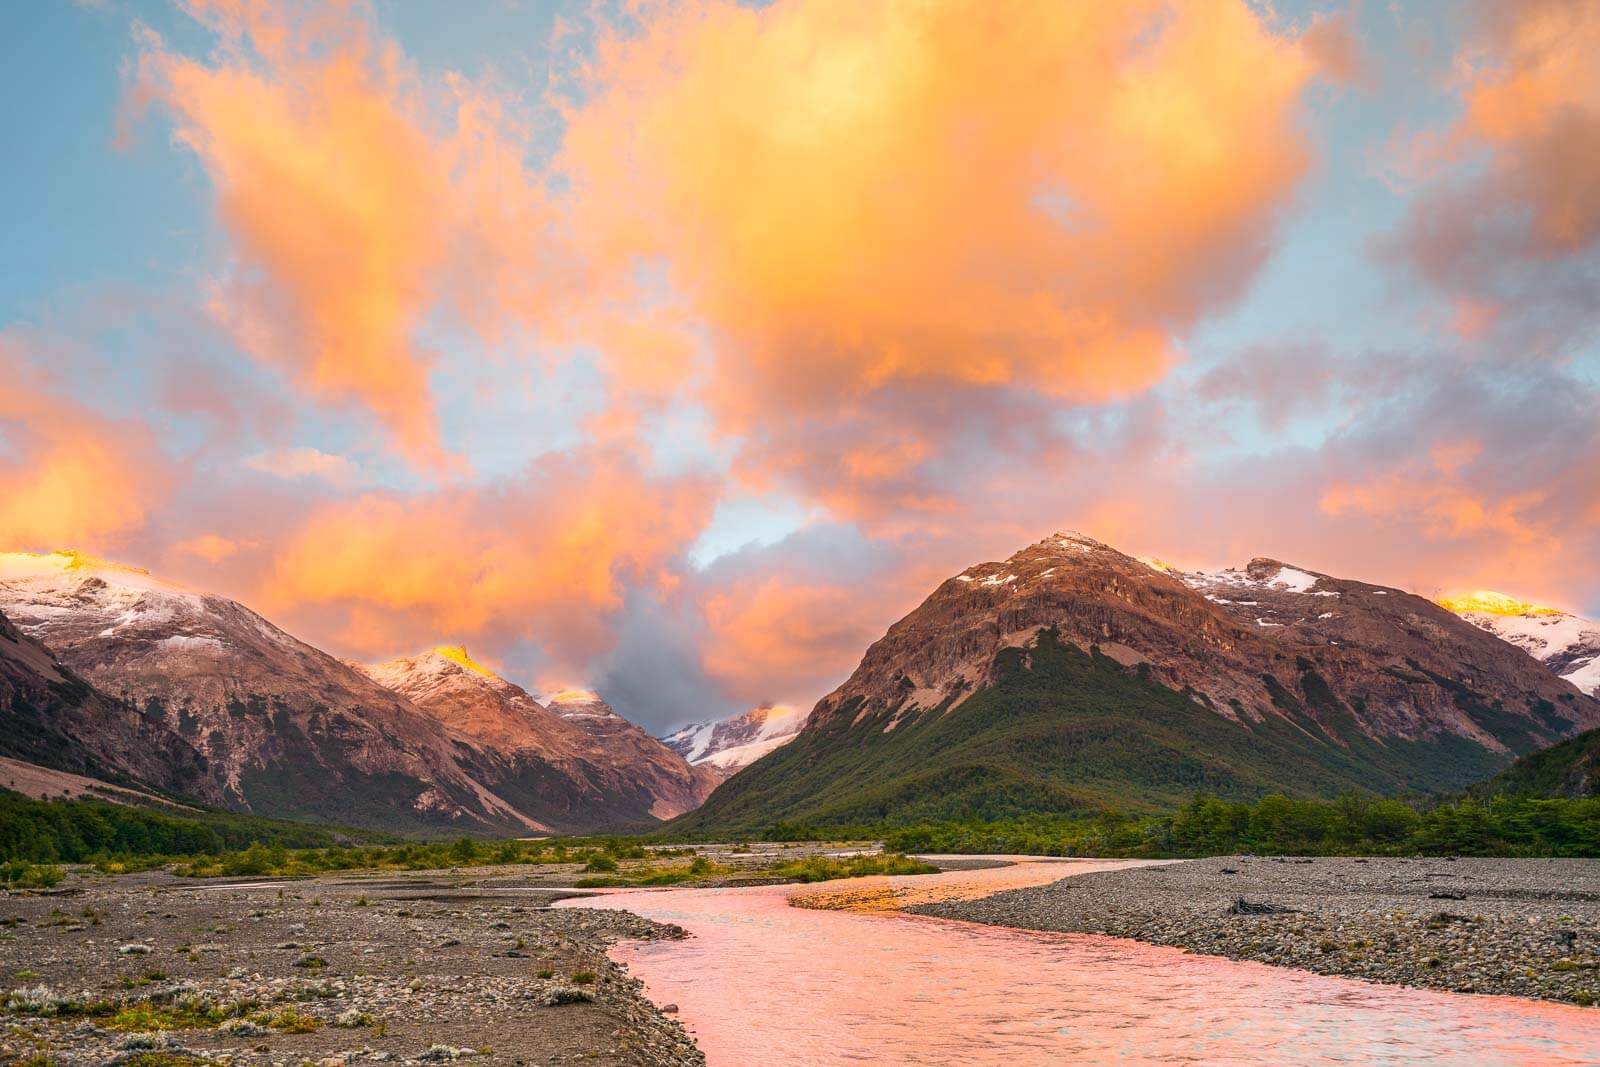
Also see our companion trek in the same region of Chile, the New Patagonia National Park Trek, another best trek in Patagonia you’ve never heard of. Combined with the New Patagonia National Park Trek you have almost two weeks of fantastic trekking in a much less traveled but exciting region of Patagonia. Chile’s New Patagonia National Park may well become the “Yellowstone of South America” due to its rich diversity. The new Park has it all — the high glaciated peaks of the Southern Andes, wide valleys with ice cold glacial rivers, forests of southern beech hanging with moss, and startlingly green glacial lakes.
Where is Cerrro Castillo?
Cerro Castillo is in Northern Patagonia. It’s in Chile about 840 miles (1350 km) south of Santiago.
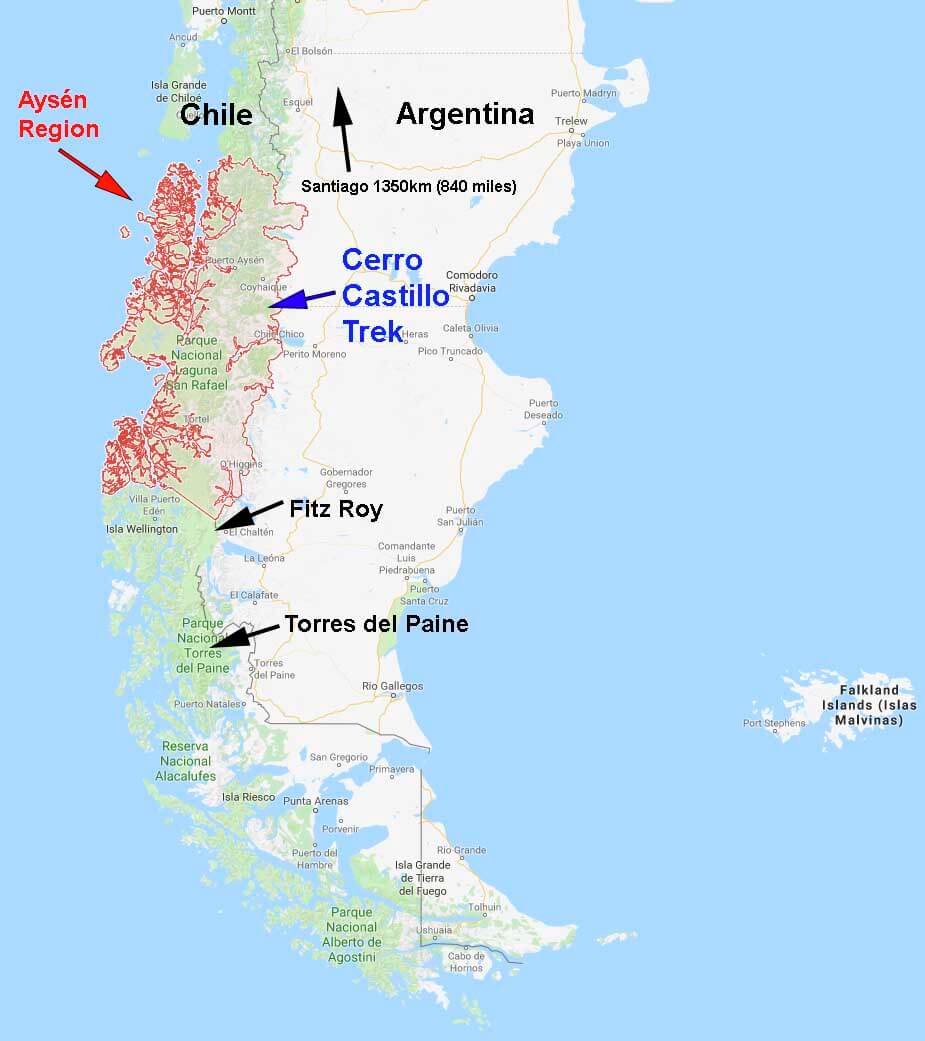 Map of Patagonia showing the location of the Cerro Castillo Trek in relation to other well known treks — Torres del Paine Trek (also in Chile) and the Fitz Roy (Cerro Torre) Trek in Argentina.
Maps and GPX files for the Cerro Castillo Trek

Our custom map of the Cerro Castillo Trek (click on map to enlarge)
We spent a fair amount of time creating a custom map of the Cerro Castillo Trek and a companion GPX file with trails & campsites, etc. You can download the map and print it out on a home printer or at Kinkos. The GPX file is best used with the Gaia GPS Navigation App for iPhone and Android — it’s what we use (read more here…). But it will work just fine with other smartphone navigation apps and handheld GPS units like Garmin.
Note: Our map and .gpx files above are provided free for your personal use. We are happy for you to use them! But please respect our work and copyright and don’t republish or distribute them to others. Thanks!
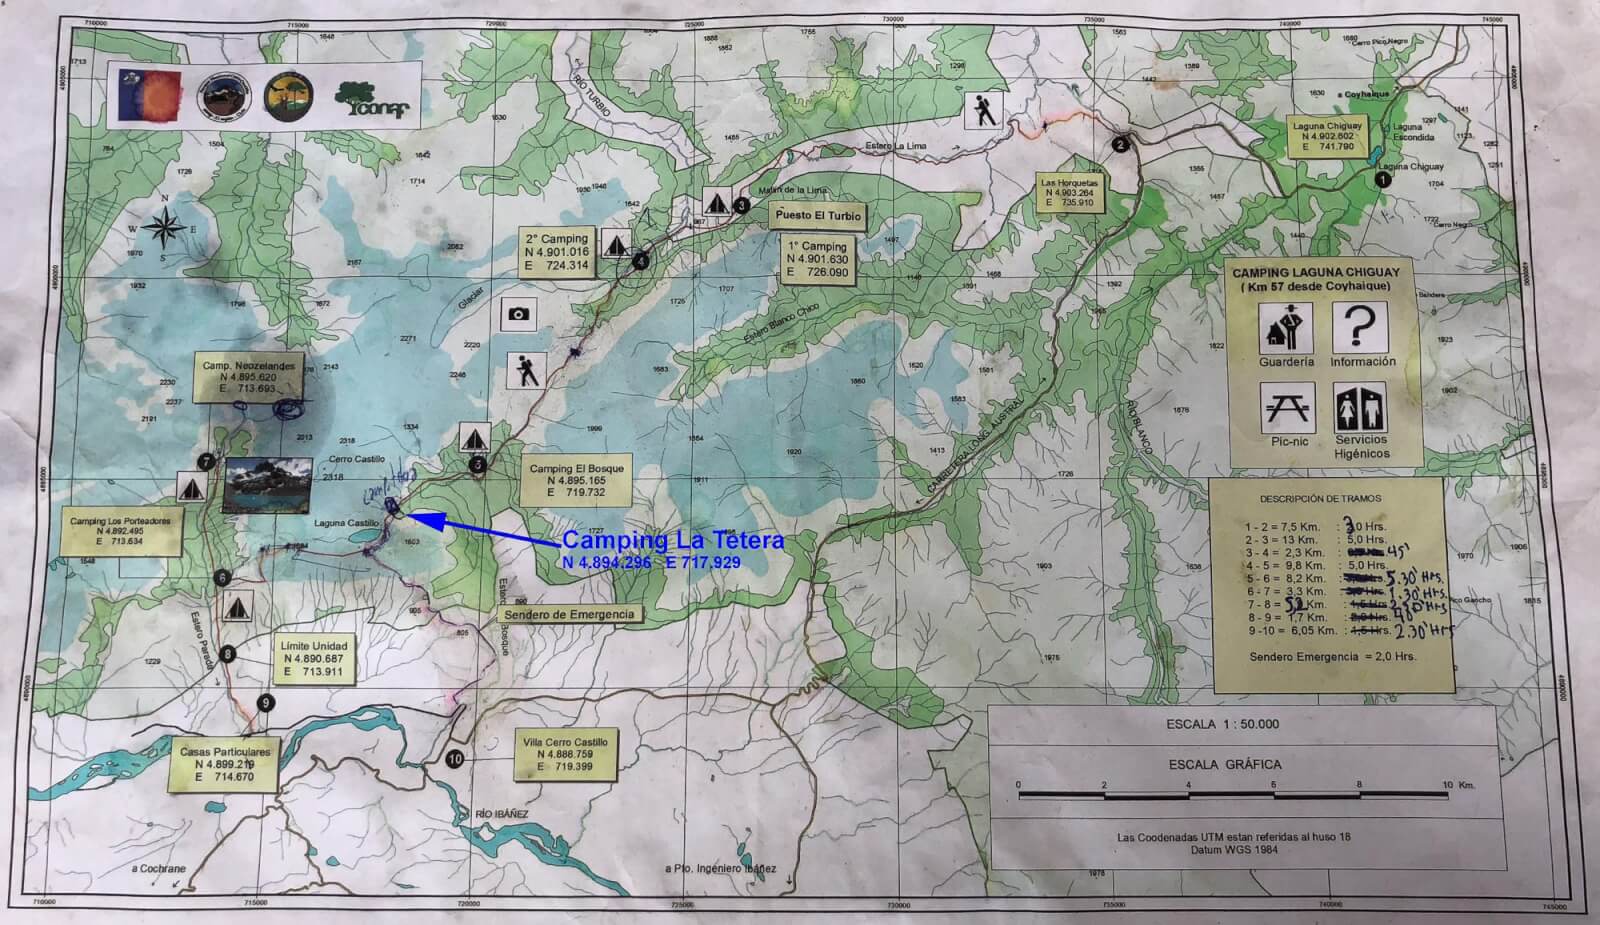
Map of the Cerro Castillo Trek provided at the ranger-staffed entrance station to the park. (click on map to enlarge)
Link to download PDF of CONAF’s map of the Cerro Castillo Trek (82 Mb)
Key Gear for the Trek
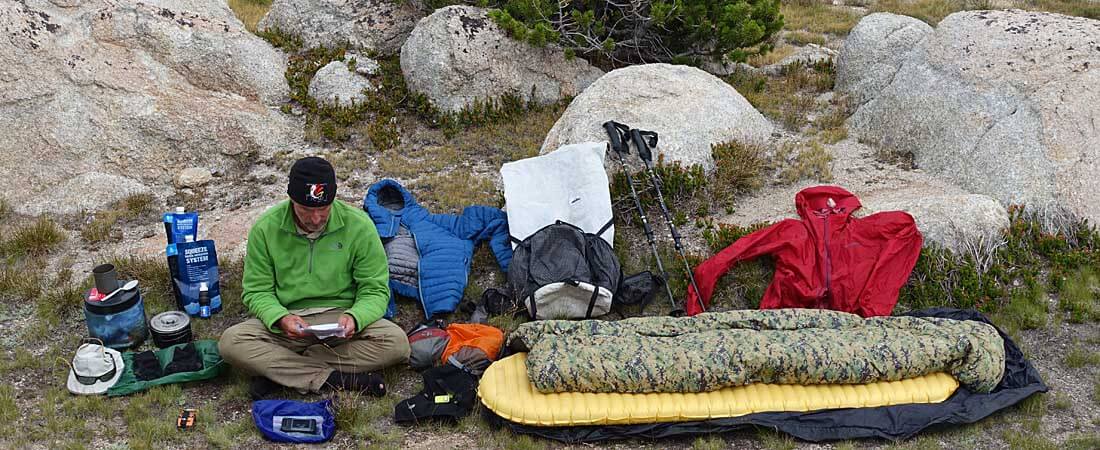
We’ve logged a lot of time in Patagonia over the past 14 years — torrential rain, snow and 70 mph winds, we’ve seen it all. As such, we think we’ve got our gear well tuned for Patagonia. So, at the end of this guide we’ve listed some of the key gear that make our trips warm, safe and most important fun!
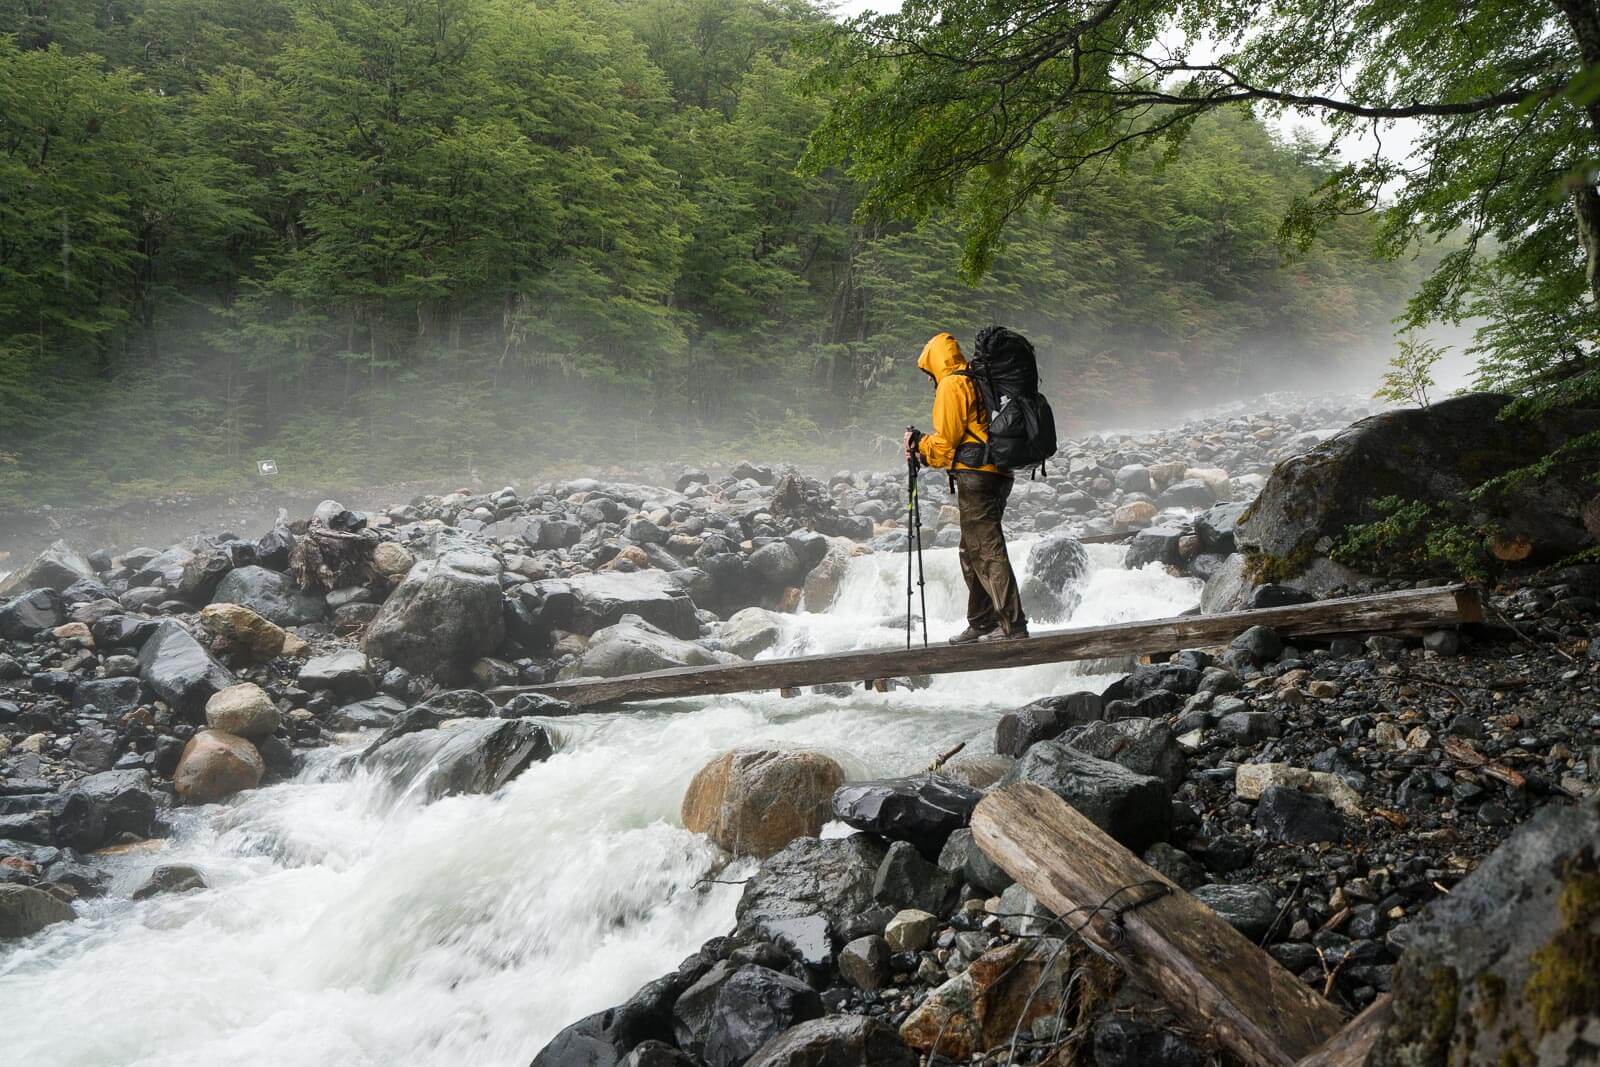
As you’ll notice in our photos, it rained a fair amount on this trip. That’s Patagonia — it rains! But rain doesn’t mean you need to be cold, wet and miserable. With good gear choices you can be warm, safe and have a crapload fun — even in the rain. And our packs with all our gear and food for this trek were under 17 pounds (8 kg). Those light packs are a big help when you are navigating wet rocks on a steep Patagonian riverbed.
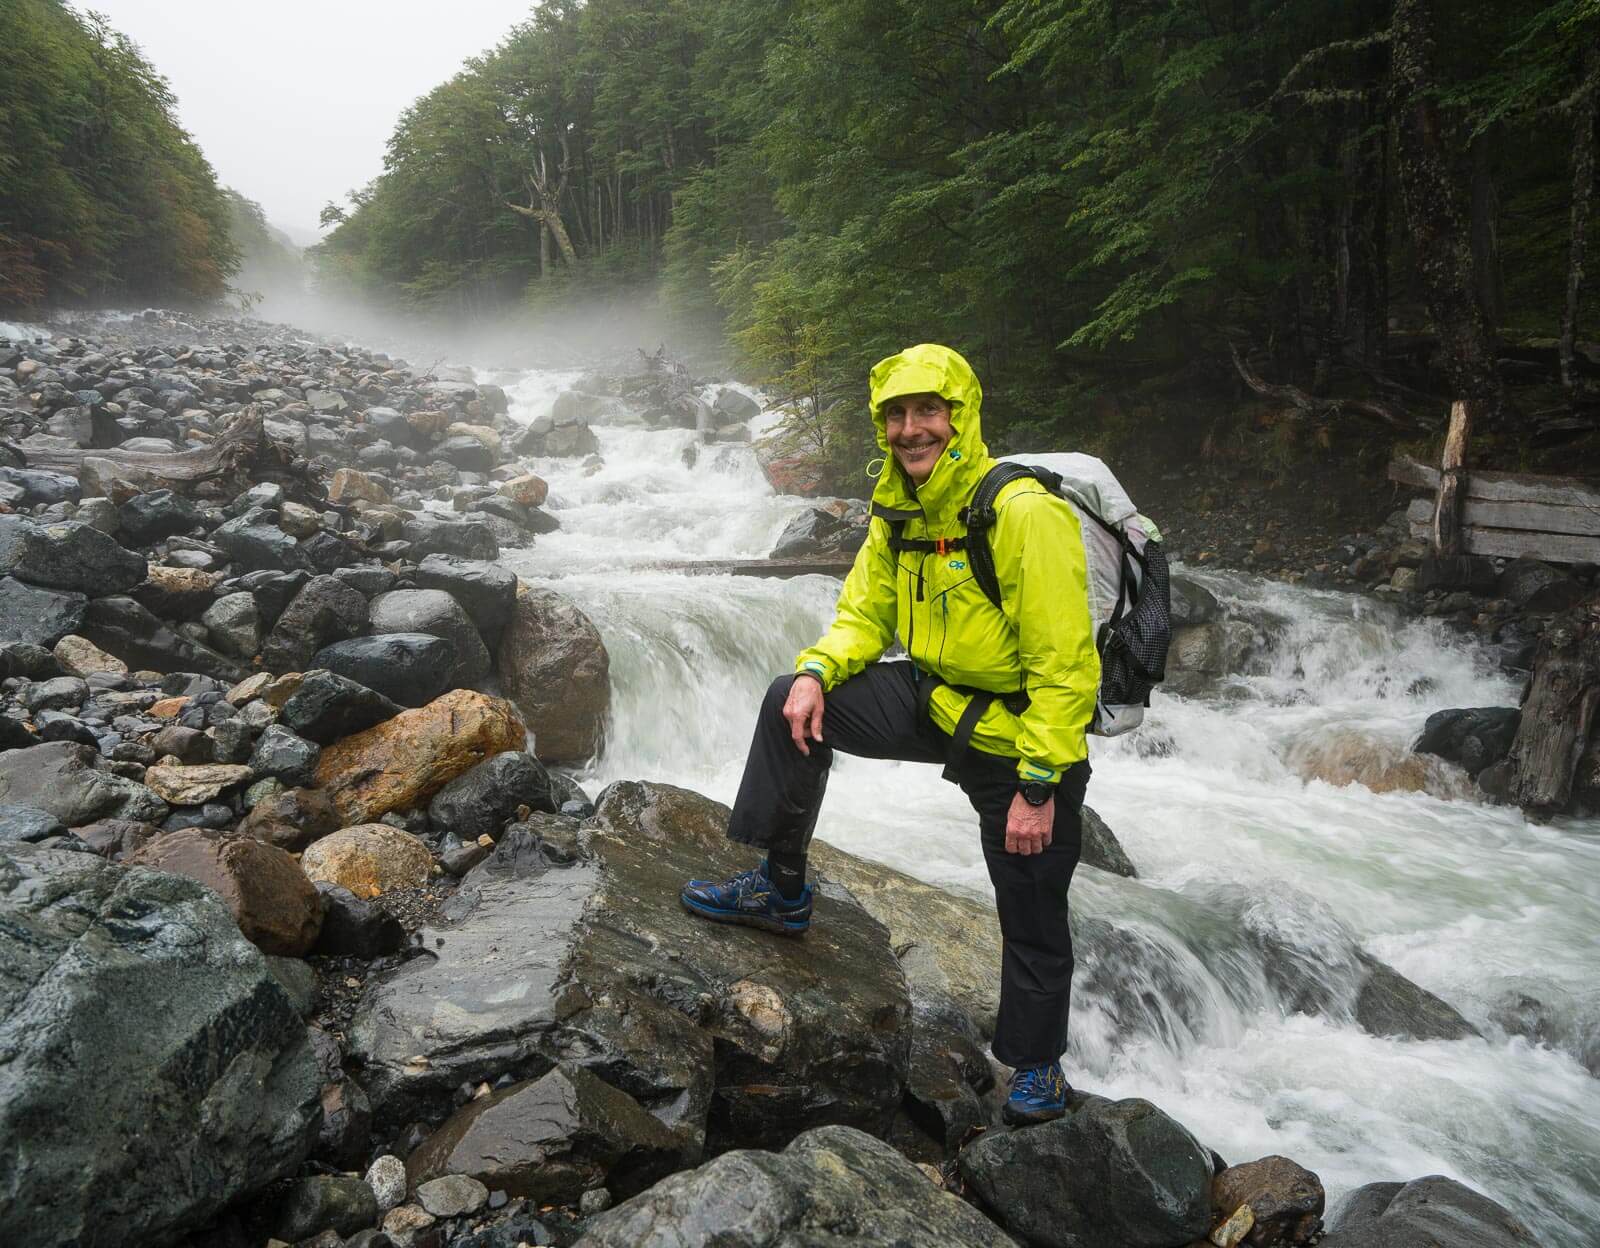
Alan is grinning, mostly dry, and very happy — even on a day with pouring rain. The key is light but excellent rainwear. This breathable and extremely comfortable rain jacket and pants weigh less than a pound (450 g) combined!
GETTING TO TREK START
From Santiago, Chile Airport to Coyhaique
From the Santiago Airport fly into Balmaceda, (BBA). There are two airlines that go to BBA, LATAM and Sky Airlines. Sky Airlines is cheaper, but has fewer flights than LATAM. For both, it pays to book earlier than later.
When you arrive Balmaceda airport, as of this writing, you have three choices for getting to Coyhaique—the three shuttles are lined up at the baggage claim and, as far as we can tell, all do the same thing. We went with T&T as they dropped us at our hotel (the others may do the same, just ask).
Food, Gear, and Fuel in Coyhaique
Coyhaique is the biggest city in Aysen with many local outfitters as well as a Patagonia and North Face store downtown. The one downside of the town is the supermarket. There is just one (UNIMARC) for a population of 50,000+ which means lines in the grocery store can take 20-30 minutes. There is talk of building a second grocery store, let’s hope they do. There a a number of outdoor gear stores in Coyhaique and they carry isopropane/butane fuel canisters. Alcohol fuel is available at the Cruz Verde Pharmacias (UPDATE: it was reported that the Farmacias Cruz Verde stopped selling alcohol, try the ferreteria ‘la reina’ instead), if you bring an alcohol stove like we did. Lodging in Coyhaique is diverse. We had no problem finding a place to stay—although during high season, best to book ahead. There is also a CONAF Office in Coyhaique that you can get maps and information for the trek.
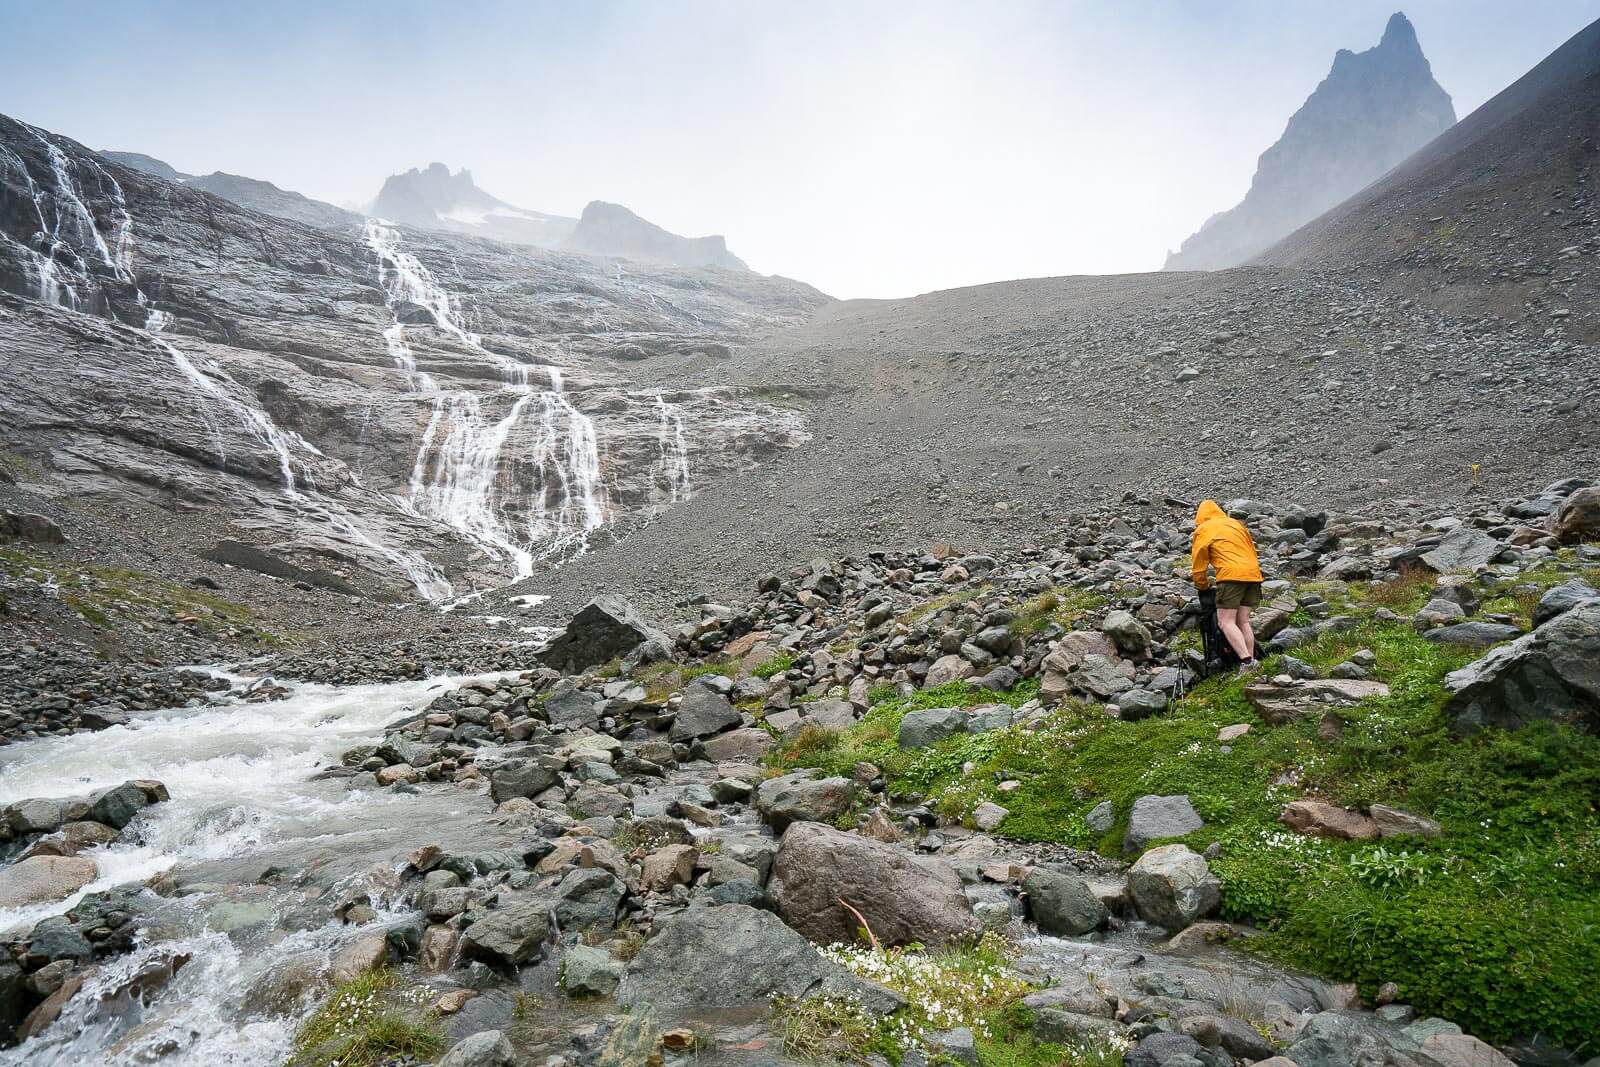
Coming down the far side of El Penon Pass with spectacular waterfalls streaming down from hanging glaciers of the high mountains all around us!
From Coyhaique to Las Horquetas (trek start)
There are two options to get to the Cerro Castillo trailhead from Coyhaique: take the bus or have a driver take you. The bus (Buses Sao Paulo) leaves at 9:00am from the terminal and is about a one hour drive costing 5,000 CLP to Las Horquetas (the trek start). If the bus doesn’t work for your schedule, a personal shuttle costs 80,000 CLP. The trailhead for Las Horquetas is in a parking lot, tell the bus driver where you want to go and he will drop you at the lot.
Day by Day Guide to the Cerro Castillo Trek
Trip Start – Las Horquetas
Trip End – Villa Cerro Castillo
Day 1 – Las Horquetas to Segundo (2º) Camping
16.2 km (10.1 miles), 4.5 hours to Segundo Camping
[14.0 km (8.7 miles), 3.7 hours to Primero Camping also called Puesto El Turbio camping]
Note: There seems to be a 12:00 noon cutoff time to start hiking (to ensure Rangers that you will make the first camp before dark

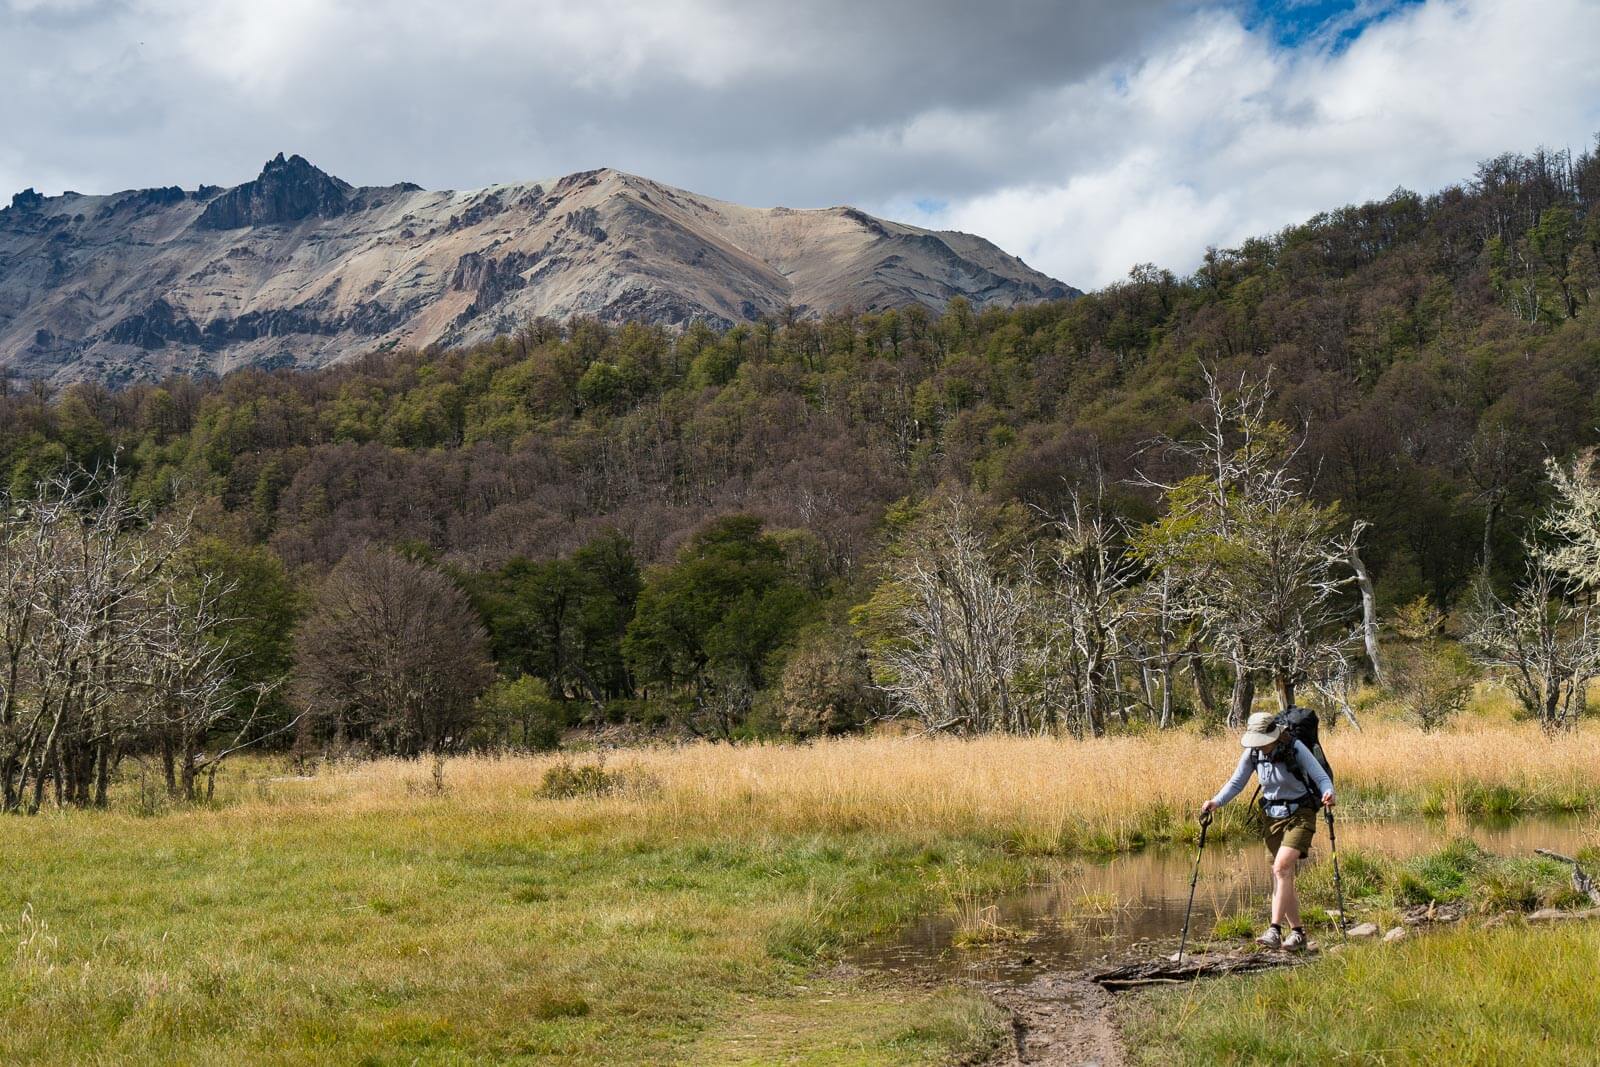
Much of day 1 is an easy walk up along an old roadbed in this beautiful valley with mountains all around you. There are some wet sections and a few stream wades so don’t expect to keep your feet dry or free of mud.
The trek starts at a nondescript gravel parking lot at “Las Horquetas” along the Carreterra Austral. There are no buildings, information kiosks or other infrastructure to indicate that it’s the start of a major hike. The trail to Cerro Castillo goes through an unsigned wooden gate on a gravel road heading out of the parking lot. You quickly cross a stream and in short distance you arrive at a park entry hut with a ranger. Here you pay the park entrance fee (23,500 CHP per person), and if you don’t have a park map, the Ranger will let you take a photo of the current park map on your cell phone.
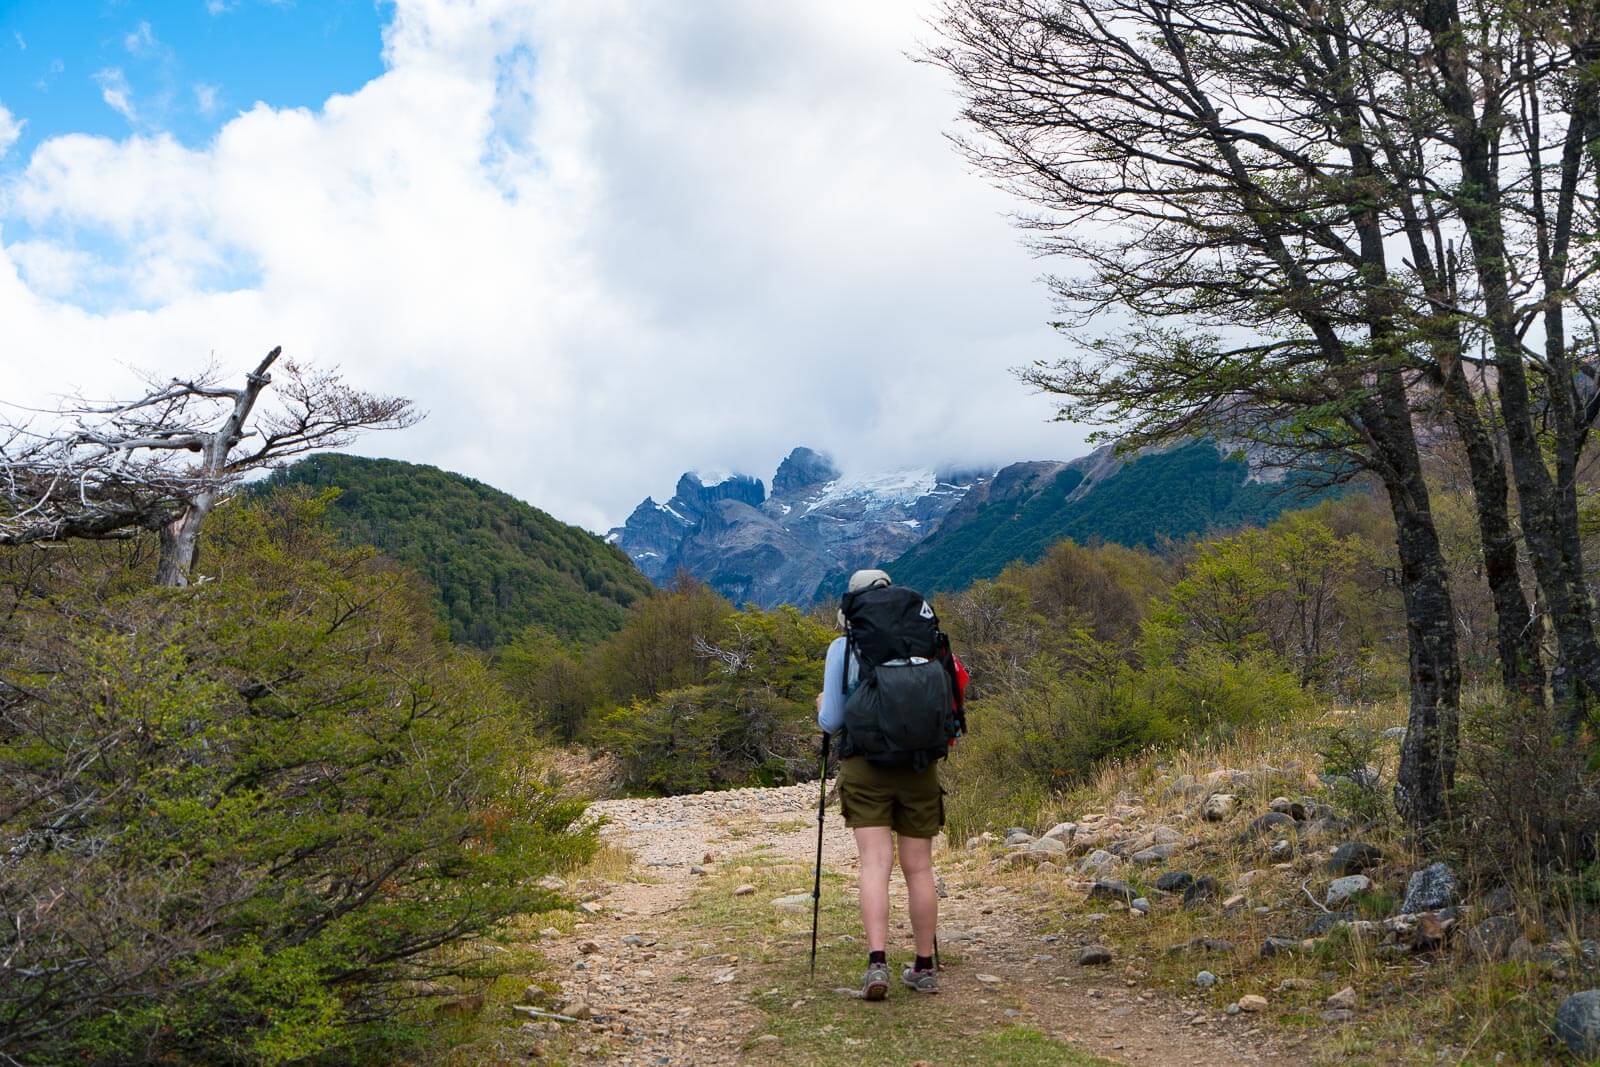
Near the end of the day you start to get glimpses of the high mountains and glaciers you’ll travel though the next day.
From here you ascend gently up the grassy and wooded valley of Estero La Lima. This mostly is on an old dirt road for much of its length. You get frequent views of the higher, glaciated peaks as you head up the valley. There are a number of stream crossings and muddy sections, so don’t expect to keep your feet dry. There is cattle in the area and you are well advised to treat any water you collect. After going up and over a turnstile at approximately 13 km, you reach your first possible campsite for the day, Primero Camping (Puesto El Turbio). This is the most popular campsite for the first day. There is a ranger station here and it’s nicely tucked in the woods and protected from the wind.
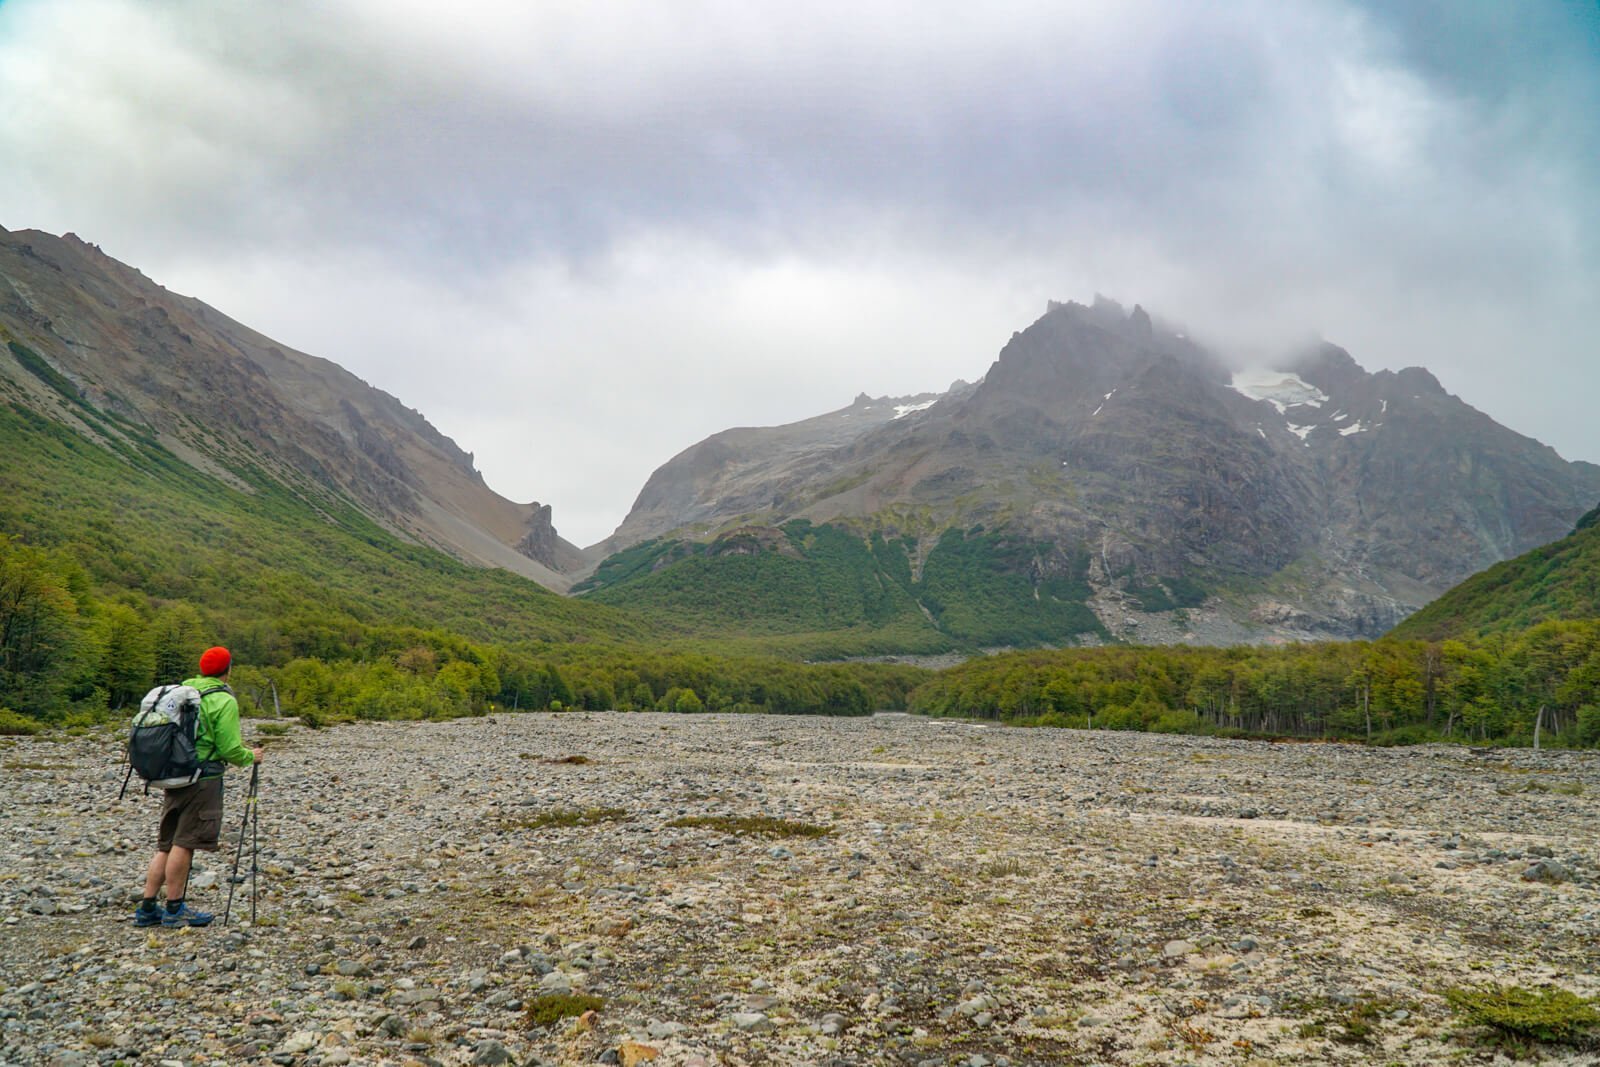
View up Rio Turbio just below Segundo (2º) Camping. Your pass for the next day, El Penon Pass, is the obvious notch center-left. Segundo (2º) Camping is in the dark trees below the central mountain.
We preferred hiking on to Segundo (2º) Camping, just a short walk up the riverbed of the massive Rio Turbio. Segundo Camping has a number of advantages. The views along the Rio Turbio are spectacular, it gives you an earlier start to go over El Penon Pass, and it has an option to do a day hike up a nearby side valley (assuming you can cross the Rio Turbio).
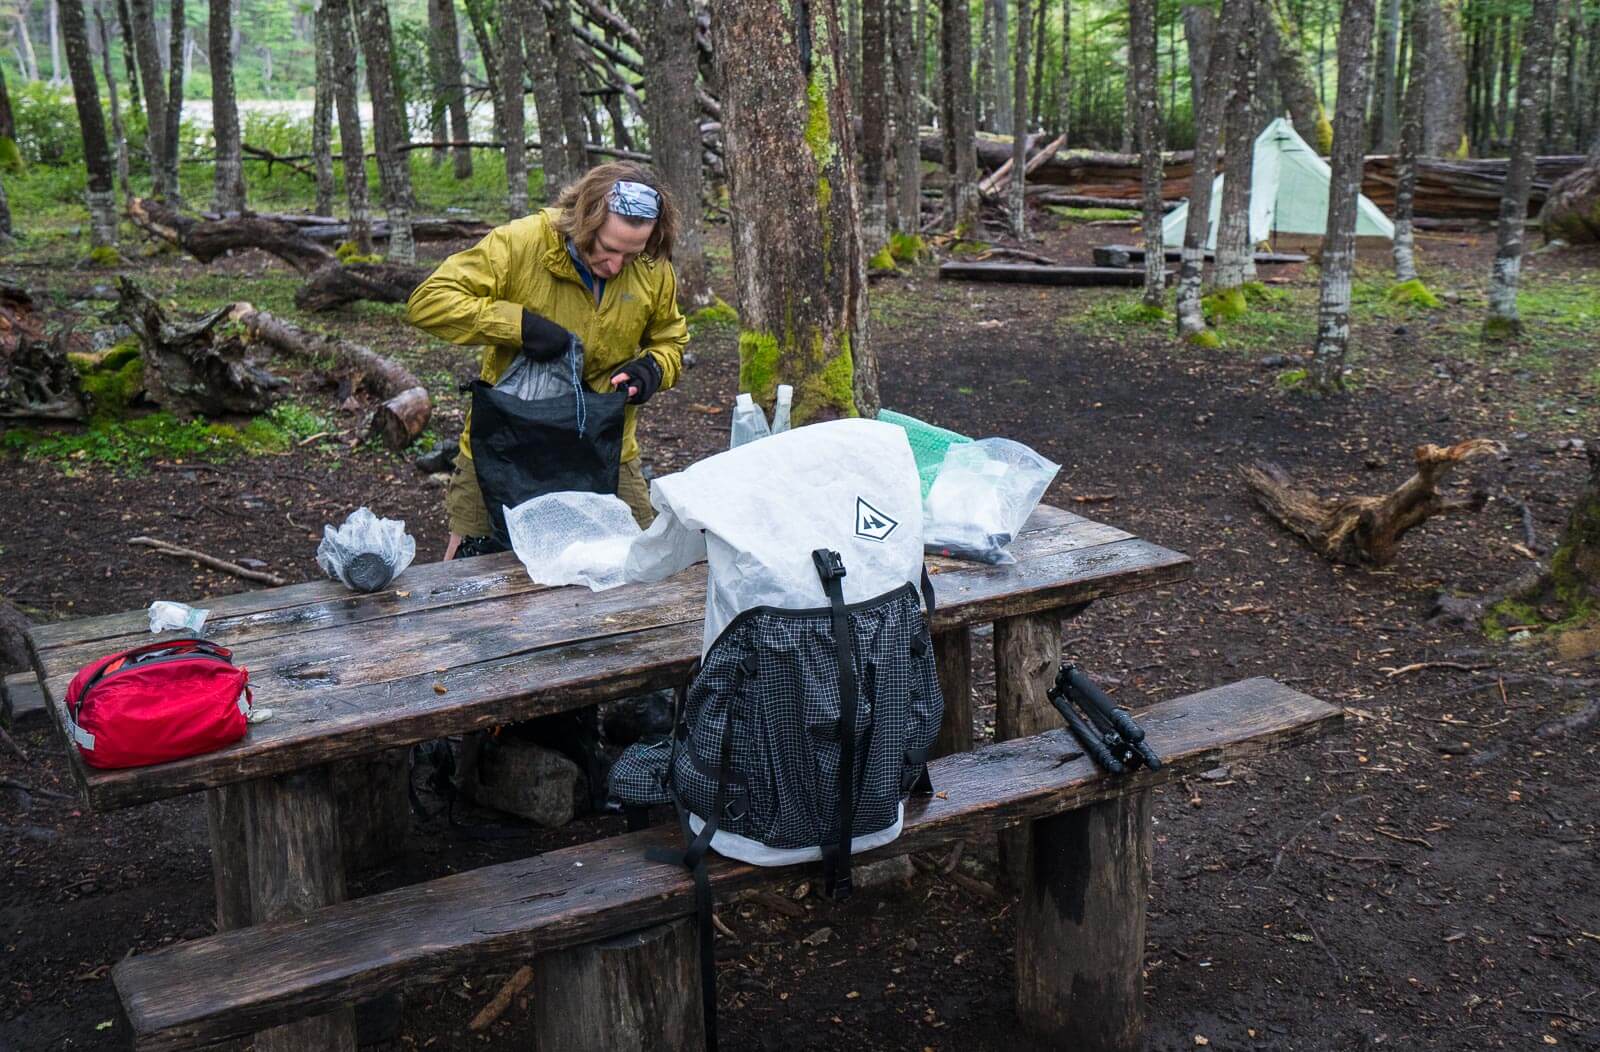
This is a typical campsite with a shared picnic table and nearby tent sites. You can see Rio Turbio peeking through the trees on the upper left. An outhouse for the campground is just a few minutes walk. And yes, it’s started to rain. Welcome to Patagonia!
Day 2 – Segundo (2º) Camping to La Tetera Camping (below Cerro Torre)
14 km (8.7 miles), ~5 hours to La Tetera Camping
[11.0 km (6.8 miles), ~4 hours El Bosque camping]

Walking up the gravel bed of Rio Turbo and heading towards El Penon Pass center left in the photo. You can see weather starting to build. It was raining hard by the time we descended the far side of the pass.
From camp, walk for a while along river bed of Rio Turbio following the footpath and steel post/markers. Once you leave the riverbed follow the well signed/cairned path up and to the left. For the first 45 minutes, you have a gentle climb on good trail gaining 500 ft. After that you climb steeply up the additional 1,700 ft to El Penon Pass (~1 hour). This section of trail is quite rocky and is not well signed in some areas. When in doubt stay near the bottom of the drainage the trail follows.
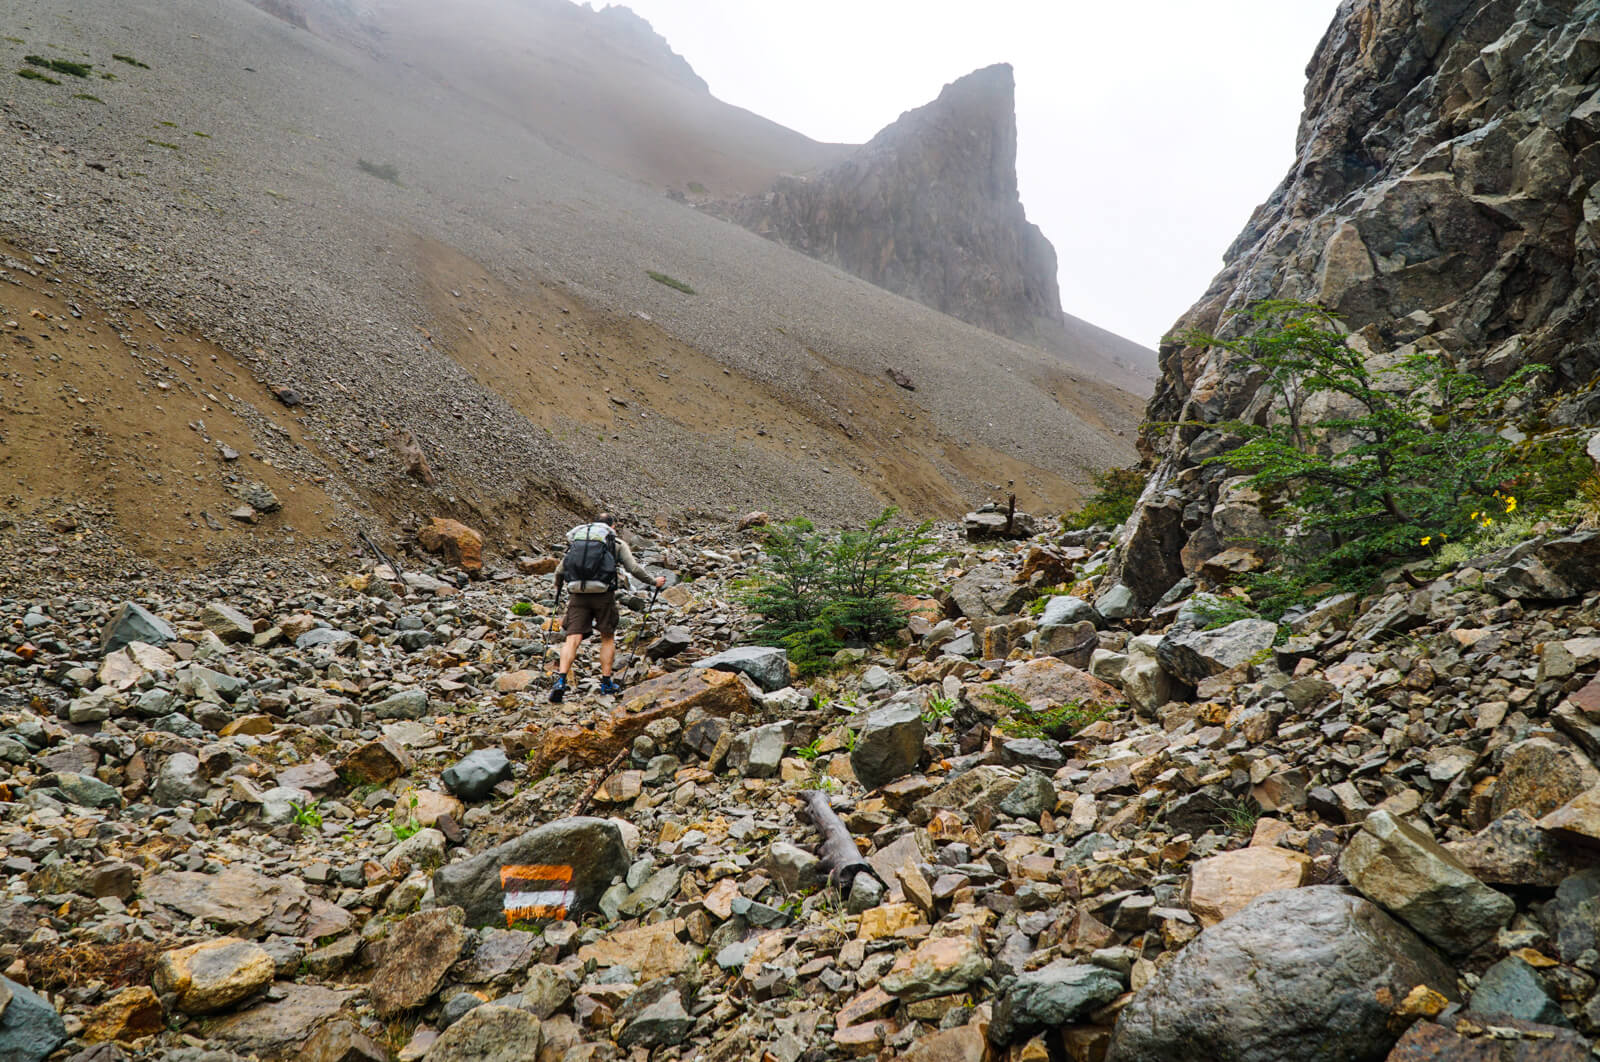
The rocky section of the climb up to El Penon Pass. Route markers are painted rocks like this or steel stakes.
At the top of the pass, there is permanent snow pack on both sides although far more on the south side. This snow can be icy, hard and slippery. Hikers not familiar with hard-snow/glacier travel may wish to bring some snow/ice traction device (Microspikes, Yaktrax, etc.) along with trekking poles. We just walked carefully across the snowpack with our trekking poles but on the south side we passed a young man who was struggling in just boots.
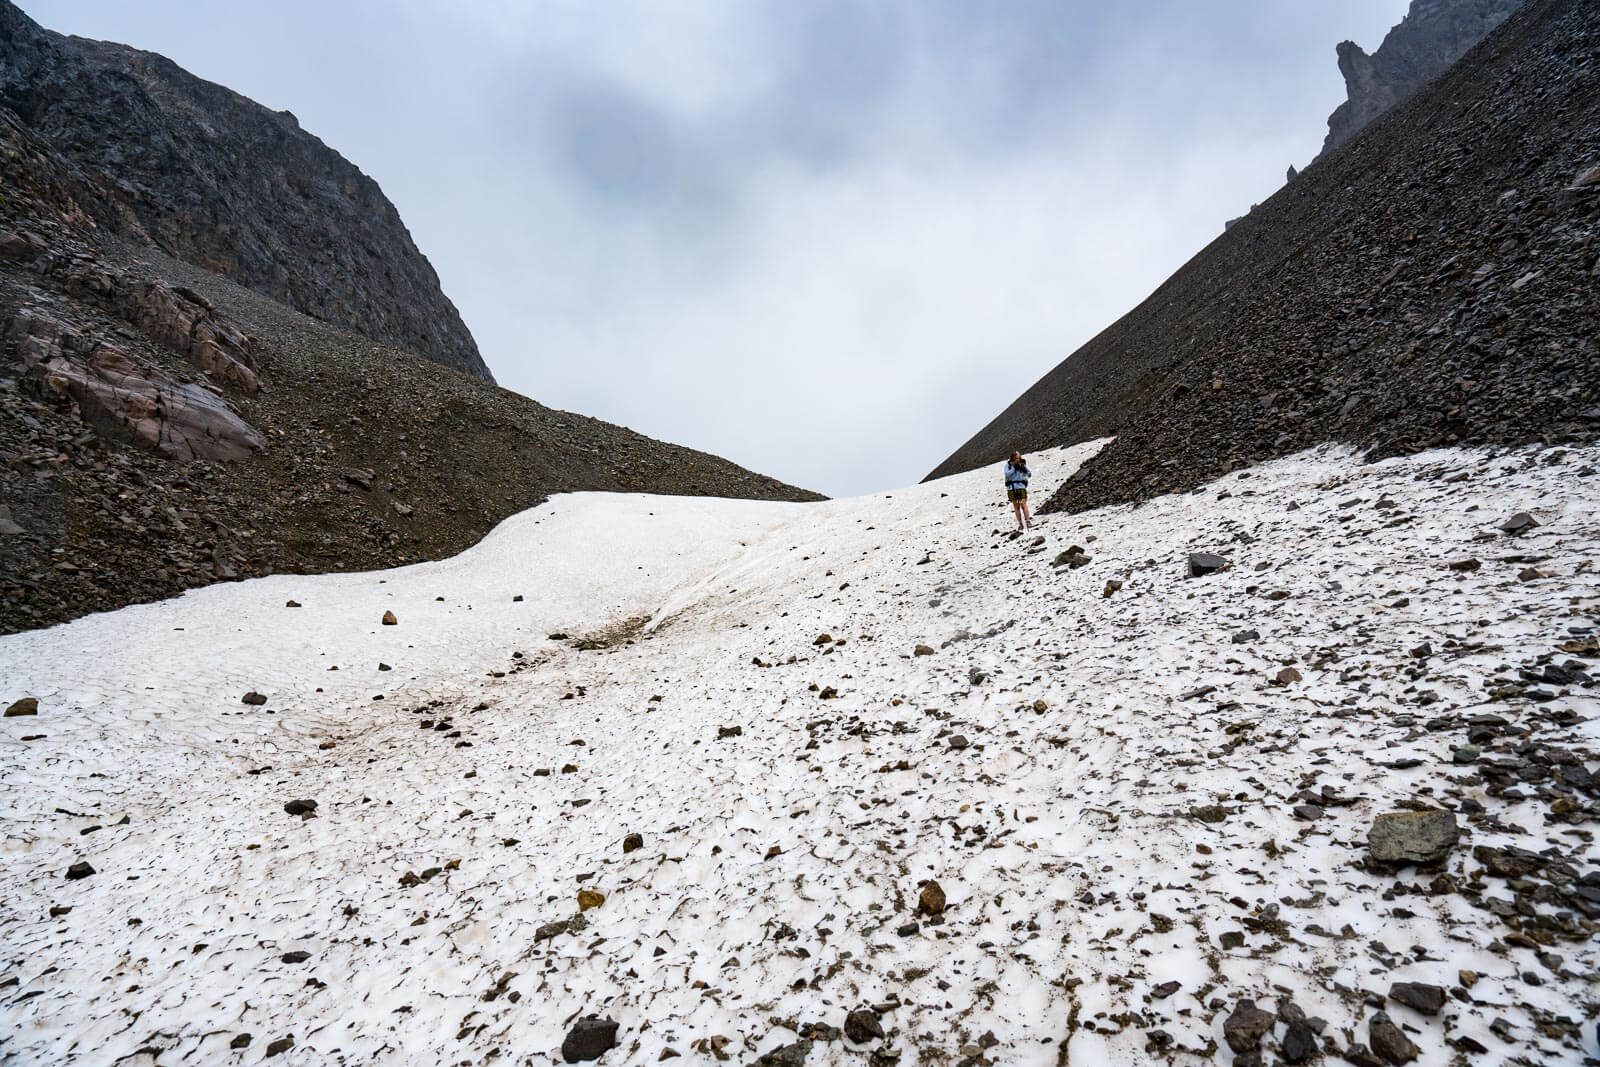
The top of the large snowfield on the south side of the pass. Even tho the snow was very hard, we easily descended this in running shoes and trekking poles making use of embedded rocks and surface irregularities.
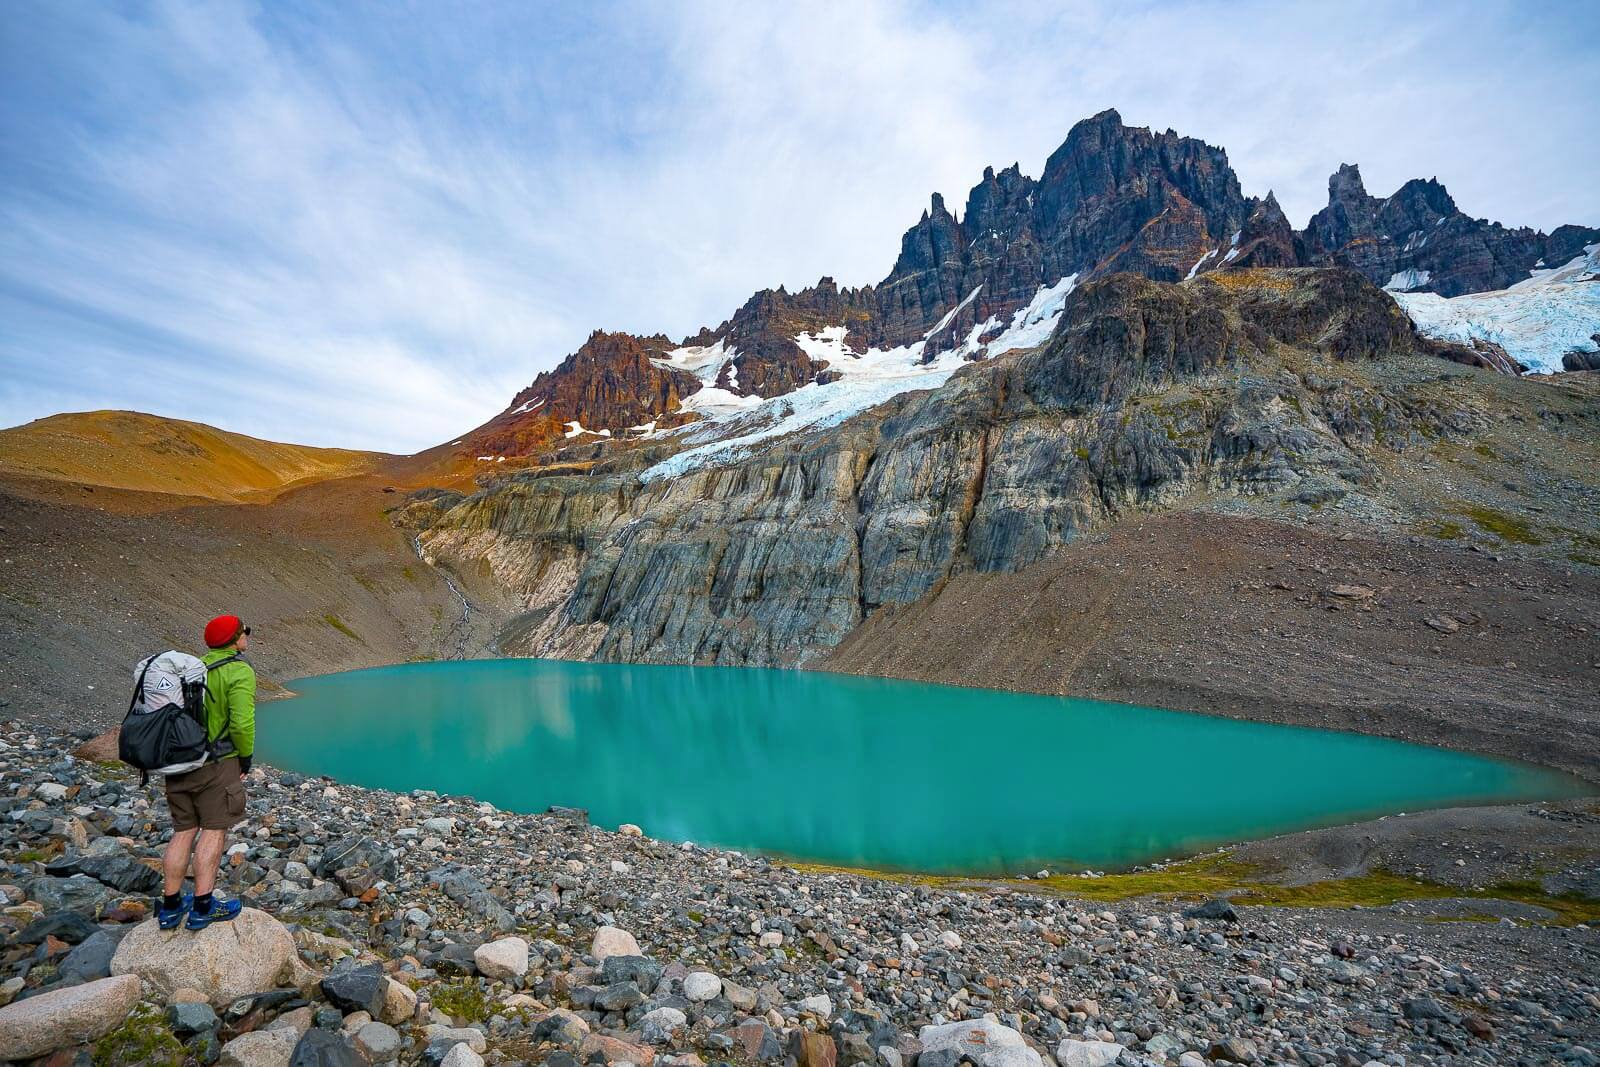
Once off the snow, its still fairly steep and rocky (sometimes loose) with switchbacks (again, clearly signed). At the base of the descent there is a flat and wide valley. On the right side, steep rock cliffs rise up to waterfalls coming off hanging glaciers. This is an excellent place for photos.
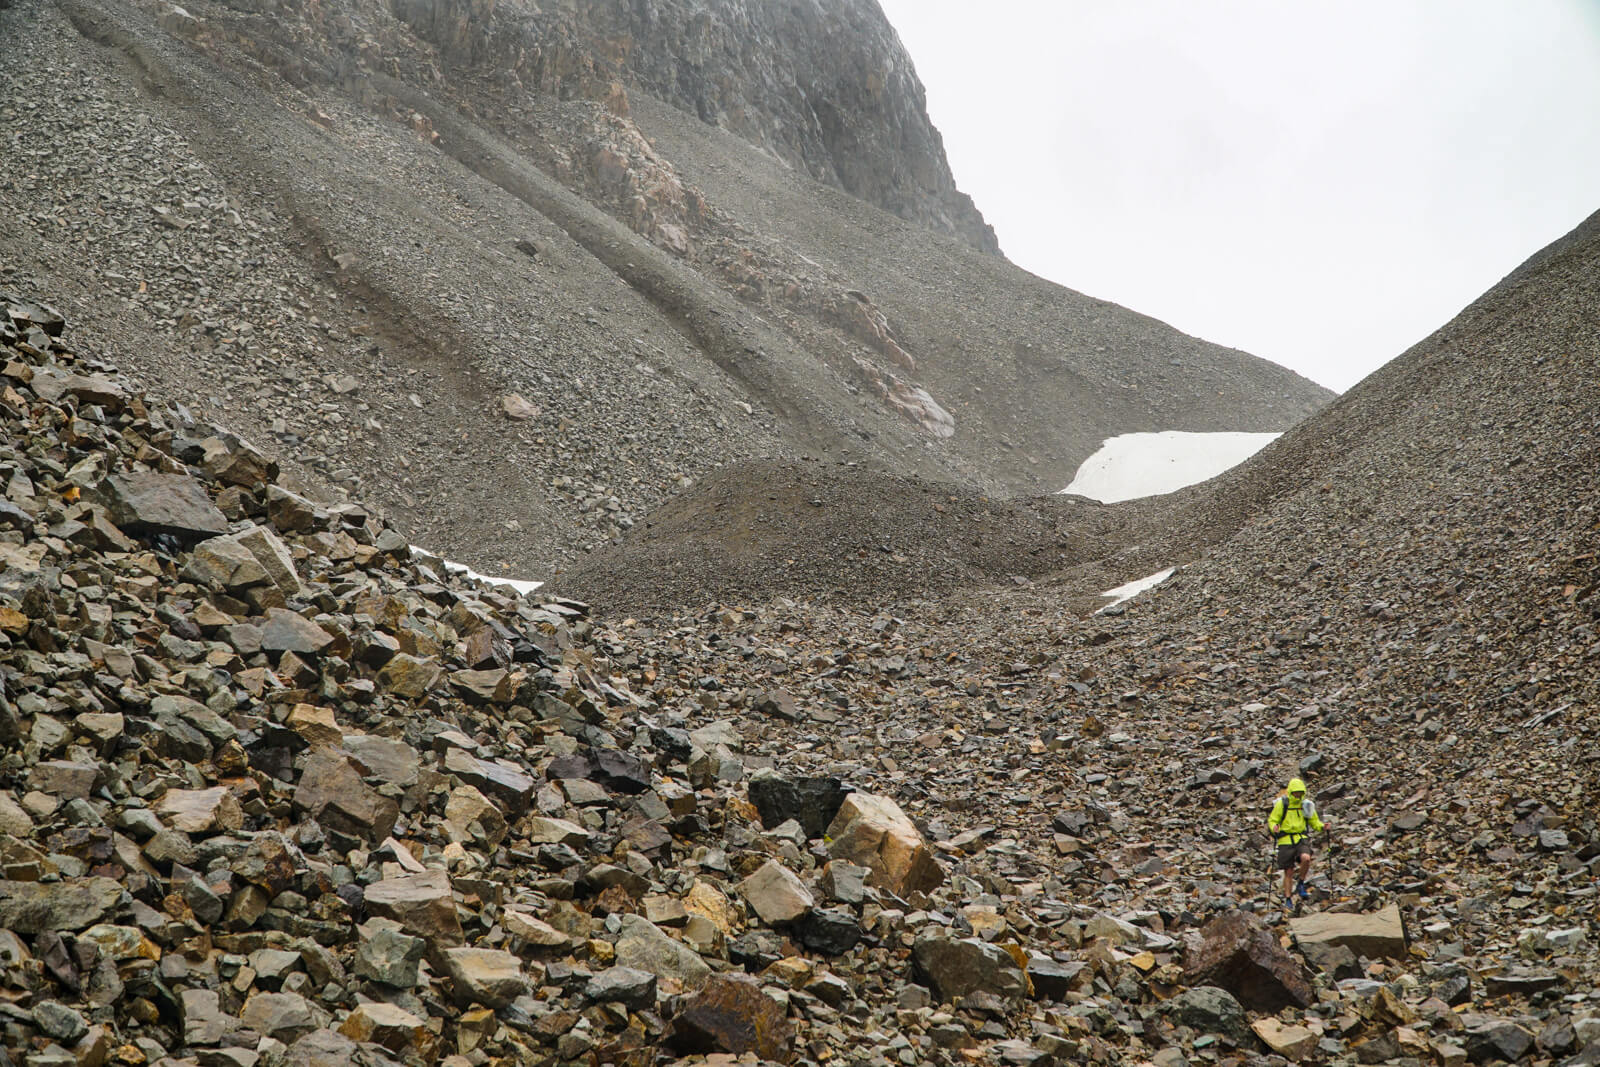
The descent down the other side of the pass is also rocky. You can see the end of the snowfield just peeking out on the middle-left.
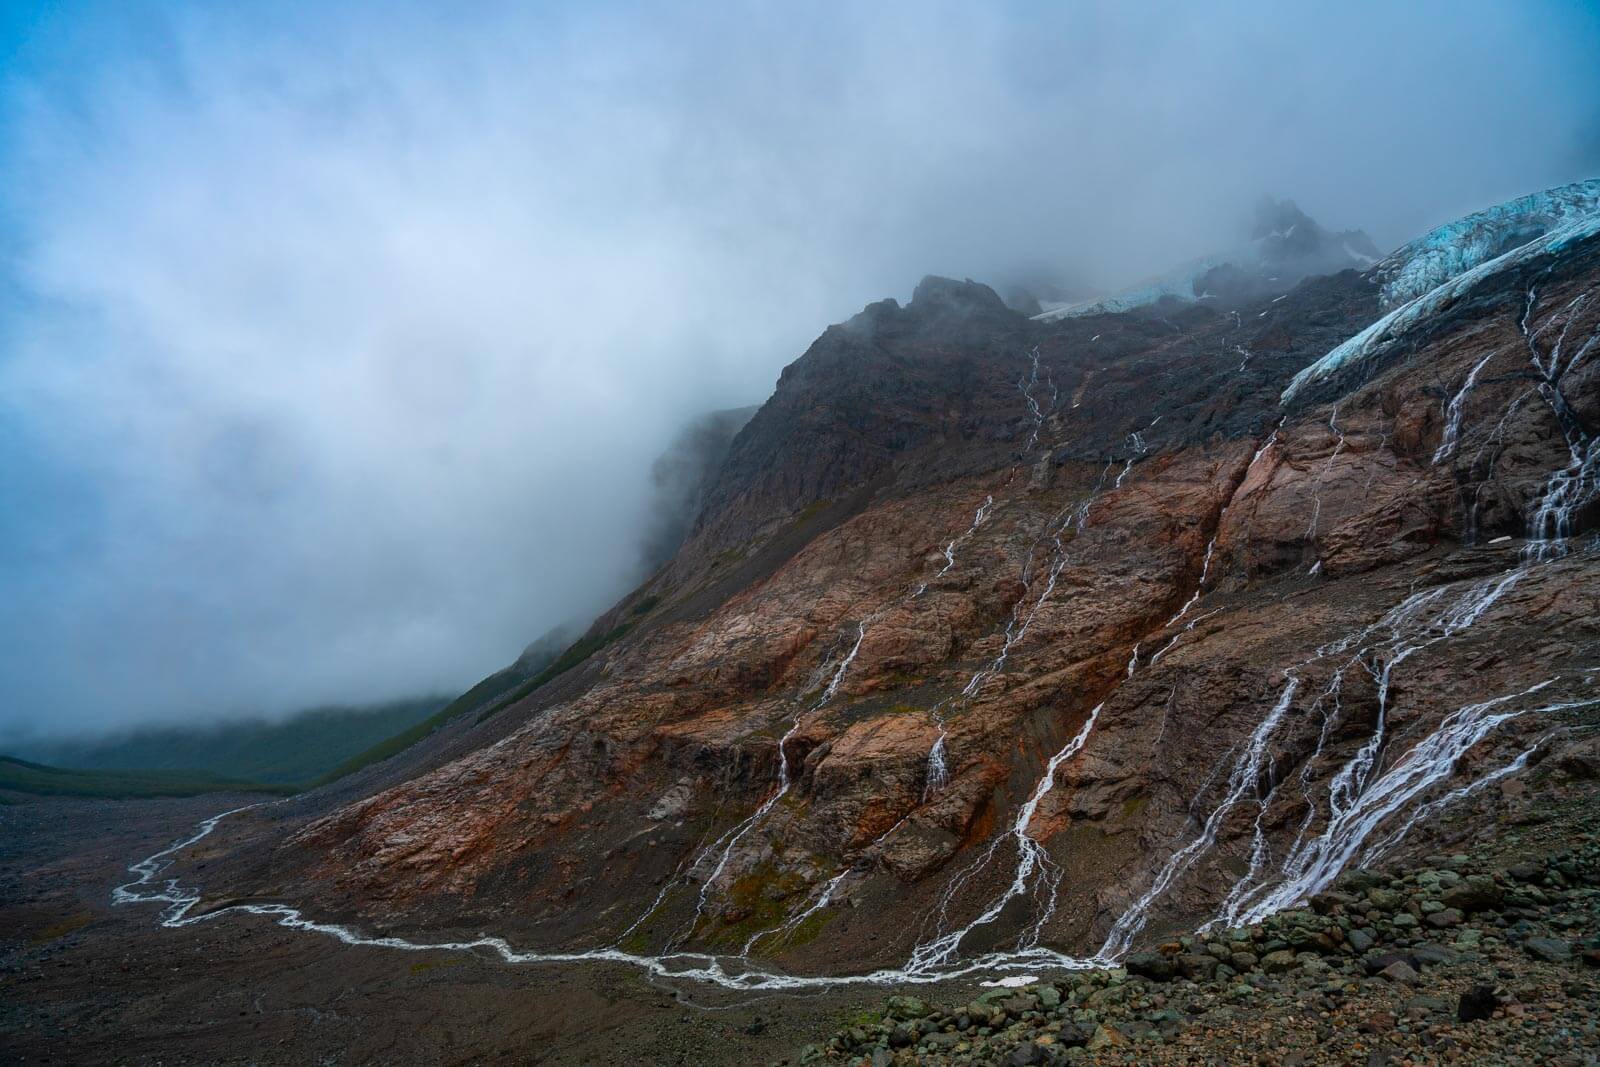
By the time we started to descend the pass, it had started raining in earnest. The upside were spectacular waterfalls streaming down from the hanging glaciers in the high mountains. You can see one hanging glacier just peeking out in the upper right of the photo.
Walk to the end of the flat valley and then drop down to the right into a valley. Follow this valley down to Arroyo El Bosque. You start on the left side and cross the stream once to the right bank on a narrow plank and over rocks (no-trivial crossing in high water). Once at Arroyo El Bosque it’s a short climb up to El Bosque camping. There are no views at El Bosque but its well protected in the woods and deep in a canyon. There is a side trail out of camp that goes up for a better views. There are toilets and tables at the campground.
When it’s raining hard, take care crossing the narrow briges as you head up from Camping El Bosque to Camping La Teterra.
From El Bosque, there is a step climb to the next site, Camping La Tetera — another 1000 ft (300 m) elevation gain and another 2.5 miles. Note: during high rains be careful on this climb when crossing wet and narrow “bridges” which can have high, fast water running under them and again on a number of rocky areas where the “trail” follows the beds of small and large streams.
La Tetera has a number of advantages over El Bosque. Being only 10-15 minutes away from Cerro Torre, its sets you up for both evening and morning pictures (highly recommend). And it makes for a short and easy last day out if you choose to take the optional Sendero de Emergencia out (it’s all downhill!). There are no tables, toilets or other amenities. Water is a short walk down to Arroyo El Bosque. Campsites are limited, and fairly exposed in sparse trees at the top of the canyon. A sturdy tent/shelter is recommended to camp here.
Day 3 – Camping La Tetera to Camping Neozelandes
9.7 km (6.0 miles), ~3.5 hours

From Camping La Tetera it’s only a few minutes walk up to Lago Castillo with the impressive Cerro Castillo (Castle Peak) rising high above it. As we mentioned earlier, if you have time, go up to take photos at both sunset and dawn. Note: it’s a wade across the outlet stream for the best place to take photos on the far, south side.
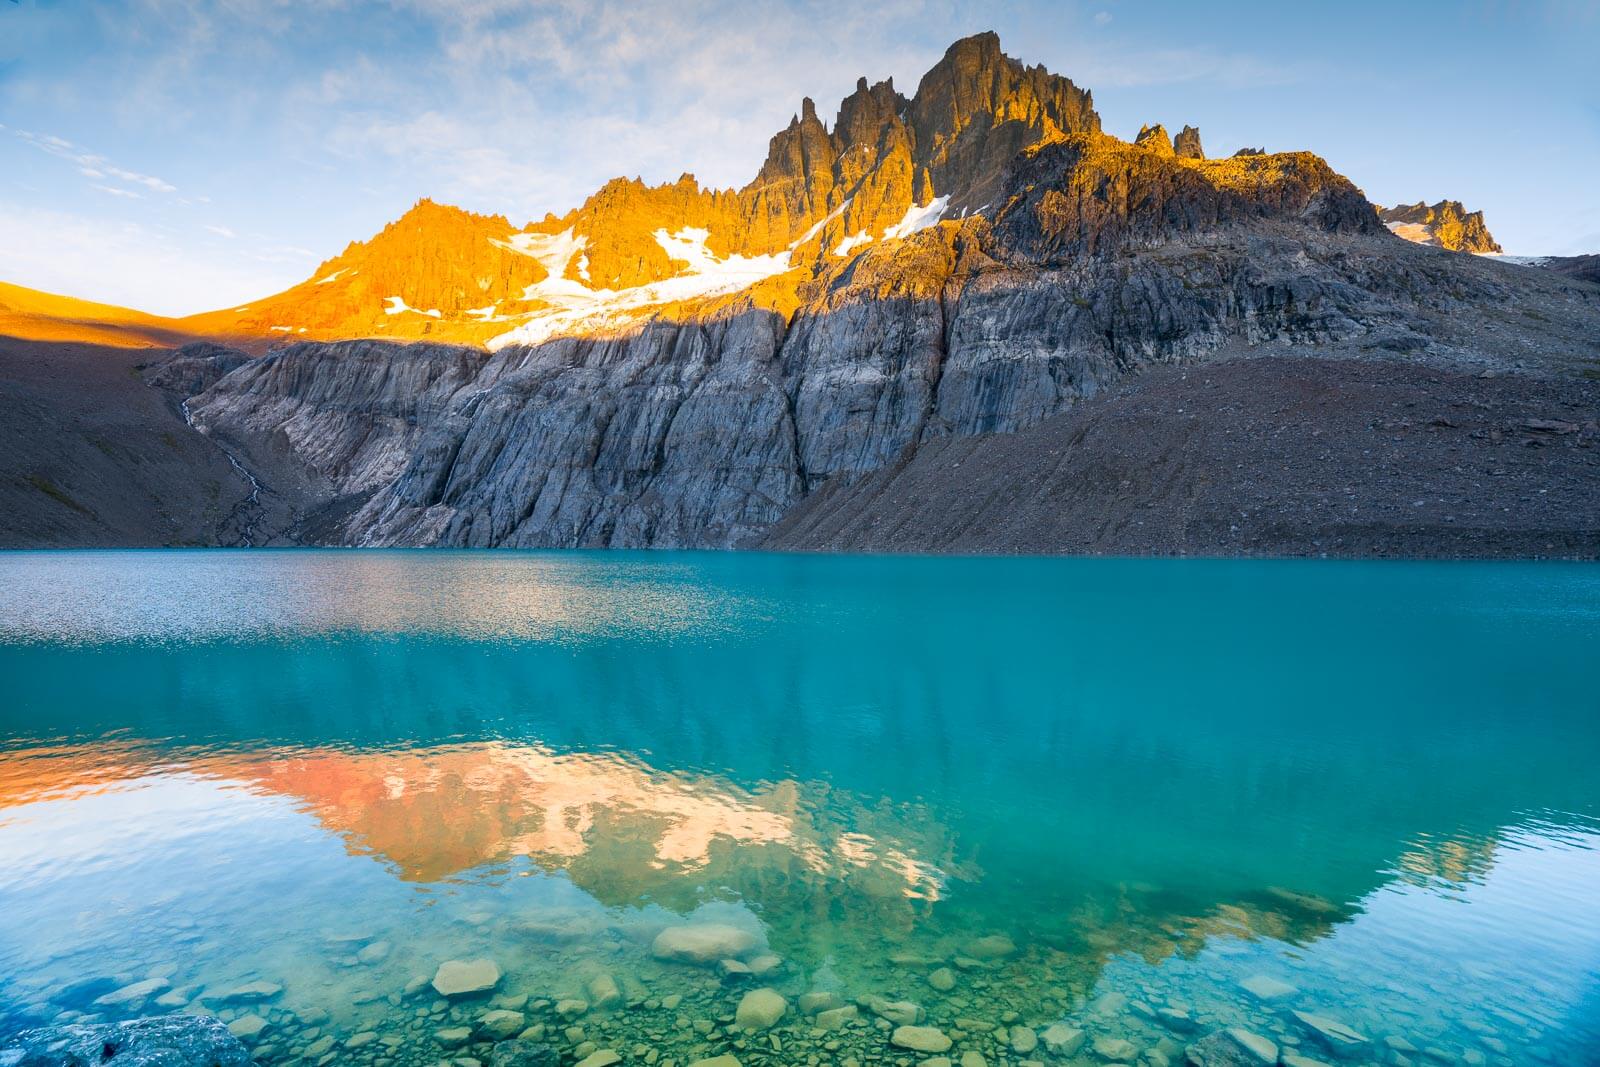
Cerro Castillo towers over the waters of Laguna Castillo at sunrise.
Once you are done with photos in the AM, follow the trail as it angles SW and uphill above Lago Castillo. The “trail” is rocky with some large talus (boulders) you will need to navigate. Although the route is well signed (usually steel posts), you need to pay attention as you traverse the talus above Laguna Castillo. When you get to the plateau above the lago make sure you take the time walk around and take in the great views of Cerro Castillo at almost eye level. From here you have two route choices.
- The first option (described below) is to continue on the classic trek to Campamento Neozelandes for the night.
- The second, is an early out that should get you to the trip end in Villa Cerro Castillo around lunchtime. To do this take the Sendero de Emergencia which drops directly down to Villa Cerro Castillo. This trail gets you down in a hurry and has non-stop views all the way. Link to Optional Day 3, Sendero de Emergenica exit.
The start of the climb to the plateau above Laguna Castillo.
Taking option 1, do the classic trek: from the plateau travel almost due west to the “pass” (really a shoulder/bench) 0.8 miles WSW of Cerro Castillo. Like the trail up from Cerro Castillo it is steep and rocky and if the wind is up, the going can be a bit challenging. Go over the pass and head down more rock (trail marked with steel stakes) and into the wooded valley where you come to a river (Estero Parada) with your first camping option, Camping Los Porteadores (with tables and a toilet). You could camp here and day hike up the valley without a pack for glacier and mountain views. But our recommendation is to keep going another hour or so to the less crowded Camping Neozelandes, where the glacier views are an easy amble out of camp. An added benefit for Neozelandes is that it puts you within easy striking distance of Laguna Duff (2.5 km, 1.6 miles).
Day 4 Camping Neozelandes to Villa Cerro Castillo
14.3 km (8.9 miles), ~3.5 to 4 hours

Retrace your steps to Camping Los Porteadores. From there continue straight and downhill for ~2.5 miles (4 km) until you meet the dirt road, “Cruce Ruta 7 (Villa Castillo) – Arroyo El Bosque.” Turn left and head east on the road for fast and easy walking into Villa Cerro Castillo. From there you join the road it’s ~3.4 miles (5.5 km) to the park entrance station on the left (and junction with Sendero de Emergencia). Just after this the road makes a hard right turn and crosses a large bridge over Arroyo El Bosque. From here it’s a short downhill walk (less than a mile) into Villa Cerro Castillo.
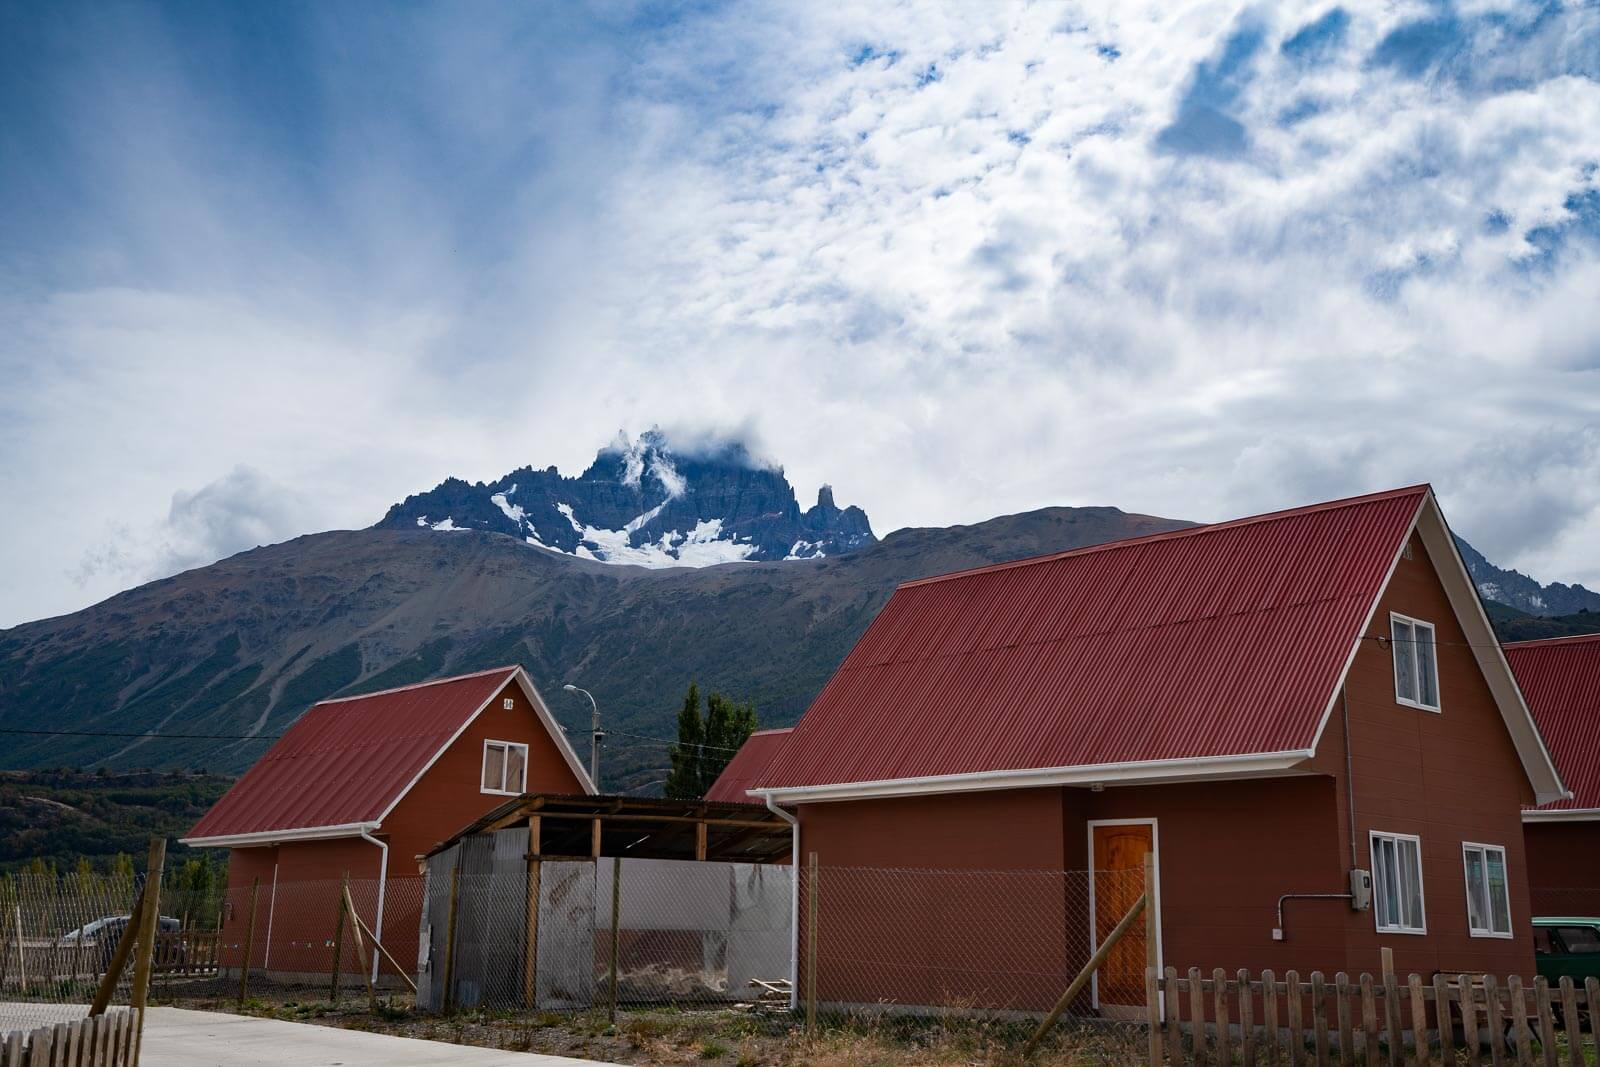
Cerro Castillo is indeed castle-like as it looms over the small village of Villa Cerro Castillo.
The town of Villa Cerro Castillo is small with limited services. There are a few small food stores and some restaurants. If you stay overnight, it may be easiest to stay in one of the campsites in town (there are several). Senderos Patagonias at the far western edge of town seemed nice. There a few cabanas and a few hostels but we don’t have enough information to recommend any.
Villa Cerro Castillo has a newly built Information Center just a block off the Carreterra Austral. The folks there speak halting English and can assist you with transportation options out of town or finding a room for the night.
GETTING BACK TO COYHAIQUE
Once arriving in Villa Cerro Castillo your options will depend on the time of day. While Villa Cerro Castillo is on the Carreterra Austral, it is not a well-traveled section. The best time to catch a bus is approximately noon to 4:00pm. As of writing we know of three buses a day going from Cochrane to Coyhaique that pass through V. Cerro Castillo. Two on Sunday. (Note that buses may be full by the time they reach V. Cerro Castillo). What they do have in Villa Cerro Castillo is a newly built Information Center. The folks there speak halting English and can assist you with options for your next destination.
The second option is to hitch. While many have reported good hitching luck, we found it to be competitive with other hitchhikers and didn’t have the patience to wait. If you arrive in late in the day, you may need to stay overnight.
Your third option is to pre-arrange a private shuttle before you leave Coyahique that will pick you up and take you back to Coyahique or the Airport. While this certainly the most expensive option, it might also be the most reliable for people on a tight schedule.
Connecting with the New Patagonia National Park Trek
The easiest access to the New Patagonia National Park Trek is from the town of Chile Chico. There are two connections you need to make to get to Chile Chico:
- The minibus in Villa Cerro Castillo to Puerto Ibanez which leads you to
- The Ferry at Puerto Ibanez
Luckily, they work in conjunction with one another. There is only one boat a day in each direction (except Tuesday-NO BOAT to Chile Chico on Tuesday) and on Wednesday there are two boats to Chile Chico. Check the latest schedules on their website. The minibus in Villa Cerro Castillo goes to Puerto Ibanez at 8:00am and 16:00 (MWThF—no weekend minibus service, although the boat still runs). The minibus leaves in front of the Information/Visitor’s Center. Cost of minibus is 800 CLP, buy your ticket on the bus, cost of boat is 2,200 CLP, buy your ticket at the office.
If you want to hitch: the Carretera Austral in Villa Cerro Castillo is not very busy and the hitching competition was fierce. In addition, if you hitch, you may need to find two rides—one to take you east on the Carretera Austral to the intersection with X-65, and another to take you down the X-65 to Puerto Ibanez. (Note: the big buses that go thru Villa Cerro Castillo are all heading to Coyhaique not Puerto Ibanez.) However, if the buses have space they might drop you at the intersection and you could hitch from there—but really, the mini bus is what you want.
The ferry is a 2-hour trip and arrives in Chile Chico at night so this may be one case where you want to have your lodging set up ahead of time. Getting into town at 21:00 or 22:00 is a bit late. Chile Chico has plenty of cabanas (Air B&B) for rent as well as other options. They also have at least two (maybe more) well stocked supermarkets for your resupply for the next part of your trek. If you take some layover time in Chile Chico, you can fly fish or go visit the Marble Caves or just rest up for the next leg. It’s a nice town to layover in.
From here follow our Patagonia National Park Trek a Guide to a New World Class Trek.
Optional Day 3 – Camping to La Tetera to Villa Cerro Castillo (via Sendero de Emergencia)
9.7 km (6 miles), ~3.5 to 4 hours

Follow the directions in “standard Day 3” to the plateau above Cerro Castillo. From the plateau head SE over a small ridge. From here the Sendero de Emergencia heading SE should be obvious, and you’ll have your first spectacular view of the huge valley below. This trail gets you down to Villa Cerro Castillo in a hurry! It also has non-stop views all the way. Although quite steep, the trail has been recently maintained and is in excellent shape. The total descent is 3600 ft (1,080m) in just 4 miles (6.5 km). Keep your entrance ticket as people have reported being asked for their ticket as they exit the park. From the park entrance turn left (east) on a dirt road. Almost immediately take a hard right turn and the road crosses a large bridge over Arroyo El Bosque. From here it’s a short downhill walk (less than a mile) into Villa Cerro Castillo.
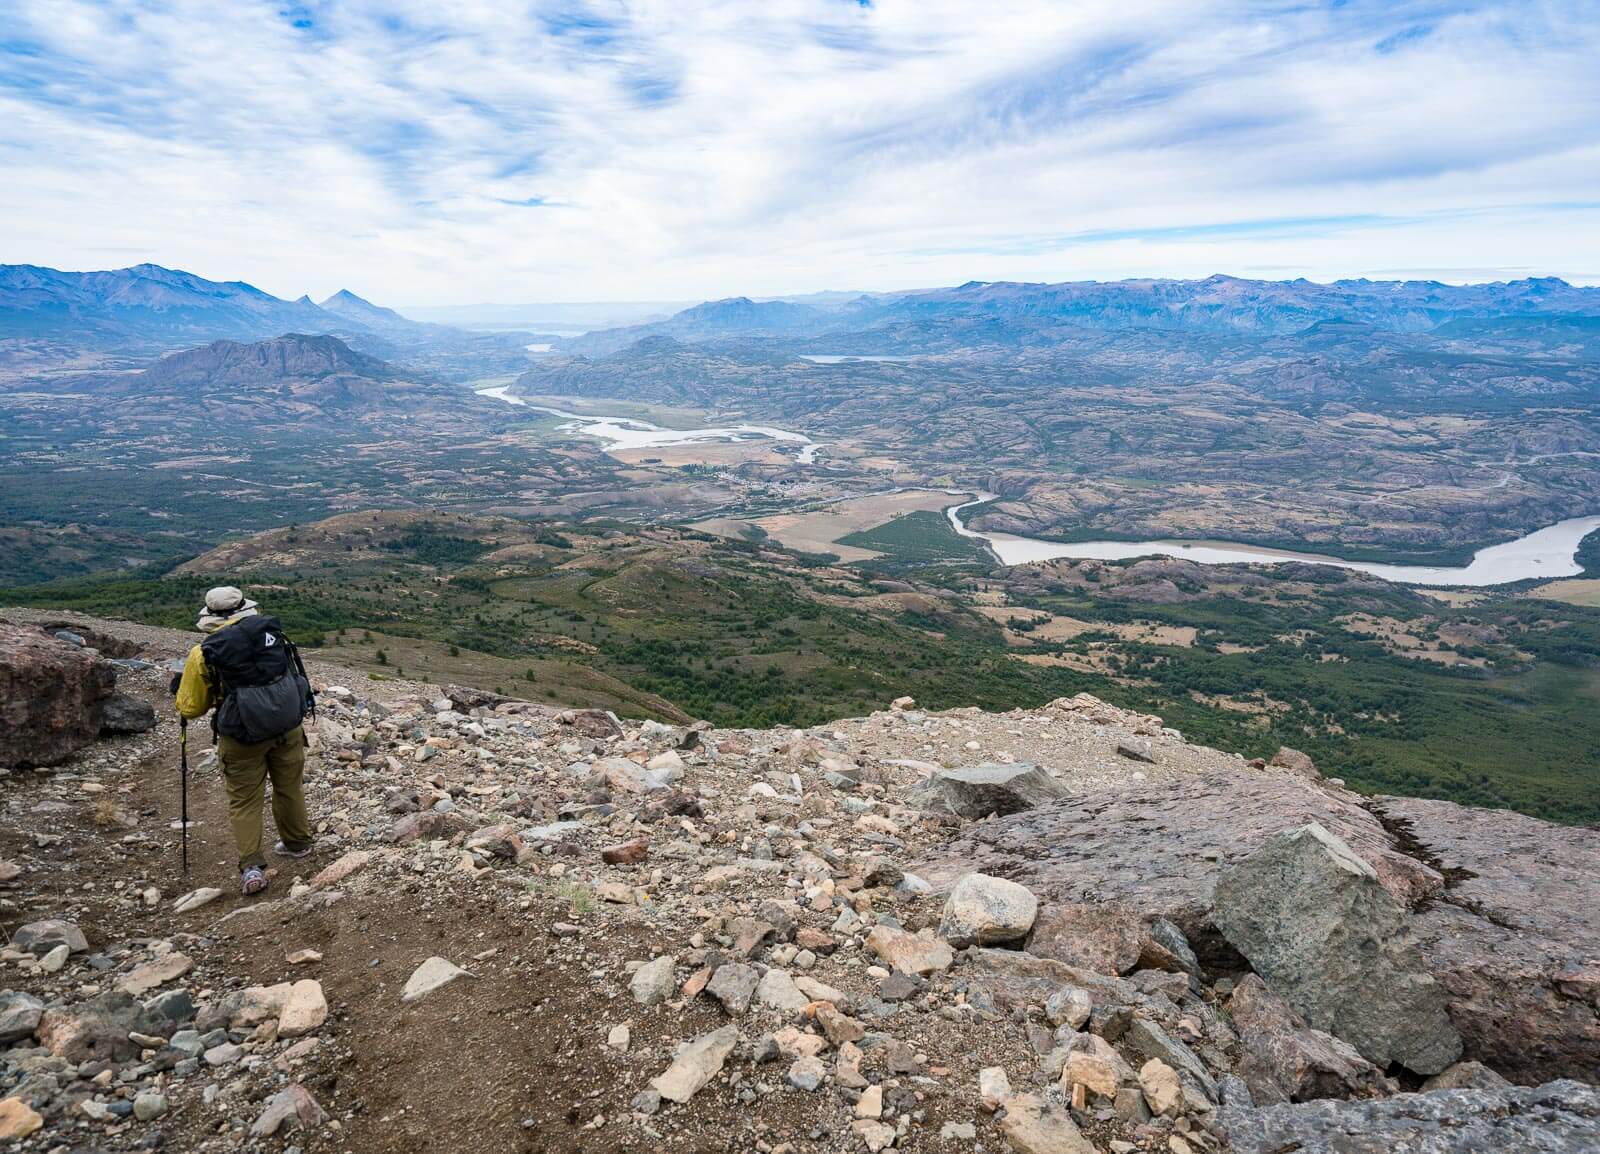
View from the top of Sendero de Emergencia. Villa Cerro Castillo is 3600 ft (1,080m) below (about the middle of the photo).
Once in Villa Cerro Castillo consult the text in Day 4 for what to do.
Our Gear for Patagonia Trekking (and most trips worldwide)
A light pack is huge contributor to a fun trip! Selecting the right gear will make your trip safe and most important more enjoyable.
Again, we’ve logged a lot of time in Patagonia over the past 14 years . As such, we think we’ve got our gear well tuned for Patagonia. Most of the gear on this list is contained in our 9 Pound Full Comfort Ultralight Backpacking Gear List, This is the gear checklist list we use to pack for all our trips worldwide. This gear is very light but will work everywhere from Patagonia to Alaska to New Zealand and the Southwest Deserts of the US.
Gear Highlights for the Cerro Castillo Trek
The following three pieces of gear: shoes, trekking poles and snow/ice traction devices for your shoes are recommended to safely traverse over the year-round snow on the El Penon Pass of Day 2. (Hikers used to some snow travel could likely skip the snow/ice traction devices like the YackTrax.)


Disclaimer
This post contains affilate links. If you make a purchase after clicking on the these links, a small portion of the sale helps support this site at no additional cost to you. I do not receive compensation from the companies whose products are listed. For product reviews: unless otherwise noted, products are purchased with my own funds. I am never under an obligation to write a review about any product. Finally, this post expresses my own independent opinion.


Related Posts
Best Ultralight Sandals For Backpacking 2024
Footwear, Clothing, Buyer's Guides, Apparel Guides, Footwear & AccessoriesBest Trail Running Shorts For Hiking 2024
Clothing, Buyer's Guides, Apparel Guides, BottomsBest Ultralight Backpack 2024
Backpacks, Buyer's Guides, Gear Guides, Tents & Packs