GAIA GPS is the Best Hiking GPS | How To Use It
The GAIA GPS App is the best backpacking GPS, and it runs on iPhone or Android, and significantly outperforms a convention handheld GPS device like a Garmin GPSMAP in almost every way. This post has all the information you need to use your smartphone as the best hiking GPS, including getting up to 7+ days of battery life without recharging. Best of all, you can do this for less than $40!
You make Adventure Alan & Co possible. When purchasing through links on our site, we may earn an affiliate commission at no additional cost to you. Here’s why you can trust us.
When using a phone for GPS navigation, we strongly recommend carrying a re-charge. Learn more in our guide to the best backpacking battery packs.
What makes GAIA the best backpacking GPS
For starters, GAIA GPS on a large screen smartphone just plain works. We’ve taken our iPhones on numerous trips North fo the Arctic Circle in Alaska, winter rafting down the Grand Canyon, technical Canyoneering in Utah, mountaineering in Patagonia and climbing in the Wind Rivers long hikes in the U.S.A, the Andes, Turkey, Australia, Europe, and a canoe trip down the length of the Mighty Mississippi River. We get 5+ days of average use without recharging! And Android phones like the Samsung Galaxy work well too.
Incredible Map Detail and Functionality | Only with GAIA GPS!
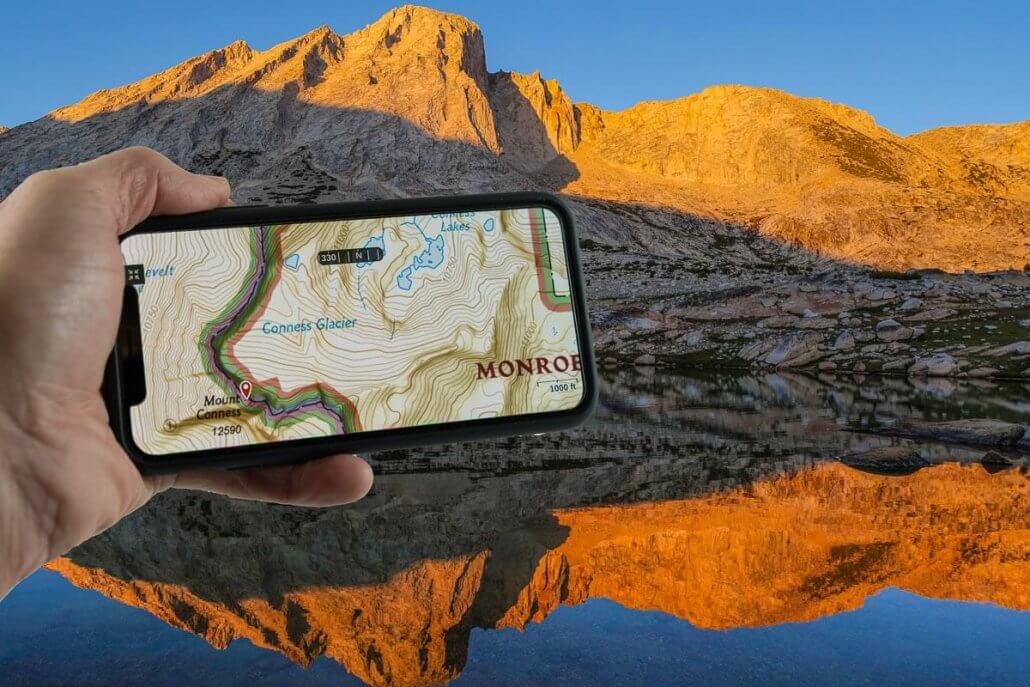
GAIA GPS is the best backpacking GPS because the smartphone app is stunningly sharp and legible, a critical aspect to navigation. A handheld GPS Units like a Garmin GPSMAP 64sx aren’t even close with a smaller screen, less information, and limited map sources. From this point forward, a dedicated handheld GPS device may never again be the best backpacking GPS. The best example of the GAIA GPS advantage is GAIA GPS’ full line of National Geographic Trails Illustrated Maps. These are the most trusted and highly-rated maps available for America’s top outdoor destinations. They give you current trails, distances, and other official park info. Vs. USGS TOPO maps where this info is 50 years out of date or just missing. Again you’ll only get it using GAIA GPS, the best backpacking GPS.
[click to enlarge and see the full detail of this map from GAIA] Start of the John Muir Trail in Yosemite. Screenshot from GAIA with the stunningly sharp and detailed National Geographic Trails Illustrated Map of Yosemite. This level of detail is what makes it the best hiking GPS
Key Advantages of GAIA GPS App for Hiking & Backpacking
GAIA GPS Works Without WiFi or Cellular Signal
To clarify a common misconception: You do NOT need WiFi or Cellular connection for your smartphone GPS to work. Even in Airplane Mode, your smartphone will communicate with GPS Satellites to get your location, just the same as a conventional handheld GPS like a Garmin. That is, your smartphone has a built-in antenna and GPS chip for getting your location from GPS satellites without need of any data service. Best, the GPS chips in current smartphones are quite good and have similar accuracy to traditional GPS units like a Garmin full-size GPS.
GAIA Maps Work in Backcountry Without WiFi or Cellular Signal
Gaia GPS App lets you download detailed maps (and GPS tracks/Waypoint) into your phone before your trip — that is while you still have WiFi or Cellular data. Then when you are out on the trail without WiFi or cell service, you can use the preloaded maps along with the iPhone’s GPS to do all the mapping and navigating you need. Woot! But for this to work, you DO need to pre-download maps to your App for it to work properly in the backcountry. Fortunately, this is very easy to do.
Almost Zero Cost!
The downloaded maps are free with your Membership. And since you already own phone, the cost of using it as a top notch hiking GPS is very reasonable—essentially just the cost of a GAIA Membership which can be under $20/year depending on level of service.
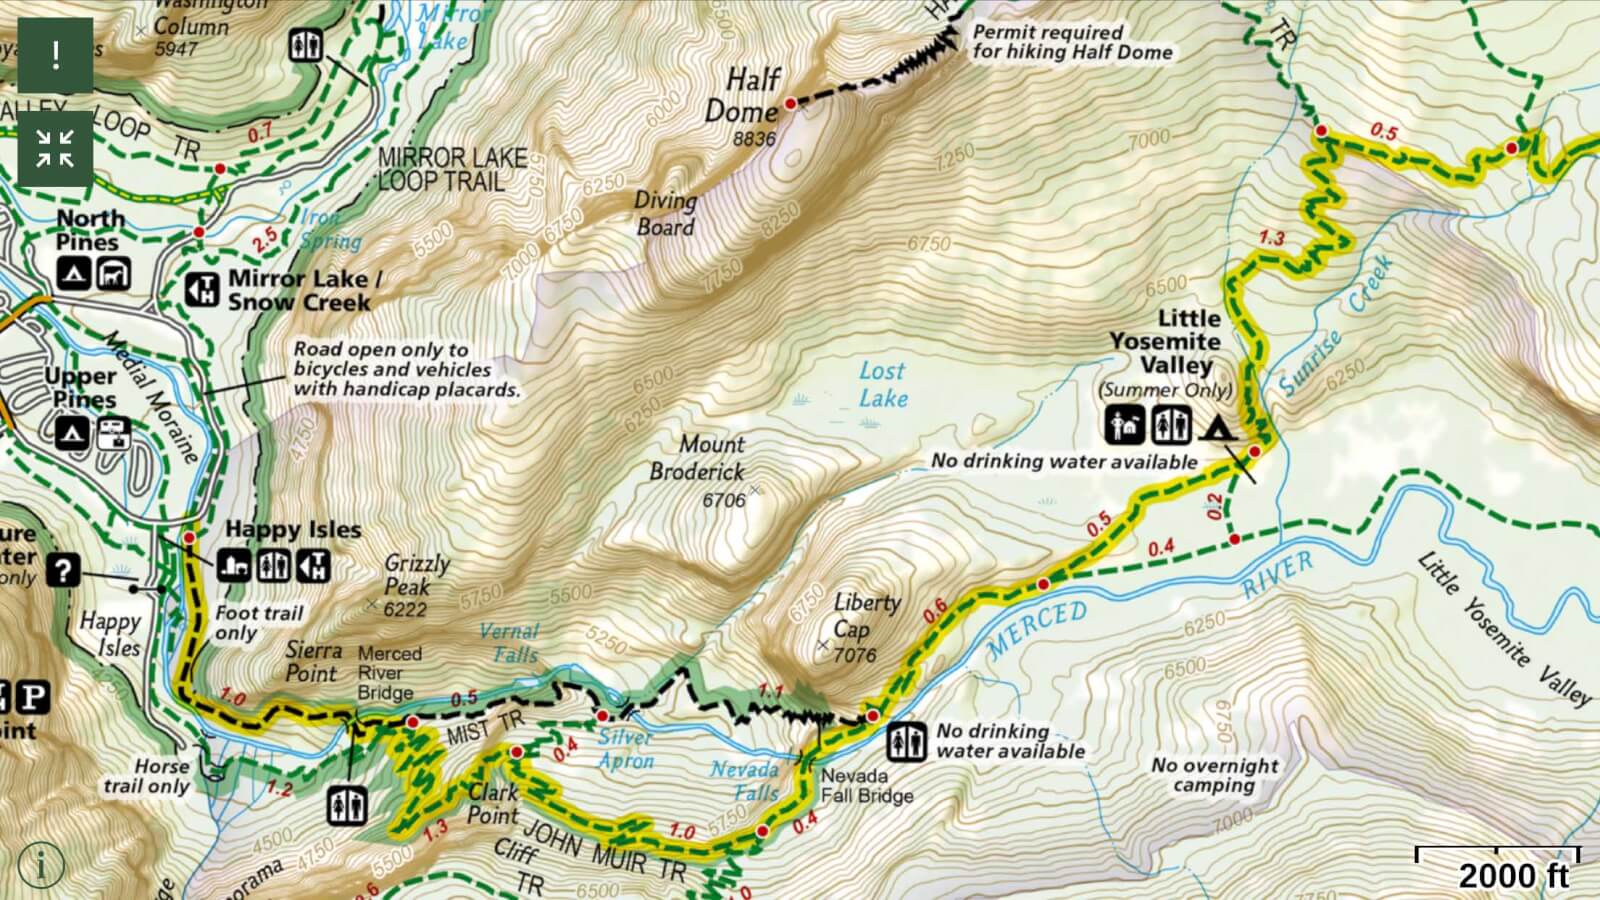
Recent large screen smartphones have larger and better displays for map use in the field and significantly better battery life than older models. If you use Gaia GPS on your smartphone, and the Web-based CalTopo for your pre-trip route planning and map printing, then your printed maps will exactly match the maps and waypoints on your smartphone! This synchronicity is part of what makes Gaia the best backpacking GPS. [Pictured is a map printed from CalTopo, and the same map on an iPhone (with waypoints and routes imported from the CalTopo file, and download the same maps as used with CalTopo).]
GAIA GPS Android is as Good as iOS Version

The current version of Gaia GPS for Android is as good as the iOS version with the functionality, all part of what makes it our pick for best backpacking GPS.
So Many Great Maps to Choose From is part of what makes Gaia the best backpacking GPS
One of the great strengths of GAIA is the wealth of maps available, free with your subscription (depending on level). No other App offers the breath and quality of maps. Our top favorites are:
- National Geographic Trails Illustrated Maps | the reference standard and most accurate for National Park trails and regulations, use zones, etc.
- GAIA TOPO Maps Excellent vector-based topo maps | super fast & small file size!
- USGS TOPO Maps | the standard for off-trail travel)
Other GAIA Maps
- Satellite Imagery
- Cell phone coverage Maps. Know if you’ll have service where you’re going.
- GAIA with Apple CarPlay Maps. Quickly find and get directions to hiking trailheads (and then use GAIA trails maps to navigate your hike!)
- USFS Recreation Sites Map | Quickly Find Campgrounds and Trails
International GAIA maps
- New Zealand TOPO
- A number of international, official country maps for Europe. E.g. Spain IGN Topo, Swiss Topo, Norway Topo, Sweden Topo, Finland Topo, Luxembourg Topo, France IGN Topo, Austria Topo, etc.
Battery life is very good for iPhones
Part of what makes Gaia the best backpacking GPS is that battery life is so good. Expect to get between 5+ days of battery life (we usually get 7 or better) without recharging. Our normal daily use of the following: use the iPhone’s GPS for a few locations, looking at electronic maps, taking a few photos, and some reading of electronic guides/references. Even so, we bring a backup battery just case we need to use the GPS more or do something silly that drains the battery.
Bring a backup batter to ensure you always have access to the best backpacking GPS
If you’re relying on it for navigation, it’s a critical safety precaution to make sure your smartphone is always available for use as a GPS. My preferred charger is the Anker PowerCore 10000 (only 6.4 oz). It is the lightest option if you need to recharge your phone a lot. It can fully charge a large phone two times, and a smaller phone three times!
Battery Life for Android Phones
Not a show stopper, but Android phones appear to have less battery life on-trail than iPhones—more in the range of 3-5 days with moderate GPS use. This seems to be in part due to differences between Android smartphones for both a) the phone hardware and b) variations of the Android OS on installed on phones. As such, the Android environment is not as easily understood/managed vs. tightly controlled, and very predictable iPhone hardware and iOS environment. This makes Android battery management more challenging. Nonetheless, an Android smartphone is a valid & capable backpacking GPS.
Cliff Notes – a jump start to use your smartphone as the best backpacking GPS
- Do: Use your smartphone as a backpacking and hiking GPS. It’s excellent!
- Do: Use CalTopo for your pre-trip route planning and mapping. It’s the perfect companion to Gaia GPS on your smartphone.
- Do: Use Gaia GPS. It’s a near-perfect App for hiking in the US, Canada and New Zealand and now Spain and France. (see below for using other mapping Apps and in other countries)
- Do: Download Maps For Offline Use to Gaia GPS before your trip
- Note: If you use CalTopo for your pre-trip route planning and map printing, and GAIA GPS on your smartphone, then your printed maps will exactly match the maps and waypoints on your iPhone. That’s a big deal in the field—making everything a ton easier to follow and understand!
- Batteries, phone case & cables: See Best Lightweight Backpacking Electronics Gear for a detailed information. But in summary consider a: backup charging battery
- Do: remember to bring your phone’s charging cable in addition to the battery.
- A $0.25 Pint Ziploc Freezer Bag as a case to protect your phone from dust, scratches and water.
Battery life management 101
- Expect: Between 5+ days of battery life in the field for an iPhone with moderate use of GPS, mapping, taking a few photos and use of electronic guides/references. You will probably get closer to 3-5 days with “conservative use” of GPS with an Android phone like a Samsung Galaxy, or any phone if you constantly take lots of photos and videos.
- Do: Put your smartphone in Airplane Mode and leave it there for the duration of your trip. For iPhones, the GPS will work in Airplane Mode
- Do: put your screen in auto-brightness, and lower your screen brightness to the minimum amount. Screen power is the single biggest battery drain for your phone.
- Do: Shut Down all unnecessary apps especially ones like Google Maps and Instagram that use location tracking (the GPS) in the background. (See more tips below for “Battery Conservation Settings” below)
- Do: set your GPS App to only get a GPS fix when you manually request it.
Considerations
- Use Tracking mode in your App with discretion. It will drain your battery by about 2% to 5% per hour. Note: the current version of GAIA only uses around 2% per hour. This makes it a viable tracking took for trips of 3-4 days (and even longer if you bring a good USB battery to re-charge it.)
- Good Idea: to test your personal battery use on a couple of long day hikes before taking the smartphone for navigating on a long trip.
- See more tips below for “Battery Conservation Settings” below
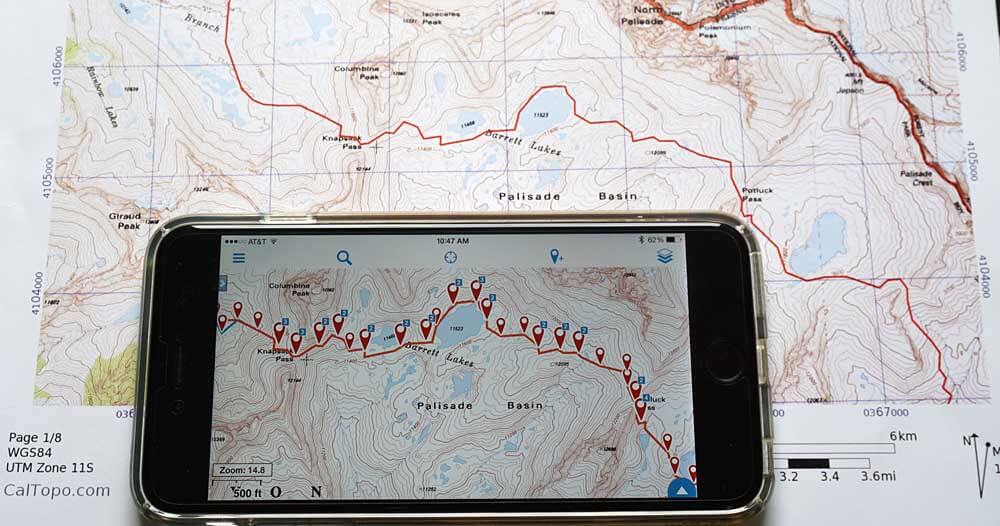
Download Maps into GAIA For Offline Use on the trail where WiFi and cellular data are not present — but where the smartphone GPS still works. On the left is a partial list of map sources for download. On the right the pink box indicates the area of the map selected for Download from a Rectilinear Area. You can also use the “Download Maps for Track” feature which automatically gets all the maps needed to follow a line, a phenomenally useful feature when setting out on a thousand-mile hike or paddle. Download Maps for Track and the wide range of map types are the two features that make Gaia GPS stand head and shoulders above the other available apps.
Battery life in the field for iPhones
From my friends and accomplished long-distance hikers, Amy and Jim who agree that Gaia is the best backpacking GPS:
Our daily use of the iPhone includes 5-50 sessions with a mapping app (depending on how ambiguous the route is), 10-20 photos, occasional use of bird guide apps, alarm clock, checking time, reading Wiki Offline, and nightly journal entries. All of our usage is discretionary except for the mapping apps and GPS reads.
We scale our discretionary use based on how many days remain before the next recharge opportunity. With restrained use, most models of iPhones will last for a week or even ten days. If we only have two or three or four days to the next recharge opportunity, then we take more photos, play more bird calls, etc. Your mileage will depend entirely on your usage patterns.
Prior to a multi-day trip, be sure to establish your baseline drain (iPhone asleep and no activity) to make sure that drain is minimized as described in the Battery Drain section. Experiment on day hikes so you can estimate your daily drain based on your own usage patterns.
Baseline iPhone battery drain is 1-3% per day
When all battery conservation measures are in place, the baseline battery drain (phone on, but not in use) of most iPhone models is 1-3% per day. Without proper battery conservation measures, the daily baseline drain will be at least 10% and often over 30%. By baseline drain, we mean that the phone is powered on, but asleep; it is ready for use, but the user is not actually doing anything with it. This is the background drain you will incur even if you don’t take any pictures, look at any maps, or use any apps at all.
Battery Conservation Settings for Android or iOS Smartphones
To ensure Gaia GPS performs like the best backpacking GPS it is, it’s important to follow these guidelines to conserve your iPhone battery and get the maximum battery life in the field. For day hikes or overnight hikes most of these suggestions are not as important, but they are critical if you want to use an smartphone for a multi-day trip without resorting to a recharge solution (external battery or solar). Our research ended up focusing a great deal on battery life, and we hope these ideas help.
Settings to Optimize Battery Life – iOS and Android Smartphones
This is a list of major settings to increase your battery life. These settings apply to both iOS and Android. In the case of iOS we have included the menu path to change the setting.
Major Settings
Monitor your battery charge percentage.
iOS: General->Usage->Battery Percentage = ON.
Airplane Mode = ON.
WIFI = OFF. Bluetooth = OFF (unless connected to something like your Delorme inReach). AirDrop = OFF. Personal Hotspot = OFF [for iOS these are all in the “Control Center” (swipe up from the bottom of the screen)]
Minimize screen brightness and screen use.
A bright screen is a significant battery drain. So to minimize battery drain you should make sure the screen is not brighter than necessary. For iOS: Wallpapers & Brightness – Auto-Brightness allows the screen to adjust its brightness based on current lighting conditions. Then still use the minimum brightness necessary to use your smartphone.
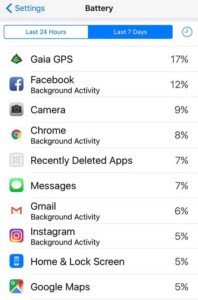
Check which Apps have the biggest battery drain.
You can do this in iOS via Settings->Battery and look under “Battery Usage”
Shut down unneeded apps.
Most apps do nothing while in the background and it is fine to leave them in this inactive state. A few apps (i.e. mapping apps that have engaged the GPS in Tracking mode, Google Maps, and even Facebook) can activate the GPS in background and drain your battery.
n theory, if an app is using the GPS there will be a small GPS Location Icon (arrowhead shape) at the top of the screen; e.g. this icon appears when Google Maps is active in the background. But the GPS Icon is not a 100% reliable indicator, so you need to ensure that unneeded apps that might be running the GPS are fully shut down before you start your trip. Here are instructions on how to shut down background apps. (For tech-weenies, here is an article that offers a more complete explanation.)
For all apps still running, minimize the use of Locations Services (i.e. GPS use).
iOS: Privacy->Location Services = ON but Turn Location Services OFF for any app that you will be using while backpacking unless it is important for that app to have a GPS read. For example, if you use a Camera app and you want it to put a GPS stamp on each image, then leave Location Services on for that app.
However, if you don’t care about having a GPS stamp on the image, then turn Location Services off for Camera app so that it does not engage the GPS (and therefore drain battery) every time you take a photo.
Don’t use Tracking Mode
if you need trip tracking use a ZOLEO Satellite Communicator or Garmin inReach Mini 2 Most smartphone mapping apps like GAIA have features to record a track as you walk, or to guide you to a specified waypoint. But to do this the app must constantly get a GPS read, which is a steady battery drain.
So if you are on a multi-day trip, don’t use tracking mode (and use guide me sparingly in GAIA and other apps only when needed). Most of the time, it’s best to manually get your current location when necessary. [In our battery tests we found that Tracking mode consumes ~5% of the battery capacity per hour.]
Set your GPS mapping App to only get a GPS fix when you manually initiate it.
Some apps like GAIA have excellent battery management (GPS use) settings, but some do not. I have GAIA set to only engage the GPS when I click the location icon.
Keep the iPhone at a reasonable temperature.
Batteries achieve optimum service life if used at 20°C (68°F) or slightly below. Avoid letting the iPhone overheat in direct sun, and keep it in pocket close to your body in cold conditions. More detailed battery information in this great article.
Optionally shut down the phone at night.
We never fully shut down the phone while on a trip, but if your particular phone has a measurable overnight drain you could consider shutting it down every night to conserve battery.
If you need to leave Airplane Mode Off (iOS only)
How to Choose your Mapping Apps
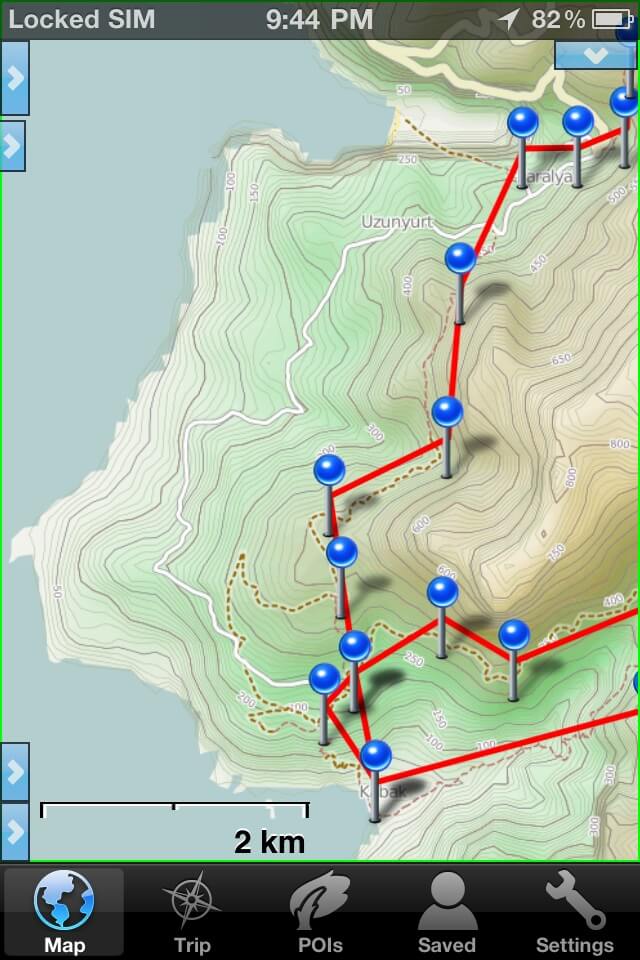
International mapping 1: Gaia GPS displaying OpenCycleMap of a section of the Lycian Way in Turkey. Red lines and blue pins show our intended route (2 alternatives shown). The brown dashed lines show trails that have been added by users to the OpenStreetMap database, wiki-style. OpenCycleMap and Satellite imagery are especially important when hiking in Turkey because the government does not publish any topographic maps. Using an iPhone with a $20 app (in this case Gaia GPS) we carried maps, satellite imagery, and track data for ~600 miles of trails in Turkey!
Gaia is the best backpacking GPS because it has so many maps to choose from. But before choosing an app, you need to decide which types of maps you want to view while hiking. You may want to use more than one app if you care about more than one map type. After deciding which map type you want you can then evaluate the features and usability of the apps that provide that map type. Here are the general classes of maps:
National Mapping Agency Maps
Topographic maps issued by the government that provides coverage for an entire country (USGS, NRCan, OS, IGN, LINZ, etc). These maps are almost always the most accurate and detailed source of topographic and geographic information, although they often do not have the most current cultural changes, such as new trails. Some governments license their map data to the apps at no charge (USA, Canada, New Zealand, and some UK maps), and others do not (UK’s best maps, France, Australia).
Free license maps
When you use Gaia, the best backpacking GPS, it gives access to freely licensed maps (for example USGS) and you usually do not need to pay any fees (beyond the initial cost of the app) to download an unlimited amount of map data. When you use an app that gives access to maps for which the app developer must pay licensing fees, then you will need to pay for the map content.
Prices vary wildly, depending on the fees that must be paid to the government for use of the maps. For example, iPhiGeNie charges 15 Euros per year to access the all maps that IGN publishes (not so bad); ViewRanger charges 90 GBP for the 1:50K LandRanger series, the Explorer series is additional (wow!).
National maps like USGS
For access to USGS, NRCan, and LINZ (USA, Canada, and New Zealand) maps we recommend Gaia GPS. Gaia GPS is the best backpacking GPS and provides Satellite imagery and OpenCycleMaps in addition to the National Agency maps and has a rich set of features.
Plan to spend at least an hour learning how to use it, as some of the important features are not obvious. For a user who wants the most complete set of functionality and the best selection of map sources, this is the best available app for the US, Canada, and New Zealand.
Europe
For access to the National Mapping Agency maps of Europe, we are not experts but propose the following.
iPhiGéNie
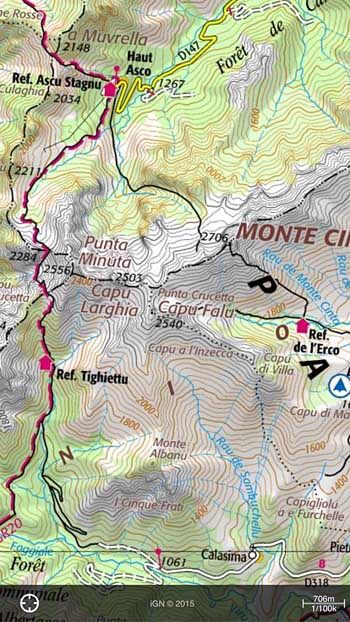
iPhiGéNie (both an initial cost and cost for map access) is the best alternative for Catalonia, Italy, Germany and Norway and an good option for France, Spain. Based on our use of iPhiGéNie on the GR20 in Corsica France, this App is the equal of Gaia in features, performance, and battery conservation. (Note: France & Spain IGN maps also in GAIA for a fee as of May 2016)
View Ranger
ViewRanger is a solid full-featured app that offers the gold standard Explorer and LandRanger OS maps of the UK as well as National Agency maps for most European countries. We used ViewRanger for a long hike in Scotland and it was solid and met our needs. This app offers USGS maps as well as maps of Europe, however, the usability and feature set are not as good as Gaia GPS and therefore we do not use it the US.
UK Map
UK Map offers freely licensed OS maps, which are not as detailed as the Explorer and LandRanger series but will suffice for many users (especially price-sensitive users).
It is elegant and easy to use but does not support waypoints or tracks.
OpenCycleMap
aka, OpenStreetMap, OSM, OSM Topo, Cloudmade Topo/Cycle, OpenHikingMap. Many iPhone apps include this map source because it is a freely licensed topographic map of most of the world (below 60 degrees latitude).
Although the topographic and geographic detail is not as good as maps from the national mapping agencies, there are three important characteristics: it is freely licensed; cultural information is often more current, and it covers most of the world.
Take a look at the OSM treatment at their website. We have successfully used OpenCycleMaps together with Satellite imagery (with no National Agency Maps) for long hikes in Turkey, Australia, and Spain. In Turkey there were no National Agency maps available; in Australia and Spain they were available but at too high a cost for our purposes.
Gaia GPS is the best backpacking gps for this map type. There are many other apps that provide access to OpenCycleMaps, but only Gaia (that we have found) also includes downloadable worldwide Satellite Imagery, is easy to use, supports waypoints and tracks, and allows import and export of gpx and/or kml files.
Satellite images
Often very useful, especially for off-trail hiking. Gaia GPS is the best backpacking GPS for satellite imagery as it offers downloadable satellite imagery of the whole world (3 different sources: Mapquest, ESRI, Google).
Regional and local maps –
Nearly every park publishes a map showing park boundaries, trails, roads, campgrounds, and points of interest. These will nearly always have the most current trail information.
Maplets
Maplets is a great app for viewing these maps; if the park you want is not already available, submit a request and they will attempt to add it. You could find these maps on your own, and view them using any iPhone pdf viewer. However, Maplets makes it very easy to find them, and by using Maplets you are able to see your current location on the map (for those maps that were drawn to scale).
Maplets includes limited ability to import, create, and export tracks and waypoints, so you will probably end up using it in conjunction with a more fully-featured app like Gaia GPS. In addition to park maps, Maplets has a rich inventory of maps of transit systems, bike routes, airports, museums, university campuses, etc. (Of all the apps I’ve used, Maplets is the one I most wish I had imagined and then produced; it is an elegant, simple, useful, concept that is very well executed.)
Tips on Using the iPhone
Gaia GPS is the best backpacking GPS app, but there are a few considerations for using an iPhone in the backcountry.
Data –
When you have a WIFI connection, download the map content (and trail data if you have it) that you’ll need while hiking. Your iPhone can get a GPS signal in the woods, but you will be unlikely to reach the Internet for data.
Battery Life –
Manage your battery life. Day hikers can get away without taking special steps to tend the battery life, but for multi-day trips, you must tend to these things. This article closes with detailed instructions on how to maximize battery life.
Protect Your Phone –
In order for Gaia to perform as the best backpacking GPS, you need to protect your phone to ensure it works. In terms of waterproofness and durability, the iPhone needs to be treated as you would treat a non-waterproof camera, unlike a Garmin which is designed for outdoor conditions.
It can be “waterproofed” with a 5 gram $0.15 Pint Ziploc Freezer Bag , a more expensive Aloksak 4.5×7″ ziplock, or an expensive LifeProof case. Even when it not raining, we keep the iPhone in a pint zip lock to protect it from sweat and dirt. LifeProof makes low-profile light-weight completely waterproof cases, which might be an good option for very wet environments.
OpenStreetMap –
Spend an hour learning about OpenStreetMap (aka OSM). OSM is a free map of the world, and many iPhone apps are based on map content from OSM. OpenCycleMap (aka Cloudmade Topo) is a variation that includes contour lines and hiking trails. Data is added to OpenStreetMap by users like us, wiki-style. If your favorite trails are not there, then you can add them and the world will be a better place for it.
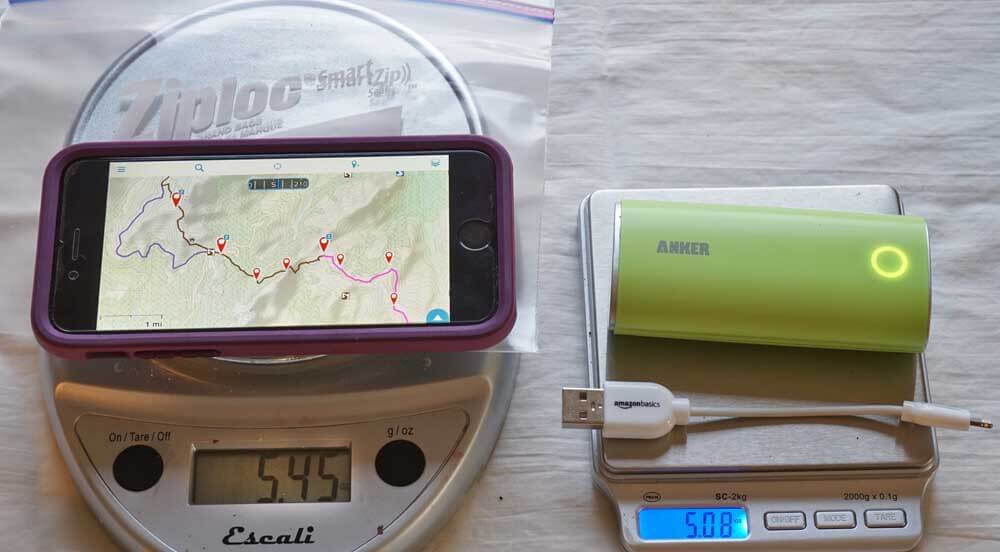
Left: the iPhone 6 in a light but protective case sitting on top of a Pint Ziploc Freezer Bag used to protect the phone from dust, scratches and water (effective, lighter and less expensive than elaborate waterproof cases!). Right: a substantial 6400 mAh external charging battery and a short lightning connector.
Detailed Testing and More Information on iOS Hardware Models
This a very technical and detailed section that supports the summary information above. It will likely only be of interest to technophiles, but here it is:
For purposes of this article (GPS and mapping), the iOS devices vary in only two ways: GPS Chip and Battery Drain. First, some iOS devices have a GPS chip and some do not.
- A device with a GPS chip can identify your location (usually within 10 or 20 meters) even when it has no WIFI or Cellular signal.
- A device without a GPS chip can identify your approximate location only when it has a WIFI signal; these devices are still useful tools for looking at maps but will not show your location on the map while you are hiking.
- All iPhone models include a GPS chip.
Second, there are subtle but very important differences in battery drain between the different models and different cellular providers. See the Battery Drain and Different Models of iPhones section below for critical information.
To clarify a common misconception: You do NOT need WIFI or Cellular connection for the GPS chip to work, which is part of what makes Gaia the best backpacking GPS; however you do need to have pre-downloaded the map content in order to have your current location show up on a map.
Battery Drain and iPhone
When all battery conservation measures are in place (as per the Battery Conservation Settings section), the baseline battery drain of most iPhone models is 1-3% per day. Without proper battery conservation measures, the daily baseline drain will be at least 10% and often over 30%. By baseline drain, we mean that the phone is powered on, but asleep; it is ready for use, but the user is not actually doing anything with it. This is the background drain you will incur even if you don’t take any pictures, look at any maps, or use any apps at all.
In range vs out of range
In some configurations, the amount of battery drain depends on whether you are in-range or out-of-range of the cellular provider. Therefore if you test your baseline battery drain at home you are likely to get one result (in-signal-range), while when you use the iPhone in the backcountry you may get a different result (out-of-signal-range).
In order to do my battery drain testing, I constructed a Faraday Cage by putting the iPhone inside a closed cookie tin and putting the tin into a microwave oven; neither the cookie tin nor the microwave alone blocked signal. We highly recommend that you run overnight tests at home with your own phone in two test scenarios: in signal range, and in a Faraday Cage.
Disable cellular activity
The most important factor in preventing drain is to disable the cellular activity. The phone will incur ~10% daily drain just maintaining a signal, or 20-30% daily drain searching for a non-existent signal. Starting in iOS 8.3, you can set Airplane Mode = ON, which will disable cellular activity while leaving GPS enabled. This solves many battery management problems that previously existed. All users with an iPhone4S or later model should ensure they have iOS 8.3 (or later), and keep Airplane Mode = ON for the entire duration of backpacking trips.


The following iOS settings should be irrelevant when Airplane Mode = ON. They are relevant only to people who choose to keep Airplane Mode OFF for some reason but want to maximize battery conservation. Use any of these as appropriate.
Cellular->Cellular Data = OFF
iTunes&App Stores->Automatic Downloads = OFF and
Use Cellular Data = OFF
Notification Center –
Turn off notifications for all apps – No sounds, no badges, no alerts, no nothing.
General->About->Diagnostics and Usage = Don’t Send
General->Background App Refresh
You can disable each app from doing work while it’s in the background (i.e. not open and visible on the screen). Turn OFF everything that you won’t need to have running in the background while on your trip. For example, you won’t need the Stocks app trying to updated stock prices while you sleep!
Mail, Contacts, Calendars: Fetch New Data -> Push = OFF, and Fetch = Manually