
2018/19 Torres del Paine W Trek and O Trek
Quick and Easy Guide to Essential Trip Planning
These are two of the most spectacular treks in the world, but are neither strenuous nor difficult to access. This is the best guide to the Torres del Paine W Trek and Circuit Treks, in-print or online. It was inspired by Alison and I finding a scarcity of accurate and up-to-date information on how to plan for hiking Torres del Paine.
Top Things You Need to Know about Torres del Paine (TdP)
Highlights – Iconic view of the Torres themselves and seeing Glacier Grey in all its glory. A world class trek!
Reservations – As of 2017, this is a reservation only trek with limits on number of hikers allowed into the park and at each campsite or refugio. Do your homework and make your reservations ahead of time (see reservations section below). Our guide offers special tips and work-arounds as you may get frustrated with the three reservations systems you have to deal with. The number one workaround is to plan your entire trip around Refugio Chileno.
Location – Patagonia, Chile. You can fly into Punta Arenas and bus over to Puerto Natales (the gateway to the park) or you can take a bus directly to Puerto Natales from many locales in Chile and Argentina. Seasonally there are few flights a week directly from Santiago to Puerto Natales. (see transportation section below)
Safety – This region of Chile is totally stable, safe, and set up for tourists. You will encounter many Chilenos and foreigners doing this trek and will make many new friends.
Reference – Our guide is the most accurate and up-to-date. We found others to be confusing, lacking critical information or just wrong!
Navigation and Maps – There are many maps of TdP. Find the one that works best for you. We offer a few in this guide including the map that the TdP park uses with proposed hiking times (that tend to be geared towards new hikers).
Season – September 1 through April 30 for the “W”, and November 15 – April 15 for the “O”. The ‘O’ is available in the offseason only with a guide. All refugios close at the end of April (i.e. there will be no services available for your trek).
Duration – W trek, 3 to 4 easy days |O trek, 6 to 7 days
Distance – W Trek 57 km, 35 miles | O Trek 128 km, 80 miles [actual distance varies depending on route options]
Camping/Lodging – TdP has a variety of lodging options from bringing your own tent to renting a tent to staying in a bunk bed to staying in nice hotel lodgings. Lodging options vary by site.
Water, Food & Fuel – Water is plentiful along the trail, in camps and all should be drinkable. The options for food are limited but available if you get in a bind. There are “Alimentacion” stores at several Refugios to supplement your food; they also have fuel canisters. And, all the Refugios have full 3-meal-a-day service (not the Campamentos). In addition, for pre-trip there are supermarkets in Puerto Natales to meet all your food needs, and most of the camping stores have fuel canisters. Alcohol fuel is available in Cruz Verde pharmacies.
Best Time of Year – December to March, Austral summer, is the best time to do this trek.
Level of Difficulty – The W is an easy hike on good & well signed trails with only few moderate climbs. The O Trek is similar but longer. Only Going up and over Paso John Grey in strong winds would be considered moderately difficult. A fit hiker can easily do both of these treks using the lower range hiking time estimates vs. the parks more conservative hiking times.
Route Finding – Easy. Not only are all trails well marked, but you will encounter plenty of other trekkers along your path.
Challenges – Patagonia weather, rain & strong winds, is your biggest challenge. That said, the vast majority of this trek is protected in the trees. Your biggest challenge outside of weather is booking the reservations for your trek (see our tips and workarounds below).
Quick and Easy Trip Planning for Torres del Paine
Important: Reservations are required & early reservations are essential for your trip’s success. We have the most useful and accurate information to help you to navigate Torres de Paine’s complex campsite and refugio reservation system.
And a new app, Torres Del Paine Lodging, shows you the availability of all campsites in the park (CONAF, Vertice, and Fanstistico Sur) in a single place! While you will still need to book campsites with directly with CONAF, Vertice, and Fanstistico Sur, you will be able to see at a glance what is open (or not) for all three.
Plan Your Torres del Paine Trek
First, follow each of these 6 Planning Steps in order and you’ll be fully prepared for your trek in no time!
- Pick W Trek or O Trek
- The W Trek (3 to 4 days) is by far the more popular & hits the high points.
- The Circuit Trek or ‘O’ Trek (6 to 7 days) is far less crowed. It does all of the W Trek, then continues around the back of the Torres del Paine to complete a full loop. As such it is more tranquil wilderness experience, and covers some great scenery not seen on the W. See park map
- Plan Your Detailed Itinerary – Help to figure out how many days and where you’ll camp
- How to Reserve Campsites, Tips & Tricks
- Reservations are difficult to make and are on three separate sites primarily designed for Spanish speakers. This section helps you to best navigate your way through these complicated reservation system(s).
- Options and tips on what to do if you can’t get the campsites you want.
- Plan your Gear (with detailed Gear List) – Most people are intimidated by Patagonia weather and therefore carry too much gear. Here we give you some tips on how so significantly lighten your pack while still being safe, warm and comfortable.
- Plan your Food (with detailed Food List) – Lists all your options for food on the trek from meals at refugios, to buying it at small stores along the route, to where and how get food ahead of time in Puerto Natales (the least expensive option).
- FAQs, notes, tips and tricks – Dealing with weather (rain and especially wind), trail conditions, campsite closures, water quality and availably, etc.
General Information: Maps, GPX files, and Transportation
These are links to essential information not covered in the 6 Planning Steps above.
Two Alternative World Class Treks in Patagonia
Looking for Something to do after Torres del Paine? Or are you finding reservations difficult and/or campsites booked? Then checkout out our guides to these two incredible off the beaten path Patagonia Treks — Chile’s exciting New Patagonia National Park Trek Guide and the Cerro Castillo Trek Guide. No reservations required and you’ll see far fewer people.
Chile’s New Patagonia National Park may well become the “Yellowstone of South America” due to its rich diversity. The new Park has it all — the high glaciated peaks of the Southern Andes, wide valleys with ice cold glacial rivers, forests of southern beech hanging with moss, and startlingly green glacial lakes. Fairly unique to the park is its expansive grasslands supporting a vast array of wildlife. It’s easy to see herds of guanacos, condors, flamingos, armadillos and much more…
The Cerro Castillo Trek is nearby and equally stunning. When, combined with the New Patagonia National Park Trek you have almost two weeks of fantastic trekking in a much less traveled but exciting region of Patagonia.
Overview of Torres de Paine W Trek and O Trek
The Torres del Paine W Trek and Circuit Trek (or ‘O’ Trek) have a well deserved reputation as world class backpacking trips. The Torres del Paine Park has the goods, with stunning views at every turn. Massive glaciers, including the vast Heilo Sur (Southern Ice Shelf) the second largest non-polar ice field on the planet. There are immense towers of rock, rushing mountain streams and waterfalls, huge azure lakes, and sublime fields of wildflowers—Andean Condors with a wingspan of over 10 feet soar overhead. Finally, you’ll meet interesting people from all over the world. The Torres del Paine provides true global trekking.
The Torres del Paine W Trek the O Trek are more accessible and more manageable than other world-renowned treks like the John Muir trail or Tour de Mont Blanc. The Torres del Paine treks are shorter and less strenuous. The classic W trek can be done in as little as 3 days. And we comfortably did the O Trek in 4.5 hiking days with plenty of time to gawk and take photos. The treks do not have a lot of elevation gain or loss. All the hiking is near sea level so there’s no altitude to deal with. The park has excellent trails with good signage. It is almost impossible to get off route or lost. Water is plentiful and in the campsites can be drunk without treatment. You are never far from help. There are ranger stations and/or campgrounds about every four hiking hours. In fact, the Torres del Paine would be a trek in the park if it weren’t for periods of nasty Patagonian weather and strong winds—very strong winds. Even so, the Torres is an entry level trip for many backpackers and trekkers. It is also a great way to start trekking in South America which has almost endless opportunities for more fantastic treks!
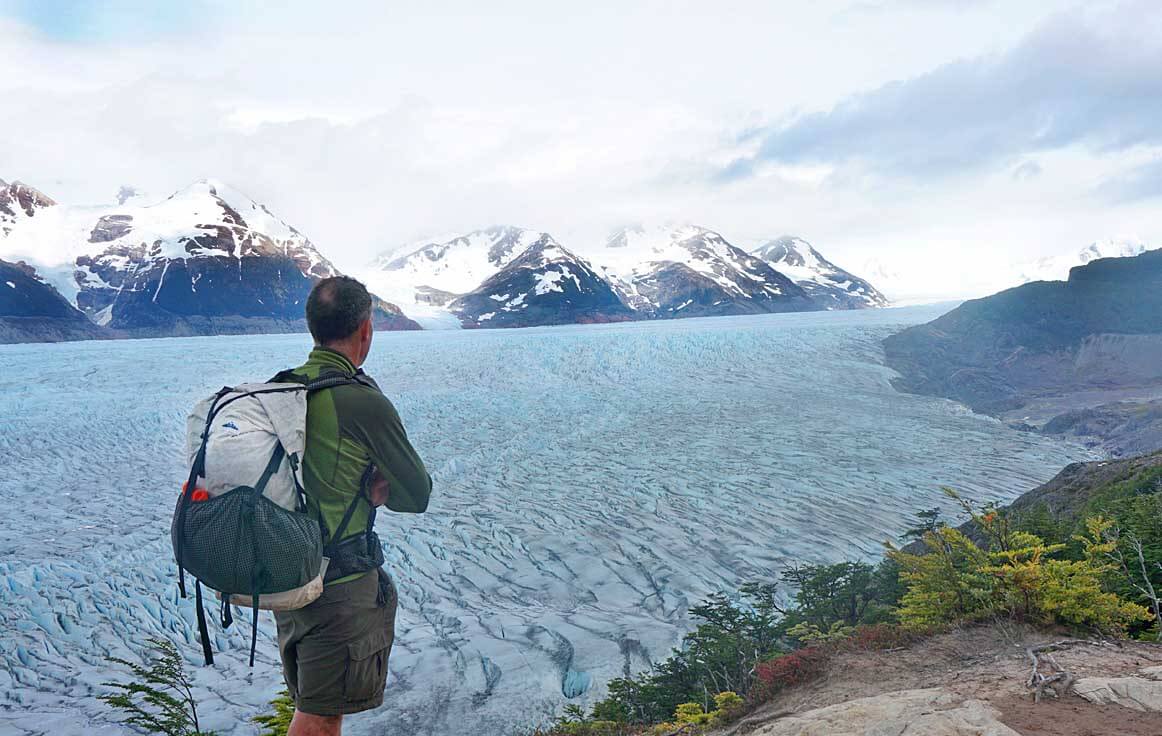
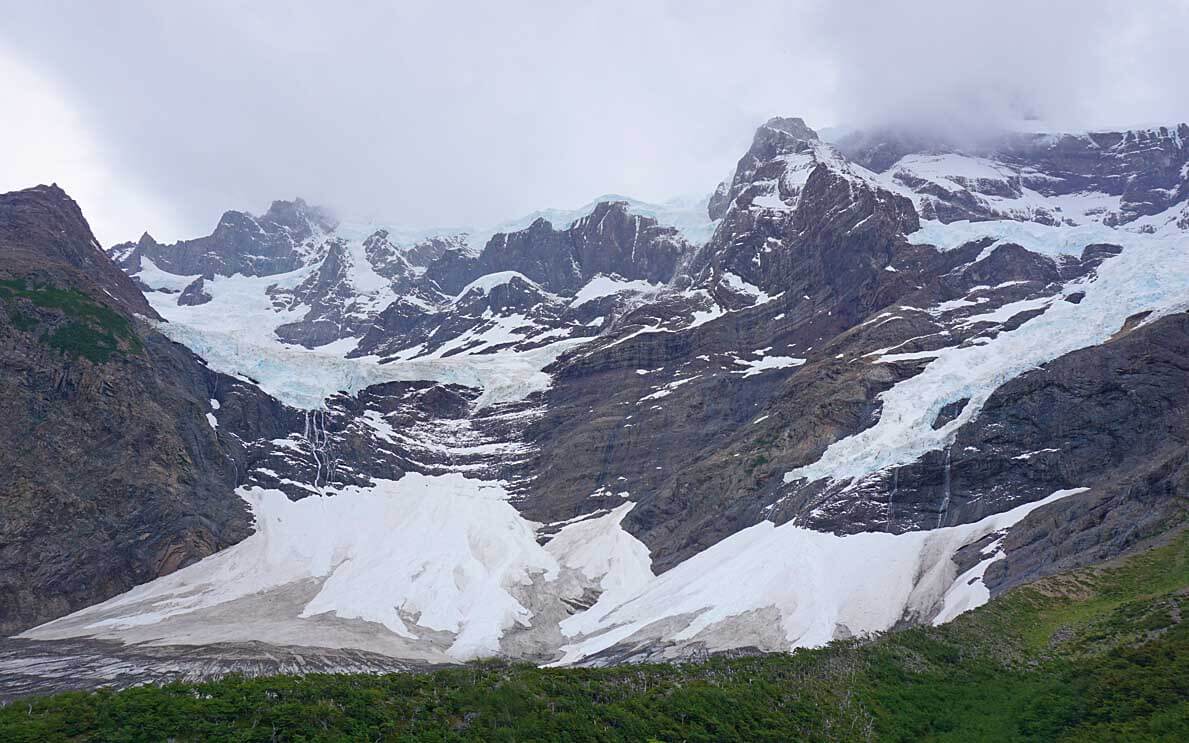
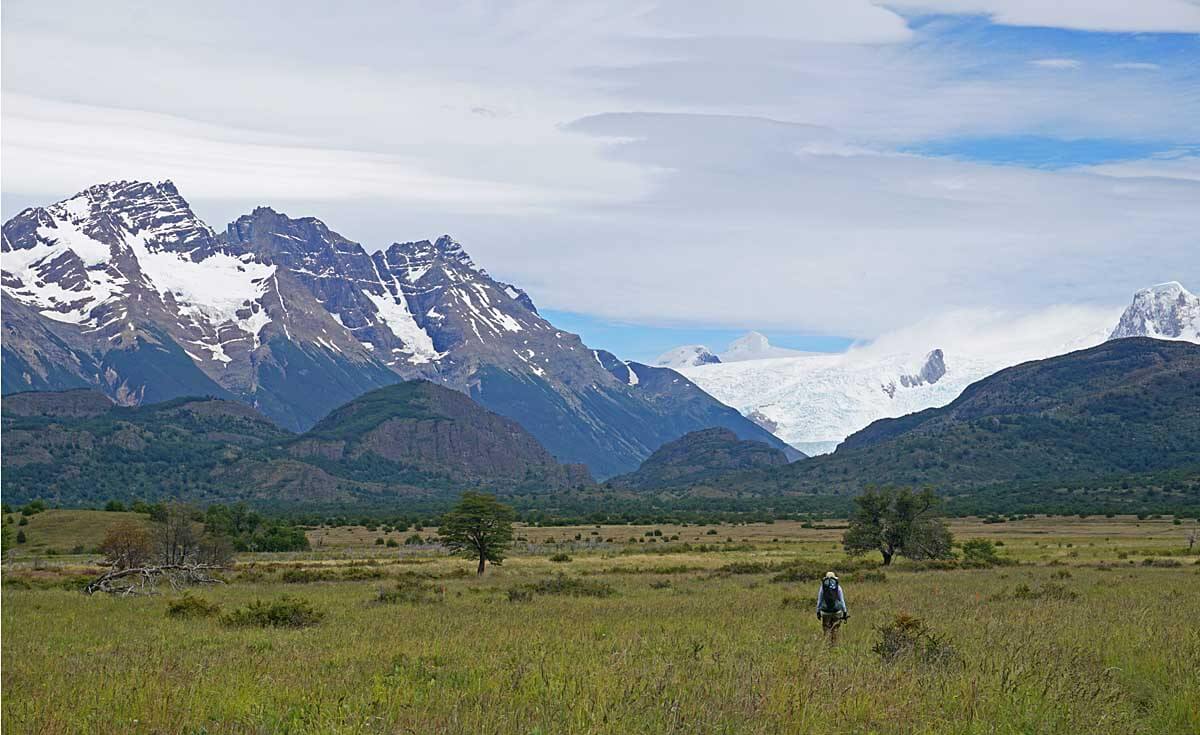
Glacier Grey, a 7 km (4.5 mile) wide river of ice that flows down from the immense Heilo Sur (this Southern Patagonian Ice Field is the second largest non-polar ice shelf). Glacier Grey’s origin from the Heilo Sur is at the upper right of the photo between the snow covered mountains of the Southern Andes. If you only do the W you will miss this view. It was our favorite part of the trek. Alan’s HyperLite Mountain Gear 2400 Southwest Pack is carrying less than 12 pounds (6 kg) at this point in the trip.
Current and Accurate Information for Torres del Paine
This guide was inspired by Alison and I finding a scarcity of accurate and up-to-date information on how to plan for hiking Torres del Paine. In fact mainstream, supposedly reputable materials about the trek were plain wrong. We hope to correct this with current and accurate information from our recent completion of Torres del Paine O Trek (which includes the full W Trek). Much of this information is especially needed in high season when some park facilities (especially on the W Trek) are full, or near capacity and camping reservations well advised.
- Hiking times in most guides and park maps are too conservative. If you are a moderately fit hiker you will likely do better than these times. This is one case where hiking too fast is as problematic as too slow (since you need to reserve your campsites ahead of time). The major complaint that we heard was of people hiking faster than expected and arriving at their reserved campground around noon (and it doesn’t get dark until after 10:00 pm in the summer!). That is they could have easily hiked to another stage that day to the next campsite. (Here is a listing of our less conservative hiking times and distances for Torres del Paine)
- The W Trek can easily be done in 3-4 days vs. the usual 5 days—with plenty of time to take photos and gawk at all the wonders of the Torres del Paine. (See our suggested 3-4 day W Trek Itinerary here.)
- O Trek can easily be done in 6 to 7 days vs. the 8-13 days recommended guides. (See our suggested 6 day O Trek Itinerary posted.)
- Bus/Ferry logistics – we also optimize bus and ferry logistics so that these times are round trip from the door of your hotel/hostel in Puerto Natales!
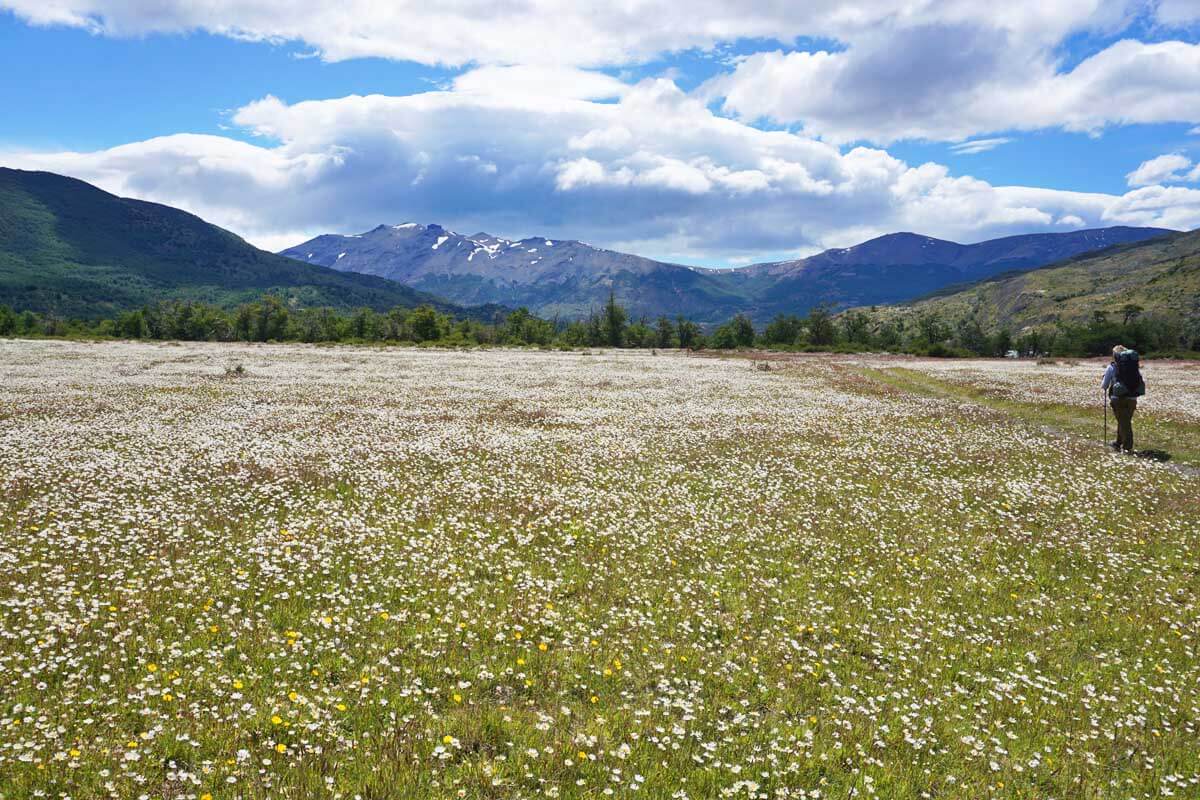
We loved the backside of the O Trek. Less people. More varied terrain. Idyllic valleys. Superb vistas. Pictured are wildflowers in full bloom in Valle Encantado (enchanted valley). We walked though fields of them for miles. They started as we dropped into the valley on our way to Campamento Serón and continued to Refugio Dickson. Along they way you get great views of the Patagonian Andes and even peeks at Heilo Sur, the vast Southern Ice shelf. Alison’s ULA Ohm 2.0 Pack is probably carrying less than 11 lb (5 kg) at this point in the trip.
Planning Your Torres del Paine Trip
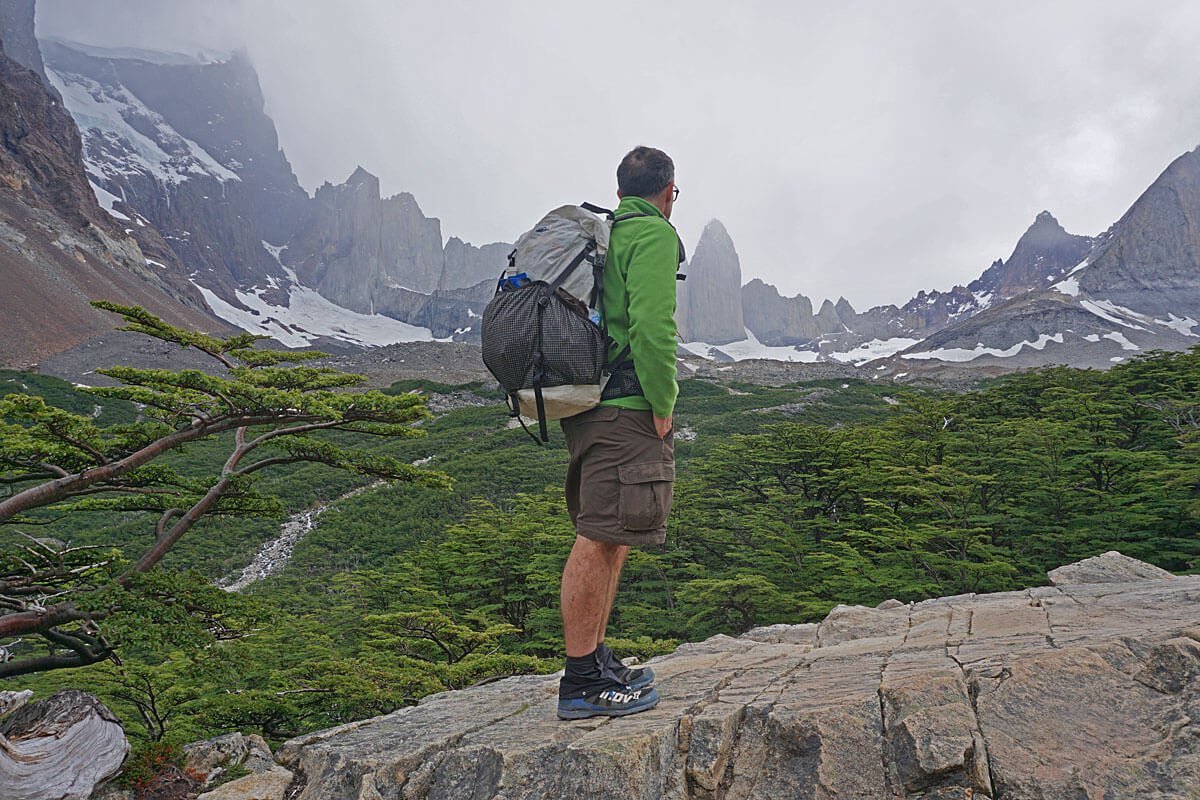
Fair warning, not all days are sunny in Patagonia, but that doesn’t mean the Torres del Paine is any less beautiful. Clouds and mists swirling around the high peaks are every bit as stunning as a sunny day. Glacier Frances (a hanging glacier) from near Mirador Frances. The summit of Paine Grande the highest mountain in the park at 3,050 m (10,000 ft) is already obscured by clouds mid-afternoon. It’s typical in Patagonia for peaks to cloud in later in the day, even in good weather. Early starts are best if you want unobstructed views of the peaks.
Step 1 – Pick your trip: W Trek, O Trek or ‘Q’
- The W Trek is by far the most popular and included in all treks listed. While most people do it in a relaxed 5 days, it can be done in 3-4 days. It covers: Glacier Grey, Valle Frances and Glacier Frances, and of course, the Torres de Paine, the gem of the Park. You will find a lot of trekkers on the W Trek in high season as well as day hikers going to the same key miradors (viewpoints) as the backpackers.
- The Circuit Trek or ‘O’ Trek does all of the W Trek, then continues around the back of the Torres del Paine to complete a full loop. We believe many backpackers could easily do the whole O Trek in 6 to 7 days. (We comfortably did it in 4.5 hiking days although with restrictions in the park, the least number of days allowed is now 6). We prefer the O Trek as it is every bit as beautiful as the W Trek, but with fewer people (only 80 people per day allowed). You also see a lot more of the park, which is more varied than just the W Trek. And, out favorite part of the whole trek was on the “O”, cresting Paso John Gardner and seeing Glacier Grey, a 7 km (4.5 mile) wide river of ice that flows down from the immense Heilo Sur (the vast Southern Patagonian Ice Field, the second largest non-polar ice shelf). [The crest over Paso John Garner is also the trickiest part; rangers can close the pass if there are high winds and/or low visibility.]
- The ‘Q’ Trek is the ‘O’ plus the section between the Serano Visitors Center (see park map here for details) and Refugio Paine Grande. This section forms the tail of the ‘Q’ and adds a bit more hiking and sight seeing for those so inclined.
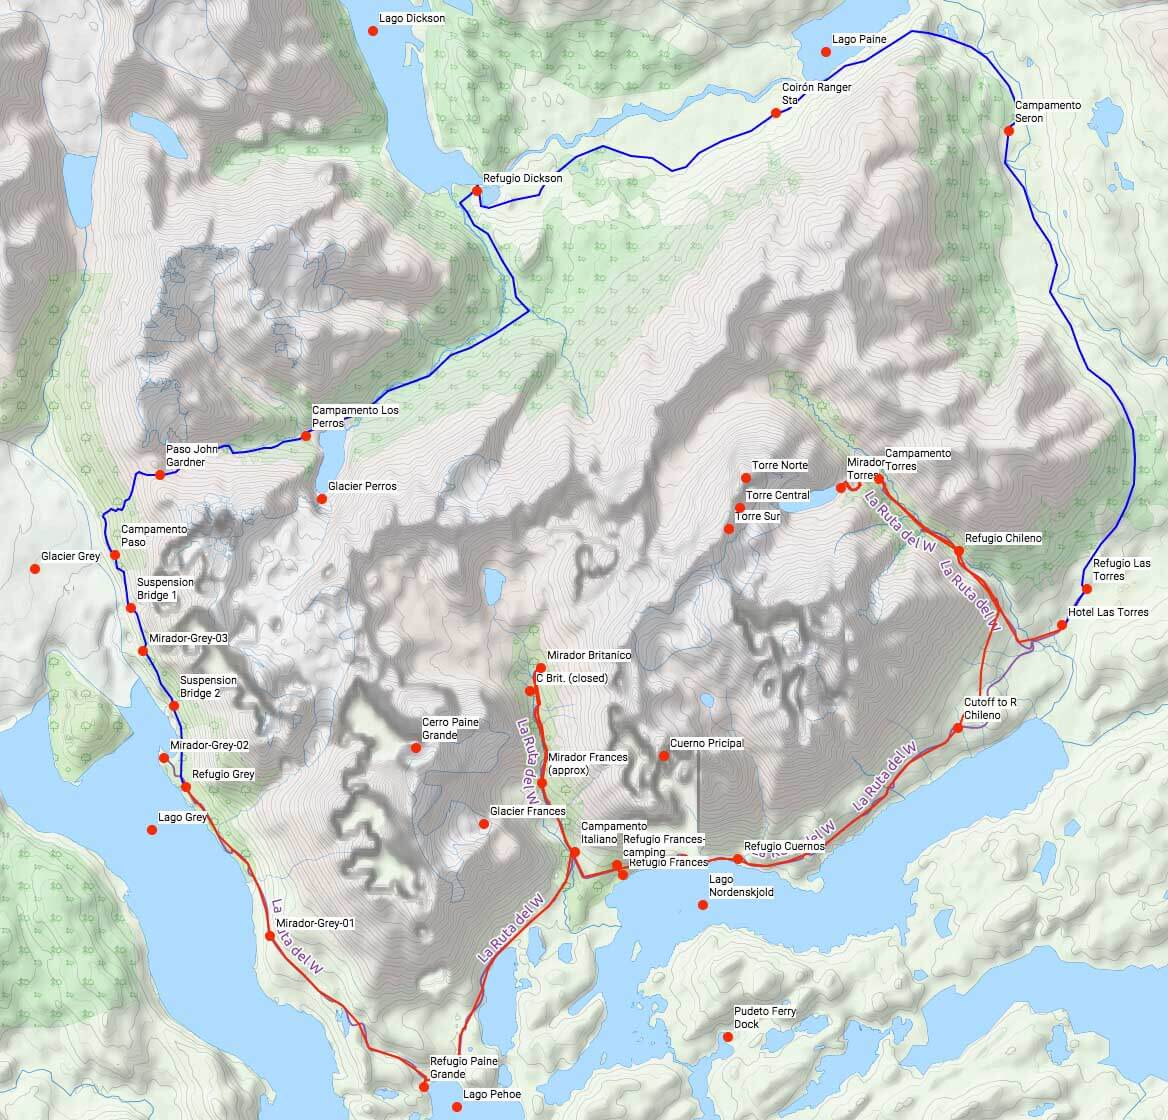
Our GPX map nicely shows the trek options: the two main Torres de Paine treks–the W Trek is in red and covers Glacier Grey, Valle Frances, Glacier Frances, and of course the Torres de Paine themselves. The O Trek is the W Trek plus the ‘Backside’ which is in blue. It includes the Valle Encantado, Lago & Glacier Dickson, Paso John Garner, and walks along the incredible Glacier Grey–note this map shows Campamento Torres which is now closed. [click on image to enlarge]
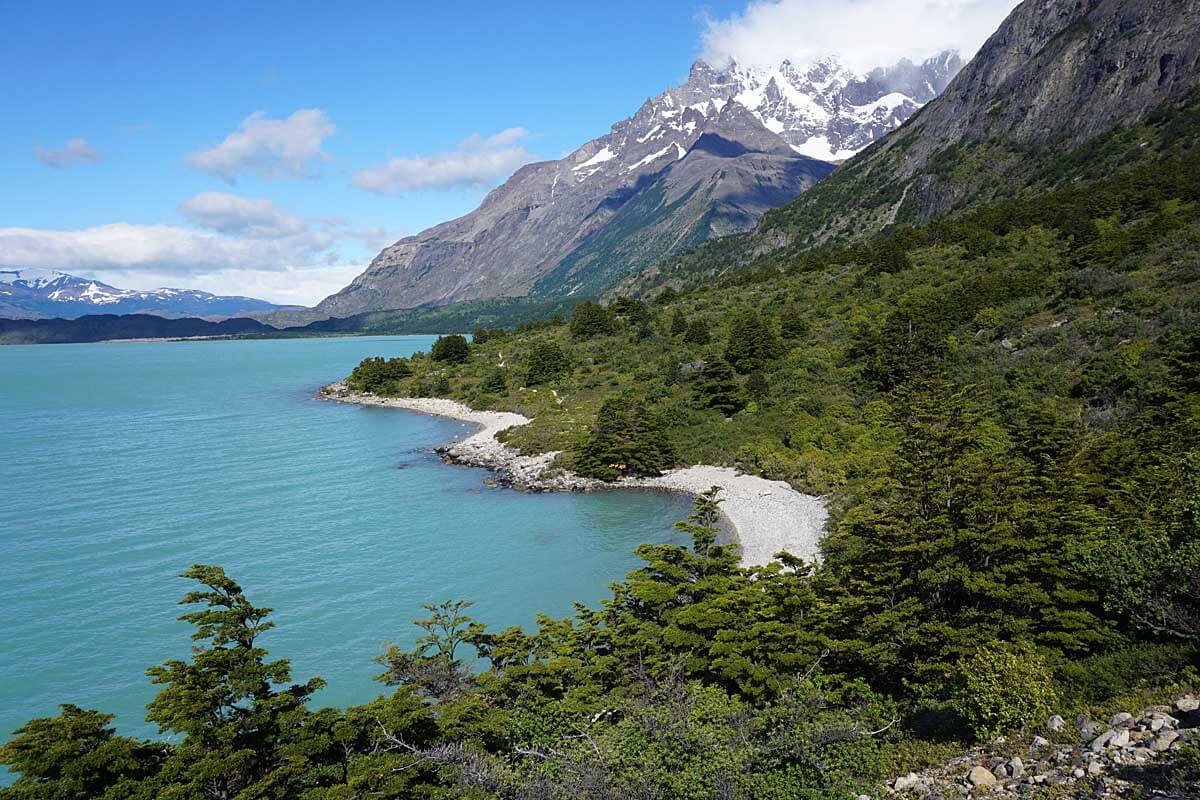
Hiking along the shores of Lago Norgenskjold. (W Trek)
GPX File for Torres del Paine W and O Treks
Link to the .GPX File for the routes and waypoints for the Torres del Paine W Trek and O Treks. It is arranged for the O Trek but includes all tracks and waypoints the W Trek.
The Official Park Map
This is the standard map handed out (for free) when you get your permit at the Park Entrance. It is accurate and more than adequate to plan and safely navigate the route.
- Trekking Map – Torres del Paine (main map) PDF will open in a PDF viewer which you can expand and zoom in. IMPORTANT! The ‘Circuit’ or ‘O’ Trek can only be done counterclockwise from Hotel/Camping Las Torres to Campamento Paso. The ‘W’ can be done in both directions.
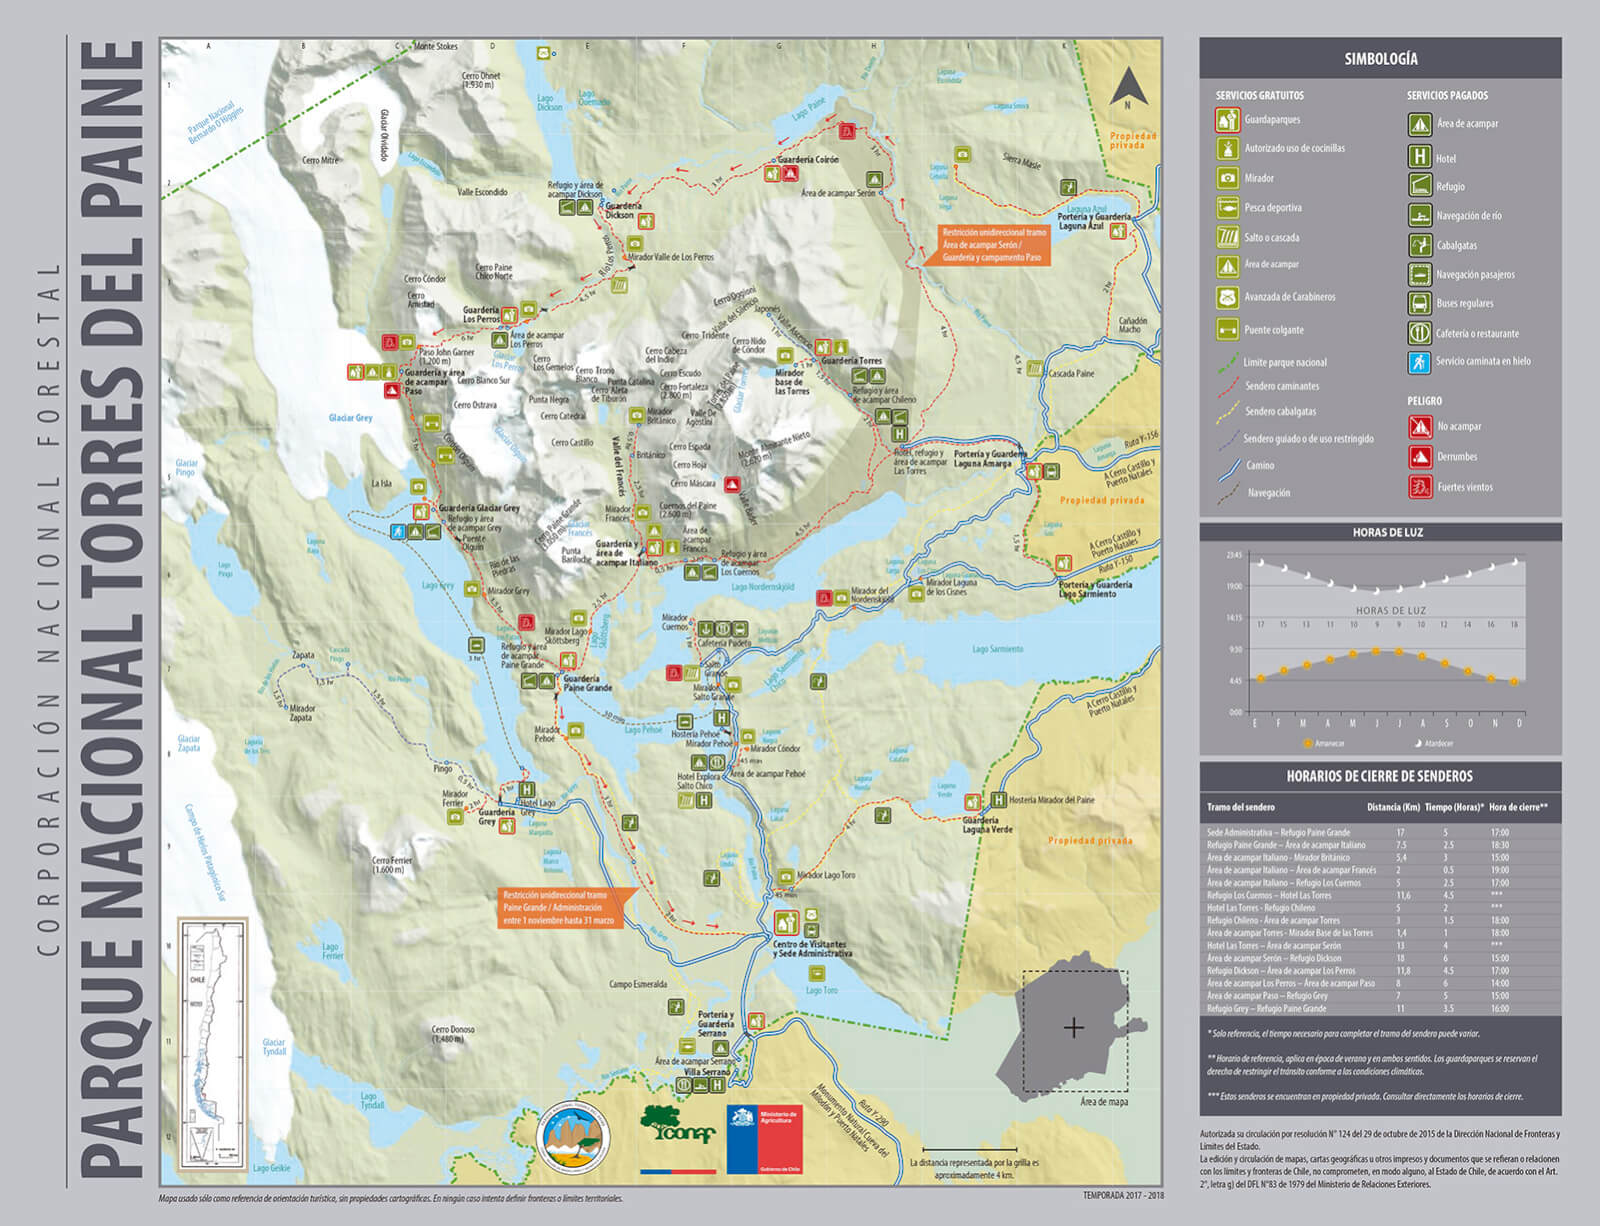
The Park’s Official Map is all you need to safely hike Torres del Paine. Note: Most if not all other maps and guidebooks are out of date with incorrect listings of campgrounds no longer in use, and trails and miradors (viewpoints) that are now closed to travel. [click on map to enlarge in a PDF viewer]
Step 2 – Plan Your Detailed Itinerary
Both the O and the W are reservation only treks! due to extensive overcrowding. You will be asked for your reservations at each site. As such, you’ll need to deal with three different groups to get your reservations: Fantastico Sur, Vertice, and CONAF (the Chilean Government). Luckily, all three have online reservations systems.
While you need to determine your itinerary based on how fast you’ll trek and how far you want to go, the reality of the reservation system puts constraints on all this.
Critical Tips for Organizing Your Trek
- Study the map – Get familiar with campsites and distances, all located on the map. The Park mandates start and ending times so you need to be clear on your hiking abilities. Look at the Map table “Horarias de Cierre de Senderos” (Trail Closing times). E.g. “Refugio Paine Grande — Area acampar Italiano – 18:30,” means that if you are hiking from Refugio Paine Grande to Campamento Italiano, you must be hiking by 3:30 pm. You can either stop at every campamento/refugio or skip to every other one. The park does not allow skipping more than one stage.
- Refugio Chileno – Focus your attention on Chileno and what date you can get that site. Chileno is the closest access to the Torres and the crux of the entire trip. With the closure of Campamento Torres it will likely be the bottleneck of your trip. Check different dates and different directions (for those doing the W). Also note that Fantatico Sur seems require you book meals with a campsite.
- Campsite/Refugio Availability App – This App is a huge help. With it you can quickly see in one place all campsites/refugios available on a given date.
We give suggested itineraries for the W Trek and Circuit or ‘O’ Trek. But we also give the table below which lists distances and hiking times for both the W Trek and O Trek. With it you can modify those itineraries or make your own new itinerary.
Hiking Times and Distances for W and O Treks (Alan & Alison’s hiking times)

C= campamento (camp) R= refugio (more facilities, meals and beds in addition to camping)
- This table is a just starting point for planning. You will need to estimate your own hiking pace based on your abilities and pack weight.
- Times in above table are for Alison and I on our recent trek which we averaged about 2 miles per hour (3.4 km/hr). We are reasonably fit and experienced hikers and carried packs under 18 pounds (under 8 kilos) . See our gear list for details. But we are both over 50 years old and by no means speed hikers. And during our trek, Alison was recovering from influenza.
- Hours (hiking times between points) is just that—hiking/moving time only. Our hiking times include only short stopped tasks like tying a shoelace, snapping a quick photo, putting on a rain jacket, or filling a water bottle. They do not include stoppage or breaks longer than 2-3 minutes. We averaged 2 miles/hour the entire trek.
- Hiking faster than expected can be just as problematic as slower. See below…
- Hiking times on Park Maps and in most guide books are conservative (based on an “average” hiker traveling with a heavy pack and not intending on setting any speed records). If you are reasonably fit hiker you will likely do better than these times. We believe with an early start and decent to OK weather, most backpackers could probably do two stages in a day. You have 17 hours of daylight in January!
- So chances are that you’ll take less time to get from place to place than their estimates. This is one case where hiking too fast is as problematic as too slow. The major complaint we heard was of people hiking faster than expected and arriving at their reserved campground around noon. e.g. they could have easily hiked another stage that day to the next campamento/refugio.
- We suggest you get an early start and hike far when the weather is good. You may get bad weather later in the trip. There is a lot of daylight in the summer hiking season. The key to making miles is to keep a steady pace and minimize time lost on long stops.
A peek at the Southern Andes and the Vast Southern Ice Field. Nearing the end of Valle Encantado on the backside of the O Trek. The day from Campamento Seron to Campamento Los Perros was one of our favorite days.
Step 3 – How to Reserve Your Campsite or Refugio
There are four types of “campsites”: Park camps (public), private run camps, Refugios (all private), and one Hotel. Only the two Park Campamentos (campgrounds) are free. All others have varying fees based on the facilities they provide.
- Park Campamentos – Free! These are the most basic campsites and are run by the park: Campamentos Italiano, C. Paso. They are reserved online, or at CONAF (Park) offices in P. Natales or at the Park entrances. These campamentos have designated dirt tent sites, clean water, a common cooking area (which you are required to use when cooking with a stove), and a pit toilet quality bathroom. These are in the woods with no views–but advantageous for protecting your tent from being flattened by strong Patagonian winds. NOTE: If you reserve the park campamentos online, you will be charged your entrance fee at that time. Do not pay this entrance fee twice (i.e buses, when you arrive, etc).
- Private Campamentos charge a small fee for use. They usually have a few more amenities. Often a small store, a cold or hot shower, tent rentals, and some even serve dinner. They do not have bed lodging. One of the best meals of our trip (in town restaurants included) was at Campamento Serón!
- Refugios – have beds (and, in at least one, cabins for rent) in addition to camping. They have nicer (sometimes substantially nicer) shower and toilet facilities than campamentos. Note: camping at a Refugio entitles you to use the nicer shower and toilet facilities, same as the folks sleeping in beds. This makes them an attractive alternative to camping at nearby Campamentos (e.g. camping at Refugio Frances vs. Campamento Italiano).
- There is one Full-service Hotel (Las Torres) on the route, conveniently located on the W within day hiking distance to the actual Torres del Paine.
Four organizations handle reservations
- Park Campamentos: The Park (CONAF) website is here, Reservas De Campamentos (free campsite reservations) and is only in Spanish. With the online reservation system, it appears that the CONAF campamentos take reservations six months in advance. NOTE: they are now charging the entrance fee when you book their free campsites.
- Instructions for the CONAF Site: Scroll down to the “RESERVAR CAMPING CONAF” click on that link; next, you will see the entrance fees for the park. The campsites are still free. However, CONAF charges you the entrance fee when you book these free campsites so get ready to pay. Click on “comprar entradas.” Now you will need to set up an account with CONAF. Use the “pasaporte” user access (‘RUT’ is for Chilean residents). Once registered, follow the instructions to book the dates you need for each of the campsites (Italiano and/or Paso). CONAF will automatically charge you the $21,000 CLP entrance fee in addition to booking your sites when you check out.
- Fantastico Sur: handles reservations for: Refugio Las Torres Norte & Central, Camping Las Torres AKA Camping Torres Central (not the same as the closed Campamento Torre), Refugio Los Cuernos, Camping Los Cuernos, Domo Los Cuernos, Cabañas Los Cuernos, the critical Refugio El Chileno & Camping El Chileno, Camping Serón, Domo Serón, Camping Francés, Domo Francés
- Vertice Patagonia: handles reservations for: Refugio Paine Grande (camping, meals & beds), R. Grey (camping, meals & beds), R. Dickson (camping, meals & beds), and Camping Los Perros (camping only).
- Hotel Las Torres: (a full service hotel at one end of the ‘W’)
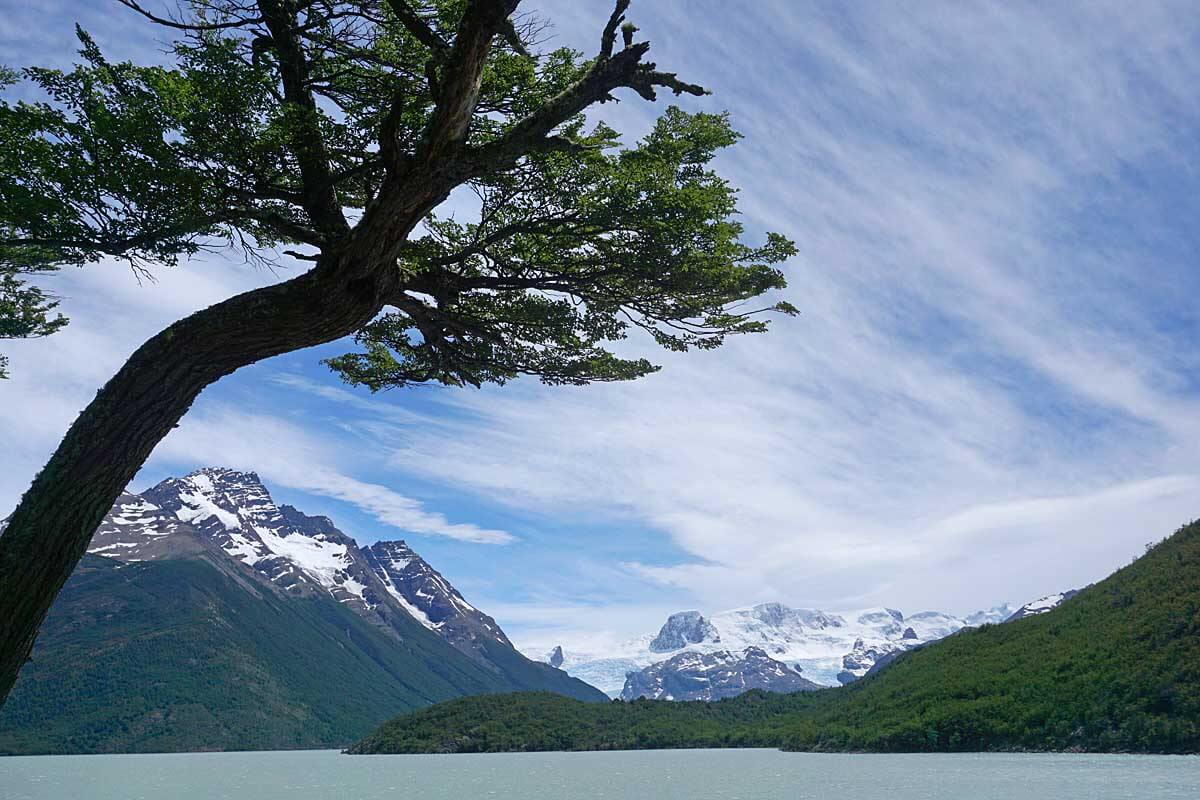
Lago Dickson with Glacier Dickson pouring down from the Southern Ice Field. This is at Refugio Dickson, backside of the O Trek.
Tips for Booking on Reservation Websites
- This camping/refugio availability App is a huge help. With it you can quickly see in one place all campsites/refugios available on a given date.
- Can’t get a site on Vertice/Fantastico? Switch to ‘book in chilean pesos’ – yes it switches to Spanish, but google translate can help you out.
- Be flexible and willing to pay a bit more-beds vs. tents, your tent vs. their tent, full meals vs. no meals, or even a hotel room. It is all cheaper than going with a group outfitter who will charge you much more
Some notes:
- Breakfast is 8’ish. You’ll get a late start if you choose to eat one from a Refugio. Lunch is around 12:30. Dinner is 7’ish.
- Fanstastico Sur was responsive and very easy to work with.
- Vertice Patagonia was harder to work with. Credit card payments online didn’t work. Their office in Puerto Natales had limited hours (closed on weekend). People report having the best results via email.
Mirador Britanico in Valley Frances. Not all days are sunny in Patagonia, especially later in the day when the mountains are likely to cloud in. A waterproof pack like this HMG 2400 Southwest is nice on days that are threatening rain.
In Case of Reservation Failure | Not All is Lost!
If you’ve tried everything and still cannot get exactly what you want, there are still options! Below we’ve listed some workarounds to consider.
Cannot Book R. or C. Chileno: You can dayhike from the Hotel Torres to the Torres del Paine. It’s a bit of a slog, but many people do it (in fact, the hotel runs guided day trips up there). And the Hotel Torres site has many lodging options so it is easier to book lodging here. It may mean that you end up there two nites in a row, but we’re betting your trip to the Torres are worth it!
Cannot Book A Trip Online Because Fantastico Sur & Vertice Are Sold Out
- Missing Just One Campsite – If you can get everything you want but are missing just one campsite, keep trying to contact the companies for cancellations. Email works as does Facebook Messenger. For CONAF, it’s a bit more tricky and you may need to wait until you get into Puerto Natales (which is a bit riskier). Both Vertice and Fantastico have offices in Puerto Natales as well.
- Everything is Sold Out – In this case, you can still day hike. The one requirement here is that you will need a rental car.
- Two key sites in the park (both have lots of space and are great for day hiking are Paine Grande (you can day hike to Glacier Grey from there) and Hotel Torres (day hike to Torres del Paine). If you can get 1-2 nites at each, you will have a lovely trip and still see park highlights (although you will be driving between the two sites so will need a rental car).
- If you cannot get any sites in the park, you can stay in Puerto Natales and drive to the Park (although one way to the park is 2.5 hours so prepare to drive). The same two options are what you want to do: hike up to Glacier Grey and hike up to the base of the Torres–one per day.
- You can also go with a tour from Puerto Natales (leave the driving to someone else). The trips from town head up to Glacier Grey and to the base of the towers (cost is in the range of $60/day)
I Give Up! Finally, if all of this is just too much, consider:
- Hiring an agency to take you out there. Cost is in the range of $1,500 USD/person.
- Other World Class Patagonia Treks of similar stature to to TdP, that do not require reservations, have far fewer people, and are essentially free:
- Patagonia National Park Trek – Guide to a New World Class Trek Chile’s new Patagonia National Park may well become the “Yellowstone of South America” due to its rich diversity. The new Park has it all — the high glaciated peaks of the Southern Andes, wide valleys with ice cold glacial rivers, forests of southern beech hanging with moss, and startlingly green glacial lakes. Fairly unique to the park is its expansive grasslands supporting a vast array of wildlife. It’s easy to see herds of guanacos, condors, flamingos, armadillos and more. And while a puma sighting is extremely rare in the more famous Torres del Paine, we had a puma saunter through our camp one night!
- Cerro Castillo Trek Guide The Cerro Castillo Trek might be the best trek in Patagonia you’ve never heard of. It rivals drama and beauty of the Torres del Paine W Trek, yet has far less visitors. Why? Well, it just hasn’t been “discovered” yet. The Aysén Region is Chile’s third largest region but also its least populated. Because of this you’ll see far fewer people on the Cerro Castillo Trek than hikes of similar beauty and stature in other areas of Patagonia — like the Torres del Paine Trek, or the Fitz Roy Trek in Argentina’s Los Glaciares National Park. As such, the Cerro Castillo Trek is a fabulous place for adventurers looking for the trail less traveled, and a stunning one at that!
When Does the Park Really Open?
Over the years we have received reports of some confusion and disarray in TdP, particularly around opening dates. So, keep in mind that the required booking system is still somewhat new to the park and clearly causing a lot more work for Fantastico and Vertice employees. As such, there is bound to be a difficult transition from the older, more free flowing system to this new stricter one. Our advice would be to continue to try and keep the communication lines open by contacting all parties, CONAF, Fantastico, and Vertice using all email addresses, Facebook, and phone. Also keep in mind that all three of these agencies are distinct and most likely do not communicate amongst themselves. You are the only thing they have in common which puts the burden on you to figure out what is going on.
“OFF SEASON” April 30 to ~ November 15
Most Refugios and Private Campamentos close during the off season. Backside of O/Circuit guided only. As of April 30 Most, most Refugios/Private Campamentos (Fantastico Sur and Vertice) are closed for the season. You can still camp on the W but obviously there will be far fewer resources. The “Backside” of the O or Circuit Trek (Serón, Dickson, Los Perros, Paso John Garner, etc.) is closed after April 15 unless you go with an official guide. They will re-open to general use/travel at the start of the High Season, usually sometime around November 15 but it can be later.
Step 4 – Plan your Gear and Food
A Gear List for Torres del Paine
This is a list of our Torres del Paine gear: 9 Pound Full Comfort Lightweight Backpacking Gear Checklist. We’ve tested and refined this list of gear in over 20 years of trekking all over the world form Northern Alaska, to the high Andes, to Patagonia. It’s light. It works!
Almost all guides will have you ridiculously over pack gear. Don’t believe them! Yes, the weather can be rough at times in Patagonia. Fear of this causes many (most) folks and even so-called “experts” and guide books to recommend massively over packing gear. But there’s no need to stagger around with a heavy pack to deal with Patagonian weather. Rest assured, you can pack much lighter and still be warm and safe. Our light gear easily handled the rain and strong Patagonian wind.
- Alison’s pack was under 15 pounds (under 7 kilos) with food for the O Trek.
- Alan’s pack was under 17 pounds (under 8 kilos) with food
- We carried about 10 pounds (4.5 kilos) of shared food for the trip. We supplemented this with purchased food along the way.
Some Key Gear for Patagonia
-
- Shelter: Mountain Laurel Designs DuoMid XL – a huge pyramid shelter that we shared. 24 oz (680g) in SilNylon, 16 oz (450g) in Cuben Fiber. We survived strong winds while watching a nearby conventional mountaineering tent be crushed.
- If you want a regular tent look at: Big Agnes Copper Spur HV UL 2 Tent, one of the lightest freestanding tents. Or for a value tent, REI Quarter Dome 2 Tent.
- Shared sleeping bag (actually a shared down quilt): Hammock Gear Burrow at around 24 oz (700 g) for 2 people. It’s also our first choice for a solo sleeping quilt, which we prefer to a sleeping bag. For more see: 2018 Buyers Guide to Lightweight Backpacking Quilts
- For a solo sleeping bag: look at the light and warm! Feathered Friends Merlin UL 30, or the Western Mountaineering SummerLite only 19 oz!
- Pack Alan: HyperLite Mountain Gear 2400 Southwest. Only 28 oz (790 g), waterproof & incredibly durable with Cuben Fiber
- Pack Alison: ULA Ohm 2.0 Pack
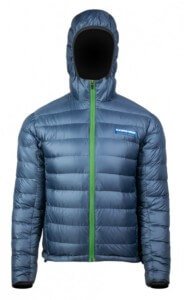
- Warm Jackets: MyTrail 850 Fill HL Hooded or 800 Fill UL Hooded down jackets (only $149!) and in Women’s. We also use incredibly light and warm Feathered Friends Eos Down Jackets.
- Action suit: Worn 95% of the time, REI Sahara convertible pants mostly as shorts; and a merino wool shirt supplemented with a Patagonia R1 Hoodie when cold and windy. For more see: Top Mistakes Using the Layering System – How to Stay Warmer and Drier
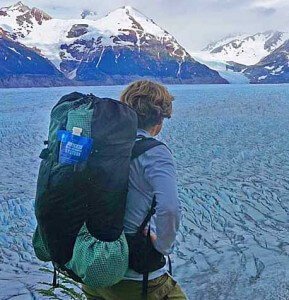
Alison’s ULA Ohm 2.0 Pack
-
-
- For hiking shoes we prefer light trainers/trail runners around 10-12 oz per shoe (280-340 g). For a variety of reasons we do not take Goretex/waterproof shoes.
- Camp footwear: Trails can be wet and it’s just faster and easier to walk thru the mud and muck than waste time hopping and skirting around. We brought very light flipflops (2.5 oz, 80g) and Injinji socks for camp. The flipflops do double duty as shower shoes and camp footwear when worn with the Injinjis. Beware packing heavier camp footwear. A pair of Crocks is around 1 pound, and a pair of light running shoes can approach 2 lbs!
-
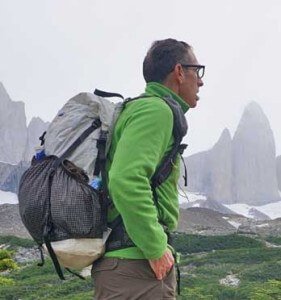
I carried a Very Light but high quality Digital Camera readily accessible on the shoulder strap of my pack.
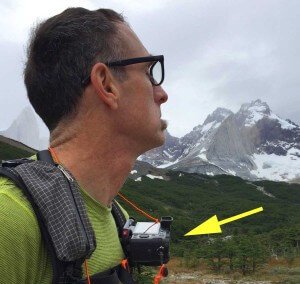
- Camera: for camera gear we take see Best Lightweight Backpacking Cameras. I took a very light 16 oz (450 g), but very high quality digital camera readily accessible on the shoulder strap of my pack. I could get it out for a shot in just a few seconds.
Note that trekking/camping gear can be rented in Puerto Natales at outfitters like the Base Camp of Erratic Rock. Another option to save both weight and time is to rent a tent at one of the campsites. To be assured of one you’d need to reserve one ahead of time, but we saw plenty of rental tents empty on our trek in high season.
Insect Protection
Note that we have reports of bugs from Serón to Grey. We use the following on areas not protected by clothing: DEET (or the newer Picaridin which doesn’t degrade clothing or plastics). We prefer airline friendly 0.5 pump sprays, which are small, pocketable and easily applied in the field. Alternatively, for around $6 USD you can get spray at Cruz Verde Pharmacies in Puerto Natales.
You can also a wear long sleeved shirt and full-length pants factory-treated with insect repellent (permethrin). Pre treated clothing has near-permanent effectiveness (clothing treated before purchase is labeled for efficacy through 70 launderings). You can also treat your own clothing with a Permethrin spray (Sawyer) which lasts up to 6 weeks (or 6 washings).
Cooking, Stoves & Fires
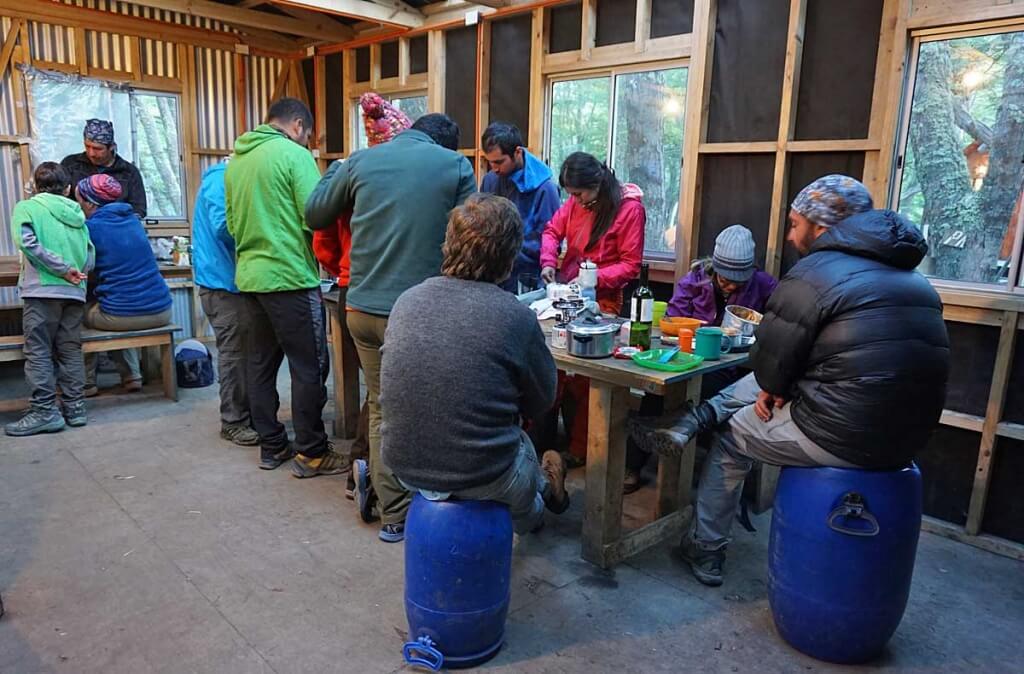
Campamento Los Perros had the nicest cooking area of the trip. Some campgrounds only have a three sided cooking shelter with a roof or designated picnic tables.
See my information on Cooking and Lightweight Backpacking Stoves
- The park is crazy strict about no fires whatsoever*. You can only cook with a stove in a designated area of the campground. Canister and Alcohol stoves are fine. *This is due to two devastating camper started fires in 2005 – 155 km2 (60 sq mi); and again in 2011 – 176 km2 (68 sq mi).
- Fuel canisters are everywhere in Punta Arenas and P. Natales. Hardware stores, hiking stores, and many other locations. Even some of the small stores at Refugios along the route have canisters. There are many options in town (hostels, hiking stores) to leave your partially used canisters for others to use.
- Alcohol fuel is available at Cruz Verde pharmacies in plastic bottles.
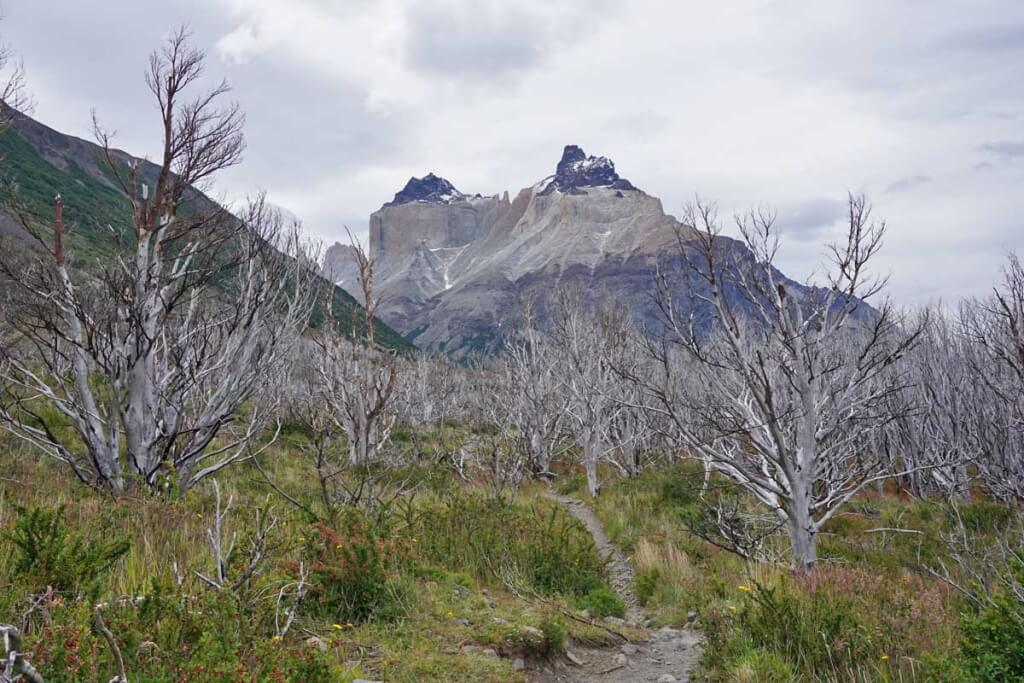
Burned trees at the start of the W Trek are a reminder of how devastating fires can be in windy Patagonia. It will take hundreds of years for this area to fully recover.
Food
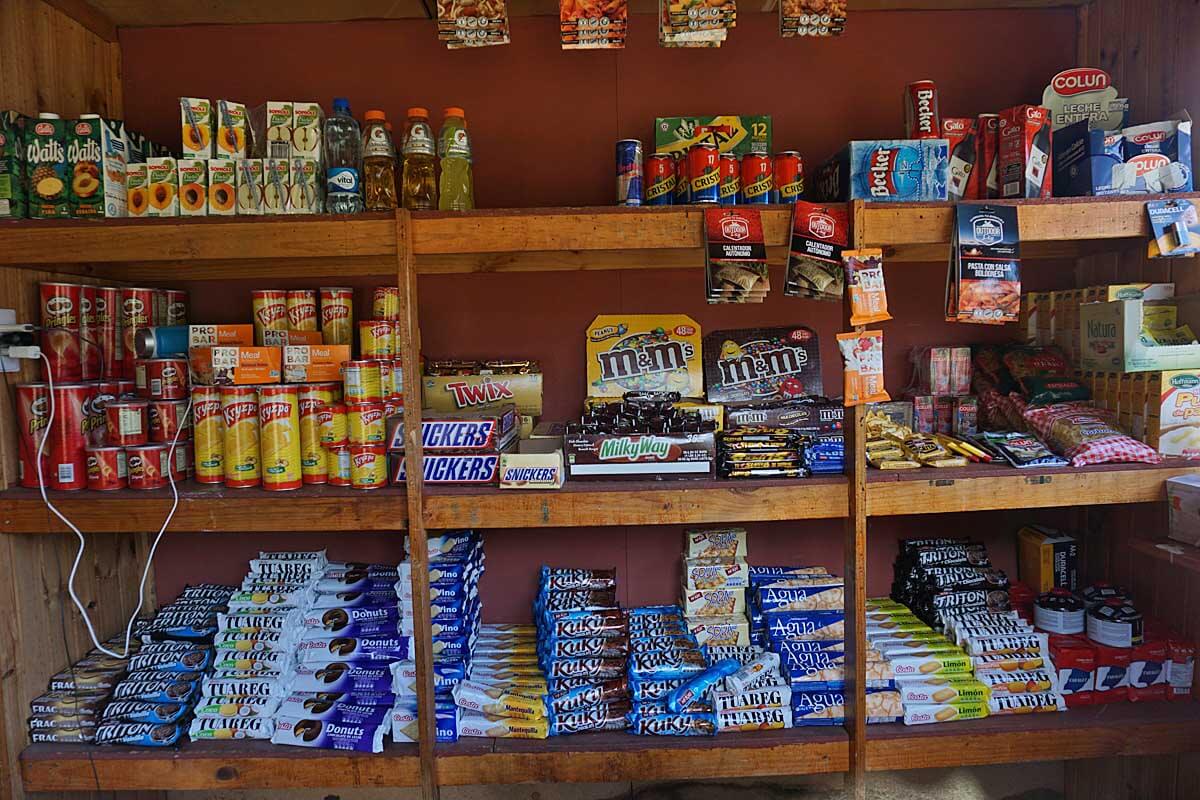
Pringles, Pro Bars, Snickers, Milky Way, Pasta, M&Ms, Powdered Milk, Batteries, Fuel Canisters. The Alimentacion (food store) at Refugio Dickson. Fuel canisters (lower right corner). Pasta is the red and white checkered bag above the canisters. (click on photo to enlarge a bit)
Food for Torres de Paine
Here’s a food list that we packed to: Simple and Nutritious Backpacking Food List
Here is a piece I wrote on Backpacking Food: Best Backpacking Food – simple and nutritious – veggie and omnivore friendly
- We brought 5 lb (2.3 kg) of food per person to do the O Trek for an expected 6 days on the route. This consisted of:
- Breakfast and coffee for every trail day (we like an early start)
- The majority of our lunches and daily snack food
- Two dinners to cook on trail
- Our dinner strategy was to cook two of our own backpacking meals; buy pasta, cheese and sauce on the trail for two meals; and have two sit-down meals along the way as the spirit and circumstances moved us.
- We supplemented this with a modest amount of food purchased along the route
- You can bring as much or as little food as you want. You can carry almost no food if you are willing to pay top $ for it on the trail (about 1.5 to 2+ times town retail cost).
- Follow all regulations (click for link) (unfortunately, only in Spanish) regarding bringing food into the country, including declaring what you bring in! My best understanding from reading the reg’s and from reports from other trekkers as of Jan 2017, is that fruit, vegetable, meat and milk products cannot come into the country—including dried and dehydrated versions. They will check at customs when you enter Chile. According to other trekkers, sealed backpacking meals are OK. As such, you will likely need to at least partially provision in Punta Arenas (best/more options) or Puerto Natales to complete your food for the trip. We bought our cheese, dried fruit, and dried meats once we were in Chile.
- Alimentacions (small food stores) are at all refugios and most private campgrounds. They have limited non-perishable supplies. Usually Coke, beer and sometimes wine, cookies, candy bars, and a few have basic camping supplies like fuel canisters. And many have pasta, tomato sauce and Parmesan cheese packets (which can be combined for simple but filling dinners).
- There are sit-down style meals at the Refugios and at Campamento Serón if you want to pay for them. We ate two dinners while there, one was just OK at Frances, but the meal at Serón was fantastic. (Dinner seating is usually at 7:00 or 7:30 pm).
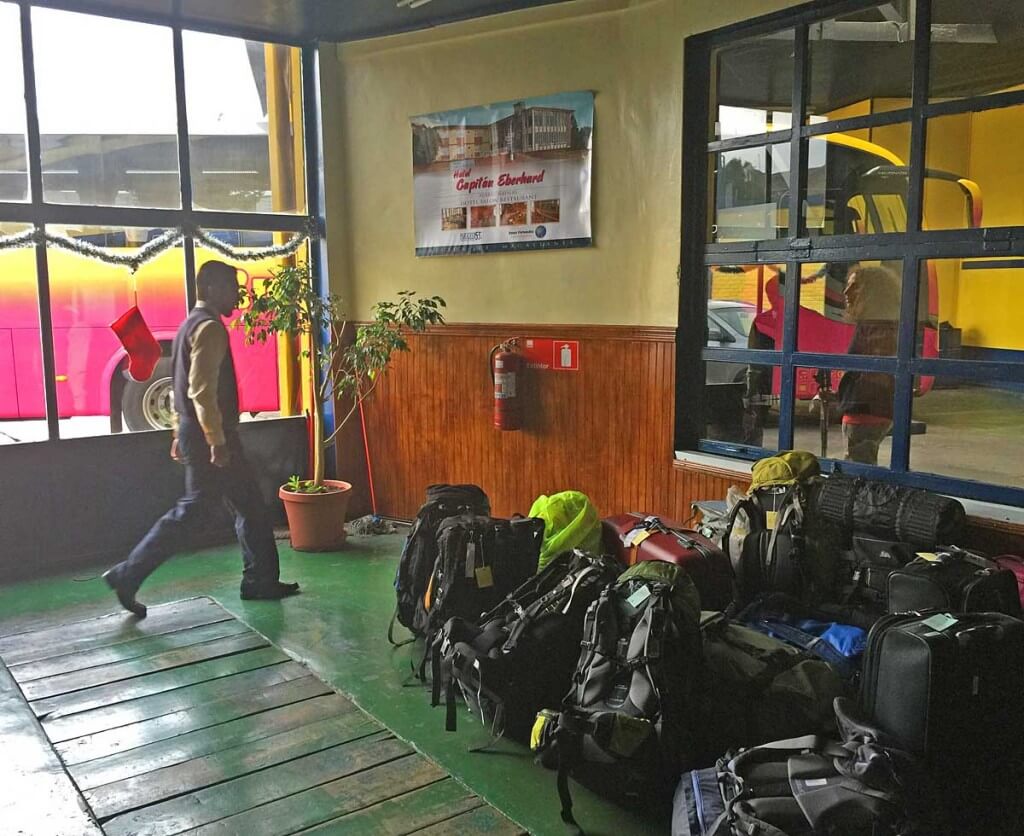
Bus Fernandez Terminal in Punta Arenas. Almost everybody is taking the bus to Puerto Natales to trek in the Park. In the foreground a large amount of the luggage is backpacks.
Transportation
Most folks will end up flying into the Punta Arenas Airport. Note: Seasonally there are few flights a week directly from Santiago to Puerto Natales, if you can book them you’ll save time and complications. From (approximately) November to March two airlines offer flights from Santiago to Puerto Natales: Latam Airlines & Sky airlines.
From the Punta Arenas Airport: All the guidebooks (and the buses themselves) say that the buses from Punta Arenas to Puerto Natales stop at the airport. However, we did not find that to be the case during the high season.
-
- We had to take a white/grey bus from the Airport to the Buses Fernández terminal in Punta Arenas, around 5,000 chilean Pesos per person. From there, we got on the next bus to P. Natales.
- Or you can take a taxi from the Airport to town for around 10,000 chilean Pesos (approx. $16 USD in 2016)
- Buses, during high season, in general run every hour (see schedules). While making reservations from a town was easy enough, we found making a reservation from the US difficult and, in the end, not needed.
- Buses Fernández (the bus we took) Runs buses from Punta Arenas to Puerto Natales (the usual town to stage from for Torres del Paine Treks). While they do get crowded, the bus companies worked together to make sure all customers were accommodated.
- Buses Gomez (the bus we took) Runs buses from Puerto Natales to the Torres del Paine Park (start of W Trek and O Trek). Again, the buses work together to accommodate all who are going. The other bus company we saw actively operating in the park was “Buses María José” although we didn’t use them.
- Update Aug, 2016: Bus-Sur also runs Puerto Natales to the Torres del Paine Park, and has a 7:00am bus. With a very early bus there is a possibility of catching the 9:30’ish ferry from Pudeto (see below).
- Catamaran on Lago Pehoé (Site with transportation and park information) and the Actual Helios Patagonicos Site (in Spanish) – this is the ferry that gets you across Lago Pehoé from Pudeto (the bus drop-off) to Refugio Paine Grande, start of the W Trek going west to east. Note that in high season the ferry may operate more frequently than their schedule indicates—adding extra ferries as passenger demand increases. You pay on the ferry.
Bus service from Puerto Natales Chile to El Calafate Argentina (El Chalten)
The other high profile (fantastic!) destination in Patagonia is the Cerro Torre, Fitzroy area outside of El Chalten in Argentine Patagonia. Alison and I trekked in this area in 2005. To do that you’ll need to take a Bus (unless you have a rental car). We have not taken the bus between Puerto Natales and El Calafate but there is a fairly large bus terminal in Puerto Natales with a lot of bus traffic during the day. Bus-Sur and Turismo Zaahj offer service between Puerto Natales and El Calafate (gateway to El Chalten). We cannot personally vouch for the buses, having not taken them across the border to Argentina.
I have been advised that during high season, Dec to Feb that busses can fill up so it may be best to book well in advance (possibly before you arrive). Some readers have used a third party to book the bus. They report “we used Patagonia Extrema/Southroad to book – we paid a 35-40% premium on tickets, but it was worth it, as our Calafate-PN, PN-Park roundtrip, and PN to PA buses were all sold-out.”
Also from El Calafate you can easily see one of the great natural wonders of Argentina, the Perito Moreno Glacier. It’s one of the few advancing glaciers in the world—it moves about 7cm each day. Because it is constantly moving, vast blocks of ice fall off the face of the glacier into the lake, calving icebergs with an explosive detonation that sounds like a bomb going off.
Chile’s Atacama Desert
The other incredible destination is to fly to the Atacama Desert. This is where Alison and I went last year post TdP. It is the driest non-polar desert in the world. Amazing salt lakes and wildlife! We saw 3 of the 6 world’s flamingo species while there. Amazing star watching, possibly the premier astronomical research location on the planet. There is El Tatio an immense caldera with its many geysers is in the Atacama Desert at over 14,000 feet (4320m). Its name comes from the Quechua word for oven. It is among the highest-elevation geyser fields in the world. El Tatio has over 80 active geysers, making it the largest geyser field in the southern hemisphere and the third largest in the world.
General Notes and FAQs
- In high season, all portions of the W Trek are crowded with both backpackers and novice day hikers. You’ll have tons of company on the trail (we had some issues getting around groups of hikers). Many W campgrounds will be filled to capacity. But then solitude is not really the point of the W. We met a lot of fun people from all over the world on the trek.
- You will see fewer people on the backside than the W Trek but don’t expect it all to yourself as 80 people are allowed in every day. In high season you’ll meet fellow trekkers on the Backside. You’ll still share the camp with other trekkers but in calmer conditions.
- The backside of the O Trek is every bit as beautiful as the W Trek and it has more varied terrain.
- You have 17 hours of daylight in January! That’s a lot of hiking and/or exploring time. Most trekkers should be able to hike two “stages” in a day.
- We suggest you get an early start and hike far when the weather is good. You may get bad weather later in the trip or even later in the day. The key to making miles is to keep a steady pace and minimize time lost on long stops.
- Keep eyes out for birds and wildlife. We saw Andean Condors quite close when hiking between R Frances and R Chileno. And Magellenic Woodpeckers in the woods between Dickson and Perros.
Water
- Water is everywhere. Usually you are 30 minutes or less from a stream or some other source. And according to local guides, and our guide book the water can be drunk without treatment. We filtered water on trail (a conservative option), but drank water untreated from our campground’s designated water sources.
Closed areas
- Hiking is only allowed on designated trails. Off trail travel (even on marked routes that say guides only) is strictly forbidden.
- The is no wild camping (camping anywhere in the park that is not a designated campground). They threw someone out the park for doing this the week we were there. (see Campsite Reservation Section)
- Valle Frances area: Campamento Britanico is currently closed for camping. You can hike as far as Mirador Britanico but not further. The Mirador further up from M. Britanico (located at the base of Fortelezza) is closed.
- Valle del Silencio area: Campamento Japones is closed to camping unless you are with a guide. And Valle Silencio and its mirador are closed to hiking (unless you are with a guide).
- Campamento Torres is also closed. The closest to the Torres you can get is Refugio Chileno.
Park Tails are well signed. It is almost impossible to get off-route or lost. I wish many US parks were as well signed as Torres del Paine.
Trail conditions
- Torres de Paine trails are well marked by an obvious and well trodden footpath and with orange blazes, and orange posts that mark the route. It’s almost impossible to get off route or lost
- Torres del Paine trails are well maintained with good footing (with the exception of boggy areas). You can hike quite fast.
- In boggy, muddy areas it’s just faster and easier to walk thru the mud and muck than waste time hopping and skirting around. And less risk of fall and injury.
- Camp footwear: Trails can be wet and you shoes are likely to get wet too. We brought very light flipflops (2.5 oz, 80g) and Injinji socks for camp. The flipflops do double duty as shower shoes and camp footwear when worn with the Injinjis. Beware packing heavier camp footwear. A pair of Crocks is around 1 pound, and a pair of light running shoes can approach 2 lbs!
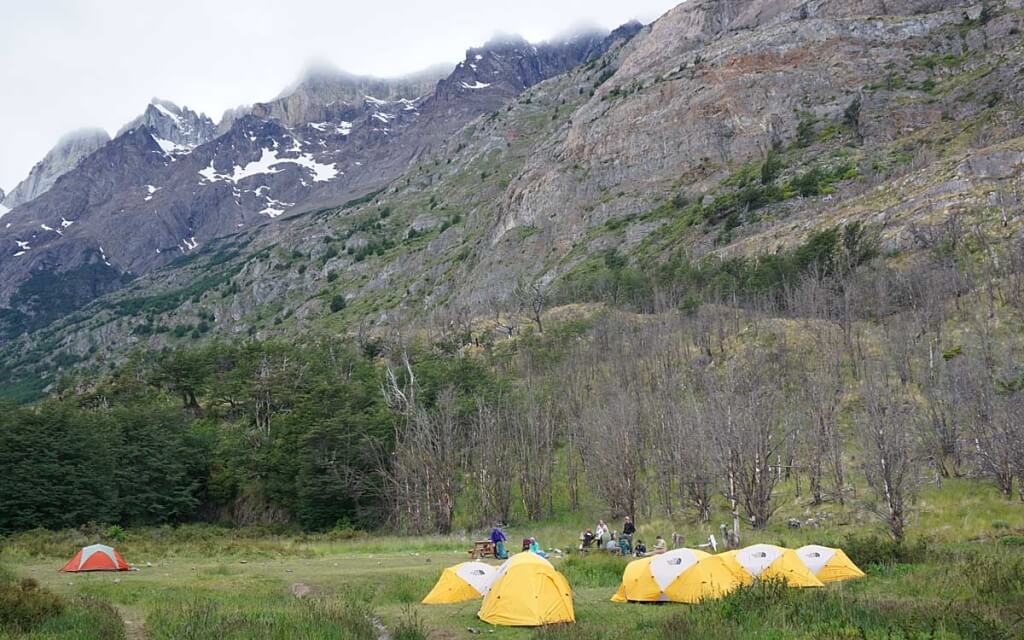
While beautiful, camping in the open is not a great idea due to very strong Patagonia winds. You are better off camping in the woods protected from the wind.
Weather and Tents
See my information on Recommended Tents, Tarps and other Shelters
- Weather conditions are notoriously difficult to predict. Localized, glacier and mountain influenced microclimates along with moisture flow from the Straits of Magellan can interact to create strong weather of all sorts. Be prepared for high winds, rain and even snow, along with sunshine and calm. Many times in the same day. You may be forced to take a layover day by high winds. Plan your route itinerary accordingly.
- Alison and I have had days in Patagonia where the wind was so strong we were unable to walk forward when not protected in the woods. Thankfully not on this trip.
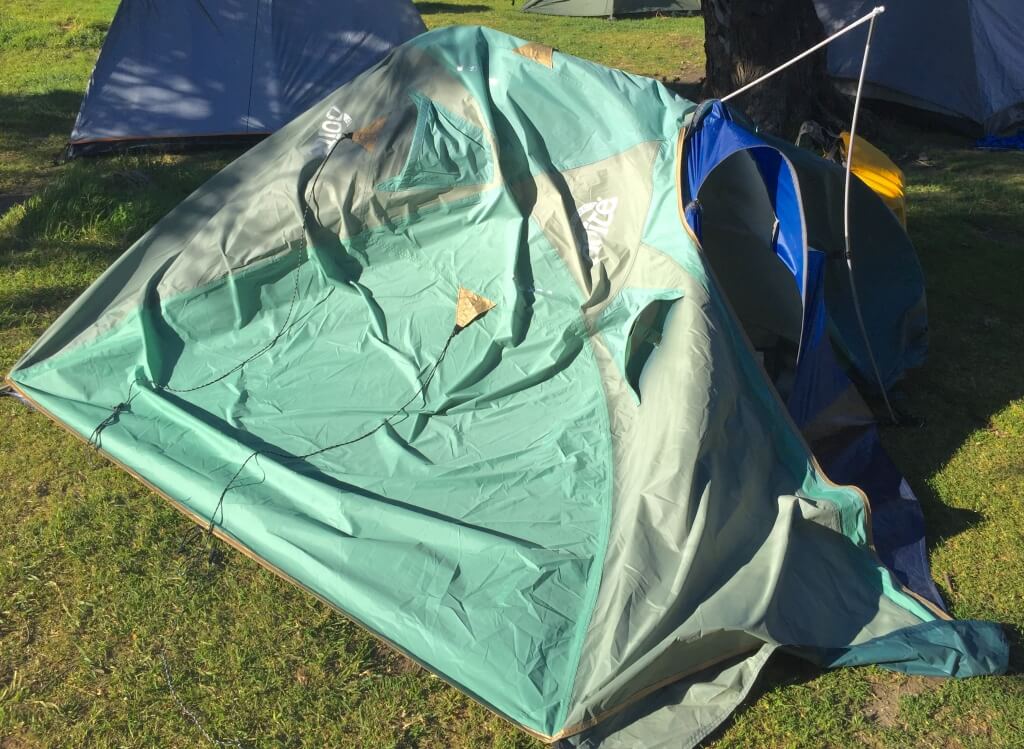
The legendary Patagonia wind is rough on tents in the open. Alison and I watched this tent be crushed and its poles snapped by a strong gust–only 100 feet from our more protected campsite.
- Always pitch your tent/shelter in the woods or with some other strong windbreak—not in the open! We saw a tent in the open a 100 feet from us crushed by strong wind gust, snapping its poles.
- Tent rental is an option worth consideration. You save the weight of carrying a tent and the time and hassle of setting up and taking it down. They usually come with ground pads. Many times the rental tents are already pitched in the most desirable campsites. [Even tho we had our own shelter, we opted to rent a large, clean, and very nice tent at Campmento Los Perros to speed our pre-dawn preparation for going over Paso John Garner. It only cost around $12.]
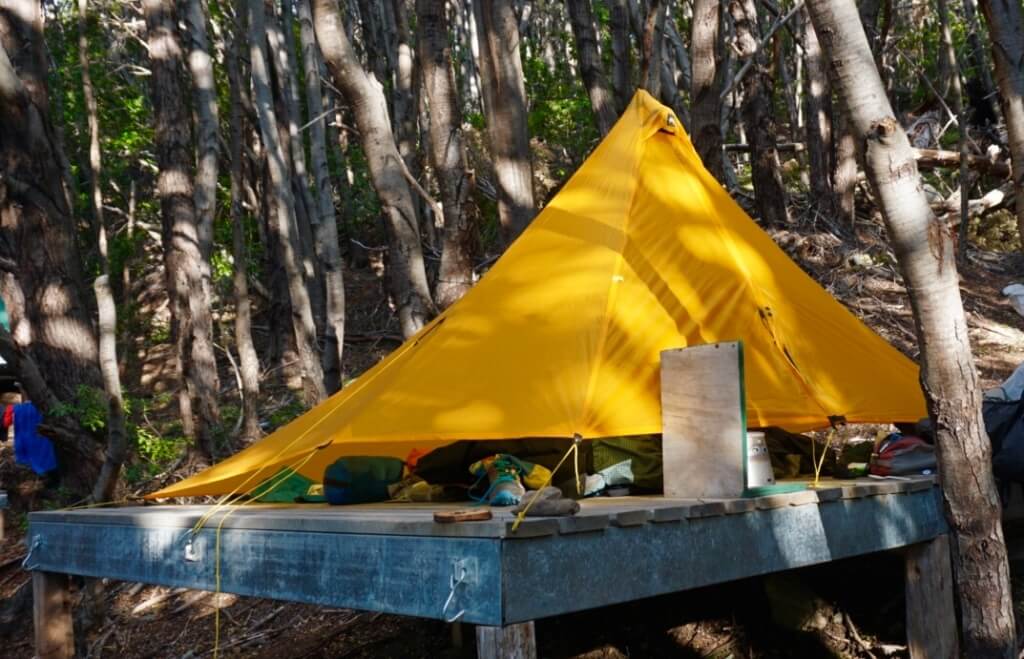
While not as sexy as an open meadow, camping in the woods makes a lot more sense in windy Patagonia. Pictured: a tent platform well protected in the woods at Refugio Frances. A minimal camping fee entitles you to the full Refugio facilities including the nicest hot showers and best bathrooms of our trip.
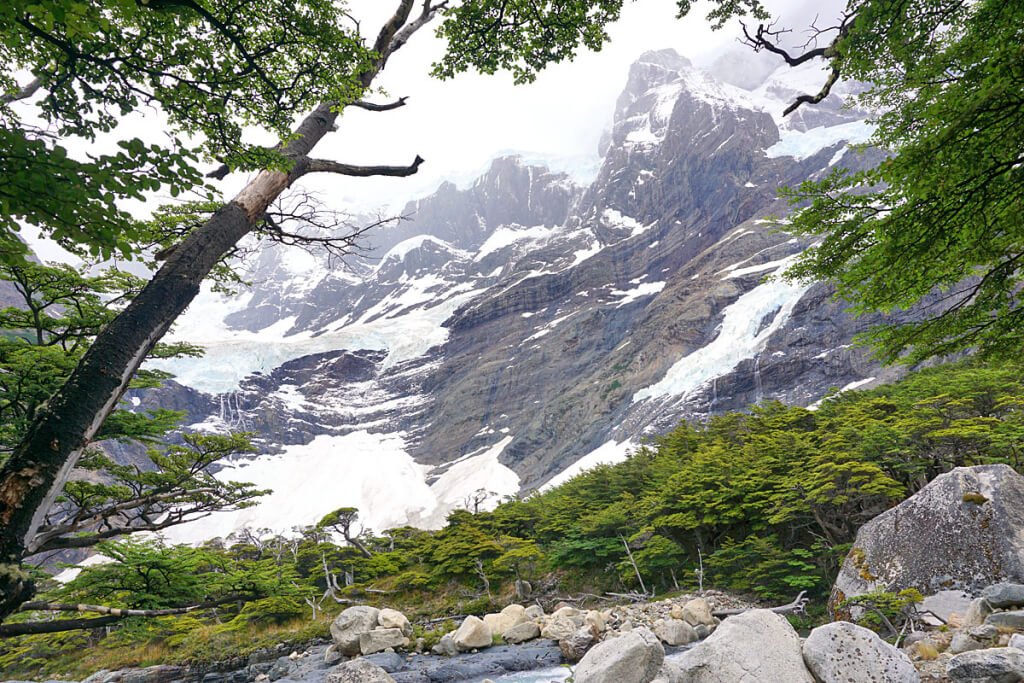
Glacier Frances from near Mirador Frances. It’s typical in Patagonia for peaks to cloud in mid to late afternoon.


Share this entry