Wind River High Route – A Guide
The Wind River High Route is in our opinion, mile for mile, the finest non-technical Alpine route in North America. It stays close to the crest of the Continental Divide in one of the most rugged and glaciated mountain ranges in the lower 48. The route is thrilling and the scenery spectacular.
by Alan Dixon and Don Wilson
Revised Jan 2016:
- The WRHR is a solid route after two seasons of successful trips.
Nonetheless, I’ve added new field data on variants to the route (some easier). - 2016 Gear List, (also refer to our current, always-evolving 9 lb ultralight gear list)
- A cool Google Earth Flyover Video of the route (Thanks Erin!).
A Wind River High Route Virtual FLYOVER Tour courtesy of Erin Saver of “Walking with Wired”
Click on image to play flyover video in a new tab
Wind River High Route — Overview
Click on image to play a trip highlights video in a new tab
Alan hiking up to Knapsack Col carrying all his junk in a trim ULA Ohm 2.0 Pack.
The Wind River High Route (WRHR) is similar in concept to the Sierra High Route (SHR) but Don and I feel that the WRHR is more spectacular and thrilling. Just as the SHR loosely follows the famous John Muir Trail (JMT) but spends much of its time off-trail, more closely following the Sierra crest, the WRHR in a comparable manner loosely follows the Highline Trail, many times going off-trail to stay higher and closer to the Continental Divide—a more elegant line in high glaciated terrain.
When the WRHR uses trails, they are higher trails, closer to the crest. It is a more challenging and more rewarding route than the Highline Trail.
Start of the Wind River High Trail
The WRHR starts in the north at the Green River Lakes Trailhead and the headwaters of the Green River. It heads generally southeast to follow the Continental Divide, crossing it four times. After passing through the legendary Cirque of the Towers, it ends at the Big Sandy Trailhead. The WRHR is approximately 80 miles of off-trail and on-trail travel with about 20,000 feet of cumulative elevation gain.
Nine Passes
There are nine passes between 12,200 ft and 11,500 ft—six off-trail and three on-trail. Some of the off-trail passes have a fair amount of talus. There are few short sections of Class 3/4 travel and one glacier crossing. The recommended hiking season is late summer. This gives time for the high snowfields to melt out and reduces mosquito pressure. By mid September their is a decent chance of snow.
Our Criteria for Planning the Wind River High Route
- An elegant line closely following the crest of the Continental Divide along the finest section of the Wind River Range.
- A fit hiker should be able to do the route in seven hiking days (we did it in 5½ days). This allows busy people to fit it into a standard “one-week” vacation including travel days (two weekends
and the five weekdays in between = 9 days total). - A non-technical hiking route. No class 5 terrain. Short sections of class 3/4 terrain ok. Don and Alan did the trip in trail running shoes and trekking poles. [Late season only. Early season snow would significantly change the technical nature of the trip.]
- Route stays high but without being inefficient, or taking unnecessary risks to force a higher line.
- Uses convenient trail heads with an easy shuttle.
Resources for the Wind River High Route
- Text Only Version of Route Description (6) 8.5×11 pages [PDF]
- Full Mapset – (9) 11×17 pages [PDF] (look here for revisions)
- Waypoints and Hiking Timetable [PDF]
- Shuttle Info
- Alan’s 2016 Gear List
- Sample Food List [PDF]
- Other Published References (books, maps, etc.)
- Potential Additions to the Route
Route Description – Wind River High Route
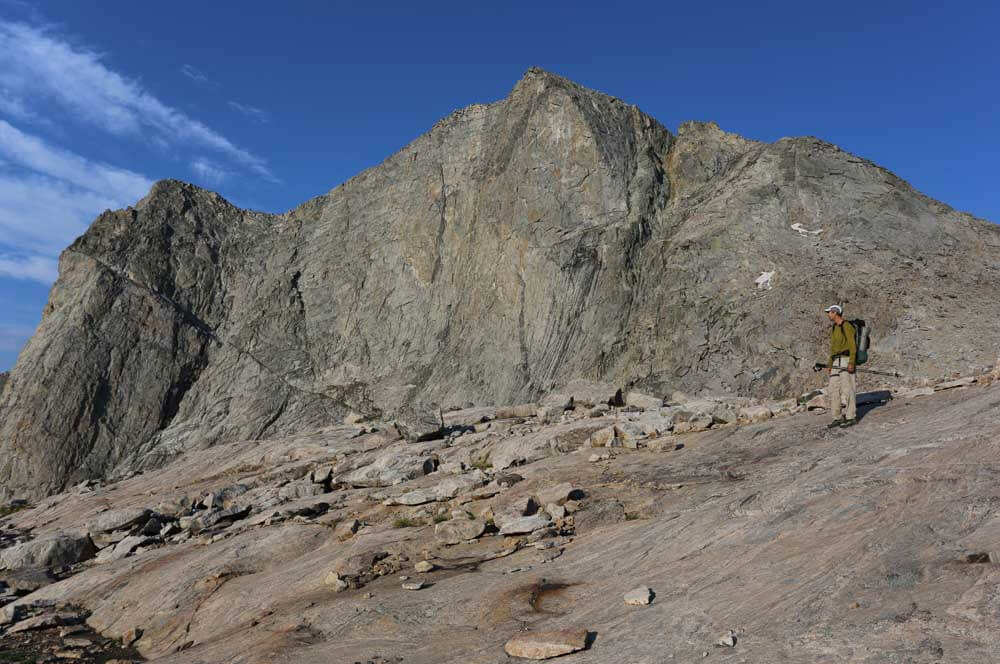
The impressive Mt. Bonneville. A massive talus field is spread out below. This is fairly typical terrain for off-trail passes along the route.
Section 1: Green River Lakes Trailhead to Upper Indian Basin
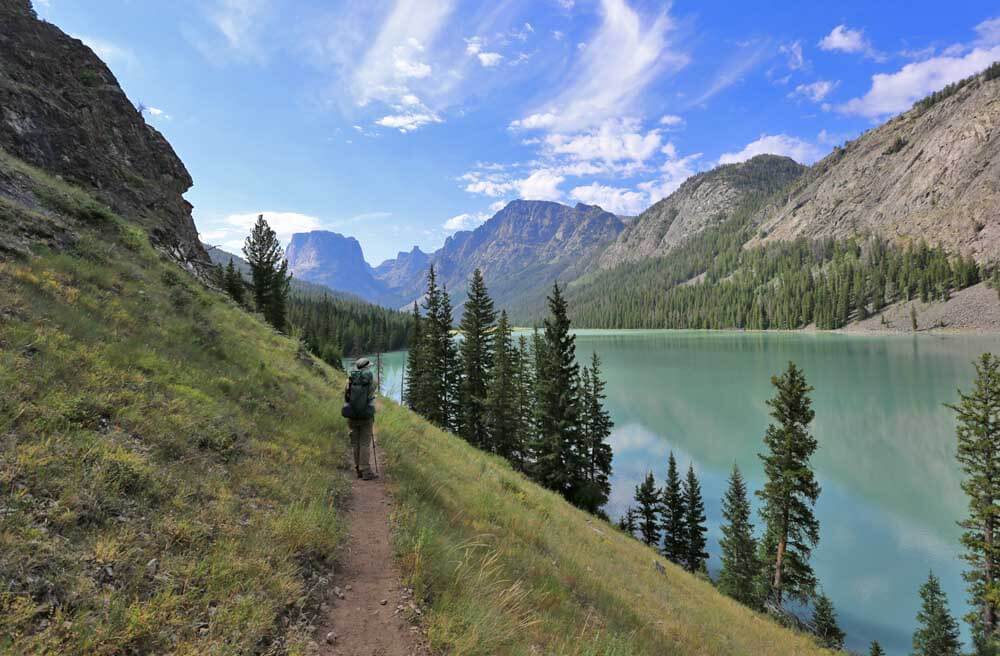
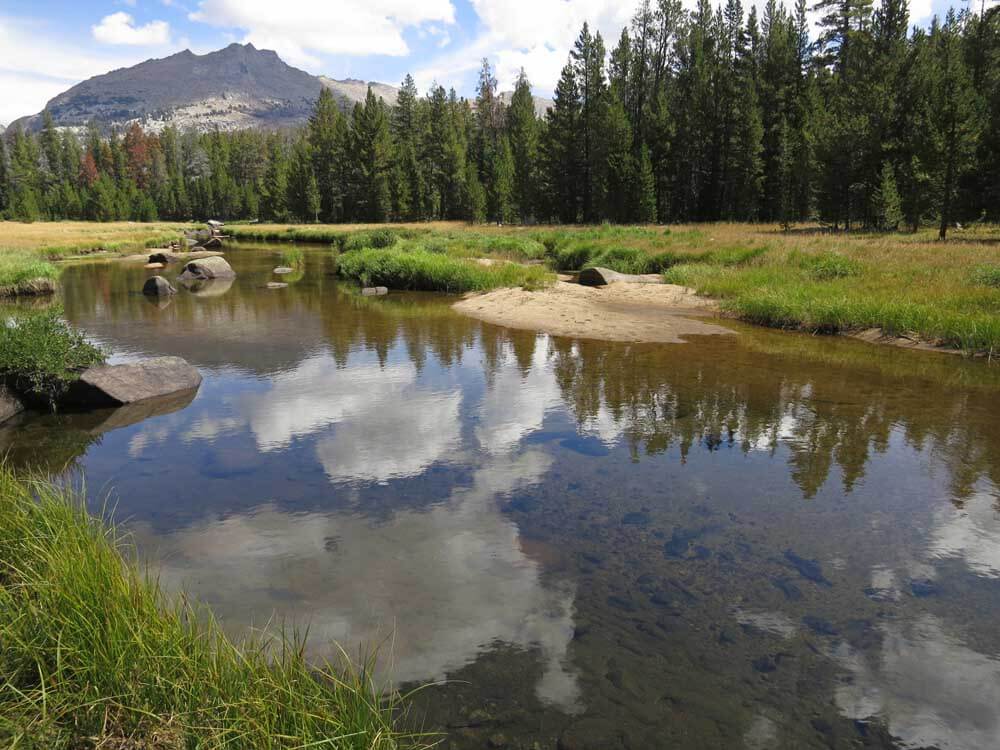
Trail along the eastern shore of the turquoise colored Green River Lakes.
The hike starts with the gentlest of introductions. A mellow wander up the flat and scenic drainage of the Green River for the first few hours, with excellent views of Squaretop Mountain. From the Green River Lakes trailhead, take the trail that heads along the eastern shore of the two turquoise colored Green River Lakes.
This trail is marked as both the Highline Trail and the Continental Divide Trail. After passing the two lakes, the trail begins a very gradual climb toward Three Forks Park, which is reached after several hours of hiking.
At Three Forks Park the trail turns abruptly west and you begin your ascent into the high country, climbing to just above 10000 feet and over Vista Pass. A slight drop and then a climb into a rocky basin towards Cube Rock Pass will bring you above 10000 feet once again. The High Route will stay above 10000 feet for the next 5 or 6 days, not dropping below this barrier until the final hike out to the car, just a few miles from the Big Sandy Trailhead.
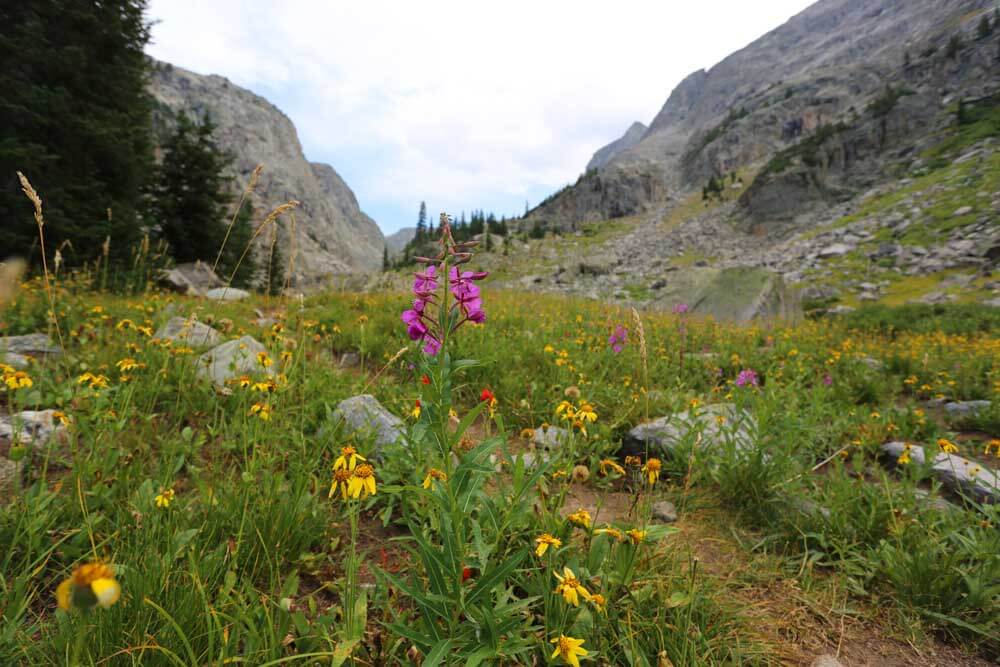
Wildflowers on the trail to Cube Rock Pass
From Cube Rock Pass
From Cube Rock Pass continue on the trail toward Peak Lake. There is decent camping on the west side of Peak Lake, but even better camping in the basin just east of the lake. From the outlet of Peak Lake, curve around its north shore, passing through a large talus slide that drops all the way to the shore. Then wander east toward Knapsack Col. Use trails can be found sporadically along parts of this valley.
As you near the Col, look for use trails that descend directly down from the pass. High on the south side of the basin as you approach the pass is the Stroud Glacier. This glacier is commonly identified as the source of one of the largest rivers in the western United States, the Green River. The river drops north out of the Wind River range, then turns south and winds its way through Wyoming and Utah, traversing some of the finest canyons in the world.
Eventually it merges with the Colorado River in Canyonlands National Park, before heading onward through the Grand Canyon and down to Mexico.
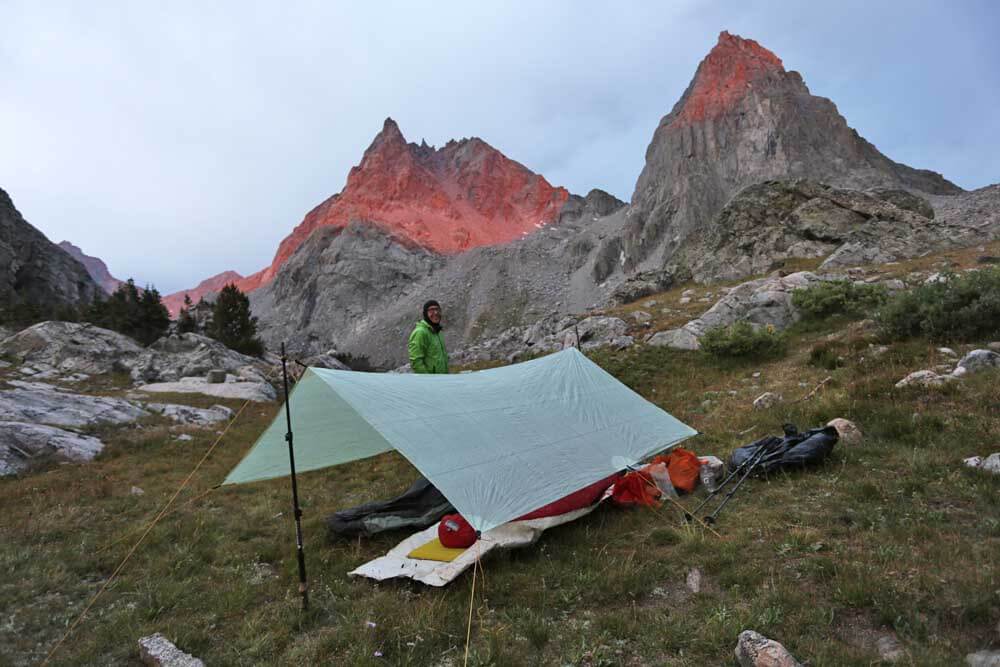
Unusual red alpenglow at our camp near Peak Lake
The approach to Knapsack Col from the west
Alan descending the east side of Knapsack Col

Alan descending from Knapsack Col, looking into the upper Titcomb Basin. The lower portion of the Twins Glacier can be seen on the right. Considerable ice lies hidden below the talus and made the lower portion of this descent more interesting than we expected.
Knapsack Col
From Knapsack Col (about 12200 feet) you are treated to one of the finest views on the entire Wind River High Route. The alpine cirque at the head of Titcomb Basin becomes suddenly visible to the east, while the view to the west reveals the far off ranges of western Wyoming.
The east side of Knapsack Col holds far more snow than the west side, and in most years the descent down the east side will require crossing moderate snow slopes. On our recent hike in the late summer of 2013, we were able to descend directly down the east side, crossing only a few small snow and ice patches.
Leaving the pass going east, if you see snow below head off to the left, avoiding the steep slope directly below the pass. Continue down and left across talus and then head back to the right as you near the bottom of the initial headwall about 250 vertical feet below the pass.

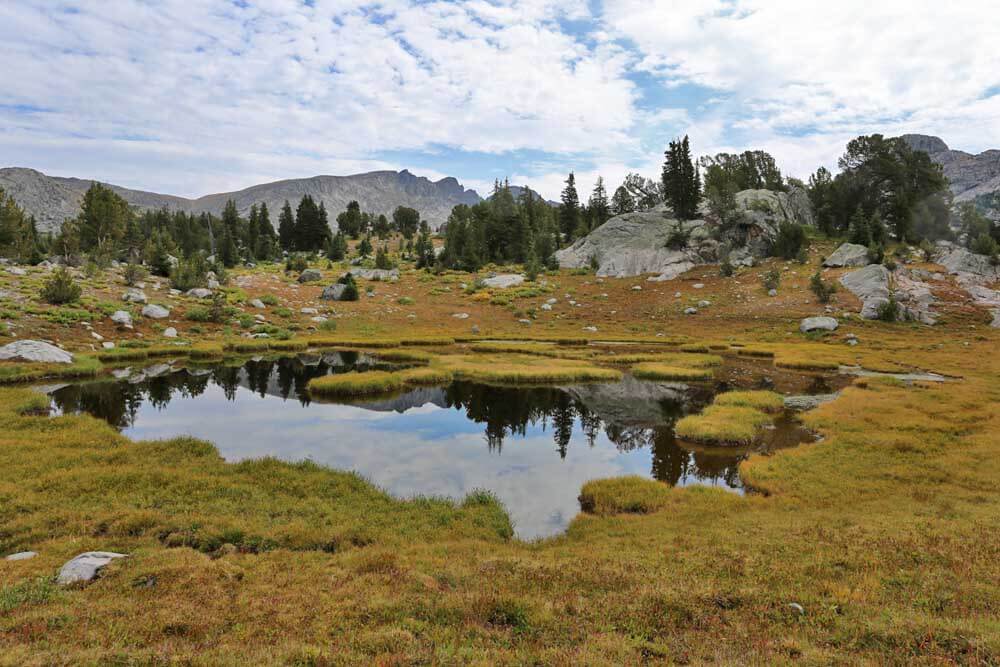
Wildflowers in upper Indian Basin.
Descend to Titcomb Basin
Descend the obvious drainage just north of the Twins Glacier, dropping over its terminal moraine to the bottom of the Titcomb Basin. Turn south toward the highest of the Titcomb Lakes, where you will join a trail that traverses the eastern shore of the Titcomb Lakes. Easy hiking along this trail will take you in a couple of hours to the junction with the Indian Pass trail.
Turn east at this junction and climb up into beautiful alpine terrain in Indian Basin, where there is excellent camping and good views of the southwest slopes of massive Fremont Peak. At 11500 feet you will encounter a flat basin holding the last small lakes before Indian Pass. There is good camping here just below the final climb to Indian Pass. [We chose to cook a pleasant late afternoon dinner here and rest a bit.
We then headed over Indian Pass and crossed Knife Point Glacier while it was still sun-warmed and soft allowing us better traction for our crampon-less trail runners.]
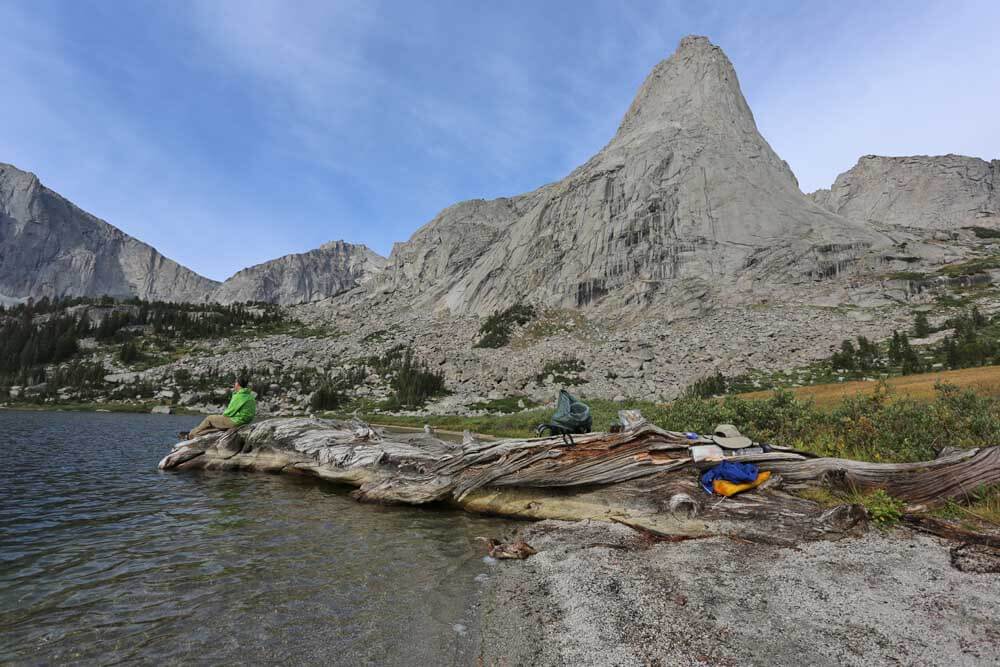
Section 2: Indian Pass to Golden Lake
The route from Indian Pass to Camp Lake is the highlight of the trip. It passes through the most rugged and impressive terrain of our Wind River High Route. It traverses across the massive Knife Point Glacier, the southernmost glacier in of a chain of glaciers on the east side of the Divide extending all the way from Gannet Peak (WY highpoint) and the enormous Dinwoody Glaciers that surround the peak.
This section also contains the most challenging navigation of the trip and the only class 3/4 terrain (although it may be possible with a bit of extra trekking and scouting to avoid anything over class 2). This entire section may be avoided with an alternate off-trail route*.
Starting from the small lakes at the end of Indian Basin ascend a use trail east towards Indian Pass. We lost the trail a few times but the Pass is obvious. The view from the Pass is stunning. Rugged and seldom visited canyons of the eastern range spread out before you. To the north extends crest of the continental divide with a chain of glaciers flanking its eastern slope. This is an excellent spot for lunch or a snack break. Looking east you can see the obvious saddle of Alpine Lakes Pass above the easternmost extension of Knifepoint Glacier.
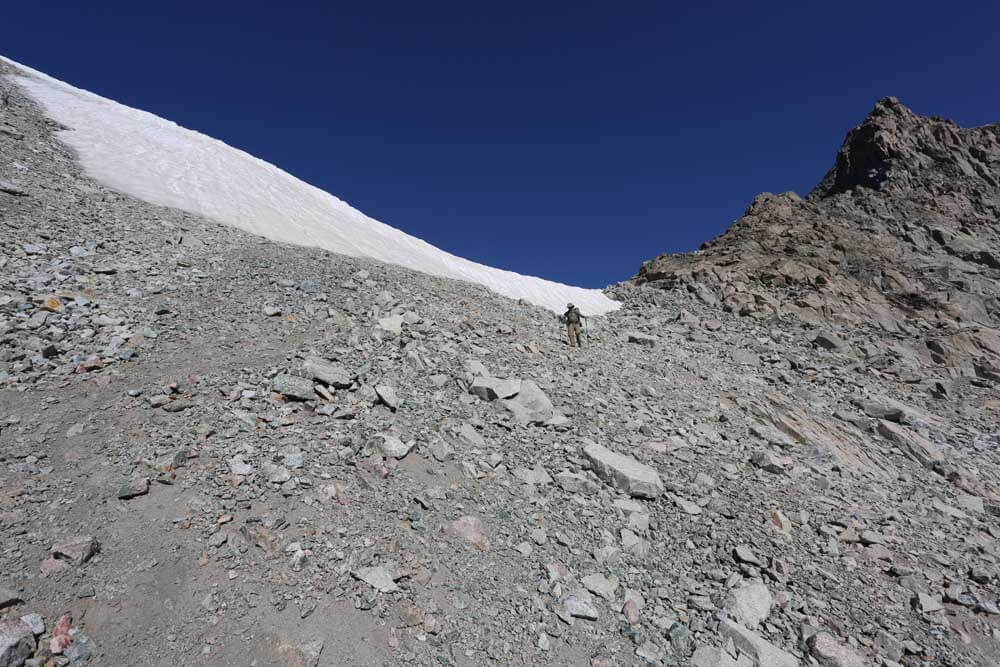
Gain Knife Point Glacier
To gain access to the flatter and more walkable portion of Knife Point Glacier, descend NNE from the Pass and along the right base of the 11,840 promontory just west of “Point” on the map. Some of the talus dropping down to the glacier is a bit unstable. Actually much of the talus adjacent to the glacier is unstable due to climate change. This talus was until very recently part of the glacier and covered with ice.
Since being exposed it has not had time to adequately settle, lock-up and become the usual more stable version of talus. So, beware of your footing on any talus near the glacier.
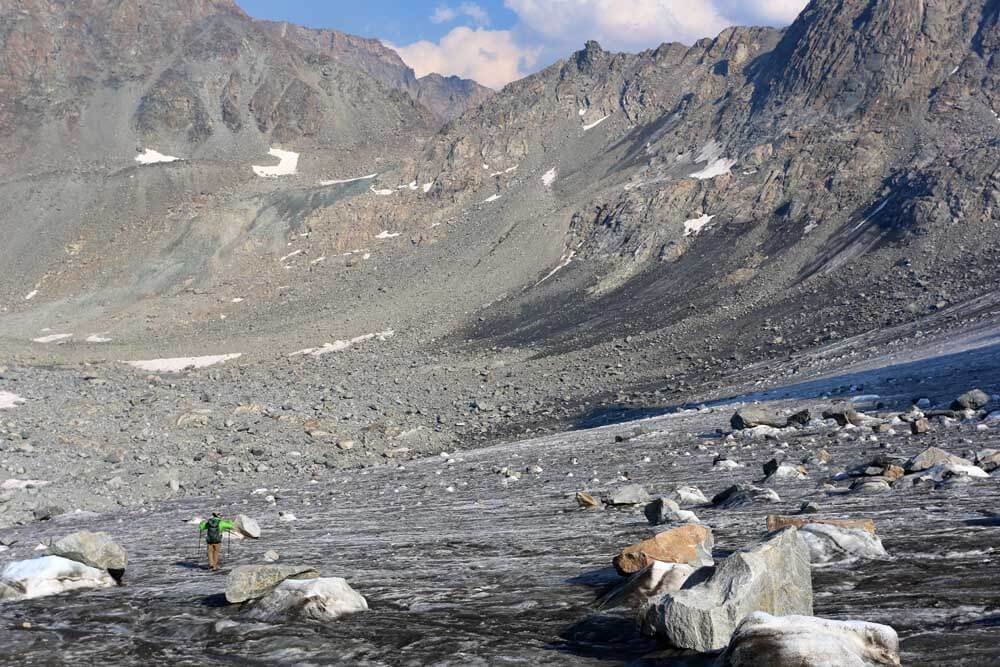
Once on the glacier
Once on the glacier, traverse SE on the flatter area of the glacier between the 11,720 and 11,600 contours to stay above the steeper terminal slope. (By August on our trip the glacier had receded to around 11,560-11,520). The goal is to attain a lower angle rock strewn ramp of the glacier at around 11,660, NE of ‘G’ of Glacier. We descended off the glacier at this point using the rocks for traction.
Head NE across a talus field (quite unstable in sections) to the base of Alpine Col. The only place to camp in this area are two man-cleared bivy sites as noted on the map and in the waypoints table. Bivy sacks only. Do not expect to pitch a tarp or tent here. There is small lakelet with good water.
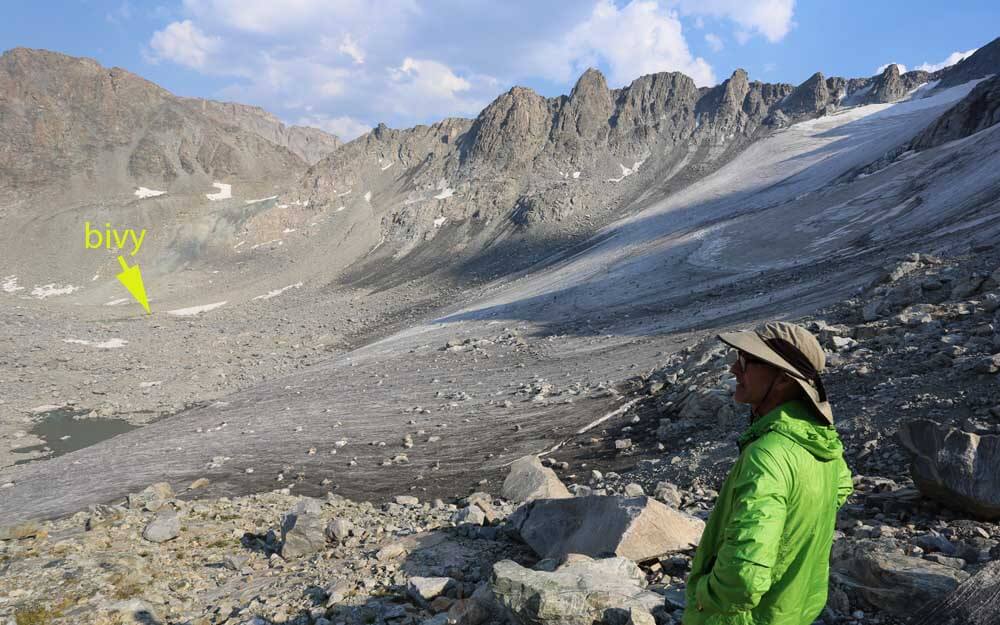
Approaching Knife Point Glacier from below Indian Pass. Our bivy site noted in the photo.
Approaching Knife Point Glacier from below Indian Pass. Our bivy site noted in the photo.
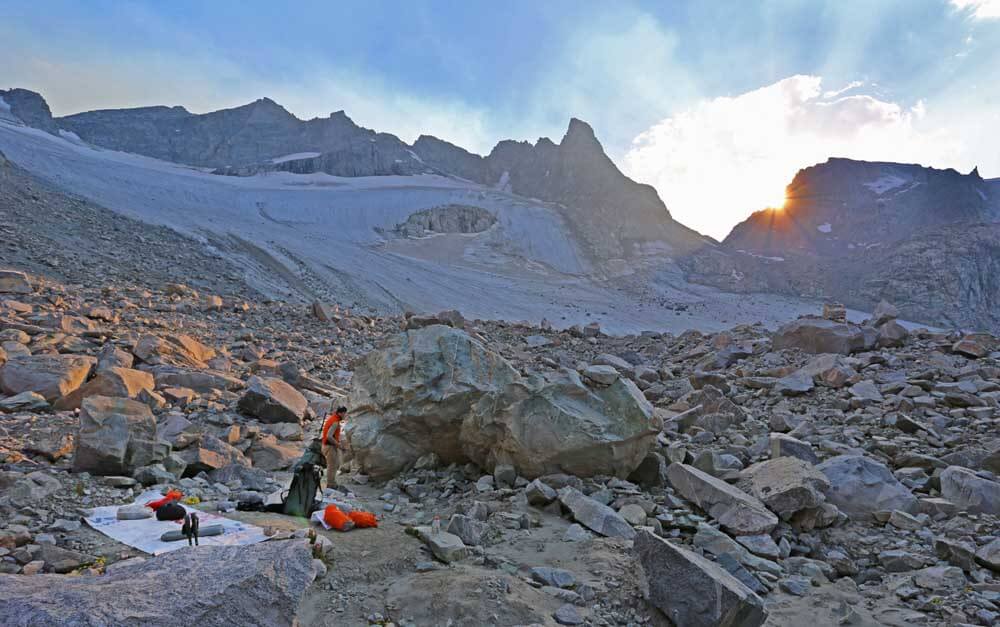
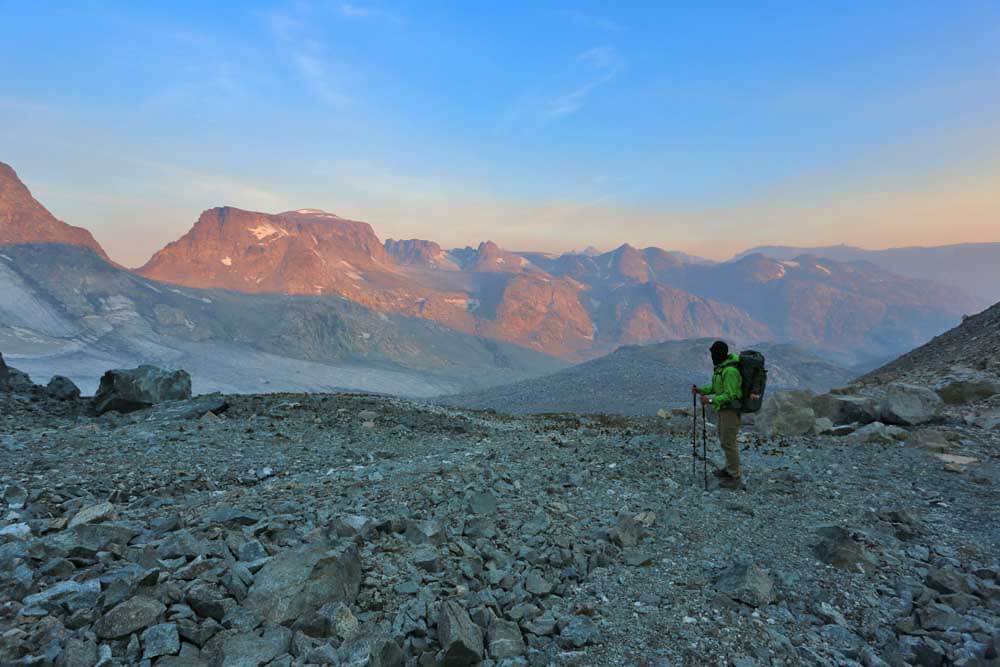
Camp in the talus below Knife Point Glacier. Indian Pass lies in the obvious notch left of the setting sun.
Ascent of Alpine Lakes Pass
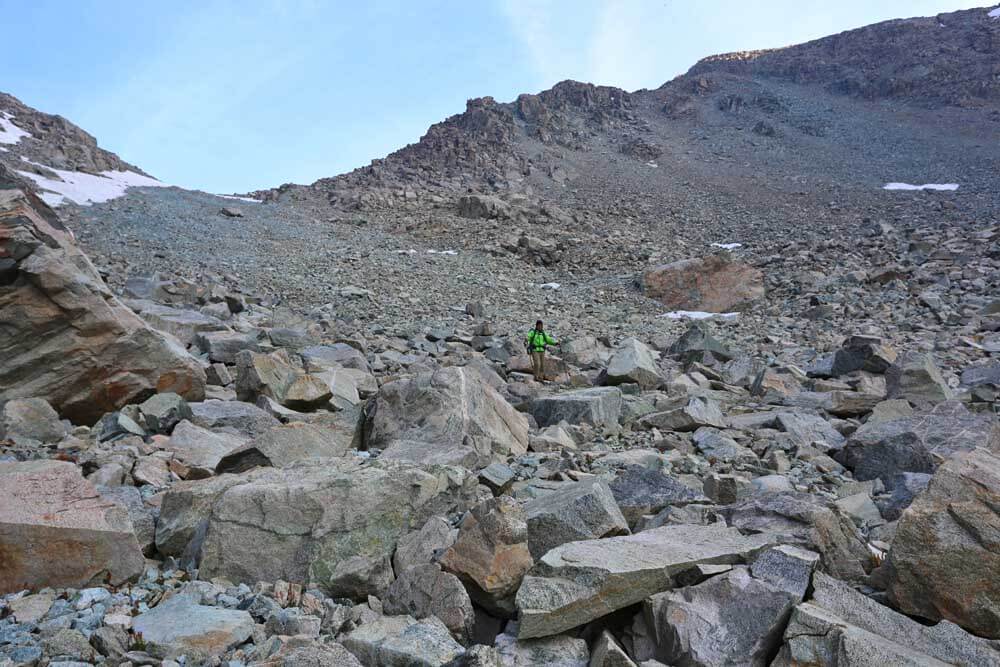
The ascent of the north side of Alpine Lakes Pass is straightforward. Good views from the top show the talus strewn, cliffy and deeply glacier-scoured valley that holds the brilliant gems of the Alpine Lakes. Be prepared for slow going in the Alpine Lakes Basin. It is filled with large and plentiful talus and the hiking involves negotiating around cliffs that drop directly into lakes and other route challenges will make for tedious progress in sections.
Dawn, Alpine Lakes Pass. Smoke from a small forest fire in the northern part of the range adds some color to the sunrise.
Descending the south side of Alpine Lakes Pass. 2013 was a very low snow year. You can expect this pass to contain considerably more snow than shown here.
Hike along the west shore of Lake 11,335, staying above the shore initially along talus filled ridges. The cliffs about 2/3 of the way along the shore appear impassable but “go.” Not visible from a distance is a short class 3 ramp system (climb up and down) near the lakeshore that allows passage to a flatter section near the outlet.
Middle Alpine Lake
Easy walking takes you down to the middle Alpine Lake (Lake 10,988), where you will have a pleasant stroll along its west side and down more talus to Lake 10,895. Here you will face a decision. We passed Lake 10,895 on the north side. It is plain sailing along the shore until you are almost to the outlet where a 50-100 foot section of cliffs ruin the party.
We climbed a class 3/4 crack system above a stand of white pines (handing packs up in a few places) for approximately 75 feet to gain flatter ground above the cliffs. We then descended gentle ramps to the outlet. Views from outlet of this lake are stupendous. It would make an excellent lunch spot or campsite.
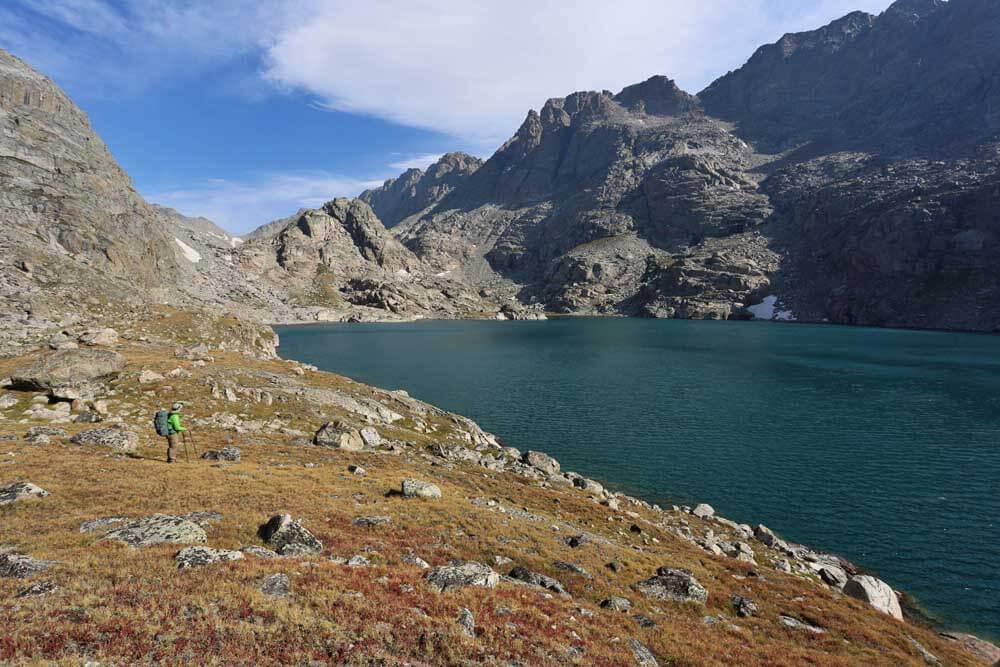
Alpine Lakes Basin and the middle Alpine Lake (Lake 10,988). We saw no one as we passed by the upper and middle Alpine Lakes.
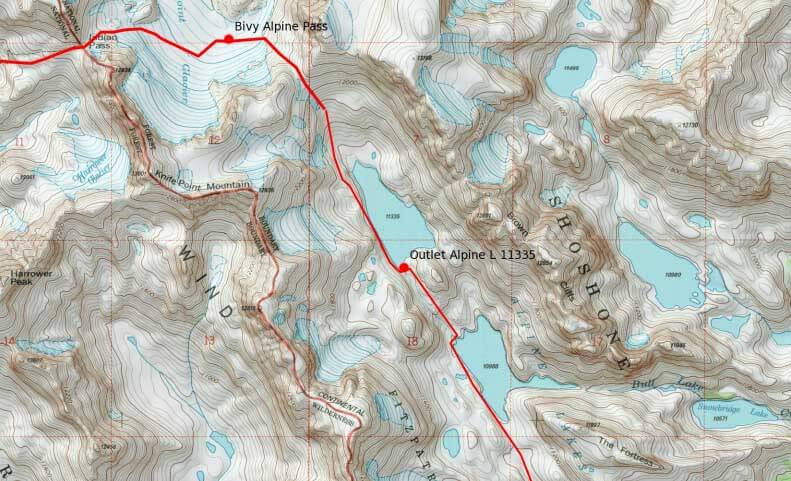
Revised 2016: Your alternative route is along the south shore of Lake 10,895.
While longer and more time consuming, this would probably be a class 2 route to the outlet. In fact, Henry Shires (and others who have hiked the route) confirm that the south shore of Lake 10895 is the safer option. This avoids the Class 4 exit crack on the north shore near the outlet.
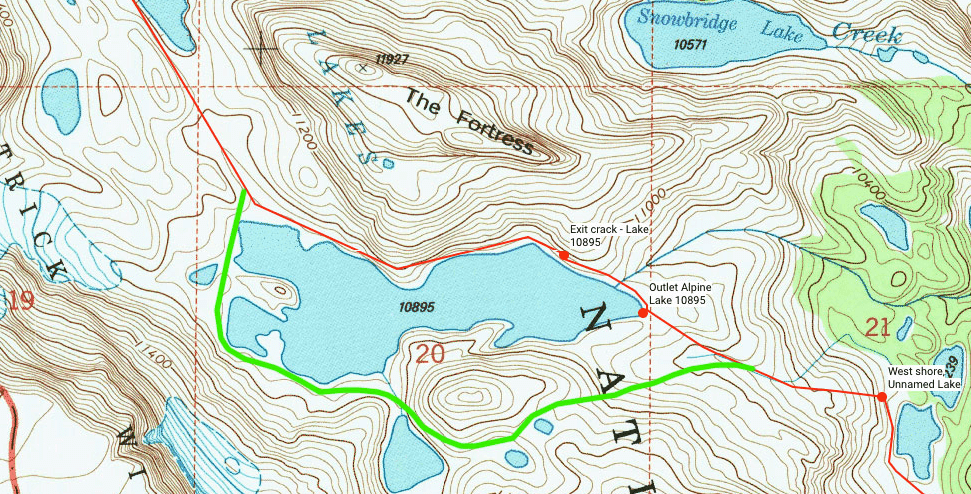
Henry writes: “I concur that the south end of the lowest Alpine Lake is the way to go. I posted a small section of map with the regular (red) route and the alternate (green) route we took here. Much safer and easier route.”
From the furthest east projection of Lake 10,895 we headed ESE and dropped into a shallow drainage that feeds an unnamed lake adjacent and south of Lake 10,239. Use ramps and gullies to make your way between cliff bands and steeper rock on the approach to the lake. There is a use trail from this unnamed lake to Camp Lake although it is easy to lose. The marked trail from Camp Lake to Lake 10,787 is not frequently traveled and is no more than a use trail in sections.
We lost it a few times but easily re-found it. The route to Lake 10,787 is obvious, but the trail when you can find it is faster and is less effort. The trail from Lake 10,787 to Golden Lake is more established. For the most part it is easy to follow although it can braid into multiple trails around the Golden Lakes.
Revised 2016: Shortcut from Lake 10895 south to Lake 10787:
The pass between “Peak 12314” and Douglas Peak goes. You can regain the trail to Golden Lakes on the south side of Lake 10787.
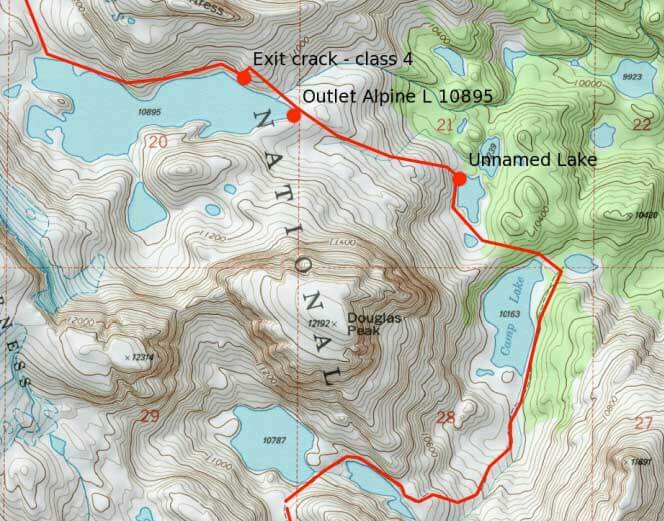
Camp Lake Bypass: The pass between “Peak 12314” and Douglas Peak goes for a slightly more elegant line
* Section 2 can be completely bypassed by skipping Indian Basin in one of two ways. Caveat Emptor: Neither of us have traveled either of these alternate routes but have been told by two experienced Wind River hikers and climbers that they “work without serious difficulty.”
Heading to Island Lake and then to Wall Lake and over the divide east of Tiny Glacier and down to Upper Golden Trout Lake.
Brendan Leonard of Semi-Rad hiked the Angel Pass Variant
Revised 2016: Brendan Leonard of www.semi-rad.com hiked the Angel Pass Variant to bypass Indian Basin/Knifepoint Glacier: It goes from Island Lake to Wall Lake then heads south from Wall Lake to Dennis Lake via Angel Pass. He provides the following along with the route track below “we pretty much followed your blue line [PDF map of WRHR] for the alternate route, going north of Spider Lake, then up a right-angling gully, cutting back left to ramps over Angel Pass.
On the other side of the pass, we went north of the first lake (seemed easier). Then getting down to Dennis Lake wasn’t that straightforward—we avoided following the drainage straight down to the lake, and traversed north, but finally realized we were going to get cliffed out, so cut back south and found a passage with one 3rd/4th class downclimb move to get us down to a gully that led to the trail around Dennis Lake.”
Click on map image to enlarge: Brendan Leonard of www.semi-rad.com hiked the Angel Pass route variant and provides this route info map.
Section 3: Golden Lake to Lee Lake
Alan enjoys dinner along the shore of Golden Lake before the climb to Hay Pass.
At the southern tip of Golden Lake a small inlet stream is the last good water source before Hay Pass. We ate dinner here on the shady, cool gravel next to the lake. A bald eagle soared over the water that evening, scouring for trout. Ascend the trail to shallow and picturesque Hay Pass, crossing to the west side of the continental divide. From the pass, a trail descends gradually to the west, passing along the eastern side of Lake 10,756.
At about 10,600 feet leave the trail and head toward the obvious basin to the southeast. After arriving at the first major lake in this basin, continue along a very flat and grassy (and frequently boggy) valley floor toward the southwest shore of Lake 10555. We found a poor campsite in the low pines along this shore. Camp somewhere else if your schedule allows. The warm water from this lake tasted distinctly unpleasant and tannic.
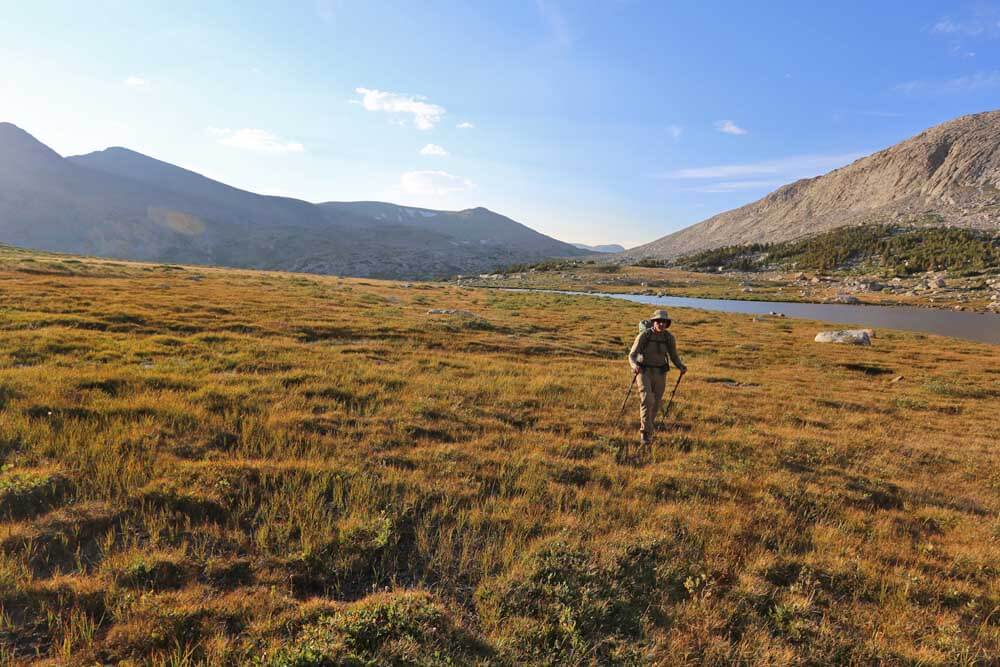
Hiking toward Lake 10555 near sunset, with Hay Pass and the Continental Divide in the background.
Long Lake
The basin will likely continue to be and boggy wet until you begin to rise toward a low pass before Lake 10,683 (sometimes called Long Lake). Hike along the eastern shore of this remote lake. The going gets rougher as you get near the west end of the lake, where you negotiate a few ramps and plenty of talus without significant difficulty. Continue over a small rise and drop into isolated Europe Canyon.
Here you will join a trail and head southwest for a short while (probably less than a half mile, depending on where you merge with the trail) until you can cut directly to the eastern shore of Lake 10,542. This easily passible shoreline takes the most direct line to a slope on the far side of the lake. Climb about 300 feet over a small pass, and along the north side of Lake 10,806.
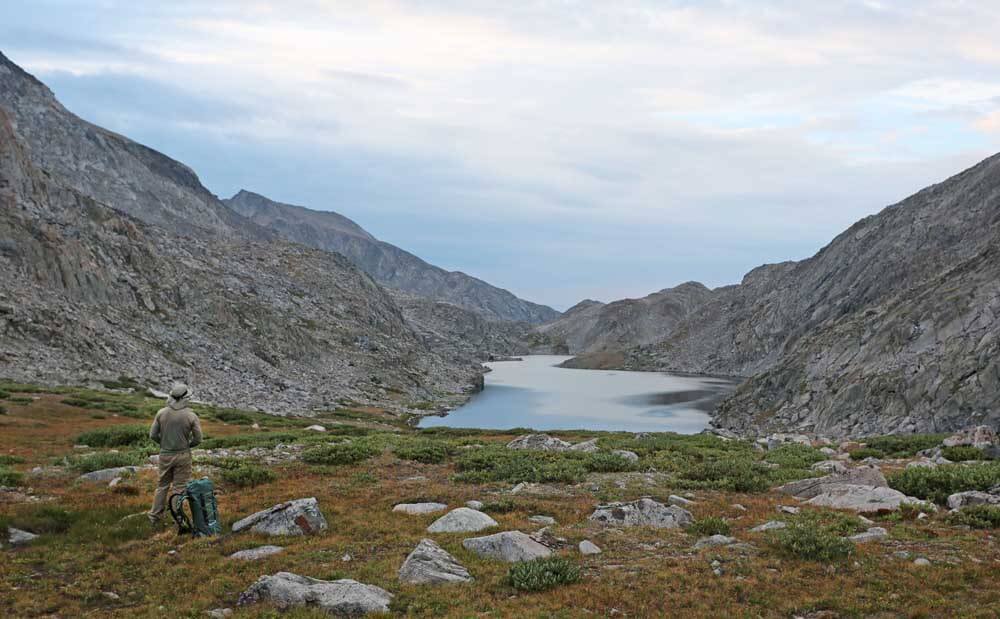
Long Lake (Lake 10,683). The route follows the shore and slope on the left (eastern) side of the lake. The going gets harder at the far end of the lake.
Hall’s Lake
Now begins an intricate traverse toward the outlet stream on the southwest side of enormous Hall’s Lake. Expect plenty of zig zagging through brush and trees, and many small drops, climbs, bogs, and lakelets. Finally arriving at Hall’s Lake, turn to the south and pass a couple of small lakes. Continue to the south around Peak 11586.
As you pass this peak, head east toward your next landmark, the outlet of Middle Fork Lake. This section is marked by beautiful and pleasant walking past many small ponds filled with plenty of big fish.
Lakelet and bog between Hall’s Lake and Middle Fork Lake.
Section 4: Lee Lake to Texas Lake
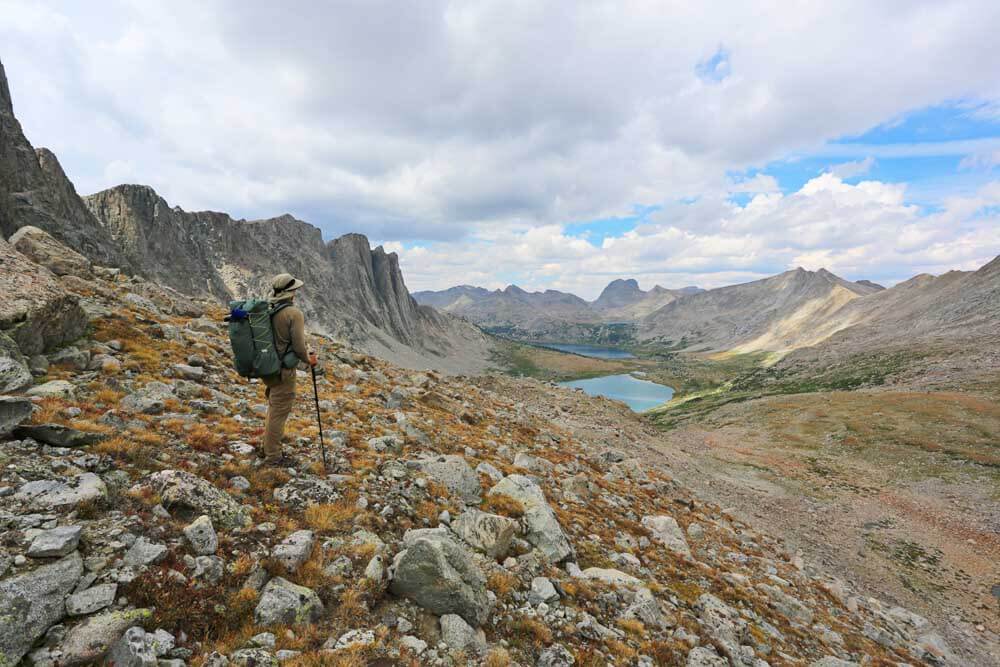
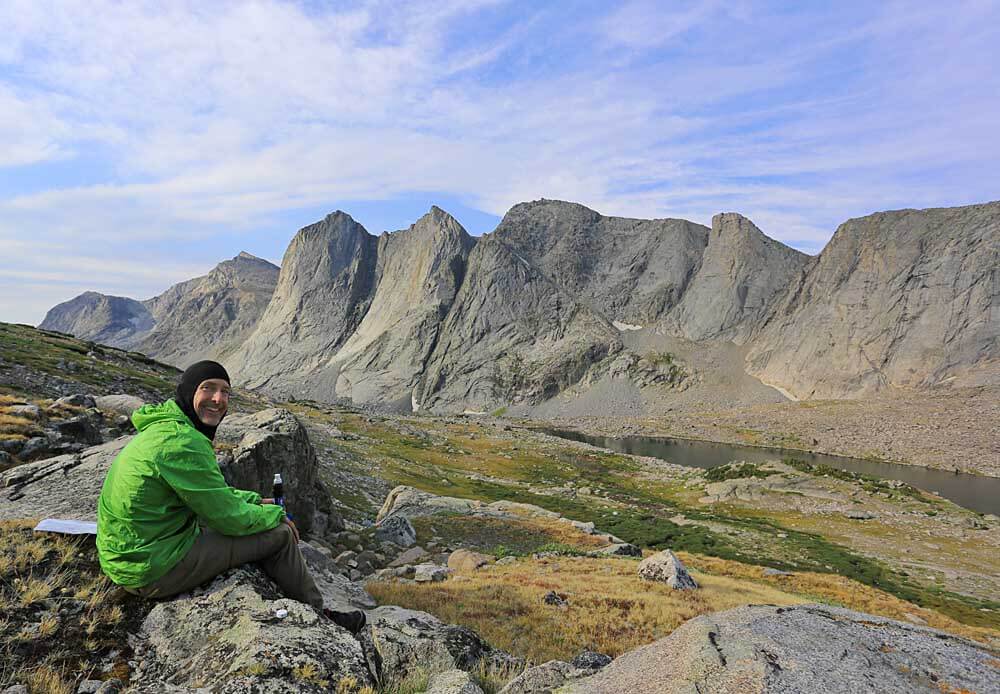
Looking north toward Lee Lake and Middle Fork Lake from near the base of Pronghorn Peak.
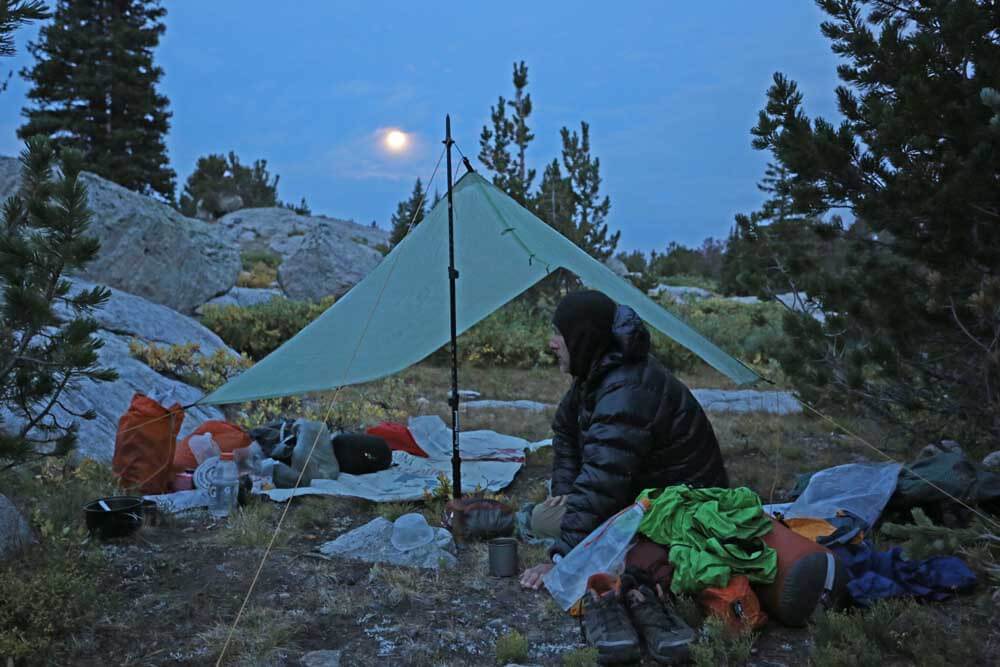
Moonrise over our campsite at Bonneville Lakes.
Bonneville and Rain Peak
Your next goal is the pass between Mount Bonneville and Raid Peak. From Lake 10,521 do not ascend directly up the steep and heinous route up the lake’s inlet stream on the SE corner of the lake. Instead, follow a lower gradient route SW of the inlet stream. Don’t turn left and up into the shallower portion of the inlet stream drainage basin until you have reached flatter terrain (just above the red ‘2’ on the map).
The ascent to the pass is straightforward. To confuse things, there are numerous use and game trails that seem appear and disappear without reason.
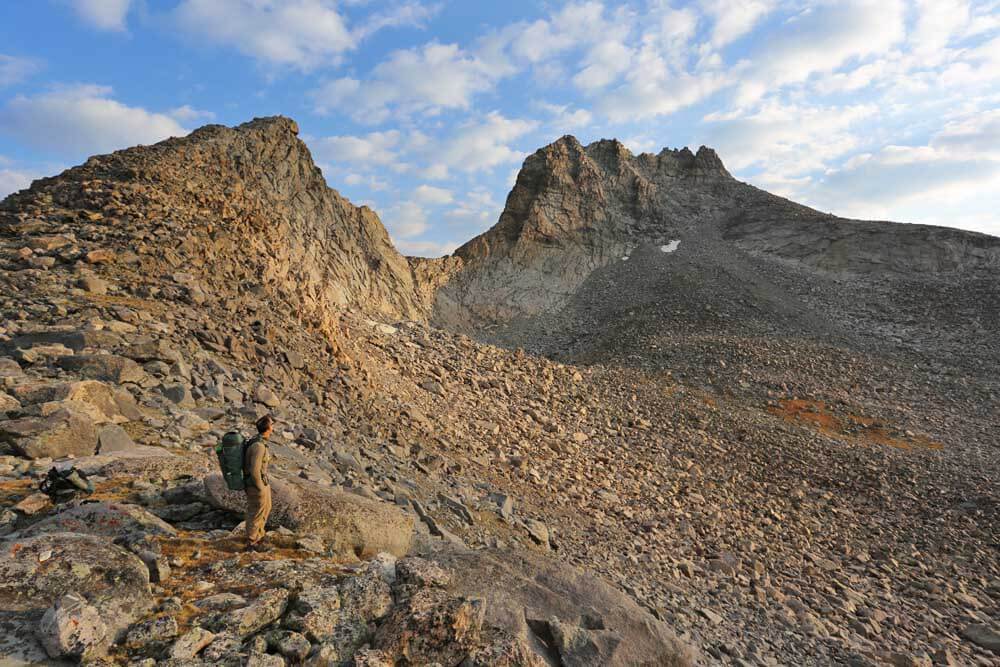
Alan gazes at impressive Mount Bonneville before beginning the descent through the massive talus field below the pass.
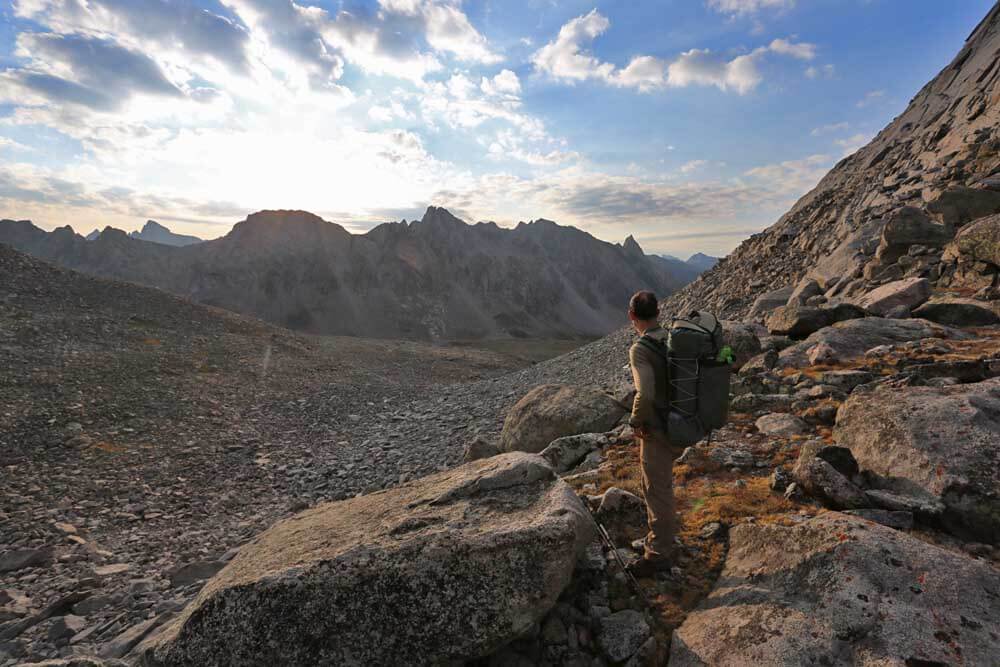
Looking into the East Fork Valley and the rising sun from the pass between Mount Bonneville and Raid Peak
There is a long stretch of size Large to XL talus as you descend the east side of the pass and make your way to small lake directly east and above Lake 10,566. To avoid the steep terrain north of Lake 10,566, head east or southeast towards the prominent south-pointing nose of the 11,000 ft contour. Use a small ramp system just southeast of the nose to reach flatter terrain below 11,000. The outlet of the small lake makes an excellent rest stop with good water and superb views.
Don descending below Raid Peak
Early morning snack stop overlooking Lake 10,566 and the extensive ridgeline extending south from Raid Peak.
Hang a left for Pyramid Lake
From the lake take a leisurely a stroll along the excellent bench that contours at 10,800 ft. Hang a left for Pyramid Lake around the south shore of a small lake north of peak 11,172. Go to the lake’s outlet to pick up a well-used trail. [Alternatively you can stay off trail for a bit longer. Drop down to Lake 10,566 and follow the East Fork River and pick up the same trail (from Pyramid Lake) further down at Skull Lake.]
The route from here is straightforward trail walking to Texas Lake. Hike the trail from Pyramid Lake to Washakie Creek. Cross to the south side of the creek and head upstream (east) towards Shadow Lake. Here there are superb views of the backside of the ridge forming the Cirque of the towers. It is an excellent spot for lunch.

Shadow Lake: Storm clouds brewing over the backside of the Cirque of the Towers. This storm shut us down for the day before we could cross Texas Pass and make our way into the Cirque of the Towers.
Texas Pass and Lake
Follow a use trail (we lost it a few times) to the small lake below Texas Pass (the pass between peak 11,925 and peak 12,537). This lake is locally known as Texas Lake. There is excellent camping in the meadow on the west side of the lake.
A long and violent afternoon T-storm with wind, hail and sleet forced us to hunker down in the late afternoon on the shores of Texas Lake. We waited out periods of sleet sliding in large sheets off of our Cuben Tarp (our only shelter for the trip). By dusk the storm had not sufficiently cleared. We gave up on our plans to camp in the Cirque of the Towers and settled down for the night. There are much worse places to camp!
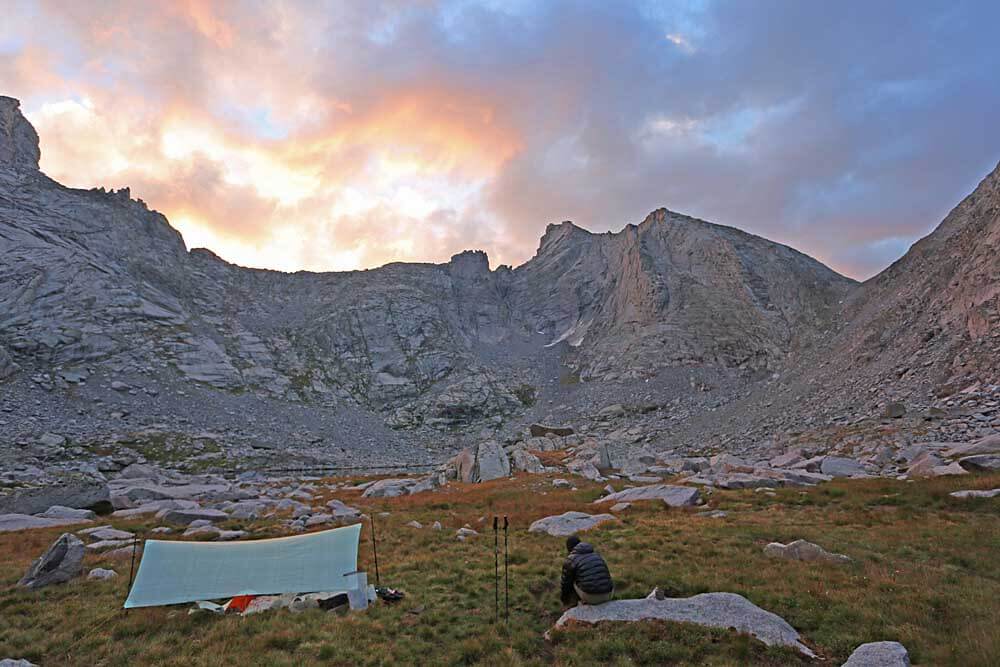
Storm showing signs of clearing in the late evening below the north side of Texas Pass.
The trip over Texas Pass and into the Cirque of the Towers is second in splendour only to the Indian Pass to Camp Lake Section. Needless to say the Cirque is legendary for both its stunning beauty and as hallowed ground for some of the best alpine rock climbing in North America. It should be on every backpacker’s bucket list.
No official trail
While there is no official trail over Texas Pass the use trail was in better condition and easier to follow than some of the official “trails” we traveled in less visited portions of the Range—it’s a veritable “use-trail freeway.”
The trail starts from the SE corner of Texas Lake and ascends on mostly solid ground between scree and talus. The views are sublime as you descend form the pass in to the Cirque and Lonesome Lake. A quintessential “Sound of Music walk.”
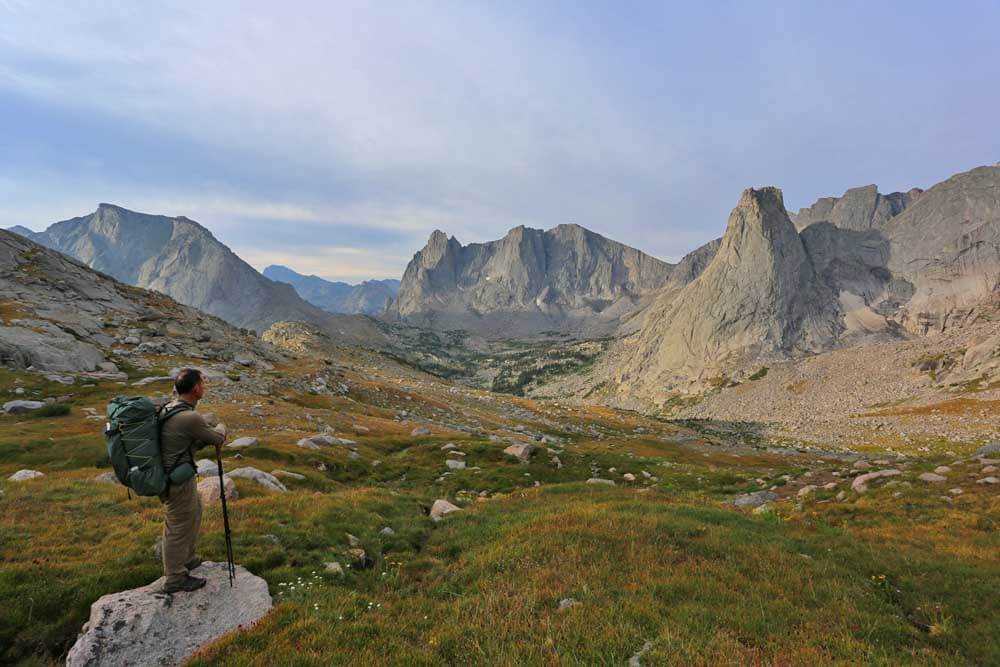
The view into the Cirque of the Towers from near the top of Texas Pass.
From the Texas Pass the use trail loosely follows the NE branch of the inlet stream for Lonesome Lake, passing through a stand of pines around 10,400 before reaching the grassy lakeside. We had a cup of morning coffee on the lakeshore while watching climbers ascend Pingora. Alan got his rod out, selected a beautiful native cutthroat trout, landed it and gently put it back. Sated with the beauty and serenity of the Cirque, we felt it was time to leave.
Lonesome Lake and Pingora in the Cirque of the Towers.
Camping at Cirque of the Towers
If you plan to stay the night in the Cirque: There is excellent camping in the basin below Pylon Peaks and Warrior Peaks.
We traversed off-trail around the eastern side of Lonesome Lake and acquired the official trail to Jackass pass around 10,400 ft. The route out to Big Sandy Campground from Jackass pass is a major trail with tons of traffic and the usual deeply eroded and braided trail sections. Nonetheless, Big Sandy Lake is a gem and a lunch or snack stop on its shores is a must. And on the final leg of the trip don’t forget to look back now and then to appreciate the lovely Big Sandy River and the mountains behind.
Big Sandy River below Big Sandy Lake
Parting Shot
Until our next adventure…
Resources for the Wind River High Route
Recommended season
Late Summer. Gives time for high snow fields to melt out. Less mosquito pressure. By mid-Sept there’s a chance of early snowstorms. See Climbing and Hiking the Wind River Mountains, by Joe Kelsey for more information on weather and other objective hazards in the Wind River Range.
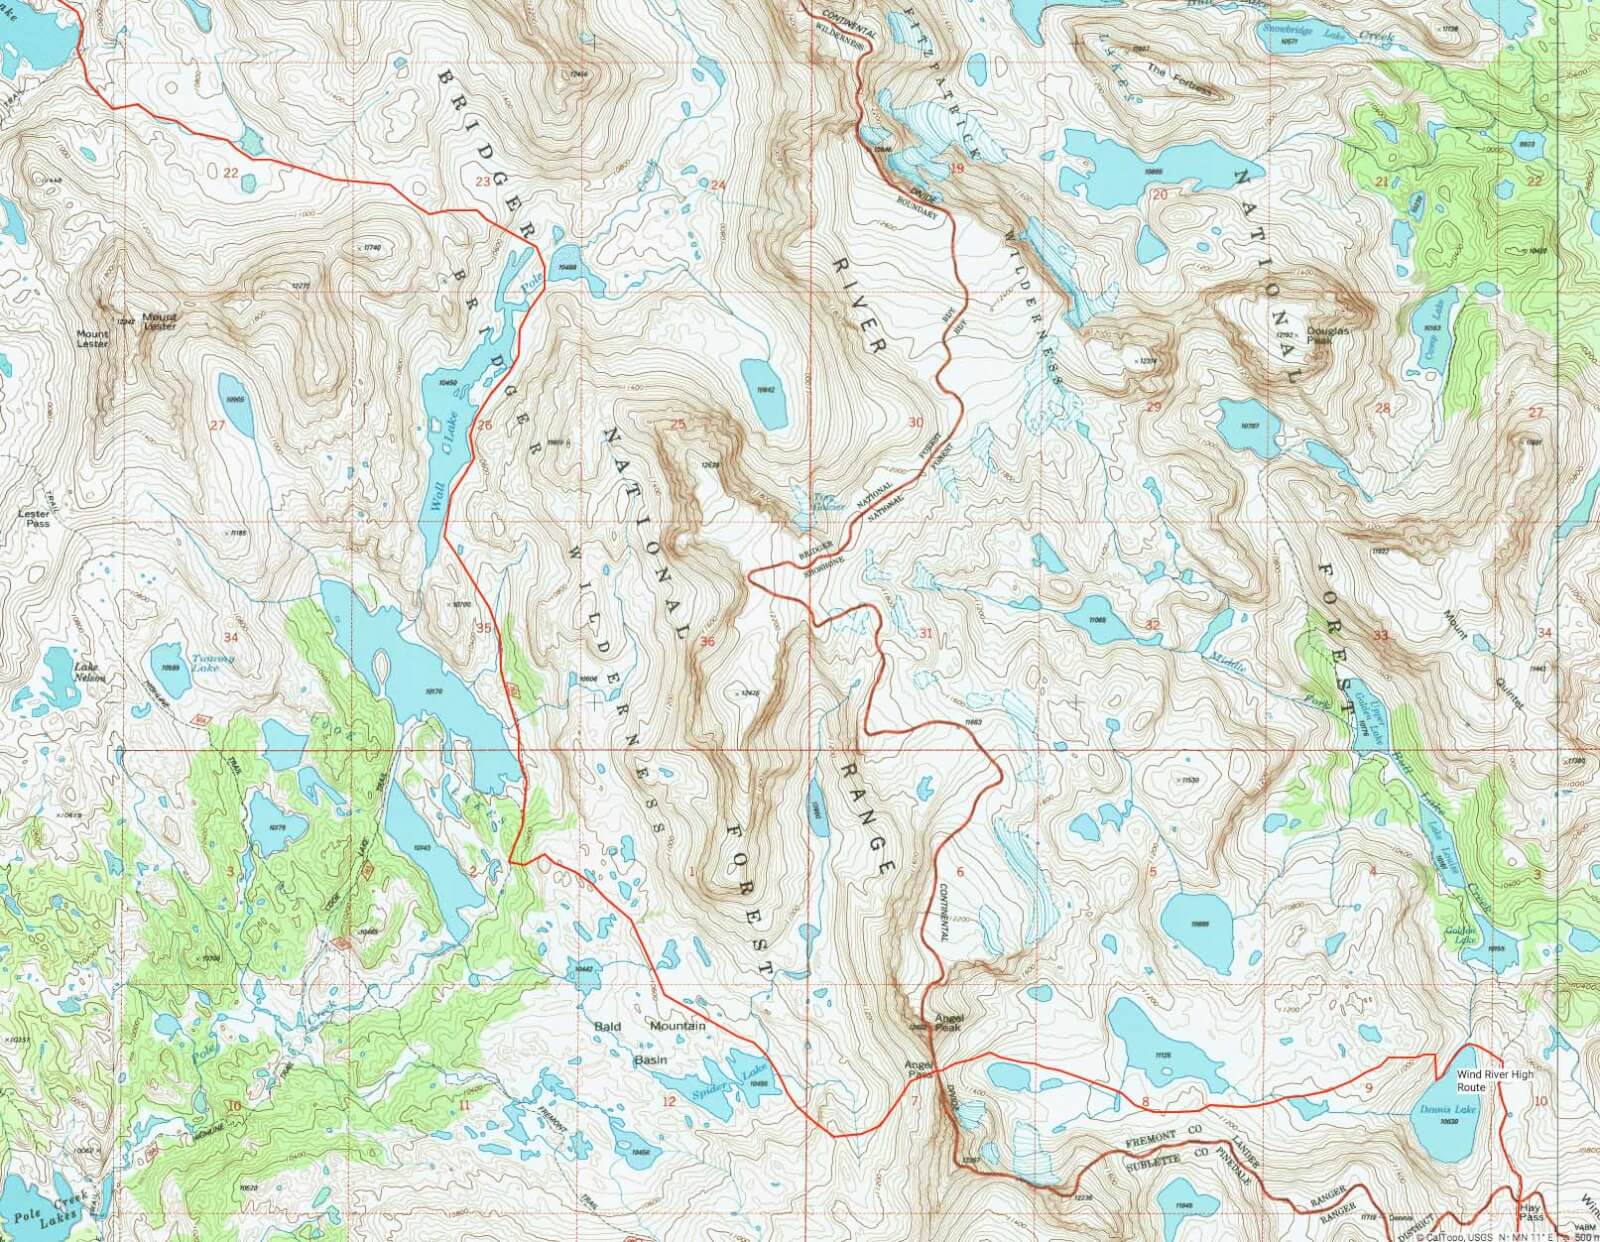
Detailed Mapset of the Wind River High Route
Detailed MapSet of the Wind River High Route. [PDF – Eight 11×17 sheets + one overview sheet]
Notes about maps
- There are a few alternate routes on the maps in addition to our main route. They are colored blue.
- The most difficult section of the WRHR, Indian Pass, Knifepoint Glacier, and Alpine Lakes can be bypassed by an easier but still off-trail section. While we have been assured by at least two people knowledgeable about the Wind River that this route does go and is easier, Don and Alan have not hiked this route and cannot guarantee the accuracy of the route or its level of
difficulty.
Hiking Times and Waypoints Table
The following table should be of use to estimate hiking times for the route. Obviously you’ll need to calibrate your personal hiking pace to the speed that Don and I walked. The table also includes the location of a few tricky sections of the route. It should save you some scouting time and/or prevent you from hiking a long ways along a bad route choice. Finally, the table does not include hiking mileage, since for the most part it is not a relevant piece of information.
For some hikers, a few sections like Alpine Lakes Basin may require a two hours or more to cover a mile.
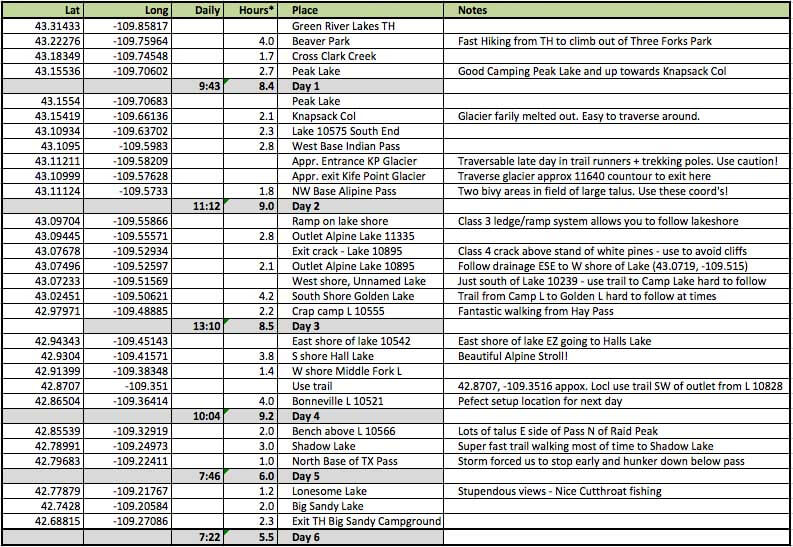
Hiking Times and Waypoints Table [PDF]
A few notes about the table
- The route is approximately 80+ miles of on-trail and off-trail travel with about 20,000 ft of vertical gain.
- Times are for Alan and Don who are reasonably fit hikers. You will need to estimate your pace from our hiking times.
- We are not G-d’s gift to high speed through hiking. We are over 50 years old, and did no altitude acclimatization before the trip. At trip start we went from sea level to over 12,000 ft in about 24 hours.
- While we traveled light, we weren’t super light. Alan’s pack was 27 pounds with a small camera, a SPOT and Satphone and Don’s was 30 pounds with a Canon 5D full-sized DSLR carried for HQ photos & video.
Daily hiking time
- Daily time is the total time from leaving camp in the morning to arriving at our next camp in the evening. This includes all stopped time, e.g. for lunch, rests at scenic spots, complicated route finding and scouting forays, longer photo/video sessions, a late afternoon dinner and rest before hiking a few more hours in the early evening
- Even though the goal was to hike at a steady but sane pace, for a long time, with a limited number of stops, we still ended up with 1 to 2 hours per day of non-moving time.
- *Hours (hiking times between points) is just that—hiking/moving time only. These times include only short stopped tasks like tying a shoelace, putting on a rain jacket, or filling a water bottle. We carried a SPOT tracker for the trip, and any stopped time over 5-10minutes was not included in hiking time.
Car Shuttle
A local shop in Pinedale, The Great Outdoors, will shuttle your car from one trailhead to another. Their service was excellent and the convenience of a shuttle made the logistics of the trip much easier.
Gear for the Wind River High Route
Revised 2016: Below is a comprehensive list of Gear for the WRHR.
My pack was 27 pounds with food, a small camera (Sony a6000 kit 1.8 pounds), a SPOT (now I would take the far better inReach SE 6.9 oz), and an Iridium 9555 SatPhone 9.7 oz. Obviously I could have saved a few pounds with less camera and electronics (but we were intent on fully documenting the trip).
I took most of the gear on the list except as noted:
- Shelter: Don and I shared a Mountain Laurel Designs Grace Duo Cuben Tarp 7.8oz (225g). We survived a strong T-storm with high winds just fine.
- Sleeping bag (actually a down quilt): Hammock Gear +20 Burrow Quilt semi-custom (21.5 oz)
- Pack Alan: ULA Ohm 2.0 Pack
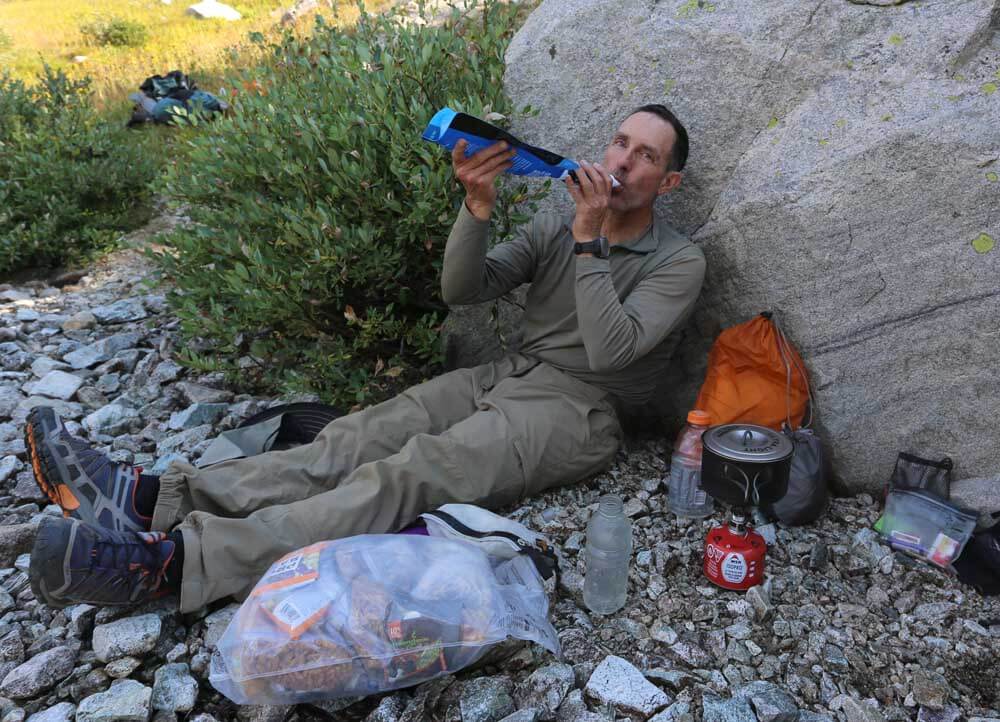
- Food storage: Ursack
- Stove & Cooking: We shared a canister stove [Don’s preference] with a single 8 oz fuel canister and a 1.3 L titanium pot. This provided fast meals for two. (We fully used the canister on the trip!)
- Action suit: SmartWool NTS lightweight zip T supplemented with a Fleece Top when cold and windy.
- Camera: Sony a6000 kit see Best Lightweight Backpacking Cameras
Gear List for the Wind River High Route
Or to see the full gear can click on this link: 9 Pound – Full Comfort – Lightweight Backpacking Gear List (original table).
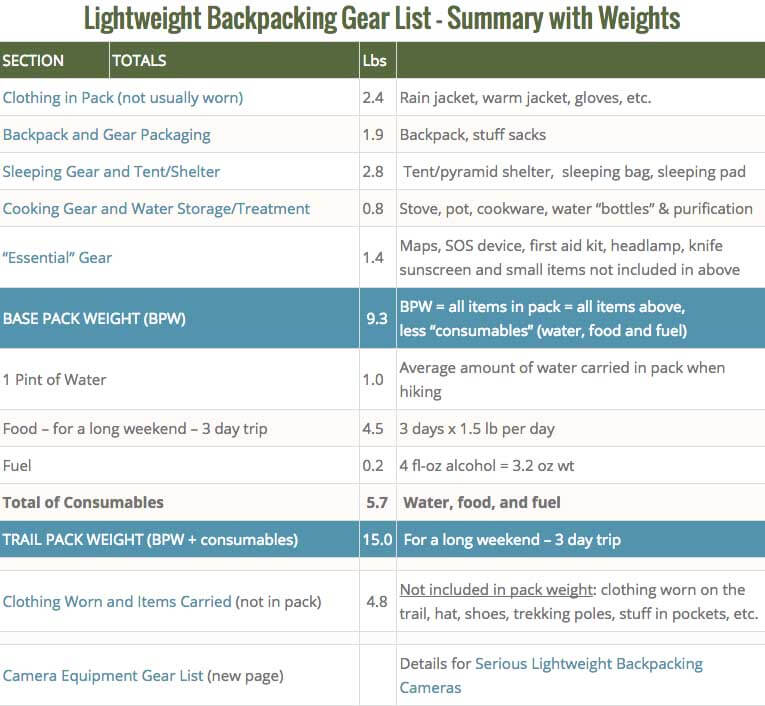
Click on image of table to see full gear list
Food List for Wind River High Route (Alan’s)
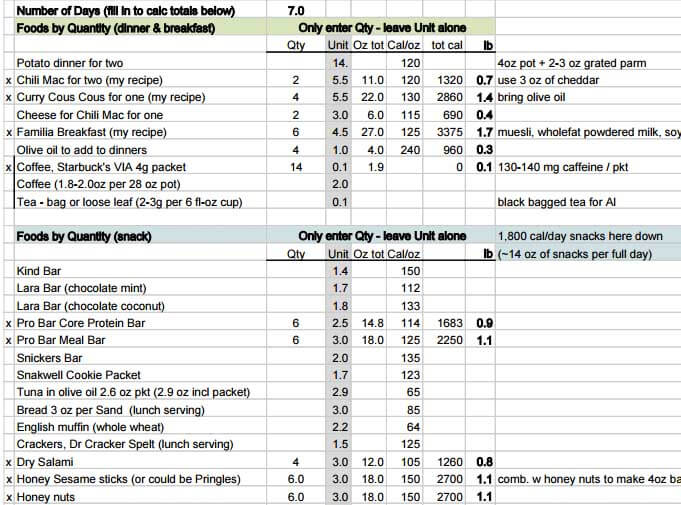
Detailed FOOD list for the Wind River Hight Route. [PDF file]
Other Published References
Books. If you don’t have a copy of Climbing and Hiking the Wind River Mountains, by Joe Kelsey, you simply must get a copy. The book is an obvious labor of love, and has a ton of great information.
Wind River Trail Maps. Earthwalk Press publishes two Wind River Range overview maps (one for the northern part of the range, and another for the southern portion). These are handy for seeing the entire range, possible alternate routes or emergency exit points.
Some Potential Additions to the Route
- Our route skips Gannet Peak & the Dinwoody Glaciers. A superb addition if you want. But difficult, time consuming, and potentially technical, requiring at a minimum ice axes and crampons. And for all but the fittest alpine travelers, adding this section would put the route beyond a weeks vacation. Less convenient trail heads? No easy shuttle?
- One could go higher and stay closer to the divide in some sections. E.g. the alpine lakes section detours around douglass peak via Camp Lake and the route also skirts around Mt Bonneville.
//
Please enable JavaScript to view the <a href=”https://disqus.com/?ref_noscript” rel=”nofollow”>comments powered by Disqus.</a>

