We’ll help you choose the lightest & best backpacking battery pack, power bank, or portable charger with the highest mAh-to-weight ratio.
Choosing between ZOLEO vs inReach Messenger vs Mini 2? We break it down to help you decide on the best satellite communicator.
We will help you choose the best headlamp for hiking and backpacking, with a focus on ultralight headlamps with high power/weight ratios.
Smartphones like an iPhone or Samsung Galaxy outperform a conventional GPS in almost every way. This post has all the information you need to use your smartphone as the best backpacking GPS, including getting up to 7+ days of battery life without recharging. Best of all, you can do this for less than $20!
Gaia GPS, the best hiking GPS App is even faster & easier to use. GAIA GPS maps are stunningly sharp & include National Geographic Trails Illustrated Maps…
Most people know about Aron Ralston of “127 hours,” who cut his arm off to save his life. A major take-away from this was that he should have left a Trip Plan with a friend. Something as simple as a short note saying where he was going and what to do if he wasn’t back on time would have gotten him help far sooner than 127 hours. This is why you should make a Trip Plan (even a very short one) and leave it with someone for every backpacking trip. [Picture above is the author about 12 miles from where Aron Ralston’s arm was pinned by a loose rock.]
You think disaster won’t happen on your trip – but you might be wrong
No matter how incredibly competent you are and how meticulously you’ve prepared for your trip, an accident or emergency can happen to just about anybody, at any time. It happened to Aron Ralston with a random loose rock. And similarly random things have happened and will happen to many others. A fluke accident, a flare up of a pre-existing medical condition, or even the odd event like an appendicitis, or acute altitude sickness, etc. can change your trip from fun to damage-control-mode in an instant.
The Life you Save Might be your Own! or Why you Should Make a Trip Plan
If you make a Trip plan you stand a much better chance of getting help or a rescue.
And stuff can happen. Personally in the last 5 years:
- I’ve participated in an immediate, life-threatening helicopter evacuation (not my bad).
- Received in-field medical instruction on how to lance an abscessed tooth though the gum with a pocket knife (yes, my tooth!).
- And locally we had a backpacker die, due in part to not having a Trip Plan and therefore, not getting rescued in time.
Finally, even if you don’t do it for yourself (or your loved ones!), make a Trip Plan as a courtesy to the Search and Rescue Personnel that may need to come look for you. These folks are mostly volunteer and it’s not respectful to have them spend countless days and hours searching for a missing person with little or no information.
What’s in this Article
The main purpose of this article is to make it fast and easy to make an effective Trip Plan. That way you’ll always do it!
- Templates to make your own Trip Plans. Instructions on how to create & use your own Trip Plans
- Who you should leave your trip plan with.
- Limitations of your Trip Plan (and SOS devices like DeLorme inReach and SPOT Satellite Messenger)
or What they can’t do for you…
What’s not in this Article
- A treatise on medical treatment for an emergency (Consider a Wilderness First Aid, or Wilderness First Responder course if you are interested)
- Advice on when you should (or should not) activate your SOS device. Always a topic of lively discussion!
The 3 Most Important Elements for a Trip Plan
It’s far better you make short Trip Plan than to not make one at all. In that vein, a Trip Plan needn’t be a lengthy or complicated.
Here are the 3 Most Important Elements for any Trip Plan:
|
For Aron Ralson, communicating this minimal amount of information via an email, text or phone call to a friend (in all of 1-2 minutes) would have likely had him rescued within 24 hours.
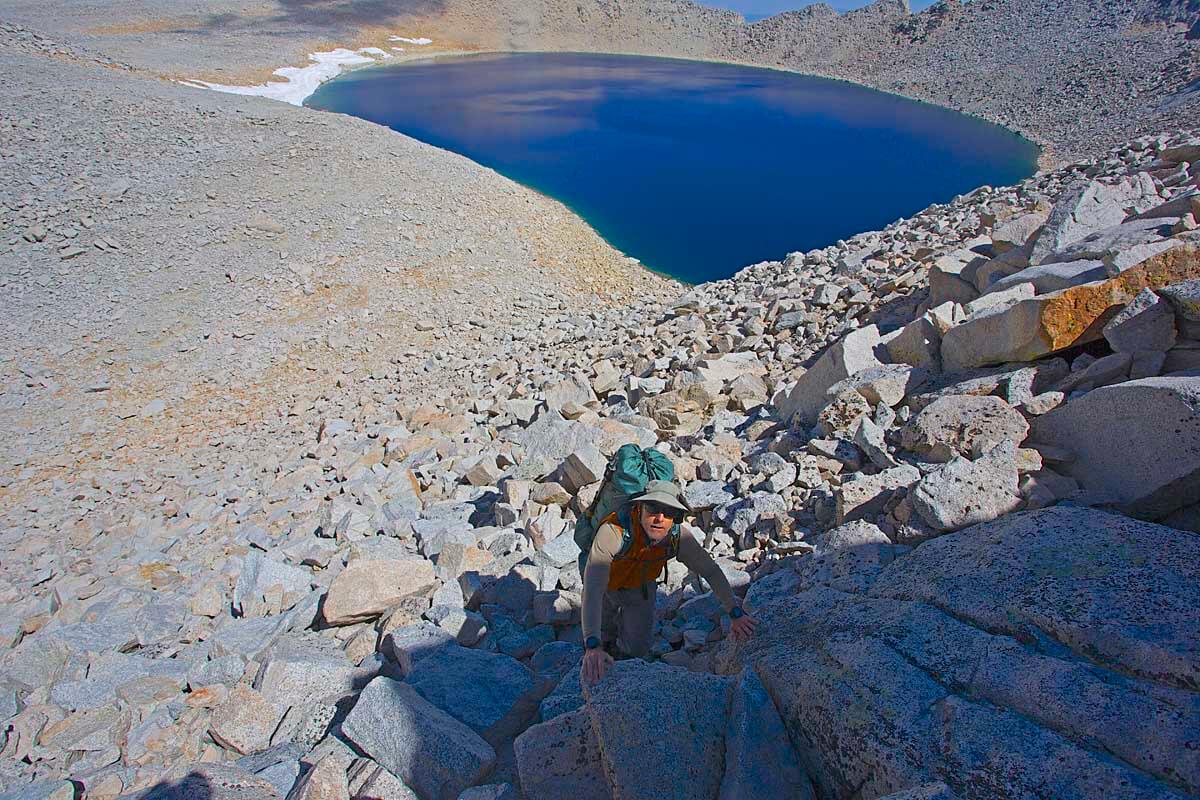
When you’re traveling off-trail in terrain like this it’s good to have a Full Trip Plan Document. On the Southern Sierra High Route. [photo Don Wilson]
Example Trip Plans – for you to fill out and use
Below is how to create your own Trip Plan from a Simple Trip Plan (“low risk” trips. e.g. hiking on the Appalachian Trail) to a Full Trip Plan (“high(er)” risk trips, e.g. dropped into Alaska by bush plane a zillion miles from anywhere). Note: Everybody has their own take on what is a risky trip. A low risk trip to one person may seem crazy risky to another person. As such, “Low Risk,” “Moderate Risk” and “High Risk” are in parenthesis for the rest of this article.
A Simple Trip Plan
When might you use a Simple Trip Plan?As stated previously, it’s far better you make short Trip Plan than to not make one at all. But here are some instances where a Simple Trip Plan might work well:
Example Trip: Section hike of the Appalachian trail with a friend (not solo) in seasonable weather |
Example of a Simple Trip PlanThe following is an example of a Simple Trip Plan. It takes the form of a short email to your trip-tracking-emergency-contacts. Obviously, if you want to include more information you can certainly use the more detailed template document, Full Trip Plan Document for Moderate to High Risk Trips (next box below), and fill it out with the information you feel is necessary and important for your trip. To: Trip-tracking-emergency-contacts
[Note that this quickly covers all of the “3 most important elements for a Trip Plan” in an email format] |
A Full Trip Plan for “Moderate Risk” and “High Risk” Trips
A Full Trip Plan is a lot more work! It includes things like the gear you are bringing including pictures of your shoe tread & tent; detailed information about each party member including wilderness experience, skills (including medical), personal medical history, etc.; extensive information about the communications electronics you are brining (including communication protocols between hikers and the emergency contacts), URLs for a map of the route, etc., etc. As such, you might not want to include all this information for a basic trip.
When might you use a Full Trip Plan?The following are some things to contemplate when you decide how “risky” your trip is and how much information you want to include in your Trip Plan:
“Moderate Risk” Trip Example: Week-long hike in the Sierra Nevada with a mixture of some on-trail travel and some off-trail side trips with sections of up to class 3 travel (scrambling on rocks using hands as well as feet—no rope needed). “High Risk” Trip Example: 1) A week-long technical canyoneering trip (class 5 rock climbing) in a remote and mostly untraveled desert canyon system. 2) Getting dropped in by float plane to white water pack-raft and climb in Alaska above the Arctic Circle. In these cases there will be more detailed trip information and likely use of a Sat. Phone. |
Full Trip Plan Document for Moderate to High Risk Trips – a template to fill out and useTemplate document – Full Trip Plan for Moderate to High Risk Trips. This is a link. Click to open Template.
|
Selecting an Emergency Contact to Give Your Trip Plan to
Here are some important factors to consider when selecting an emergency contact (trip-tracking-emergency-contact):
- Level headed and reliable. For me this is usually a close family member or one of my trusted hiking/climbing partners. I trust them to seriously monitor my trips and in an emergency do the right thing without drama.
- Familiarity with the area. If I am pack-rafting in Alaska I want someone that is familiar with the terrain and challenges of white water packrafting and land travel above the Arctic Circle. If I am on a Technical Canyoneering trip in Utah, I want someone experienced in canyon travel to be my emergency contact. With less specialized and technical terrain, there are far more people eligible to be emergency contacts.
- Responsiveness. In this day and age, especially for higher risk trips we might be communicating indirectly or directly with our emergency contact. This could be indirectly via location-check-ins or tracks from devices like a SPOT or inReach. Or it can be directly like text messages from an iReach or a call form a Sat. Phone. I want my contact to closely monitor these communications and quickly respond to things like an emergency, or if my trip track hasn’t moved in 24 hours and I haven’t notified them as to why. Or just to reply to my request for a weather update before climbing, etc.
The limitations of a Trip Plan and SOS Devices
Sometimes a timely rescue is not possible. A Trip Plan and/or a SOS Device like the DeLorme inReach and the SPOT Satellite Messenger is not the solution to everything. I have been in some extremely bad situations where rescue was not feasible even if I had sent out an SOS. As they say, the best rescue is self-rescue. And to state the obvious, Goal One is not needing rescue in the first place. So be sensible and safe out there.
Finally, a SOS device should never be considered a license to do silly things or take unnecessary risks.
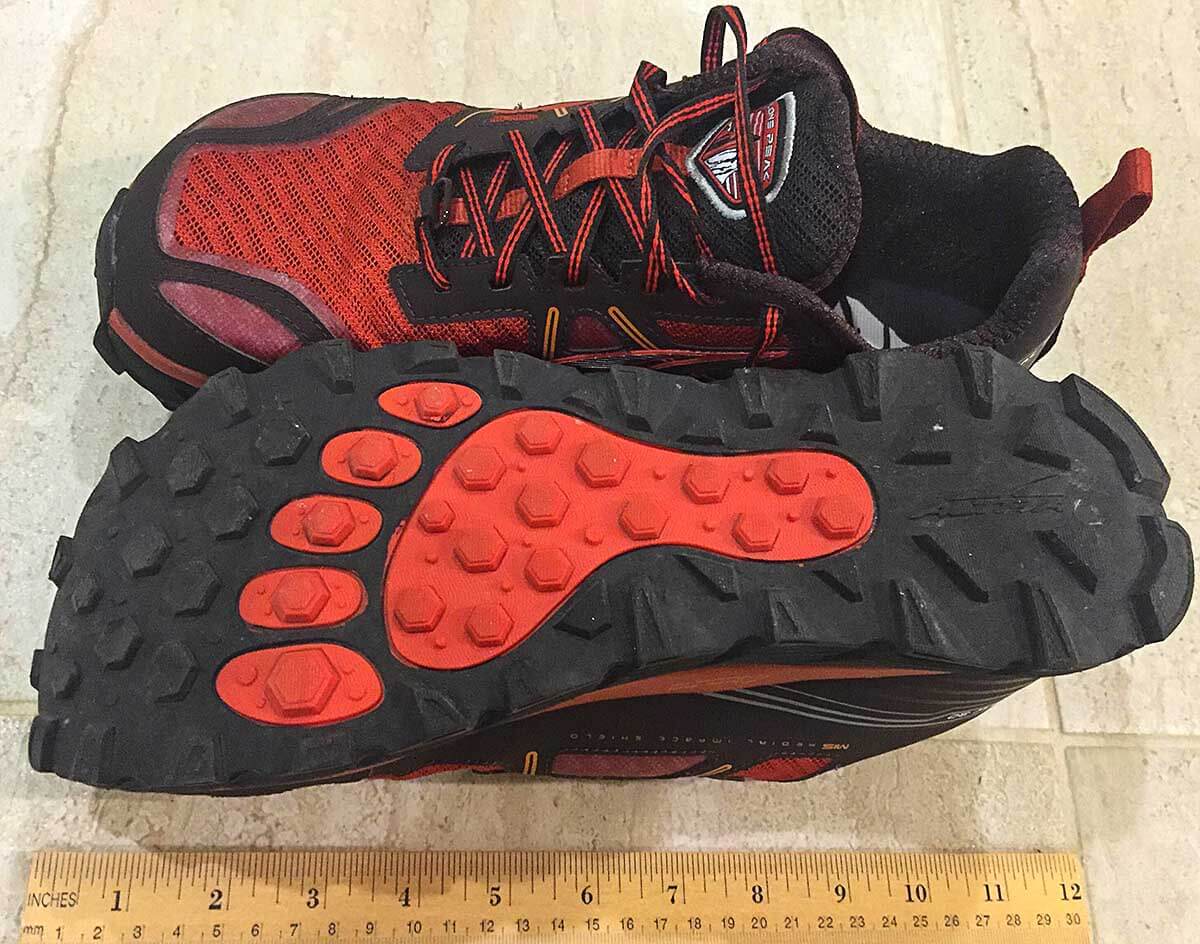
A shoe tread picture for a Trip Plan Document. My Altra Lone Peak 3.0 trail running shoes.
This best lightweight backpacking electronics gear is supremely functional, but is also light, low-cost, practical, and durable. It is the gear I take backpacking. This post has many Tips on How to Effectively Use this Gear.
This is part 1 of a 3 part series
- On Trail – Best Lightweight Backpacking Electronics Gear (this article)
- Best SOS/Tracking/Satellite Communication devices and their use
- Off Trail – Best Lightweight Electronics for before/after your trip—town, hotel, airports, plane etc.
and options for a light “Mobile Office” as well as electronics for International Trips (coming soon)
See section below for a quick summary of Travel Electronics For Use in Hotels and Airports Etc.
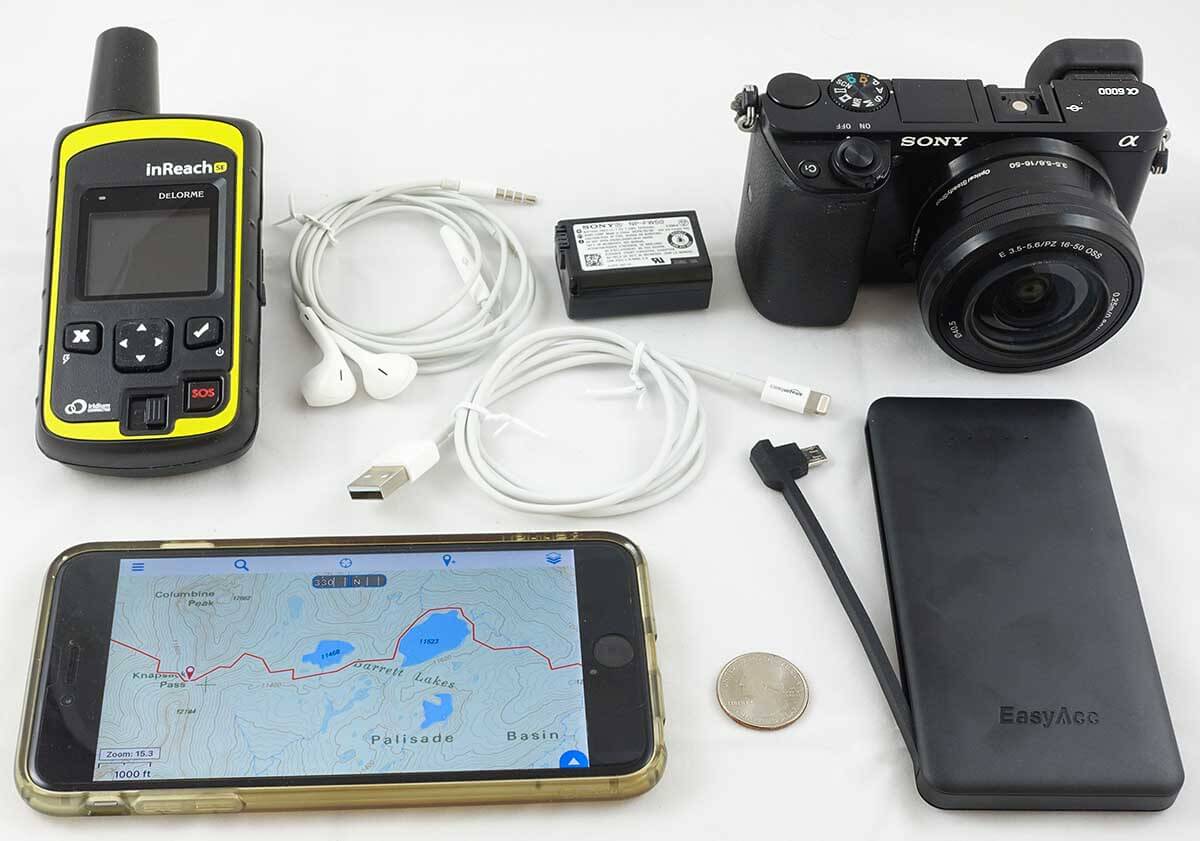
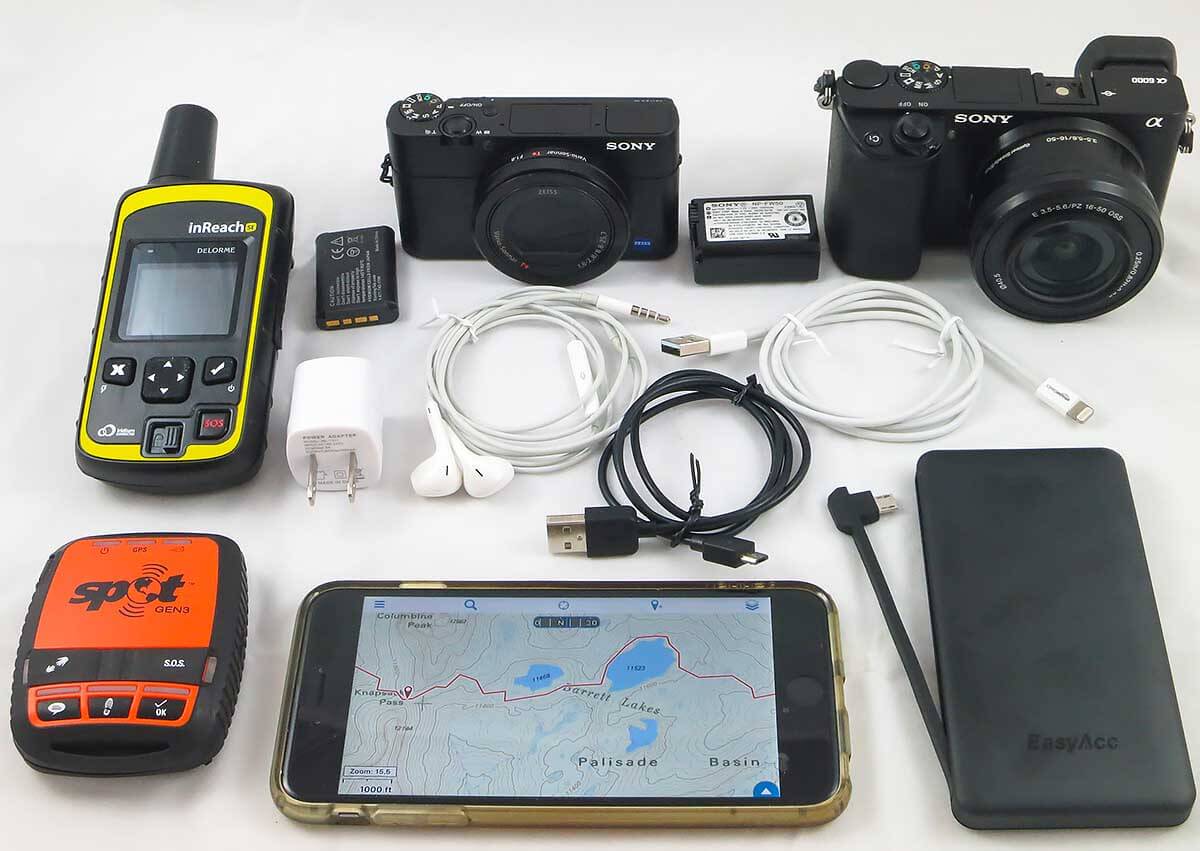
This is the gear that I take backpacking. Clockwise from bottom left: iPhone 6 Plus with light protective case, DeLorme inReach SE, Apple headphones, Amazon Lightning cable, *Sony a6000 camera with spare battery, and backup USB Battery.
*Note: I cover cameras like the Sony a6000/a6300 in a my post, Best Lightweight Backpacking Cameras.
On Trail – Best Lightweight Backpacking Electronics Gear
Here is a summary of the key components of the best lightweight backpacking electronics gear list. A detailed table with all the components and weights is further down in this article.
- $0* Smartphone – 7 oz with case (*cost is zero since I already own a smartphone)
A large screen smartphone is the premiere, lightweight, multi-functional device. It’s easily the best mapping GPS and navigational tool. A large screen smartphone (iPhone 6 Plus or Samsung Galaxy s6/s7) running an app like Gaia GPS is superior to conventional GPS units in almost every way. I get around 7 days normal trail use out of my iPhone 6 Plus before recharging. See: How to use your Smartphone as the Best Backpacking GPS.
As a multi-functional tool, my iPhone has electronic maps (more functionality & covering far more area than paper ones), electronic trail guides, waypoints & mileage tables, field guides for birds and plants (e.g. Sibley Birds). It’s also a decent camera and video recorder, trail note journal, e-book reader, audio book and music player for relaxing and getting to sleep at night. - ~$20 USB battery – 5 to 6.5 oz (see below for options)
Forget solar chargers, take a high-capacity USB battery to recharge your electronics mid-trip. (Note: For most trips of one week or less, a USB battery is lighter, less expensive and less fuss and bother than a solar panel.) - (optional) $150-$280 +service, SOS/tracking device – 5 to 7 oz
Take a SOS/tracking device like a 6.9 oz DeLorme inReach or the 4.8 oz SPOT Satellite GPS Messenger. (I use inReach on most trips.) I will discuss SOS/tracking devices and their use in more detail in a future article.
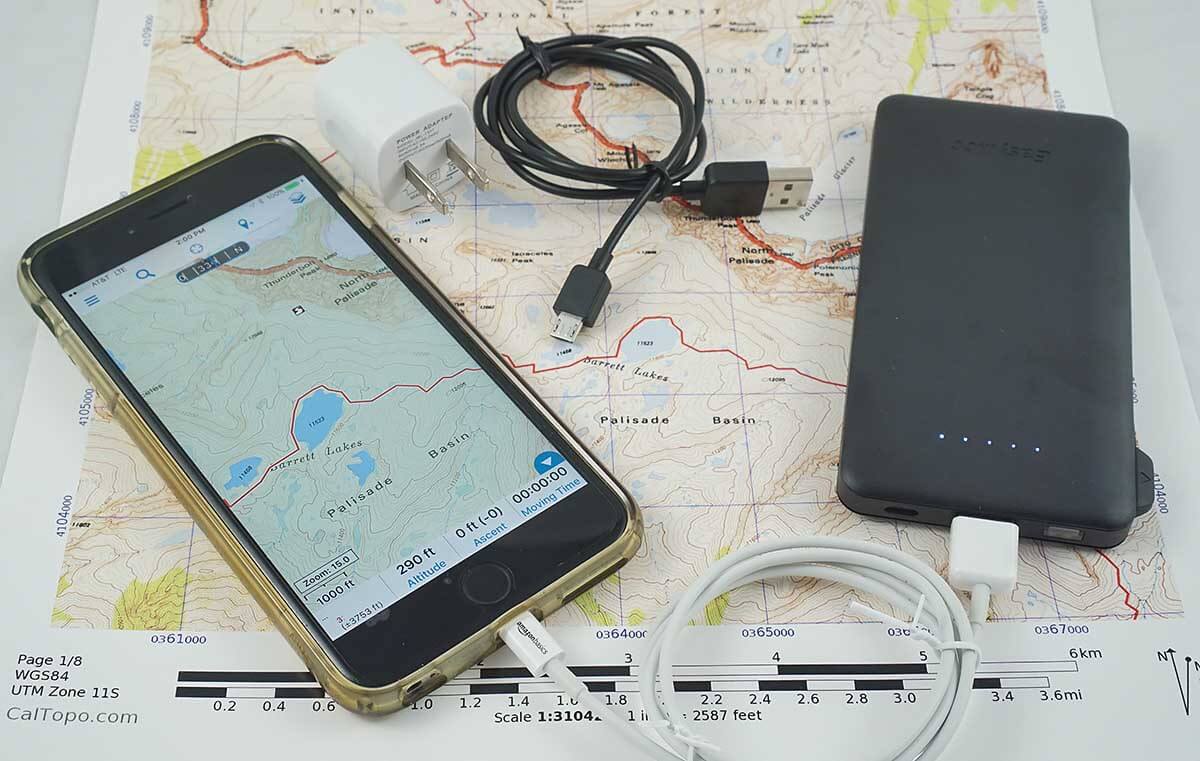
Yes, a Smartphone is the best backpacking GPS out there! Pictured is the iPhone version of backpacking electronics. The USB battery on the right will recharge the iPhone 6 Plus two times. (The wall charger and micro-USB cable [top center] are only needed if you’ll have access to electricity mid-trip)
Always Bring a Backup Battery!
|
 It’s critical safety precaution to make sure your electronics are always available for use. My three favorite lightweight and high capacity USB backup batteries are:
Gear List Table – Best Lightweight Backpacking Electronics
Note: all blue text in the table below is a link to more detail for the item.
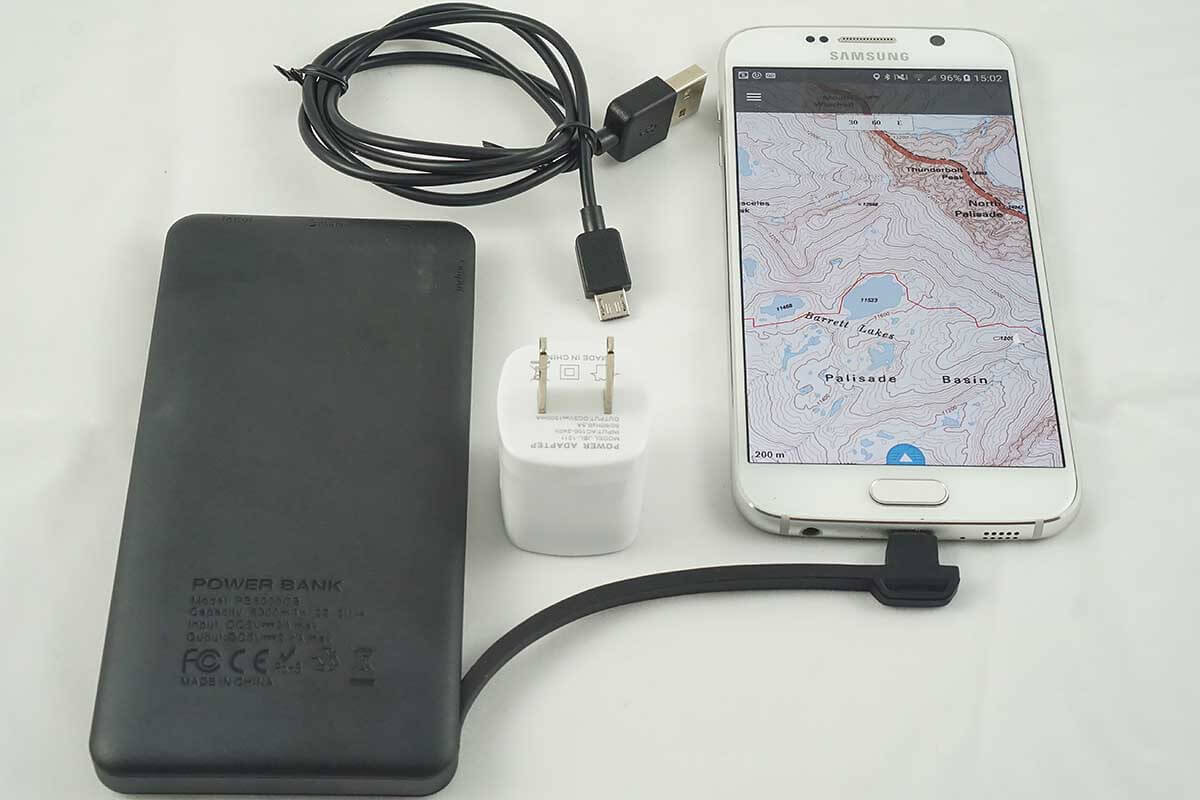
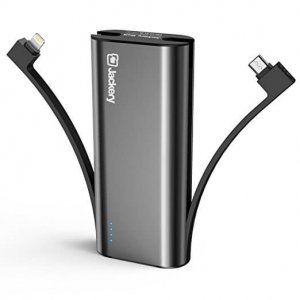
The Samsung Galaxy s6/s7 version of backpacking electronics. The USB battery on the left will recharge a Galaxy s6/s7 two times. For most trips, all you need is the battery and your Galaxy Phone—no extra cables needed! (The wall charger and micro-USB cable [top center] are needed when you’ll have electricity mid-trip.)
Tips for Selecting a Battery
Quick Review: If you take an iPhone 6, or iPhone 6 Plus and replicate the gear in my kit including the USB backp battery, you should get around 7 days of on-trail use. This assumes “smart use” of the gear, i.e. use it but don’t over-use it. See article on iPhone battery conservation.
- How long can your electronics go without charging? Pre-trip, you’ll need to do a bit of testing to see how long each one of your backpacking electronics will last with your normal use on trail. E.g I know I get about 6-10 days normal use from my iPhone 6 Plus. That’s daily “smart use” of the GPS, reading electronic maps and trip info/guides, etc. along with some listening to Audiobooks at night. See article on battery conservation for using an iPhone on-trail.
- Find out how many mAh it takes to charge each of your devices—Smartphone, inReach, Kindle, etc. E.g. an iPhone 6s Plus or Samsung s6 takes approx. 2,750 mAh (milli-Amp-hours), a Delorme inReach 2,450 mAh, and a Kindle Paperwhite 1,420 mAh.
- Select a proper capacity (mAh) battery. Using the information from 1 and 2 above, calculate how much mAh of battery capacity you’ll need for your trip. For example, the EasyAcc USB Battery (5,500 mAh, tested capacity) will charge an iPhone 6s about three times, an iPhone 6s Plus or Samsung Galaxy s6 about twice, and a DeLorme inReach about twice. For me, it has enough capacity to keep my entire lightweight backpacking electronics gear going for about a week. (My iPhone 6 Plus might/or might not need a partial charge, and my inReach may need a full charge mid-trip if I run it in tracking mode while I hike. That will still leave me some battery to spare.)
- See “Always Bring a Backup Battery!” box (above) for some specific battery recommendations.
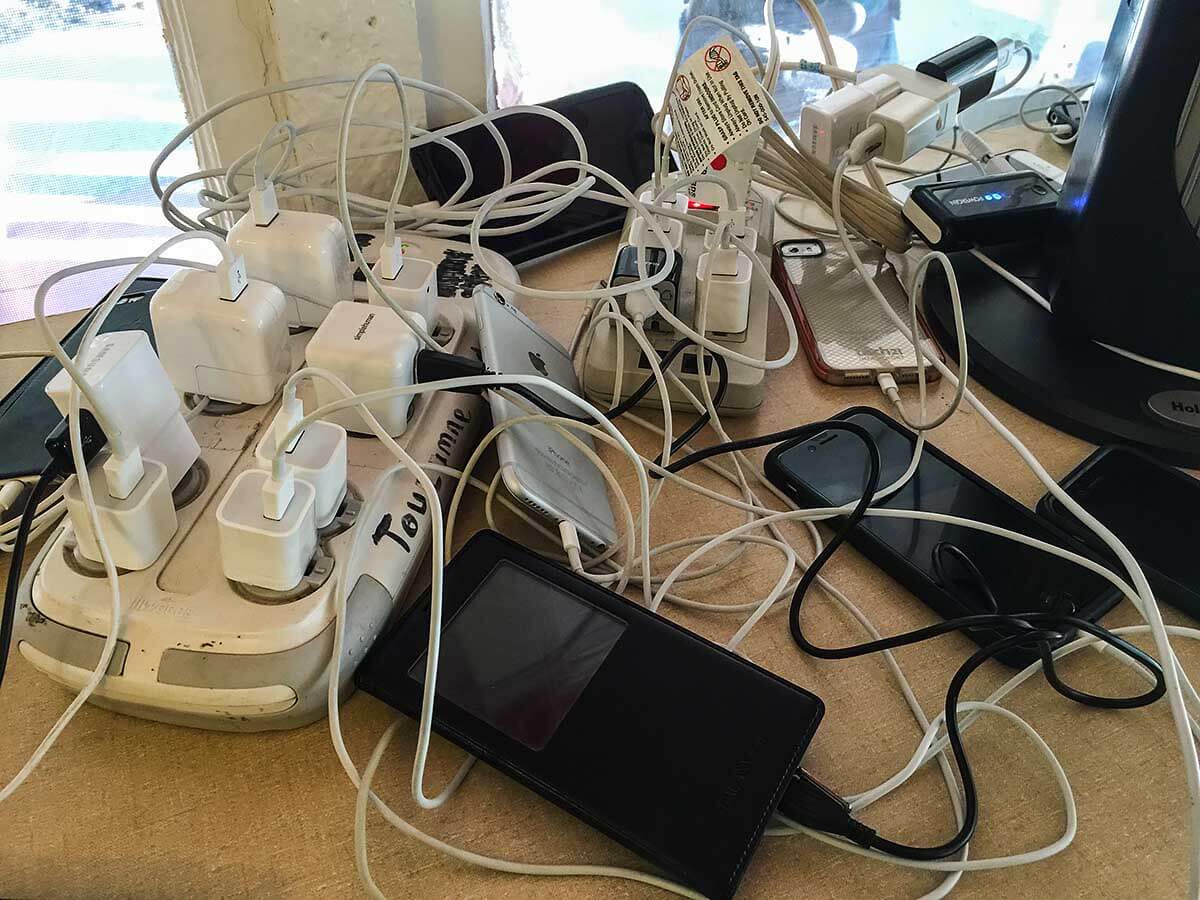
Recharging opportunity for the Pacific Crest and John Muir trails at Tuolumne Meadows, Yosemite: Want to see just how many people actually take electronics in the backcountry? Check out any recharging station along a major trail. Clustered around every available outlet will be a rats nest of tangled wires, phones, USB batteries, and cameras. Next to that will be a bunch of trail-gritty backpackers eating ice cream and drinking coffee, beer or cokes waiting for their electronics to charge.
Tips for Selecting Cabling and Wall Chargers
- Figure out your cabling needs
No apple products – you may get by with just the micro-USB cable already attached to the many USB batteries. (Note: a longer, 3ft u-USB cable may be more convenient. e.g. you can use your electronics more easily while they charge.)
Yes Apple products – you’ll need a USB to Lightning cable like this AmazonBasics Lightning Cable. - If you will have opportunity to recharge mid-trip, you’ll need a USB wall charger and a cable to connect to battery/electronics. For most USB batteries you’ll need a micro-USB cable to recharge it (either the usually short one provided with it, or preferably a more useful 3ft u-USB cable).
- If recharging opportunities are frequent (e.g. hut to hut trips), you may be able to get by with a smaller capacity battery. With frequent enough access to electricity a Generic 1.5 USB wall charger and cable will recharge your electronics.
Why is this the Best Lightweight Backpacking Electronics Gear?
Large Screen Smartphone
- For starters, a Smartphone running GAIA GPS just works. It’s better and less expensive than traditional backpacking GPS units like a Garmin.
- My friends and I have taken iPhones (as a mapping GPS) on numerous pack-rafting trips in Alaska, winter rafting down the Grand Canyon, technical Canyoneering in Utah, climbing in the Wind Rivers and the Sierras, long hikes in the U.S.A, Turkey, Australia, Europe, and a canoe trip down the length of the Mighty Mississippi River. In almost every way a smartphone running GAIA GPS is superior to traditional mapping GPS units such as the Garmin.
- iPhones can operate 7 to 10 days of “normal trail use” before needing a recharge.
- As a multi-functional tool, a smartphone also has electronic maps, electronic trail guides, waypoints & mileage tables, field guides for birds and plants (e.g. Sibley Birds). It’s also a decent camera and video recorder, trail note journal, e-book reader, audio book and music player for relaxing and getting to sleep at night.
- Finally, a large screen Smartphone like the iPhone 6 Plus or Samsung Galaxy s6/s7 are more useful than smaller screens. You can see a lot more of your GPS map, guide book pages, etc., making it easier to use and far more practical than a smaller phone screens or smaller tradtional GPS unit screens like a Garmin.
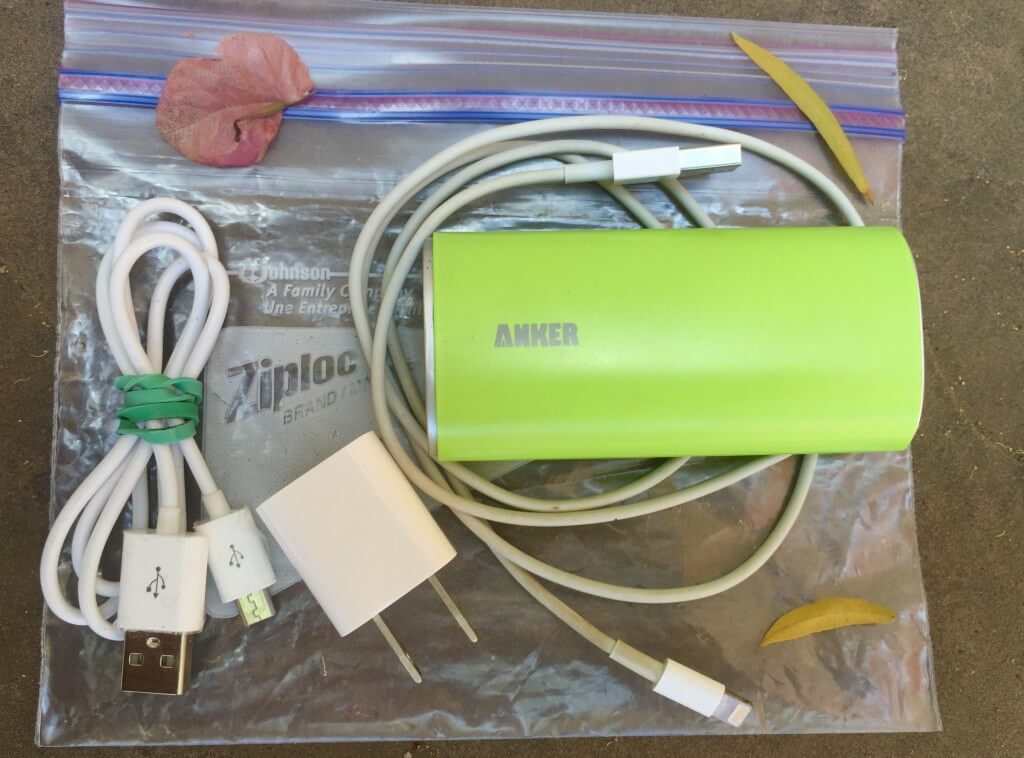
A LIGHT CHARGING KIT: Pictured from left to right: micro-USB cable for both charging micro-USB devices and your USB backup battery; 1 amp Apple USB wall charger; Apple Lightning cable, a lime green USB Backup battery (not a current model tho), and underneath a Pint Ziplock Freezer Bag to stow everything.
SOS/Tracking Devices and Sat Phones
Satellite Com Devices: For most trips, the DeLorme inReach is easily the best value. From left to right: Iridium 9555 SatPhone, DeLorme inReach, Iridium GO! and lower right SPOT Gen3. All of these devices have 2-way com with the exception of the SPOT.
Let me preface this by saying that in the last 5 years I used 2-way Satellite Com devices to:
- Initiate an urgent and immediate evacuation (less than 2 hours) via helicopter for a life-threatening medical situation. I was in satellite communication with park personnel to assess the situation, and provide first responder care. During the course of our communications, the Park made the decision for the medical evacuation via helicopter.
- Receive medical instruction on how to lance a horribly abscessed tooth via the gum with a pocket knife (from an Emergency Medicine Doctor and a Dentist)
So my personal take on this issue is that stuff can and will happen. I cannot begin to predict what will happen, where it will happen, or to whom it will happen. Who would expect that a healthy trip member would start having a heart attack or a horribly abscessed tooth in the middle of a 10 day trip? What I do know is that my carrying one of these devices potentially saved at least one life and one tooth and as such, I will continue to carry one.
I realize tracking devices and sat phones can be a contentious topic. As such, I am not suggesting to know what is best for others. I leave it up to each backpacker to make their own decisions.
See also: “Best SOS, Tracking, and Emergency Communications Devices for Backpacking“
Travel Electronics For Use in Hotels and Airports Etc.
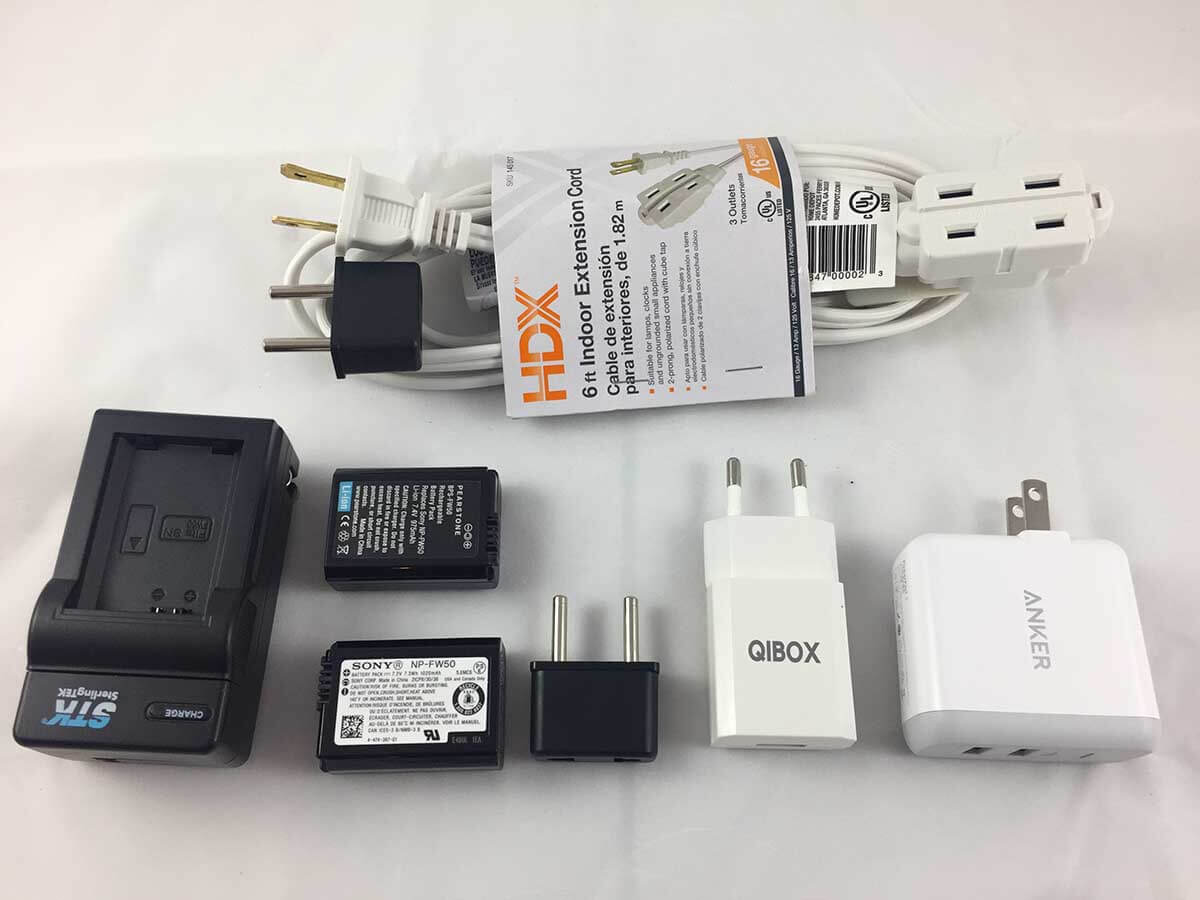
Key items are a $2 extension cord that when combined with a cheap 2-prog travel adapter (Ceptics USA to Europe Asia Plug Adapter) gives you 3 US style outlets. I find that the Anker 2 port (2.4 amp each) charger is fast and dependable. And in truth, the QIBOX charger is not as good as a 2 amp US charger with the cheap 2 prong travel adapter. [On the far left is batter charger for my Sony a6000 camera and two camera batteries.]