A SuperStove combines a pressure regulated, wind resistant, high BTU burner with a heat exchanger pot for max efficiency in wind and cold.
You’re researching which are the best freeze dried meals for backpacking, and we’ve got recommendations! There have been lots of new brands and dietary options popping up in the freeze dried sector over the past decade, and this buyer’s guide highlights a few of our favorites.
There is no exact answer to this question. In my “The Best Backpacking Food – simple and nutritious”, I threw out the best guess of 1.5 lb of food per day. But how but much food you need depends on who you are and what you do.
You make Adventure Alan & Co possible. When purchasing through links on our site, we may earn an affiliate commission at no additional cost to you. Here’s why you can trust us.
1.5 Pounds per Day | “Regular” Hiking Food
In the last 15 years of backpacking I personally seem to have settled on around 1.5 pounds per day of food give or take a bit. And again, I believe this is a good target for most hikers and it has worked well for most of my backpacking clients. This is for warm season backpacking with up to 12 miles per day (possibly more) with some off-trail travel. If I am going for killer trips, like 10-12 solid hours of hiking per day it will be more like 1.8 pounds of food per day.
Over the years I have lowered my hiking pace, but hike longer and take fewer breaks. I find that a slower hiking pace of 2.5 miles per hour (average including stops) is much more efficient calorie-wise than hiking at a faster pace. Most accomplished long distance thru-hikers I have talked to use a similar approach. Also, I find the slower pace beats up my body less and I get up the next morning fresh and ready to hike another day.
1.2 Pounds per Day | “Low Carb” Hiking Food
In the past 5 years I’ve had good success with 1.2 lb of Low Carb Hiking food = 3,000 calories. That’s almost 1/2 the weight of the 2 lb per day most hikers carry. Nonetheless, it’s plenty nutritious and since it’s around 150 calories/oz it provides the same calories. Go ahead and checkout our Low Carb Hiking Food List | 3 Day.
2022 | Keto Hiking Food, 1 lb/day: I in the last 3 years I have gone to keto hiking food. I’ve successfully used it on all my trips for up to 3 weeks, even when guiding north of the Arctic Circle in Alaska. My Keto Food averages out to around 1 pound per day for 3,000 calories. (But you need to be bonafide keto adapted before using this on the the trail. This means you likely need to have been following a consistent keto diet at home for at least a few months. And you need to be testing at home that you actually are in ketosis).
Estimating How Much Food You Need
In an example below, in order to not lose weight, a 160 pound male hiking 10 miles a day, with a 3,000 elevation gain, would need around 4,000 calories per day, or 2.0 pounds of food per day (assuming a caloric density of 125 calories per ounce). This is a very rough estimate, and should not be taken too seriously. You will need to do some experimenting to determine you own caloric needs for on the trail.
From this it is clear that 1.5 pounds of food per day (a figure often used by ultralight hikers) does not work for all situations, and for all people. Although that 1.5 lb of food per day will likely work well for many people on a short trip (e.g. a 3-day-weekend — where they not doing long miles and long hours of hiking per day. And for most of us, if you end up metabolizing/burning off a pound of fat on a trip, it’s all for the better [since backpacking is one of the supreme fat burning activities]!
But just because you can get by on 1.5 lb of food per day, doesn’t mean that it’s the best way to eat in all situations. Obviously serious thru hikers need more like 5,000+ calories per day to maintain their body weight. And even if you aren’t grinding thru hiking miles — if you are a fit person, hiking decent miles per day, and don’t want to lose weight, you’ll likely need more than 1.5 lbs of food per day.
Factors to consider for how much food you pack
- How much do you weigh?
- Does your metabolism run high or low?
- How far will you hike each day?
- How fast will you hike?
- For how many days?
- How much elevation gain?
- At what altitude?
- At what temperatures?
- How difficult is the terrain?
- What type of shape are you in?
- What are you used to eating?
- How much excess body fat do you have?
- Do you want to lose weight? Etc., etc.I
An (over) simplified example of food need calculations. An estimate! (see Note 1):
- A 160 lb person has a base metabolism of approx. 2,200 cal/day
- 10 miles hiking with a 30 lb backpack at 120 cal/mi, is another 1,200 calories.
- Assume 3,000 elevation gain is another 600 calories.
- Total caloric expenditure: 4,000 cal/day
- 1.5 pounds of food at 125 cal/oz = 3,000 calories. (see Note 2)
- Caloric deficit = 1,000 cal/per day. Or around 1/3 lb of hiker per day (this is fat metabolized/burned)
Under this very simplified estimate, our 160 pound hiker runs a 1,000 calorie per day deficit. They would lose about 1/3 lb per day or around 2 lb per week. If our hiker was a bit overweight and didn’t mind being hungry this might be OK or even desirable. But it’s probable that they would feel better and hike faster if they weren’t running a caloric deficit.
For someone near their ideal weight, running a 1,000 calorie a day deficit might not be a good idea. It might be OK for a few days, but not for long outings. It’s not that you can’t do it if you have to. I’ve hiked 3 days without food.
- Is it good for your health?
- Will you feel great and enjoy your outing?
- Will you hike your fastest?
- Will your body have the nutrition to recover after a hard day of hiking?
- Will you be more injury prone?
- Will you be alert and make safe decisions?
- What will your moods be like around others?
The answers and decisions to these questions and what you do is quite is personal. There are not right answers or decisions. But it makes sense to think about these a bit so you come up with the best food plan for you.
Note 1: I realize that this is a this very simplified estimate. Base metabolism, hiking efficiency, etc. are variable. The best approach is to do some on or off trail testing and see what caloric intake works best for you. Note that you may be able to get by on a low calorie intake but your athletic performance may go down as well. I know that I can eat 2,200 calories a day and ride my bike 175-200 miles per week. I also know that if I do this, I feel terrible, I loose around 2 lb per week, I can be cross with those around me, and my overall riding speed drops 1-2 mph. At around 3,200-3,500 calories a day I feel great, don’t gain weight, and can train at high intensity.
Note 2: I believe that most of us will end up averaging around 125-130 cal/oz even when packing high fat items like chocolate and peanut butter, etc. as part of our food. Low carb hiking food can be up to 150 cal/oz is doable for many people.
Note 3: Keto Hiking food can be as high as 170+ cal/oz. But this is a specialized diet. You need to be bonafide keto adapted before using this on the the trail. This means you likely need to have been following a serious keto diet at home for at least a few months. And you need to be testing that you actually are in ketosis using a Blood testing meter (Keto Mojo is the best and what I use) or Breath meter (Amazon) although I use the KEYTO Breath Meter
Disclaimer
- To be very clear, I am not a Medical Doctor or a Nutritionist. What I share here is from my personal experience as a backpacker for over 50 years, professional backpacking guide, outdoor writer and an elite athlete. As such, this post should in no way be considered professional medical or nutritional advice. When in doubt, consult with the correct board-certified professional.
We’ve completely overhauled our Backpacking Food to the latest research and thinking on the best hiking food & nutrition. So whatever your diet, low carb, keto, omnivore, vegetarian, & vegan we give you the latest knowledge available to create a healthy and nutritious trail diet that will put a spring in your step.
Our Low Carb Backpacking Food List is nutritious & has all calories of traditional backpacking food but it’s healthier & 1/2 the weight!
Our Keto Backpacking Food List is nutritious & has all calories of traditional backpacking food but it’s KETO & 1/2 the weight!
Our camp coffee is delicious! Try our pour over coffee method to make your next backpacking coffee and be pleasantly surprised!
Based on extensive field and lab testing, I believe that the Trail Designs Kojin Ultralight Alcohol Stove is the best alcohol stove system for ultralight backpacking (when paired with a Caldera or TriTi Cone). The new Kojin stove is incredibly fuel efficient and easy to use but best of all it boils water fast! And that’s rare for an alcohol stove. As such, the Kojin stove has earned its place in my pack as “most favored stove.”
Test setup (lead pic): TD Kojin Stove, with Toaks 1350 ml Ultralight Titanium Pot and TD Ti-Tri titanium cone.
You make Adventure Alan & Co possible. When purchasing through links on our site, we may earn an affiliate commission at no additional cost to you. Here’s why you can trust us.
Highlights of Trail Designs Kojin Ultralight Alcohol Stove
- Fast boil times. Just over 5 minutes to boil a pint! And that’s ripping fast for an alcohol stove.
(Faster than the previous stove I used, the Standard Zelph Stove1.) - Fuel efficient. Uses less than ½ fluid oz (13.8) ml to boil a pint.
[Many (most?) alcohol stoves use approximately twice that amount of fuel, especially when windy.] - No wasted fuel waiting for stove to burn out. No need for precise fuel measurement and waiting for the stove to burn out. Just pour an ounce of fuel in. When the pot boils, snuff the stove out and cap it. Unused fuel is saved and ready for your next cooking session.
- Safe. Fuel will not spill out of stove. (fiber filler material captures alcohol fuel). Great for safety. You really don’t want to spill alcohol fuel.
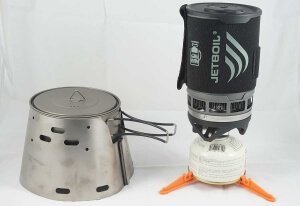
What are the Advantages of an Alcohol Backpacking Stove?Note: If alcohol stoves aren’t your thing, this is an equal opportunity website. So check out my post Best Backpacking Stove System | Trail Designs Caldera vs. JetBoil. Then you can decide which stove is best for you. And yes, the JetBoil is a great fuel-efficient stove system too! Just a canister one. |
Quick Specs Kojin Stove
Link on Trail Design’s Website: https://www.traildesigns.com/products/kojin-stove
- Weight: 16g, 0.56 oz
- Material: Aluminum body with proprietary fibrous filler
- Dimensions: 62mm diameter x 22mm thick, 2.4 in x 0.87 in
- Fuel Capacity: 40 ml, ~1.3 fluid ounces
- Fuel efficiency*: ~14 to 15 ml to boil a pint at 70°F/20°C at sea level
- Time to Boil 16 oz*: ~5.5 to 6 minutes – with wide bottom pots of 0.9 to 1.3 liters
- Operating temp: I’ve used the stove to 12°F (-11°C). Stove lit right up & boiled water without difficulty
* when paired with a Trail Designs Caldera or TriTi Cone.
Note: While the Kojin is primarily for use with the Caldera/Ti-Tri systems, it can also be used in conjunction with your own pot stand and wind screen.
The Details – Kojin Ultralight Alcohol Stove
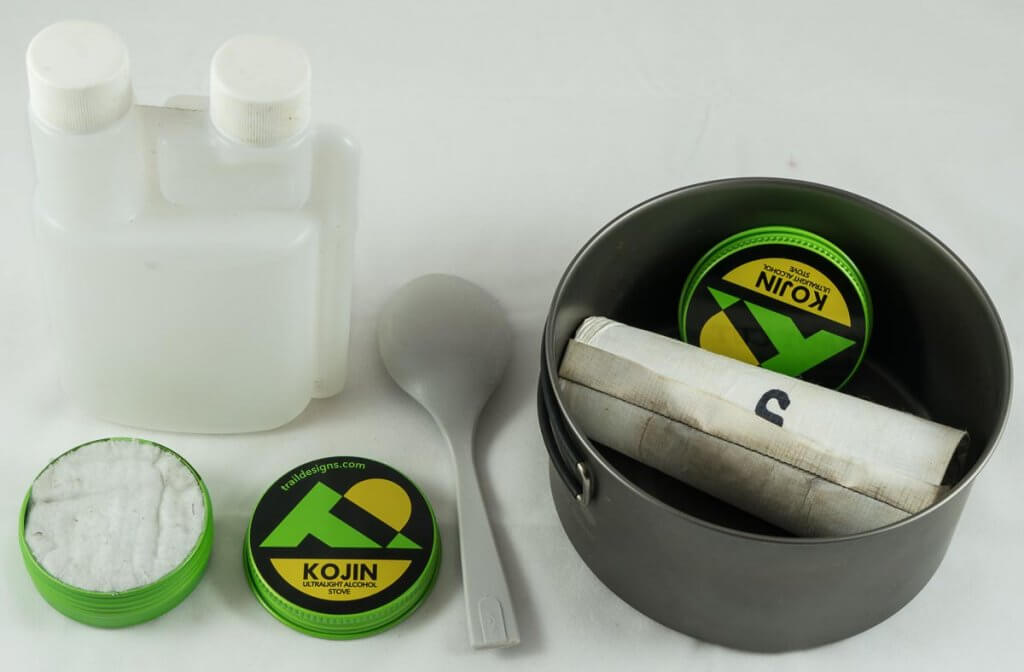
Starting bottom right and moving left: The Kojin Stove easily fits into the Toaks 900 Pot, with room for a TD Ti-Tri titanium cone, spoon, lighter and matches. On the left is the Kojin stove showing its white, fibrous filler material and screw on cap that seals the stove. Finally (upper left) is a twin reservoir fuel bottle that makes measuring alcohol fuel a breeze. Best fuel bottle on the market!
Trail Designs Kojin Ultralight Alcohol Stove is composed of an aluminum screw top “pill case” style housing. Inside is a proprietary, white fibrous filler that acts both as a wick and as a fuel stabilizer to prevent spills. You can turn the stove on its side and the fuel won’t drain out. It is designed by Trial Designs to be used inside their Caldera or TriTi Cone systems. [See lead picture for an example of a TriTi Cone system.]
Note: pour fuel slowly into the stove’s fiber compound. If you pour too fast some of fuel may run over the side before it completely absorbs in to the fiber compound. I find that the stove is most easily filled using the Liberty Mountain Twin Neck Fuel Bottle (see right). With a squeeze the bottle easily measures out 1/4 or 1/2 oz of fuel. And a flip top spout on the reservoir side is great for precise pours. I find that its 8+ oz capacity works for a 7-day trip (at least for me). A testament to the stove’s efficiency.
After that put the stove in the cone and carefully light it with a match or lighter [some light the stove an then put the cone over it]. When your water boils take your pot off the cone and blow the stove out (it isn’t hard). Then you can gently place the cap loosely on the stove being careful not to touch the hot stove [but don’t screw it down]. This prevents heated fuel from rapidly evaporating.
After the stove has cooled sufficiently to safely handle! (~ 5 minutes) you can screw the cap down to seal the stove and save the fuel for your next cooking session.
Which Pot Works Best?
While the Kojin Stove will work with many pots and stoves, I find it works optimally with wide bottom pots of 0.9 to 1.3 liters. E.g. Evernew and Toaks 900 and Toaks 1300 pots (the Toaks Pots are a particularly good value). With these pots you get fuel efficiency of 15 ml fuel to boil a pint or better! And the fast burn rate of the stove, and wide heat transfer are of the pot bottom gives you fast boil times. You can buy these pots at Trail Designs or Amazon.
Compared To?
All of the stoves below are similar in weight (15 to 17g) and work well with the TD Caldera or TriTi Cone system. They are discussed below from left to right:
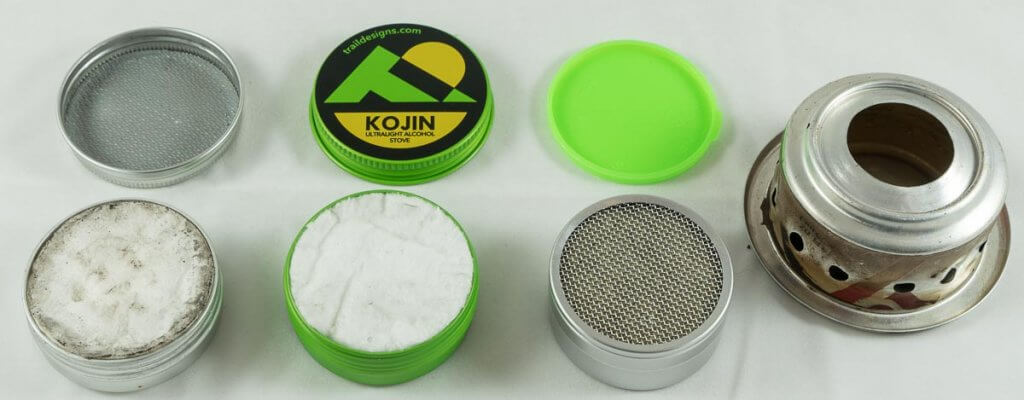
- On the left is my well used May 2017 prototype stove. After a ton of use it still works great. The cap shows the grey sealing material.
- Next is the production Kojin Ultralight Alcohol Stove. Mostly cosmetic changes, altho the finish on the production version makes the cap easier to screw on and off. I find this stove excellent for solo use. But it’s also my stove of choice for my wife and I to share where we use it with a Toaks 900 or Toaks 1300 pot.
- 1 Then the Standard Zelph Stove with the steel mesh covering its proprietary filler compound. The Zelph is a good stove with similar fuel saving properties. But a smaller surface area and the steel mesh slow the Zelph’s heat output for slower burn times. And I find the plastic sealing cap (green) tends to loosen up over time and not seal as tightly.
- Finally the Classic Trail Designs 12-10 Stove. Still a great stove and it boils a bit faster than the Kojin (but it’s close). It also holds more fuel so it’s better if you boiling a lot of water/cooking for multiple people. Downsides are: 1) the stove won’t easily fit in a pot with a sidewinder cone like the Kojin and Zelph stoves. 2) you can’t save fuel—you have to let the stove burn out after it boils. And 3) you have to use stakes, inserted into sidewinder cones to raise the pot up in the cone for optimal operation. So in my opinion, the Kojin is a far better stove than the the Classic 12-10.
What could be Better
- The filler material doesn’t absorb fuel quickly as you pour it in. If you pour too fast some will run over the sides. Having a slight lip on the stove above the filler material would fix this. [Right now the filler material is flush with the top of the stove]. Workaround, for now, is to use a flip spout cap on your fuel bottle. This will give you the control necessary to easily fill the stove. Again, the Liberty Mountain Twin Neck Fuel Bottle is the best for this purpose.
- I could wish for a bit more capacity than 40 ml. My biggest problem is over filling the stove after 3 to 4 uses. At that point I don’t really know how much remaining fuel is in the stove, and I can over fill if I don’t watch carefully. Even 50 ml capacity would be a help. Again the work around is to pour carefully from the spout of the Liberty Mountain Twin Neck Fuel Bottle.
Conclusion
Since the first prototypes in May 2017, I’ve been field (and lab) testing the new TD Kojin Ultralight Alcohol Stove. After many weeks of use in the field, the stove has performed almost flawlessly. This included using it down to near single digit temperatures at 11,000 feet in the Sierras. The Kojin stove lit right up in the morning with no issues and quickly boiled my water. Because of this, the Kojin stove now goes on every trip with me — whether I am traveling solo or with my wife.
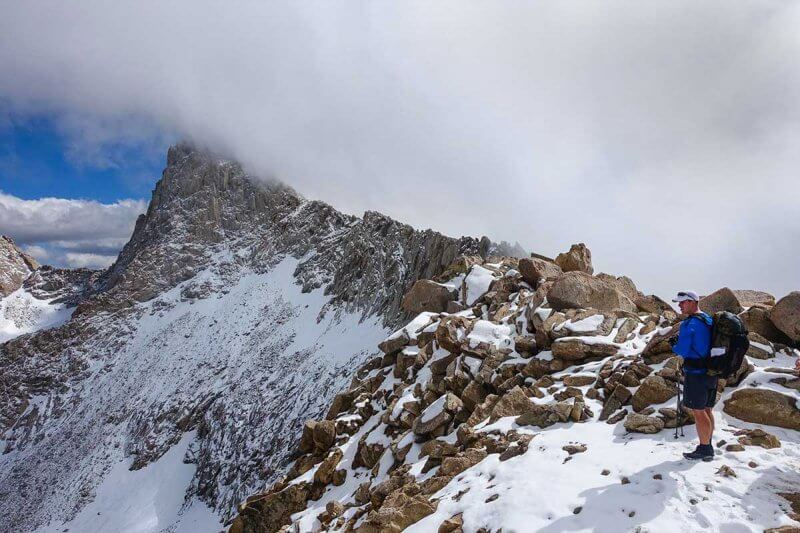
I used the Kojin stove in near single digit temperatures at 11,000 feet in the Sierras. The stove lit right up in the morning with no issues and quickly boiled my water.
Further Reading
- Best Backpacking Stove System| Trail Designs Caldera vs. JetBoil
The best alcohol stove system, Trail Designs Caldera, and the best canister stove system, JetBoil. What makes both these systems “best” is that the stove, pot and windscreen/heat exchanger are an integrated unit, thoughtfully engineered for… - 9 Pound Full Comfort Lightweight Backpacking Gear List
A 9 pound pack is all you need to be safe and warm. So, if you want to lower your pack weight but retain all the convenience and comfort of “traditional” backpacking, look no further than this Lightweight Backpacking Gear Checklist.
Drink When Thirsty debunks the many myths about hydration and dehydration like “If you are thirsty, it’s already too late” and “If your urine is yellow, you are dehydrated.” This article suggests that Drink When Thirsty is the best and healthiest strategy for hydration during exercise.
| It turns out that your body’s natural, thirst mechanism (700 million years old) works well to keep you hydrated and healthy during exercise. In fact, the amount of water your body requires is probably far less than what the Sports Drink and Bottled Water companies have been telling us. |
People may be drinking too much water…
With all the hype about the risks of dehydration, it is actually over hydration (hyponatremia) that may be more of a risk. People are now having serious health problems from over hydration for endurance races and even hiking in the Grand Canyon—sometimes resulting in death1,2,3. [Note: Since I first published this post it has been shared by numerous Emergency Medical Treatment and Search and Rescue organizations for this very reason.]
Learn more about choosing between our favorite backcountry filters – Sawyer Squeeze vs Katadyn BeFree vs Platypus Quickdraw and hiking water bottles.
You make Adventure Alan & Co possible. When purchasing through links on our site, we may earn an affiliate commission at no additional cost to you. Here’s why you can trust us.
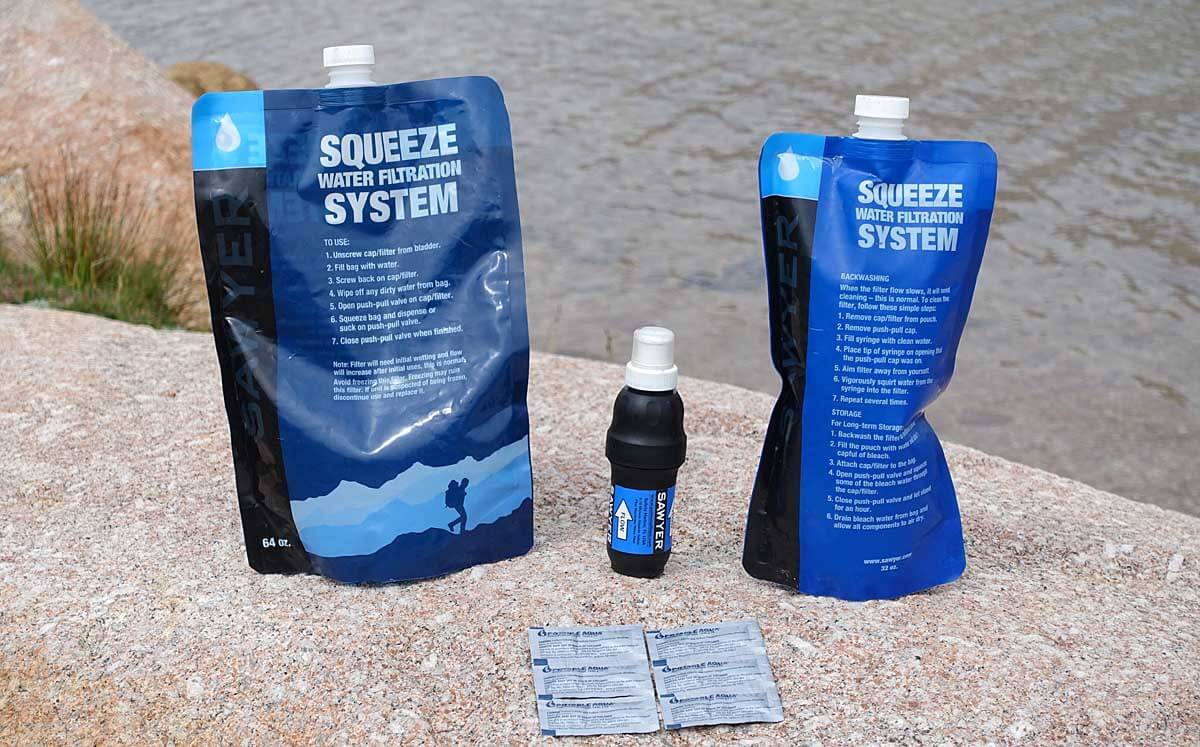
Best Hydration and Purification System – It’s NOT Complicated!
The simple, inexpensive Hydration and Purification System that Alison and use is shown above. When “drinking to thirst,” it has kept us well hydrated — even between distant water sources in the desert.
Excerpted from my 9 Pound – Full Comfort – Lightweight Backpacking Gear List:
- Sawyer Squeeze Filter: We can drink immediately at water sources. This means both quick, effective hydration and less water to carry when we hike.
- Water Treatment Tablets: For fast, efficient water purification in camp. We can treat 3 or more liters of water in less than a minute. And it’s ready to drink 20-30 minutes later.
Drink When Thirsty – Myths and Facts about Hydration
I recently interviewed three world experts in the field of sports hydration (not affiliated with Sports Drink and Bottled Water companies)
- Dr. Marty Hoffman, MD, founding member of the Foundation for Medicine & Science in Ultra-Endurance Sports, a member of the Wilderness Medical Society, and professor at the University of California Davis
- Dr Tamara , D.P.M., Ph.D., Associate Professor of Exercise Science, Oakland University, Rochester, MI
- Dr. Kristin Stuempfle Ph.D, Professor, Health Sciences, Gettysburg College
This is what I learned from these experts…
Myth1 – If you are thirsty, it’s already too late
Correct – Drink When Thirsty
- All the experts in sports hydration I talked with adamantly agreed that Drink When Thirsty is the best and healthiest strategy for hydration during exercise*.
- As Dr. Hoffman’s puts it: “Drink When Thirsty works for prolonged exercise. Our bodies have a fine tuned feedback system that lets us know when to drink…there is no real danger of dehydration when people have access to water. Thirst kicks in, and people drink.”
- This agrees with the recommendation from the Statement of the Third International Exercise-Associated Hyponatremia Consensus Development Conference, 20154 to Drink When Thirsty; “Using the innate thirst mechanism to guide fluid consumption is a strategy that should limit drinking in excess and developing hyponatremia [over-hydration with significant health consequences] while providing sufficient fluid to prevent excessive dehydration.”
- Excessive drinking when you are not thirsty increases the risk of hyponatremia, arguably a greater risk than dehydration.
*Dr. Tamara Hew-Butler says the natural thirst mechanism has been working in animals and keeping them well-hydrated for at least 700 million years. See more from Dr. Hew on how the human thirst mechanism works.
So why have we been told to drink, drink, drink?
Why do we continue to hear sayings like, “hydrate or die,” “if you are thirsty, it’s already too late,” and stating that “your athletic performance will drop if you don’t drink enough“?
Deborah Cohen, investigations editor for the BMJ [formerly British Medical Journal], wrote up her findings in the 2012 feature article, “The truth about sports drinks5“. This article implies that the sports drinks industry has dramatically increased sales of their products by:
- Creating a “disease of dehydration”
- Stating that the natural thirst mechanism is inadequate to keep athletes hydrated. [Cohen implies that the evidence for this view is lacking.]
- And that this “lack of evidence” is in part due to the close financial and other affiliations between the sports drink companies and the scientists/researchers and supporting institutions that produce the research to support this view.
- Cohen’s article gives examples of studies supporting the sport drink companies claims, that when reviewed by an independent panel of experts, are not deemed robust enough to support those claims.
Here are some excerpts from the article
“Sports drinks are increasingly regarded as an essential adjunct for anyone doing exercise, but the evidence for this view is lacking. Deborah Cohen investigates the links between the sports drinks industry [e.g. Powerade (Coca-Cola) and Gatoraide (PepsiCo)] and academia that have helped market the science of hydration.”
‘“The problem was industry wanted to sell more products so it had to say that thirst was not adequate,” Noakes [Professor Tim Noakes, Discovery health chair of exercise and sports science at Cape Town University] says.’
| ‘Disease mongering is a well documented phenomenon in healthcare6 and Noakes suggests that industry has followed a similar pattern with dehydration and exercise.
“When industry wanted to sell more product it had to develop a new disease that would encourage people to overdrink,” he said adding: “Here’s a disease that you will get if you run. Here’s a product that is going to save your life. That’s exactly what they did. They said dehydration is a dreaded disease of exercise.”’ |
Debunking Other Hydration Myths
The following debunks:
- You need to drink a liter per hour
- Dehydration is a big problem
- If your urine is yellow you are dehydrated
- Dehydration causes cramping
And finally it address the Big Question, “How much water should I drink/carry on a hike?”
Myth2 – You need to drink a liter per hour
Correct – Drink When Thirsty
- Again, Drink When Thirsty is the best strategy.
- Dr. Kristin Stuempfle says that studies7 show that the human body can only process a maximum of 0.8 liters (27 oz) to 1 liter (34 oz) of water at rest. That is not what your body needs—just the maximum amount of water it can process if needed—an important distinction.
- That maximum amount of water processed will go down during exercise. According to Dr. Stuempfle our body’s natural response to exercise is to shunt blood from the kidneys and the GI (stomach and intestines) and put it toward motor (leg) muscles, heart, and skin (cooling). In addition, during exercise the body secrets a natural antidiuretic hormone (ADH) to slow urine output. All these combine to reduce your body’s ability to process water.
- So if you drink more water than you need during exercise (i.e. not drinking to thirst) then your body is receiving more fluids but has less capacity to handle them. Thus the risk of overhydration, and possibly hyponatremia.
In cooler environments where water is plentiful you may not need to carry any water with you. Drink from the source, and you will likely not be thirsty when you reach your next water source.
Myth 4 – Dehydration is a big problem
Correct – Mild dehydration is not a cause for serious concern
- It will not significantly impair performance or health
- Dr Hoffman told me: “Even a mild hydration deficit of 2-3 liters is OK (provided you were adequately hydrated at the start of your hike). You may not be happy about it, but it’s not a serious problem.“
- Dr Hoffman also told me: “Top ultra runners are still performing well late in the race [100 miles] with a few percent bodyweight loss. They could not perform as well as they do, if percent bodyweight loss and mild dehydration was a big impediment to race performance8,9.”
Myth 5 – If your urine is yellow you are dehydrated
Correct- Urine naturally turns yellow during exercise, even when adequately hydrated
- Dr Hoffman says that: “Trying to keep urine clear during exercise will cause over hydration.” There was complete agreement among all the researchers on this point.
- Additionally Dr Hoffman said: “[during exercise] urine color is not useful, and should not be used, as an indicator of hydration status…During exercise, because of hormonal influences to retain fluid and blood flow being shunted away from the kidney, urine production should be diminished, so urine color will darken.”
- And from Cohen’s article5: “The science of dehydration has led to another widely held belief that is not based on robust evidence—that the colour of urine is a good guide to hydration levels.” And also from Cohen’s article5: “There is a lack evidence for the widely recommended practice of assessing hydration status by looking at the colour of urine,” it suggests.
Myth 6 – Dehydration causes cramping
Correct – Cramping well understood but not likely from dehydration or electrolyte levels
- All the researchers I spoke with agreed that cramping is complex, not well understood and likely has multiple causes.
- They also agree that dehydration and electrolyte depletion are not likely the main causes.
- Dr. Hoffman not only noted that cramping appears to be neuromuscular, but that dehydration or electrolyte depletion does not cause cramping. Dr. Hoffman said this finding has been known for a number of years. In fact, cramping has more to do with neuromuscular nerve misfiring—nerves sending a false signal to muscles to contract and stay contracted, as indicated in research10 by Martin P Schwellnus, UCT/MRC, Research Unit for Exercise, Science and Sports Medicine, Department of Human Biology, Faculty of Health Sciences, University of Cape Town, South Africa.
- From the New York Times Article A Long-Running Mystery, the Common Cramp by By GINA KOLATAFEB. 14, 2008:
- “DR. SCHWELLNUS proposes that the real cause of cramping is an imbalance between nerve signals that excite a muscle and those that inhibit its contractions. And that imbalance, he said, occurs when a muscle is growing fatigued.”
- “There’s the dehydration proposal: you just need more fluid. But, Dr. Schwellnus said, he studied athletes who cramped and found that they were no more dehydrated before or after a race than those who did not have cramps.”
How much water should I Drink/Carry on a hike?
This is the big challenge for backpackers, day-hikers or others that need to carry enough water between distant sources. Unlike Dr. Hoffman’s “There is no real danger of dehydration when people have access to water,” there is a possibility that if we don’t carry enough water between distant sources that we could run out of water and potentially become dehydrated. On the other hand, if we are hiking a long distance between water sources and and decide to carry 5 liters of water we are carrying an additional 11 pounds. This too has serious downsides.
So the big question for hikers and backpckers is
How do you estimate the “right” amount of water to carry between distant sources? |
The goal is homeostasis, or to drink the same amount of water as your body uses. But how do we estimate our personal water consumption needs for homeostasis in the field? There is likely no “right or exact” answer to this. Dr. Stuempfle and Dr. Tamara Hew-Butler agree that the following would be a reasonable strategy for individuals to estimate their personal water consumption in the field:
- On test day-hikes (or a weekend backpacking trip), Drink When Thirsty and record the amount of water your drink per hour. Try to do this close to the same level of exertion, and temperature and humidity that you will expect on your backpacking trips (or long day hikes).
- Use this consumption rate per hour as a starting point for estimating the amount of water you’ll need to carry between distant sources in the field for your longer and more serious trips.
- It is best to be conservative (carry a bit more water) until you have tested out and fine tuned your personal water consumption rate over at lest a few longer trips in the field.
- Obviously if it is hotter, more humid, you are working harder, or your pack is heavier, you may need more water per hour. But, if it is cooler, less humid, or you are not working as hard, you may need less water per hour.
On a personal note, when following Drink When Thirsty I frequently do not carry any water with me in the field (Sierras, Appalachian Trail, etc.). When I drink (using aSawyer Squeeze Filter so I can drink directly at the source), I find that I am unlikely to be thirsty until I reach the next water source. My wife seems to run a bit thirster, and in addition to drinking at water sources, she usually carries somewhere between ½ to ¾ of a liter between sources.
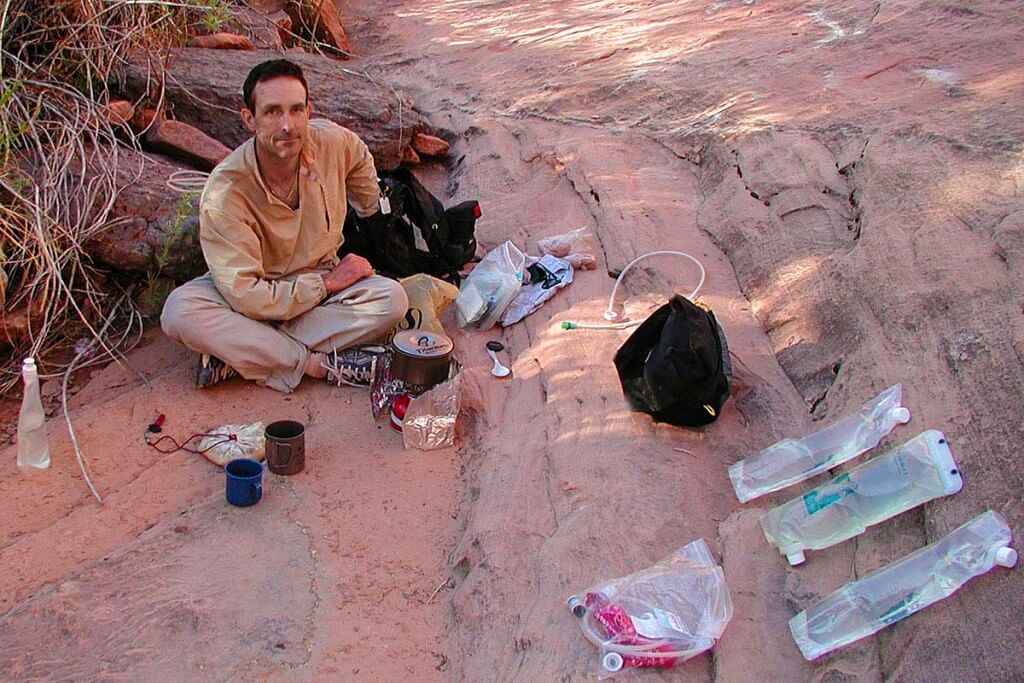
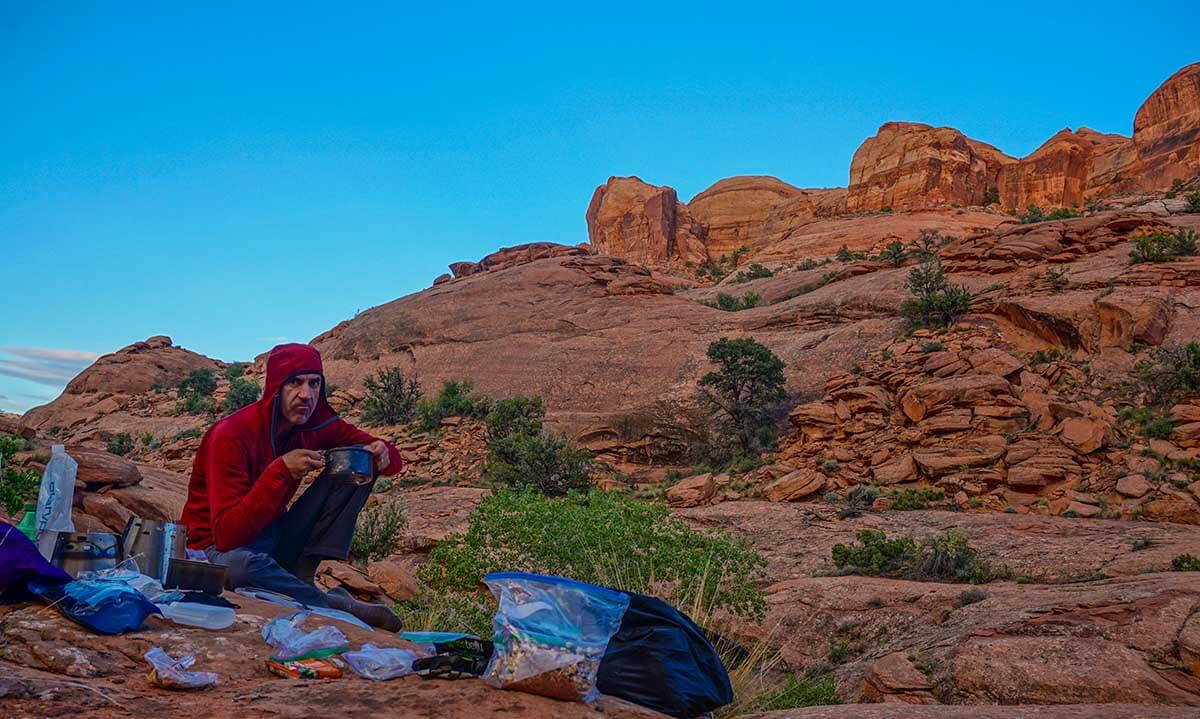
Although I rarely carry water with me, the desert is the exception. This picture is from a drought year in the Southern Utah desert. So an unusually dry time in an already hot and dry place. I have collected a lot of water: for dinner that evening, breakfast the next morning & to carry during the day to our next reliable water source.
The only place we carry large amounts of water between sources is in the Desert Southwest, like Canyoneering in Utah. But even then, following Drink When Thirsty, we carry less water than the “recommended” amounts in guide books and other “authoritative” sources. We pull long days in the desert and feel healthy and fine. But we have years of field experience and comfortably know our personal water needs in the desert.
How the natural thirst mechanism works
Dr Tamara Hew-Butler, who has studied the natural thirst mechanism in animals, says it’s been working to keep them well-hydrated for at least 700 million years. The human thirst mechanism functions in two ways:
- Brain sensing electrolyte levels11: Your brain has real-time osmosensors that monitor sodium concentrations (more specifically, the amount of osmoles, for which sodium makes up the greatest amount) circulating in the blood. When sodium levels start to rise above normal, your body has a two stage response. The first response, is to slow urine output and therefore water loss (this occurs before thirst is triggered). If sodium levels continue to rise, your thirst mechanism kicks in and you become thirsty. It is important to note that you are NOT dehydrated at this point. All this happens before dehydration becomes an issue. This is your body’s normal mechanism to keep you from getting dehydrated. Dr. Hoffman and Dr. Hew-Butler both point out that as long as folks have access to water, their thirst will cause them to drink and not become dehydrated.
- Your heart (actually the main valves) senses blood volume (water): Your heart valves have barorreceptors that can detect a reduction in blood volume (water in the body). This also has a two stage response just the same as the brain’s osmosensor responses. Stage 1 happens at an 8-10% blood volume depletion and triggers an anti-diuretic hormone release which slows urine output and therefore water loss. You are not thirsty at this point. If blood volume continues to decrease, your thirst mechanism kicks and you get thirsty. Again note: that you are NOT dehydrated at this point. All this happens before dehydration become an issue. This is your body’s normal mechanism to keep you from getting dehydrated.
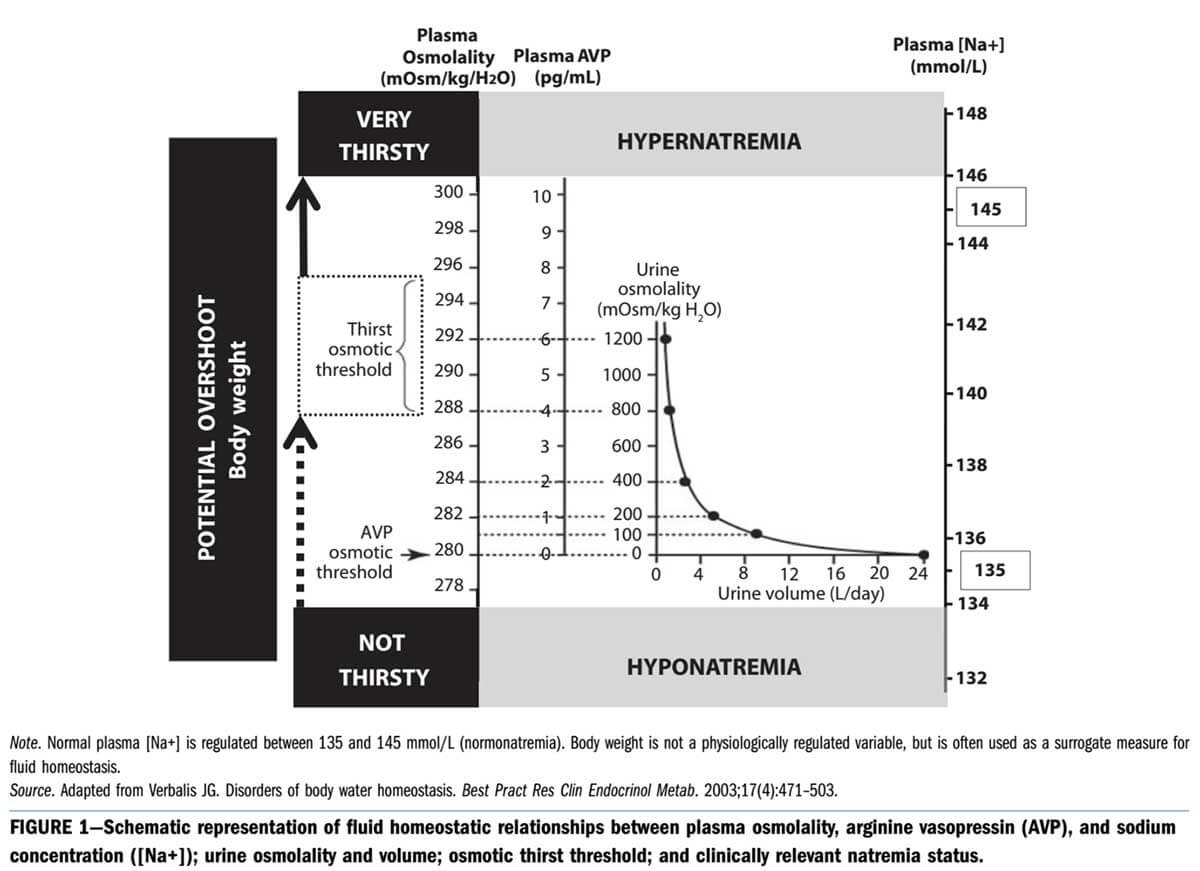
Figure source: 11 – INADEQUATE HYDRATION OR NORMAL BODY FLUID HOMEOSTASIS? – Tamara Hew-Butler, PhD, LETTERS, American Journal of Public Health, October 2015, Vol 105, No. 10, page e6
Summary
Drink When Thirsty, it’s been keeping hominoids well hydrated for millions of years.
References
1 Three Cases of Severe Hyponatremia During a River Run in Grand Canyon National Park – Emily A. Pearce, BS, et al., WILDERNESS & ENVIRONMENTAL MEDICINE, 26, 189–195 (2015)
2 Hiker Fatality From Severe Hyponatremia in Grand Canyon National Park – Thomas M. Myers, MD, et al., WILDERNESS & ENVIRONMENTAL MEDICINE, (2015)
3 Exercise-associated hyponatremia with exertional rhabdomyolysis: importance of proper treatment – Martin D. Hoffman1, et al., Clinical Nephrology, DOI 10.5414/CN108233
4 Statement of the Third International Exercise-Associated Hyponatremia Consensus Development Conference, Carlsbad, California, 2015 – Hew-Butler, Tamara DPM, PhD, et al., Clinical Journal of Sport Medicine: July 2015 – Volume 25 – Issue 4 – p 303–320, doi: 10.1097/JSM.0000000000000221
5 The truth about sports drinks – Deborah Cohen investigations editor, BMJ 2012;345:e4737 doi: 10.1136/bmj.e4737 (Published 18 July 2012)
6 Moynihan R, Heath I, Henry D. Selling sickness: the pharmaceutical industry and disease mongering. BMJ 2002;324:886.
7 Peak rates of diuresis in healthy humans during oral fluid overload – Noakes TD, et al., 2001 Oct;91(10):852-7. PMID:11732457
8 Race Diet of Finishers and Non-Finishers in a 100 Mile (161 km) Mountain Footrace – Kristin J. Stuempfle, PhD, Martin D. Hoffman, MD, Journal of the American College of Nutrition, Vol. 30, No. 6, 529–535 (2011) page 529
9 Association of Gastrointestinal Distress in Ultramarathoners With Race Diet – Kristin J. Stuempfle, Martin D. Hoffman, and Tamara Hew-Butler, International Journal of Sport Nutrition and Exercise Metabolism, 2013, 23, 103 -109
10 Cause of Exercise Associated Muscle Cramps (EAMC) — altered neuromuscular control, dehydration or electrolyte depletion? M P Schwellnus, British Journal of Sports Medicine 2009 43: 401-408 originally published online November 3, 2008 doi: 10.1136/bjsm.2008.050401
11 INADEQUATE HYDRATION OR NORMAL BODY FLUID HOMEOSTASIS? – Tamara Hew-Butler, PhD, LETTERS, American Journal of Public Health, October 2015, Vol 105, No. 10, page e5
These tasty and nutritious backpacking meal recipes are healthier, have more calories and cost less than commercial, freeze dried backpacking meals. Keep it simple — there are enough nutritious backpacking meal recipes here to provide sufficient daily variety to keep meals fun and interesting. But there aren’t so many recipes that I spend too much time buying ingredients and assembling a large inventory of gourmet meals. I’d rather spend my time hiking than fussing with food.
Note: This is a companion piece to my top rated post, Best Backpacking Food – simple and nutritious – veggie and omnivore friendly which has more detailed info on nutrition and backpacking food choices.
Photo: Author eating dinner in the Alaska Range – credit: Andrew Skurka
You make Adventure Alan & Co possible. When purchasing through links on our site, we may earn an affiliate commission at no additional cost to you. Here’s why you can trust us.
| Quick Links to Recipes | ||
|---|---|---|
| Link to Breakfast Recipes | Link to Dinner Recipes | Link to Desserts/Hot Drinks |
Meal Rotation Planner — Nutritious Backpacking Meal Recipes
Keep it simple — I rotate 2 to 3 meal options for each trip. This provides enough food variety on the trail. By limiting meals to 2 to 3 nutritious backpacking meal recipes, I simplify food purchasing and meal prep.
| Backpacking Meal Planner – example of a 3-day rotation | |||
|---|---|---|---|
| Day | Breakfast | Lunch | Dinner |
| 1 | None: eat large one off-trail | #1 Wrap+cheese & mustard (fruit #1) | #1 Rice+beans w chips+cheese |
| 2 | #1 Muesli | #2 Bison+sesame stix (dried fruit #2) | #2 Couscous curry |
| 3 | #2 Hot oatmeal/cream-o-wheat | #3 Crackers+almond butter (fruit #3) | #3 Chili mac |
| 4 | #3 Grape-Nuts + strawberries | #1 Wrap+cheese & mustard (fruit #1) | #1 Rice+beans w chips+cheese |
| 5 | #1 Muesli | #2 Bison+sesame stix (dried fruit #2) | #2 Couscous curry |
| 6 | #4 Quick breakfast meal bar | #3 Crackers+almond butter (fruit #3) | None: eat large one off-trail |
If you don’t already have one get an inexpensive kitchen scale that weighs up to 11 pounds (5 Kg). Almost all the ingredients are measured by weight for these recipes.
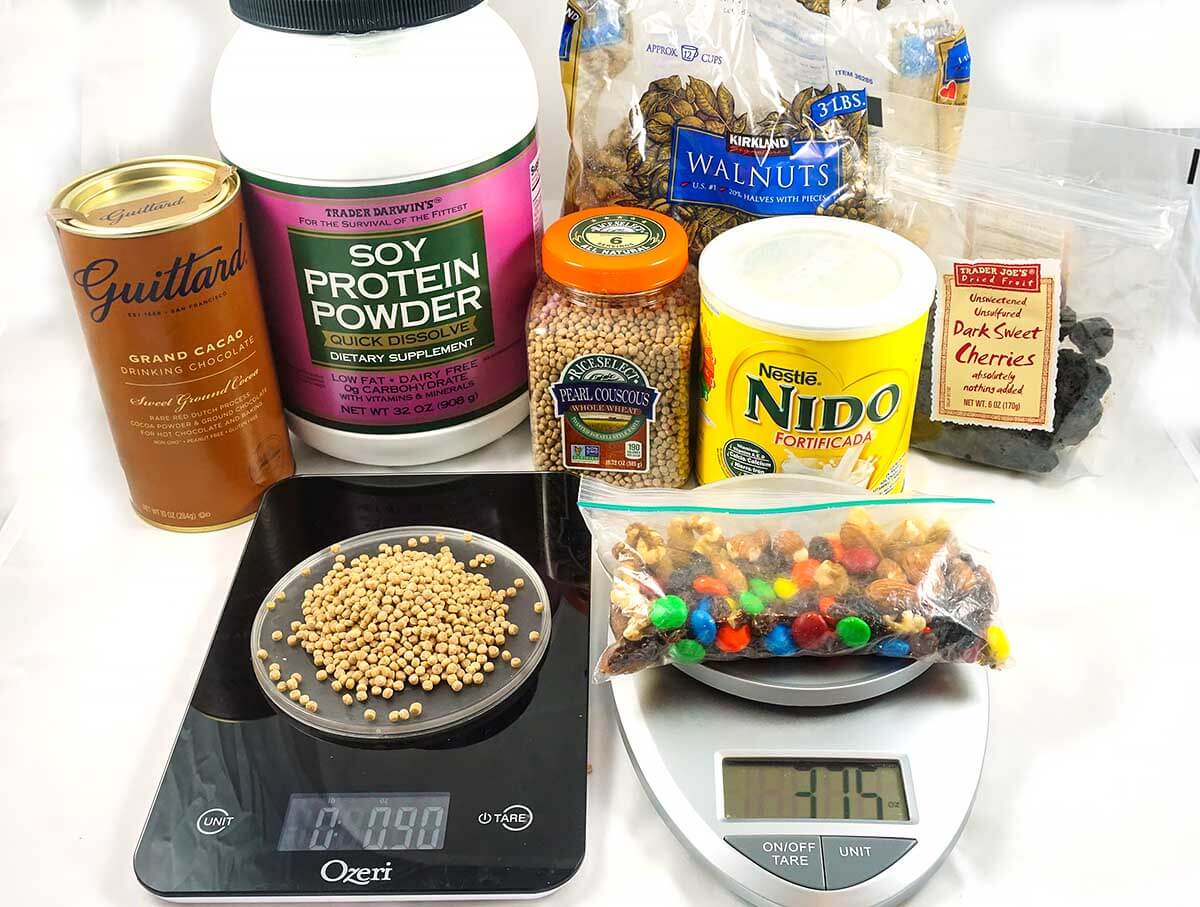
If you don’t already have one get an inexpensive kitchen scale that weighs up to 11 pounds (5 Kg). Almost all the ingredients are measured by weight for these recipes.
Breakfast Recipes
The following are nutritious and filling breakfasts that should keep a spring in your step until lunch! They have healthy fats and a good amount of protein. Note that the table below is in scrollable window. Please scroll down to see all the recipes Or you can see ALL THE RECIPES full page here, as a Google Sheet
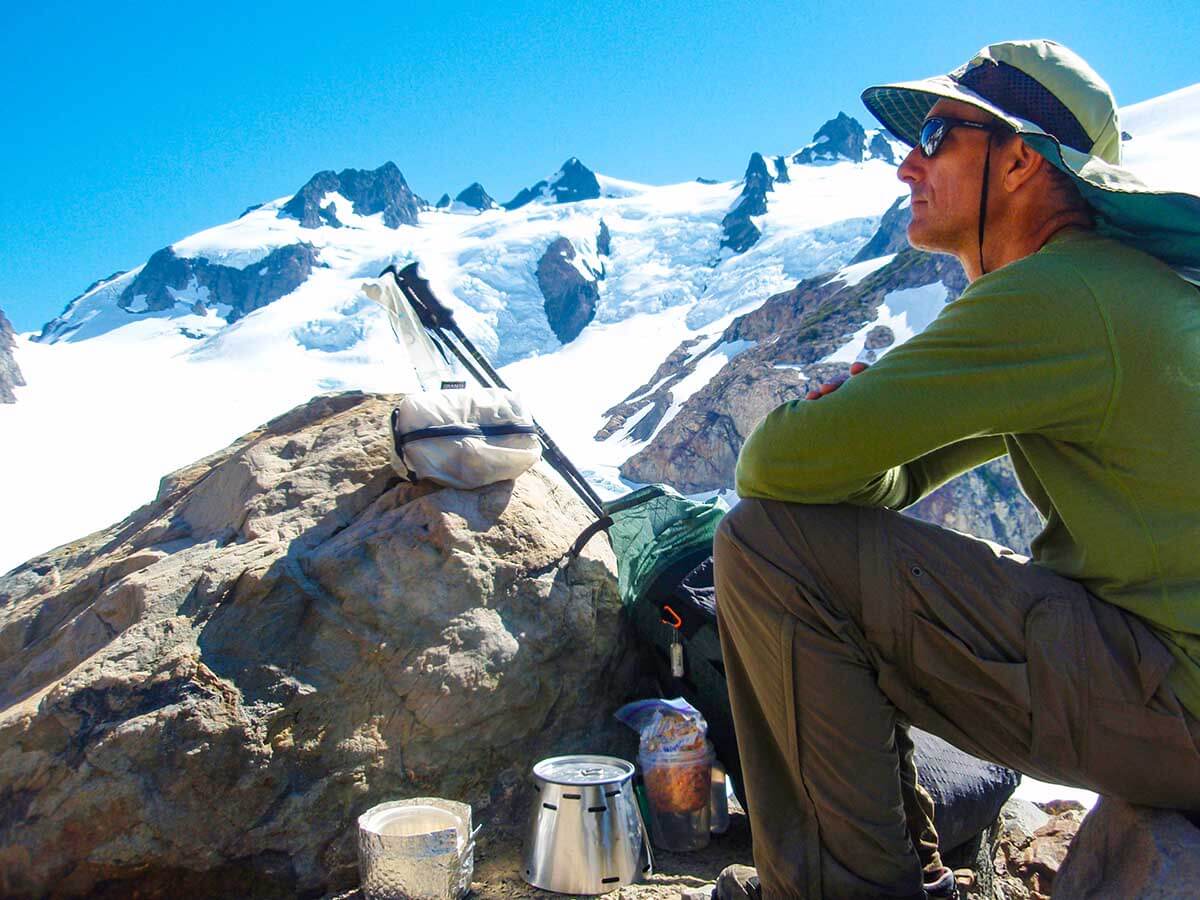
Dinner mid-way up Mt. Olympus, Olympic Peninsula, Washington State.
Dinner Recipes
The following are nutritious backpacking dinner recipes. These are filling meals at around 700-800 calories per serving! They have healthy fats and a good amount of protein. Note that the table below is in scrollable window. Please scroll down to see all the recipes Or you can see ALL THE DINNER RECIPES on a full page here, as a Google Sheet
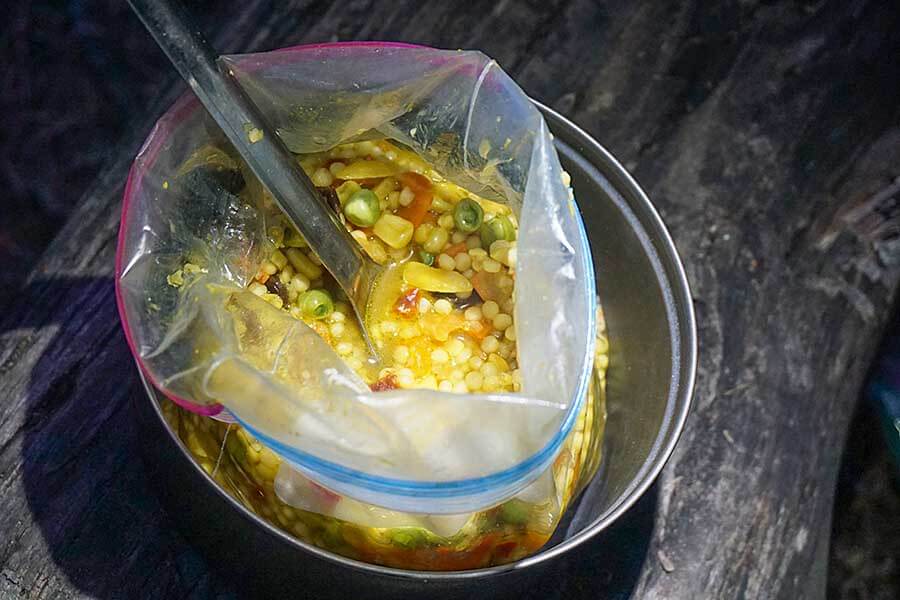
Rehydrating in a Ziplock bag makes cleanup much easier. Especially nice in “dry” camps. You usually use less fuel as you kill your stove as soon as the water boils. Downside is that the meal does not rehydrate as well as when it’s cooked in the pot, and rehydration can take longer. A long handled spoon pictured here helps reach into deep baggies without getting your fingers covered in food.
Dessert and Hot Drink Recipes
The following are just few ideas for desserts and after dinner drinks. Note that the table below is in scrollable window. Please scroll down to see all the recipes Or you can see ALL THE DINNER RECIPES full page here, as a Google Sheet
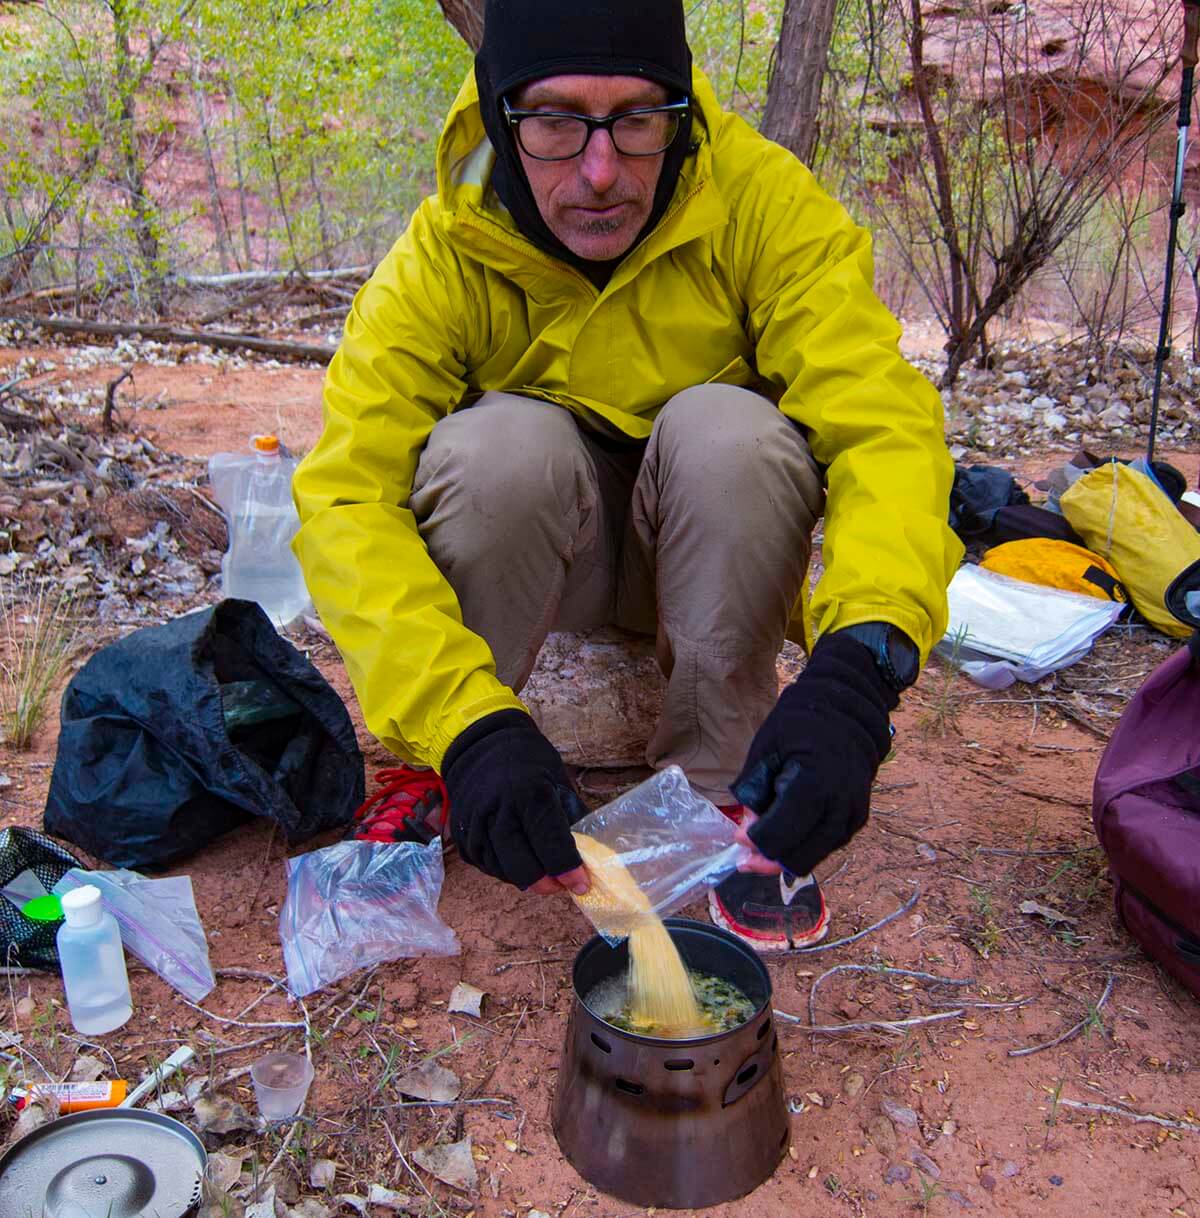
Cooking a meal in the pot does a better job of rehydrating a meal. Especially if you let it simmer for a few minutes after a boil. Downside is that the pot is harder to clean, especially with cheese. And food can burn to the pot bottom if you aren’t careful. (photo: Andrew Skurka)
Rice And Beans With Cheese And Tortilla Chips
Use these healthy freeze dried Black Beans & Rice (available at REI) or at Amazon. Open the meal bag and add 2 oz of Just Hot Veggies or any of Just Tomatoes FD veggies.
Then separately package in ziplock snack baggies:
- 3-4 oz cheddar cheese (cubed or shredded)
- 2 oz of lightly salted tortilla chips of your choice (lightly crushed)
Place both the cheese and chip baggies back in the meal bag and reseal it.
Meal Prep Directions
- pour 17 to 18 oz hot water into the meal packet and set aside to re-hydrate
- after about 5 minutes, stir in cheese
- when full hydrated (about 10 min), crumble tortilla chips over the top and enjoy!
Note: eat in packet with long spoons unless you want to be scraping cheese out of your pot and/or bowls for some time.
Dinner in a remote canyon in the Escalante Grand Staircase.