A shakedown hike is critical to the success of your big backpacking trip for the year. Learn how to plan and execute a shakedown to avoid costly mistakes. Think of it as “Spring Training” for backpacking.
Whether you are a beginning or experienced backpacker or hiker, Adventure Alan is about helping you become a better, more efficient & happier backpacker. To this I bring 50 years experience of backpacking all over the world (20 years ultralight backpacking), professional guiding in extreme places like Alaska.
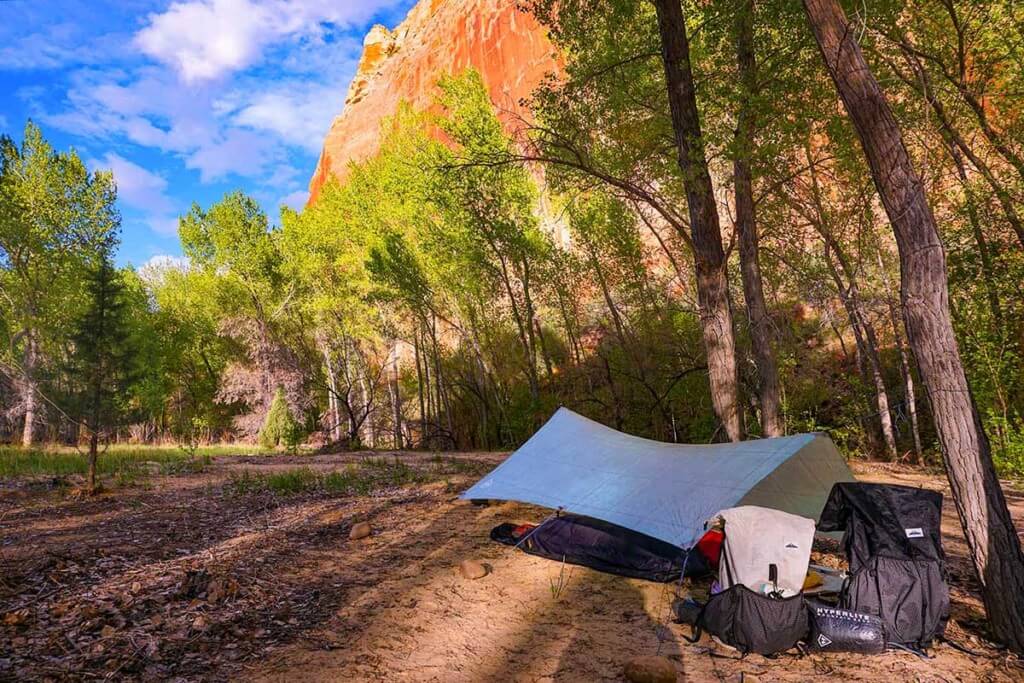
For much of the US hammock tent camping is fantastic & arguably the best way to sleep in the backcountry. This is true anywhere with trees—nearly all of the eastern US & much of the Mountain West.
2018 is forecast to be the worst year for tick/Lyme disease*. But don’t let fear of Lyme or Zika keep you off the trail! This article has tips on the clothing, gear, repellents, and techniques that will maximize your Lyme and Zika Prevention as well as other tick/insect diseases when hiking or backpacking. Includes section on new Picaridin lotion which is more effective than DEET with none of the downsides.
Lead photo: 2015 map of prevalence of Lyme disease [source US Centers for Disease Control (CDC)]. Superimposed on the map is a blacklegged tick, the primary transmitter of Lyme disease to people. Zika is also on the increase as noted here (CDC Map of Zika), and here Harvard Medical School Article on the rise of Zika.
This Article in Five Parts
- DON’T GET BIT – DON’T GET SICK: Why not getting bit is your first and best strategy for lyme and zika prevention.
- Best Ways to Protect Yourself from Lyme & Zika While Hiking: The Cliff Notes version
- New Picaridin Lotion. More effective than DEET with none of the downsides!
- What to Do if You Get a Tick Bite
- Non Chemical Ways to Reduce Bug Bites: For those leery of chemicals. But this content improves the effectiveness of all methods to reduce bug bites, chemical and non-chemical.

Why it’s hard to check for ticks in the field: Blacklegged tick nymphs which can transmit Lyme disease (second from left in photo) are exceptionally hard to see in the field. It’s extremely difficult to find them on your body during an evening check in camp and showering is not usually an option. For instance, how would you find the second from left blacklegged tick on your scalp or in body hair? Keeping them off of your body in the first place is your best strategy. BUT! by all means, continue to check for ticks (just don’t expect it to be 100% effective in the field). AND if you remove a tick quickly (within 24 hours) you can greatly reduce your chances of getting Lyme disease.
1. Don’t Get Bit – Don’t Get Sick
The best strategy to reduce your risk of getting a bug-transmitted diseases like Lyme and Zika is to not get bit in the first place. I know this sounds obvious, but some bug-transmitted diseases are not preventable. That is, if you get bit by a bug carrying some diseases you may get infected despite the best medicine. And if you contract a disease there may be no medications to effectively treat it. Consider the following:
- Lyme Disease: Currently, there are no vaccines to prevent tick-carried diseases like Lyme disease, or Rocky Mountain Spotted Fever. Fortunately per the CDC, “patients treated… in the early stages of Lyme disease usually recover rapidly and completely.” (But note: there is some controversy about the effectiveness of treating Lyme disease if undetected/not-treated in time.)
- Zika & West Nile: There are no vaccines to prevent mosquito-carried diseases such as Zika, and West Nile encephalitis today. And there are “no specific medicines” for Zika or West Nile if you contract them.
2. Best Lyme and Zika Prevention for Hiking
| Permethrin Treated Clothing Per the CDC a key element for maximum tick and mosquito protection is wearing Permethrin-treated clothing. Treated clothing can be of thinner, cooler fabrics and still provide protection. This is crucial to staying cool and comfortable when hiking in warm weather—the conditions when bugs are prevalent & disease most likely. |
The following is SAFE and effective. The “Best Lyme and Zika Prevention” techniques in this post are are based primarily on information and recommendations from the CDC (Centers for Disease Control) and EPA (Environmental Protection Agency). E.g the CDC’s section on “Maximizing protection from mosquitoes and ticks:” But they are also based on Alison’s and my experience hiking long distances in hot, humid environments with high disease risk. Examples include the tropical jungles of South America—or spring in Shenandoah National Park (lots of Lyme!).
A short list of Clothing and Bug Protection (a cool set that you won’t overheat in)
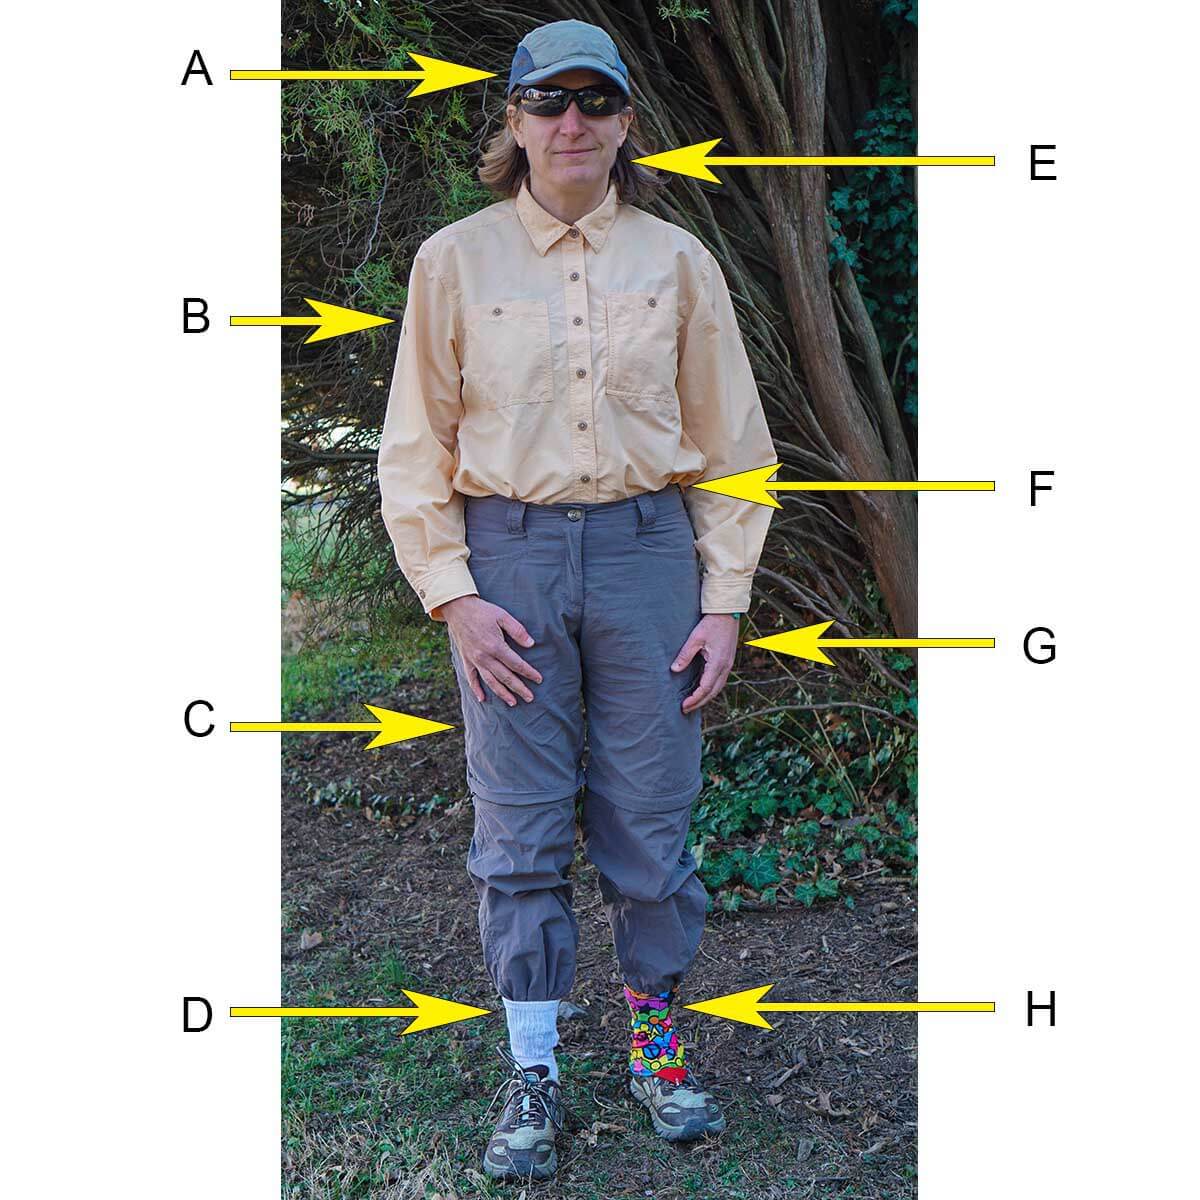
Yes, the outfit might look slightly geeky (although bright gaiters spice things up). But having contracted Lyme disease on the AT, I can say without reservation it is an illness you never want!
for best viewing of this table on a mobile device, turn phone sideways (or view on a laptop or tablet)
| Item | Description | Comments | |
|---|---|---|---|
| E G | Bug repellent on face neck hands | Sawyer Picaridin lotion 14 hrs! Pocketable Picaridin 0.5 oz spray |
Lasts 14 hrs! No odor. Won’t melt plastic. Small, pocketable, easily applied. |
| A | Hat (repellent) | Exofficio Bugsaway Hat | Bug repellent for upper head area |
| B | Shirt hiking* | RailRiders Men’s Journeyman Shirt w Insect Shield & Women’s Oasis | Cool fabric, mesh side vents, sun protection, Lifetime insect repellent (vs. sprays 8-14 hrs) |
| Shirt (alt) | Exofficio Bugs Away Halo Long Sleeve Shirt Men’s and Women’s | Widely available: Campsaver and other sources like Amazon. Lifetime insect repellent. | |
| C | Pants hiking* | ExOfficio BugsAway Ziwa Pants Men’s and Women’s | Available in both Men’s and Women’s. Light, cool, sun protection. Lifetime insect repellent. |
| Pants (alt) | RailRiders Men’s Eco-Mesh Pant with Insect Shield | RailRiders pants have huge side vent on legs for cooling. Lifetime insect repellent. | |
| E G | Bug repellent on face neck hands | Sawyer Picaridin lotion 14 hrs! Pocketable Picaridin 0.5 oz spray |
Lasts 14 hrs! No odor. Won’t melt plastic. Small, pocketable, easily applied. |
| D | Physical Prot. | Tuck pants into socks | Prevents tick entry into pants. Stops pants legs from “gapping” and exposing ankle to mosquitos |
| F | Physical Prot. | Tuck shirt into Pants | Prevents tick entry into pants and lower shirt area. |
| H | Gaiters | Dirty Girl gaiters (fun colors!) or REI Co-op Activator Gaiters |
Seals pants against tick entry. No ankle gaps. Can be treated with permethrin spray. |
| H | Gaiter trap shoe (optional) |
Altra Lone Peak shoes or Altra Superior shoes |
Velcro “gaiter trap” permanently attached to heel of shoe. (adhesive ones that come with gaiters only work for a while) |
* You can treat your own clothing with Permethrin Spray (REI) or at Amazon This lasts for up to 6 weeks or 6 washings. (For comparison: factory treated clothing is good for up to 70 washings, essentially “life-time” use). Both clothing treatments far exceed the 8-14 hours of skin applied repellents like Picaridin and DEET. And they don’t require the time/attention needed to properly apply repellents to large areas of skin each day.
Picaridin – A New Repellent Better than DEET
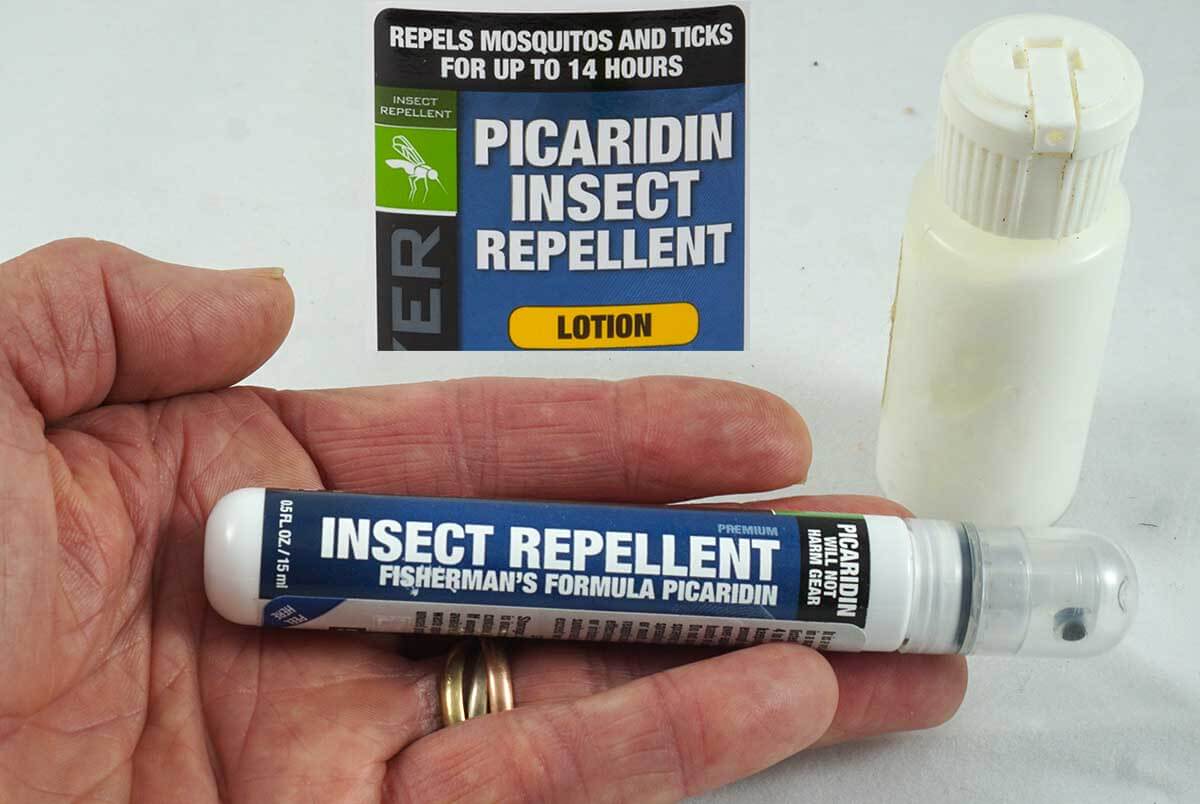
Picaridin (lotion) lasts 40% longer than most DEET products and lacks the downsides of DEET. It has no odor and doesn’t melt plastics or degrade clothing. In Hand: Airline friendly 0.5 pump sprays, last 8 hours are small, pocketable and easily applied in the field. Right rear: Picaridin lotion lasts 14 hours, and can be repackaged into small 1 oz squeeze bottles.
Picaridin is a new (2005) “pepper-based” insect repellent that lasts up to 40% longer than most DEET products. And perhaps more important, it lacks many of the downsides of DEET. Picaridin has no odor and doesn’t melt plastics or degrade clothing. It is registered as safe and effective by the US EPA. More about Picaridin here
- Picaridin lotion at 20% concentration is effective for mosquitoes and ticks up to 14 hours. See: Insect Repellents: Use and Effectiveness (EPA)
- In comparison, DEET is effective against mosquitoes for up to 10-12 hours at moderate (~20 to 30%) concentrations. But for 10 hour effectiveness against ticks, DEET needs to be above 90% concentration vs. Picaridin’s 14 hours at 20%.
- Airline friendly 0.5 pump sprays (lasts 8 hrs) are small, pocketable and easily applied in the field.
- But Picaridin lotion is the champ, lasting 14 hours. (The lotion can be repackaged into a 1 oz squeeze bottle—this is our first choice when hiking.)
Important: Make sure you closely follow the directions for applying repellents, including knowing how long an application will last! Skin applied repellent effectiveness greatly depends how well and how often you apply it.
Treated tents and camp mosquito netting
Note: The EPA has also approved Sawyer permethrin spray as an insect repellent treatment for tents. As such, you may want to consider this option if you are in an area with high risk of disease and/or you are a person super concerned about ticks and mosquitoes. This spray treatment might be especially useful to treat the bug netting on the door(s) of your tent where insect entry would be most likely and where mosquitoes want to hang out. As always, follow the package directions to the letter!
- A National Institute for Health (NIH) study indicates that “Permethrin treatment of tents is an effective, inexpensive public health measure to reduce mosquito bites.”
- The CDC says: “[bug] nets are most effective when they are treated with a pyrethroid insecticide.”
3. What to do if you get a tick bite – per the US CDC

Use fine-tipped tweezers to grasp the tick as close to the skin’s surface as possible.
Pull upward with steady, even pressure. Don’t twist or jerk the tick; this can cause the mouth-parts to break off and remain in the skin. Avoid folklore remedies such as “painting” the tick with nail polish or petroleum jelly, or using heat to make the tick detach from the skin. Your goal is to remove the tick as quickly as possible–do not wait for it to detach.
- Here are the complete instructions for how to best remove the tick (and send it in for testing if you wish)
- In most cases, the tick must be attached for 36 to 48 hours* or more to transmit Lyme disease
[*Note: There may be no established minimum attachment time for Lyme transmission. Rather, This study from the National Institutes of Health suggests that the chance of Lyme transmission increases the longer the tick is attached, with no minimum time.] - Here are the Signs and Symptoms of Lyme Disease to look for
- And always check carefully for ticks each hiking day
“If you develop illness within a few weeks of a tick bite, see your health care provider right away.”
“Patients treated with appropriate antibiotics in the early stages of Lyme disease usually recover rapidly and completely.”
4. Non Chemical Ways to Reduce Bug Bites
While this section is non-chemical, its content is important and applicable to all methods to reduce bug bites, chemical and non-chemical.
Overview
- Non Treated, Bug Protective Clothing: Wear clothing that bugs can’t bite through and/or ticks can’t enter. There are some challenges here when hiking in warm weather.
- Where and When You Go: Be smart about where and what time of year you take your trips. (also has a short section on international travel)
- Where You Camp: If possible, camp in areas with few bugs (some nearby camps, just a few minutes away can be much better than others!)
- Shelter bug netting: Includes tips you may not know about using a tent or shelter with bug netting
a) Non Chemically Treated yet still Bug Protective Clothing
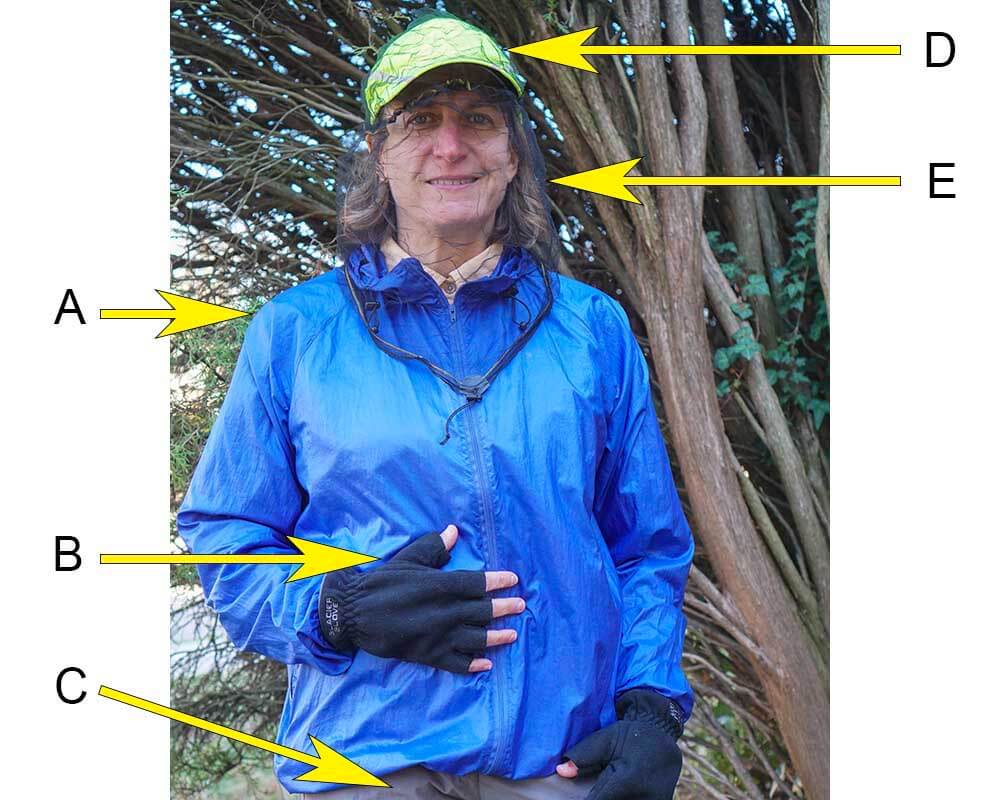
| The difficulty here is to: 1) prevent tick entry with seals on entry points for pants and shirt and 2) have clothing thick enough to stop mosquito bites. By the time you’ve met both criteria, your clothing is usually too hot and uncomfortable for warm weather hiking—the exact weather when bugs are prevalent & disease most likely. In summary, this is not an optimal warm weather option. It is listed here as an alternative for hikers who are leery of chemicals. |
I have used this non-chemical clothing system with success for some intense mosquito hatches in the Western Mountains in summer (Rockies/Sierras). It works well for camp, and is OK for moderate paced hiking as long as temps don’t climb into the 60’s or higher. The beauty of this system is that includes clothing I would normally bring on a hike (e.g. a windshirt/rain jacket and baselayer/hiking shirt).
for best viewing of this table on a mobile device, turn phone sideways (or view on a laptop or tablet)
| Item | Description | Comments | |
|---|---|---|---|
| A | Windshirt | Patagonia Houdini or most “windbreakers” |
Any windbreaker or rain jacket will work. When layered over a midweight baselayer, this provides decent protection against mosquito bites. Good for camp, but a hiking challenge in warm weather. |
| Baselayer | Capilene Midweight Top Ibex Indie Hoodie 1/4-Zip |
This is also my hiking shirt in cooler environments like the Western Mountains in Summer (Rockies/Sierras) | |
| B | Gloves | Glacier Glove fingerless fleece | Protection from bugs, but fingertips free for dexterity. |
| C | Pants hiking | REI Sahara convertible pants RailRiders X-Treme Adventure |
Need to be thick enough that mosquitoes can’t bite thru. Note: While these have worked well for me, I can’t say with 100% confidence that either of these pants are thick enough to prevent all mosquito bites. |
| D | Hat, ballcap | OR Sun Runner Hat | Scalp protect. Keeps netting off face. Any brimmed hat fine. |
| E | Bug-net | Sea to Summit Head Net | Non-chemically treated. OK for camp, but not fun to hike in. |
For hiking in warmer weather (e.g. AT in summer), one might need to find a single shirt (and pants) that meet your personal criteria for adequate protection from mosquitoes bites. (Since I use chemically treated clothing in warmer temps, I don’t have enough experience to recommend non-chemical pants and shirts.)
b) Where You Go: Be smart about where and when you take your trips
If you are through hiking the AT, you may not have wiggle room to avoid bugs. You’ll likely have to hike through the height of mosquito and tick season (mid-spring, summer, and early fall). In this case, you’ll just need to do your best to avoid bug bites. But most trips will likely have some good options to avoid the worst bugs. So do your research on what bugs are present and what times of the year they are most present/active. Then if possible, plan your trip to avoid the worst of the bugs. Here are some examples:
- We like to do much of our AT hiking in early spring and late fall when mosquito pressure is lower and there are hopefully fewer ticks. And winter on the AT is lovely with no mosquitoes and fewer ticks to worry about, and not a lot of people either!
- Mosquito pressure in Alaska is surprisingly low in August. But it is insane intense just a few months earlier around summer solstice (June 21).
- Alison and I take our kayaking trips in the everglades in January and February when mosquitoes are virtually non existent.
- And finally, where you camp (see below) and where you walk has an impact, especially with ticks. Wading through thick brush or grasses (e.g. an off trail bio break) in spring/summer on the East Coast will invite a greater chance of encountering ticks. Sticking to the grass free center of the trail helps.
Here are a few resources to help research bug and disease pressures for your trips
- For the United States: CDC Lyme Disease Maps, and Maps of Zika in the US
- International Travel: Look up your country in CDC’s Travelers Health Destinations List. Always do this in consultation with a travel health professional. The CDC recommends visiting your travel doctor (ideally, 4-6 weeks) before your trip to get vaccines or medicines you may need.
c) Where You Camp: If possible, camp in areas with fewer bugs
While it is unlikely that that you can avoid bugs completely, good campsite selection can greatly reduce the number of bugs in camp, even in areas with lots of bugs like Alaska in June. Sometimes a campsite only a few minutes walk away may have far fewer bugs.
- Where insects live: Camp away from boggy soggy areas areas with standing water.
- Avoid places obviously frequented by animals: Don’t camp along game trails or other places obviously frequented by animals like deer and rodents (especially white-footed mice the primary carrier of blacklegged ticks that transmit Lyme).
- Find wind: Try to camp in open areas that have a breeze which reduces the number of flying insects. An elevated area, like a bluff above a river or a small ridge is a good place. If you know the prevailing wind direction use it to your advantage. Note: Dense trees or brush stop wind, and therefore can harbor a lot of insects.
- Pay attention to elevation: In the mountains, biting insect hatches usually are most active at a particular altitude. Plan your day to camp above or below that altitude to reduce bug pressure.
- Final Check!: Before you commit to a camp, it’s good to stand around for 5-10 minutes and assess how bad the bugs are. If they are bad you can look for a better camp without having committed the time and effort to unpacking and setting up camp.
d) Use a tent or shelter with good mosquito netting
This is solution that is likely familiar to most people. And most of you already own a tent with good mosquito netting. But here are some things you may not know.
- You do not need a heavy tent for good protection from bugs. There are a number of light tents, TarpTents & other shelters that will protect two people for around 2 pounds (only 1 pound per person!). See my Recommended Tents, Tarps and other Shelters for some light but effective options.
- Hammocks with mosquito netting are also a good option. These are getting more popular on the AT, some are quite light. See more here: Hammock Camping Part I: Advantages & disadvantages versus ground systems
Tip: When entering your tent, take “a lap” away from your shelter before running back and jumping quickly through the door. By doing this you’ll likely shake the insects hovering around you, and therefore bring far fewer mosquitoes into the tent. After getting into the tent, do a search and destroy mission for the few bugs that may have tailgated in with you.
Desert canyons are some of the most stunning places on earth. And contrary to the hype of high adventure and disaster in technical slot canyons, with flash floods & amputating arms—many beautiful canyons are low risk and perfect for backpacking and hiking. No rock climbing or rope needed. As such, you should seriously consider non-technical canyon backpacking in Utah.
- Best time to go: mid-March to May | mid-September to October (or even November)
- Special skills needed: This post covers much of what you need to know. It includes tips on how to purify and best manage your water in a dry desert environment (don’t stress it’s not that bad!).
- Navigation: Explains how canyon navigation is different from regular hiking/backpacking and what you’ll need to know.
- Special gear needed: While there is no need for ropes or climbing equipment, our section on the Right Gear will make canyon travel easier and safer. And there’s a section on desert canyon clothing tips, including sand resistant shoes that are also good for wading.
Canyon travel or canyoneering is mountain climbing in reverse. Rather than striving for the highest point to look down, you are in the bottom of a canyon with the world above you. It is a more intimate and enfolding way of viewing your surroundings.
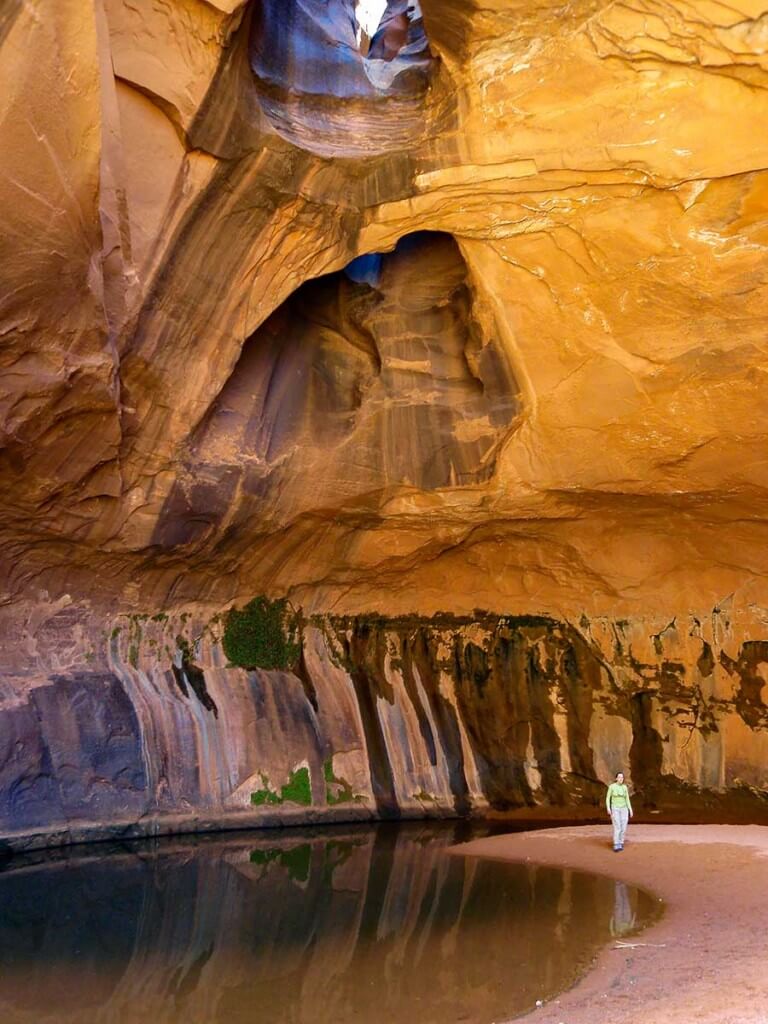
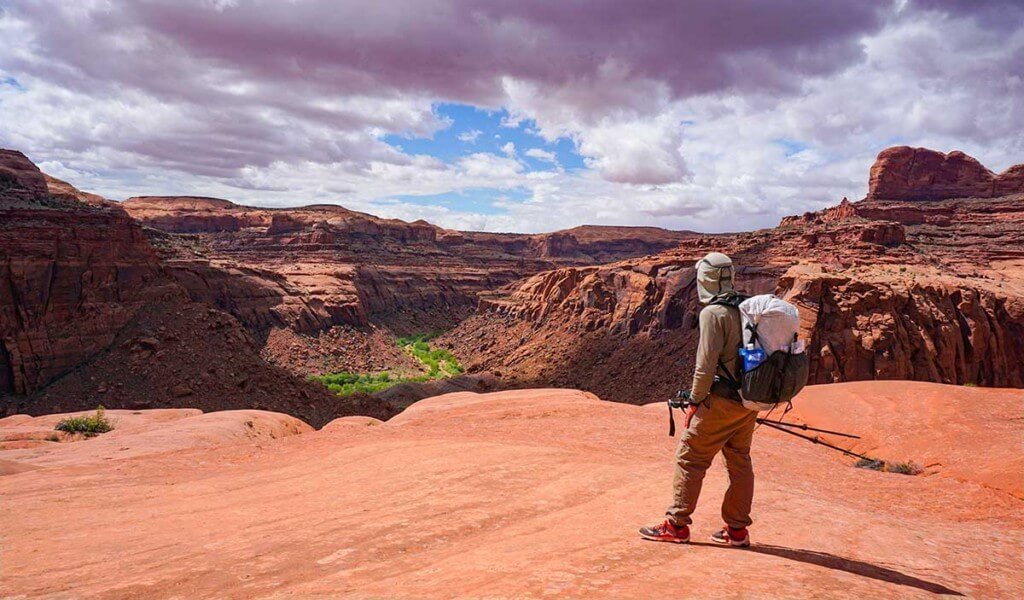
Utah Canyons offer some of the best hiking & backpacking in the world
These canyons are stunningly beautiful and except for a few, lightly traveled. I can think of few places that offer as much solitude. Alison and I find the sparse beauty and solitude of desert canyons a deeply spiritual place. One that draws us back year after year for their peace and serenity.
Gems like Paria Canyon, Buckskin Gulch, the Zion Narrows, Coyote Gulch or Grand Gulch are just few of the big name canyons that are easily accessible to anyone with basic hiking skills. But the list of equally superb but lesser known canyons that await you in the Southwest US goes on and on. The Escalante Grand Staircase National Monument may alone have a lifetime’s worth of superb canyons and side-canyons to explore. Many may have only a few visitors every 10 years.
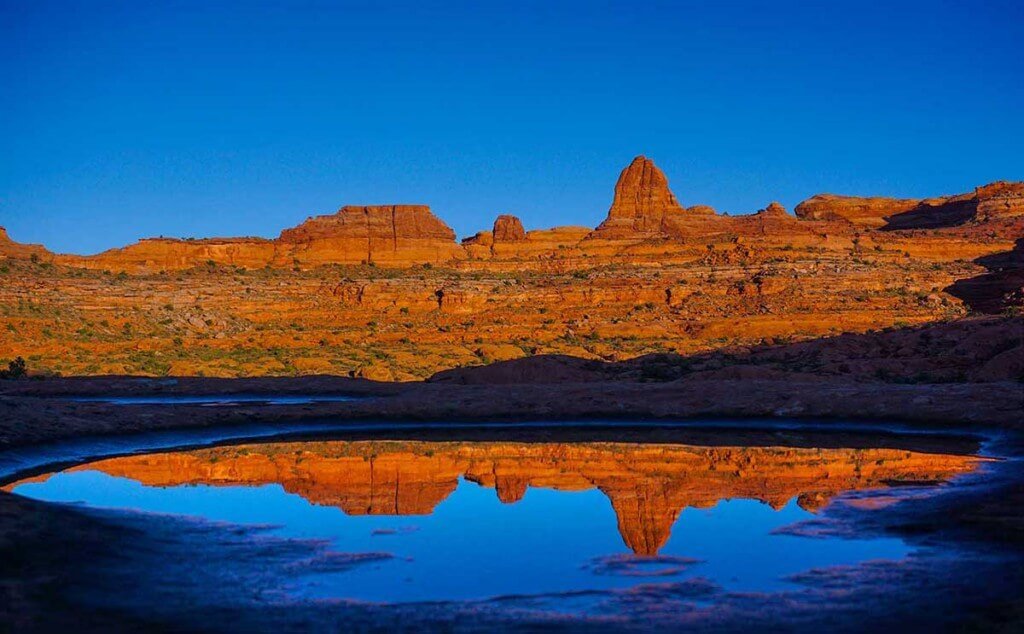
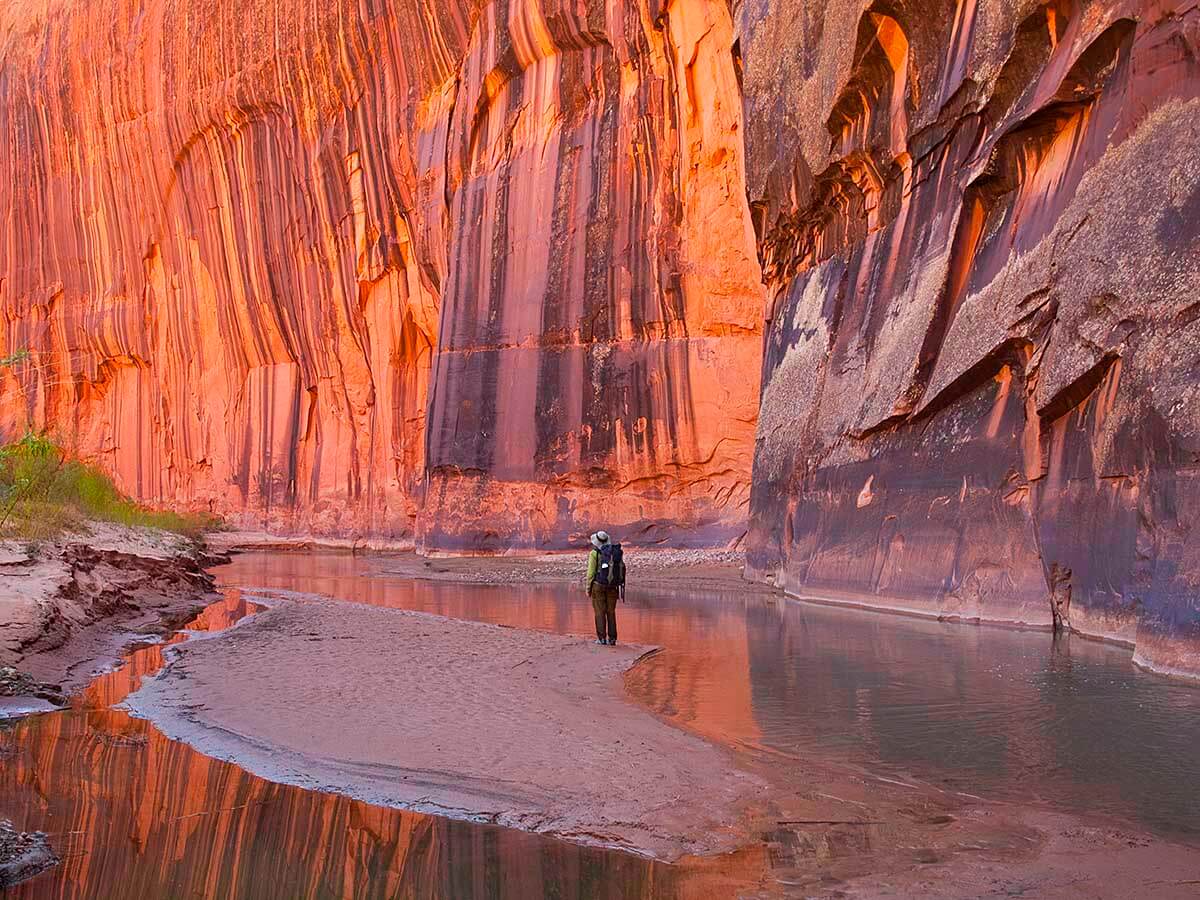
High above the Escalante River: Dawn reflection in a slickrock pool in a remote side canyon. This canyon sees fewer than 10 people per year.
Tips for Non-technical Canyon Backpacking in Utah
The good news is that many of your backpacking skills will work for canyoneering. But there are some things that will be new and different. Here are a few to consider:
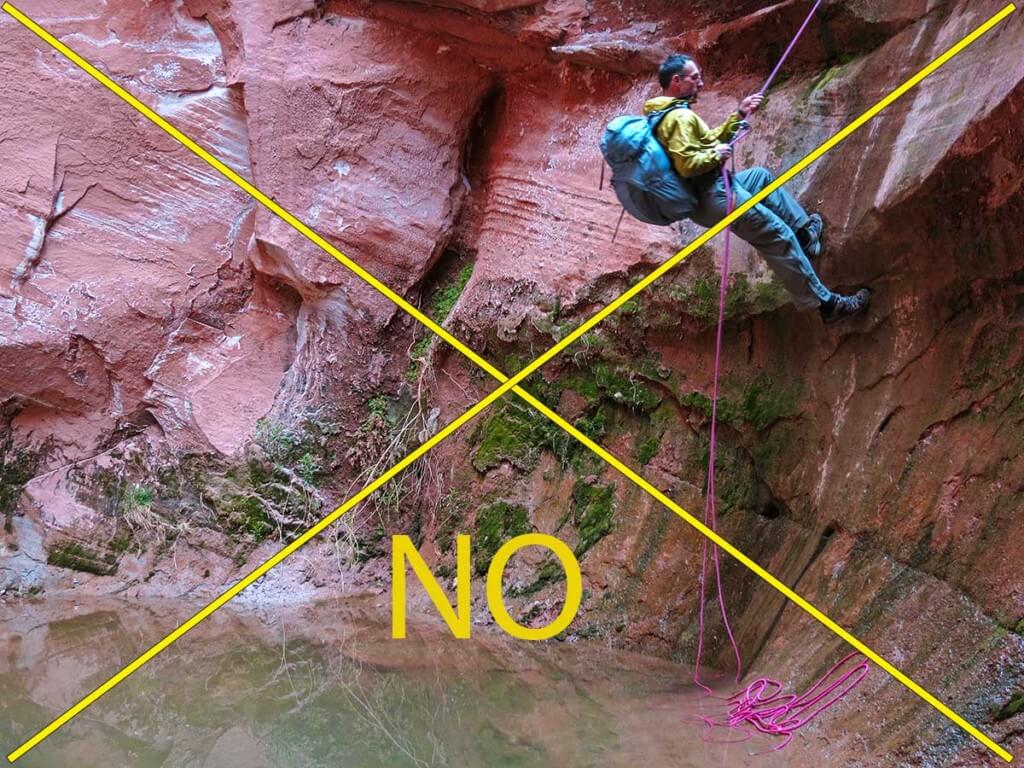
- Canyon travel can be technical and non-technical – This article is only about “Non-technical Canyon Backpacking in Utah.” This non-technical canyon travel, or what I call “canyon backpacking” is low risk and similar in difficulty to regular backpacking. You don’t need a climbing rope. In some canyons you might need to do occasional calf-deep wading, a fun but safe scramble, or some bushwhacking. But nothing to get excited about. Technical canyoneering with ropes and rock climbing will not be discussed in this article.But at the end of this post I have included a section on tips for the more adventurous canyon traveler.

What this guide is NOT ABOUT. There’s no need to do this to see many spectacular canyons!
- When to go – Most of the year it is too cold or too hot to backpack in the canyons. Most canyons in Utah have a short season, the middle of spring (mid-March to mid-May) and middle of fall (October-November).
-
Gear for Non-technical Canyon Backpacking in Utah – Having the right gear makes canyon travel easier and more fun. Here’s a link to the Gear List that we use. It’s excellent for non-technical Canyon Backpacking or hiking in Utah. A section dedicated to clothing is below.

Paria Canyon
- Don’t stress too much about drinking water – Water, or lack of it, is not the big a deal most “knowledgeable professionals” make it out to be. See: “The Best Hydration – Drink When Thirsty.” Many of the better known canyons have well documented water sources so you’ll know how far it will be to your next good water. As such, you won’t be humping a ton of water or in dire risk of dehydration. My wife and I over the last 15 years have routinely carried far, far less than the recommended gallon of water. We have yet to go dry or thirsty. Note: Most canyon river/stream water, if it’s running at all, is too silty and hard with minerals to make good drinking. You’ll get most of your water from springs and from the few clear-drinkable sources of canyon river/streams. For treatment, I prefer the Sawyer Squeeze Water Filter System.

Neon Canyon, Escalante Grand Staircase National Monument
- There is a low risk of flash floods in most “backpacking” canyons – most of the better known “backpacking” canyons are not slot canyons. As such, they are less prone (but not immune) to sudden and devastating flash floods. A slight risk of a flash flood (or far more likely, just high water) still exists in almost any canyon. So you still need to be aware of the weather. During the rare big storm, water levels may rise considerably but not so fast or so high that you won’t have time to find suitable high ground. They will also recede quickly. (Buckskin Gulch is the exception big name canyon with a significant flash flood risk, but the Ranger’s won’t give you a permit for Buckskin if there is the slightest chance of a flash flood. And many hundreds of people hike it safely every year.)
- Start small and build – Take some canyon day-trips and expand your skills—locating canyon entrances and exits, finding and managing drinking water, walking through sand, river wading, bushwhacking—generally learning how to make intelligent and efficient progress in a desert environment. Even two or three canyon day-trips will give you great insight to prepare for and execute your first multi-day canyoneering trip. Oh, and day-tripping in canyons is great fun!

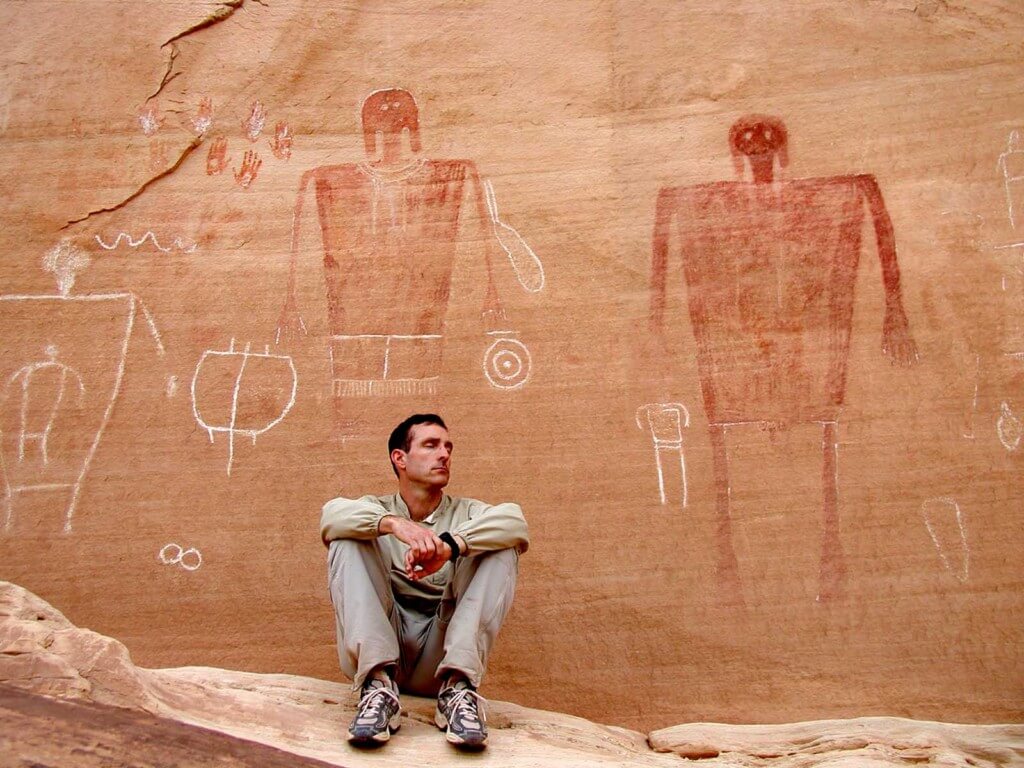
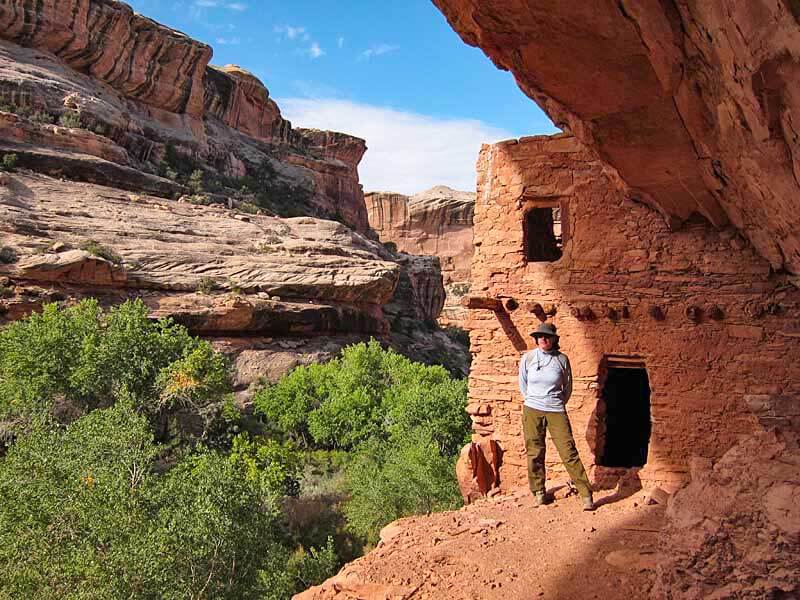
Grand Gulch, an open air cultural museum of Anasazi pictographs/petroglyphs and ancient dwellings. Note: If you find any artifacts; pottery fragments, arrowheads, etc. please leave them where you find them. The same goes with structures and dwellings. Do not enter them, walk on walls, etc. General rule is don’t touch, don’t move. Leave it as you found it.

- Guidebooks to get you started – Steve Allen has the best and most respected series of guidebooks on canyoneering in Utah. While some of his trips are technical, there are plenty of non-technical trips. And his general advice about canyoneering is among the best for both the non-technical and technical traveler. I have used the Falcon Guide “Hiking Grand Staircase-Escalante & the Glen Canyon Region” for canyons that Steve Allen doesn’t cover like Buckskin Gulch, Paria Canyon, and Grand Gulch. The guide’s specific information on the canyons is adequate but I would defer to Allen for general information on Utah and canyoneering.

Hiking in shorts, short sleeves and hatless is a terrible idea! Complete clothing coverage is better.
- Clothing for Non-technical Canyon Backpacking in Utah – The desert can be a hot, scratchy, prickly place with intense sun. Wear long desert/travel pants like these , long-sleeve desert/travel shirts like these or a Rail Riders Adventure (or EccoMesh) Top, and a hat with complete sun coverage including neck and ears (e.g. Outdoor Research Sun Runner Hat). Light smooth fabrics (like thin nylon) slide easily through brush, absorb little sweat/water and dry quickly. Apply strong sunscreen to unprotected areas like hands or wear sun gloves like these OR ones. For more info See a detailed list of clothing we normally wear.
Footwear – Boots are not needed or even desirable. Take light trail running shoe like Altra Lone Peaks or Altra Superiors. Fine mesh outer fabric is best (our favorite shoes are the Altra Superior Trail Running Shoes which have a very fine mesh that slows sand entry but lets water drain quickly after wading. And beware, the large-weave mesh popular on many trail runners lets too much sand in. Gore-Tex shoes do poorly. They are too hot, do not breathe well and don’t drain water after wading. (But they do have the advantage of being sand-proof!) - Navigation in Canyons is different than other backpacking areas
Navigating Canyon Bottoms takes a bit of getting used to. (Don’t worry, you’ll get better at it over time.) There are no signs, no blazes and almost no trails. One might think it’s simply a matter of following the canyon bottom like a train on its tracks. But for those new to it, walking in the bottom of a many branched canyon system can seem more like navigating a hedge maze. At the bottom of a canyon you have limited visibility and to the uninitiated the main canyon can be almost indistinguishable from its many side canyons. It’s much easier than you think to walk by and completely miss your exit ramp or exit side canyon. Over time you’ll get more observant, and pay better attention to small details. Travel in many canyon bottoms is a combination of river walking/wading, bushwhacking through willows (easier) and tamarisk (harder), and sandy bench walking. There is no “right” route: you just figure out what works for you.Navigating Benches Above the Canyon should likely wait until you are a more seasoned canyon traveler. It is usually more challenging than traveling the canyon bottom—with more difficult route-finding, hard to find entrances and exits, potentially technical sections and a likelihood of impassible side canyons and slots blocking forward travel.Note: Contrary to common belief GPS can work in canyons! So with some caveats, the section below explains how to best use your GPS in many canyons — just don’t rely on it!!
Paria Canyon
- Emergency contact. Much of Utah is remote like few other place in the lower 48. Hikers are hard to see or locate in the canyons, and there may be few or no other hikers to happen by if you are in trouble. Make sure you have your trip itinerary filed with an emergency contact monitoring your trip. I strongly recommend you consider a device like a Garmin inReach (preferred) or a SPOT Satellite Messenger. And here’s a link to a good template for your “Trip Plan” (a trip-tracking/emergency info document). It’s a great idea to have some version of one, even for a day hike!

Tips for those feeling more adventurous
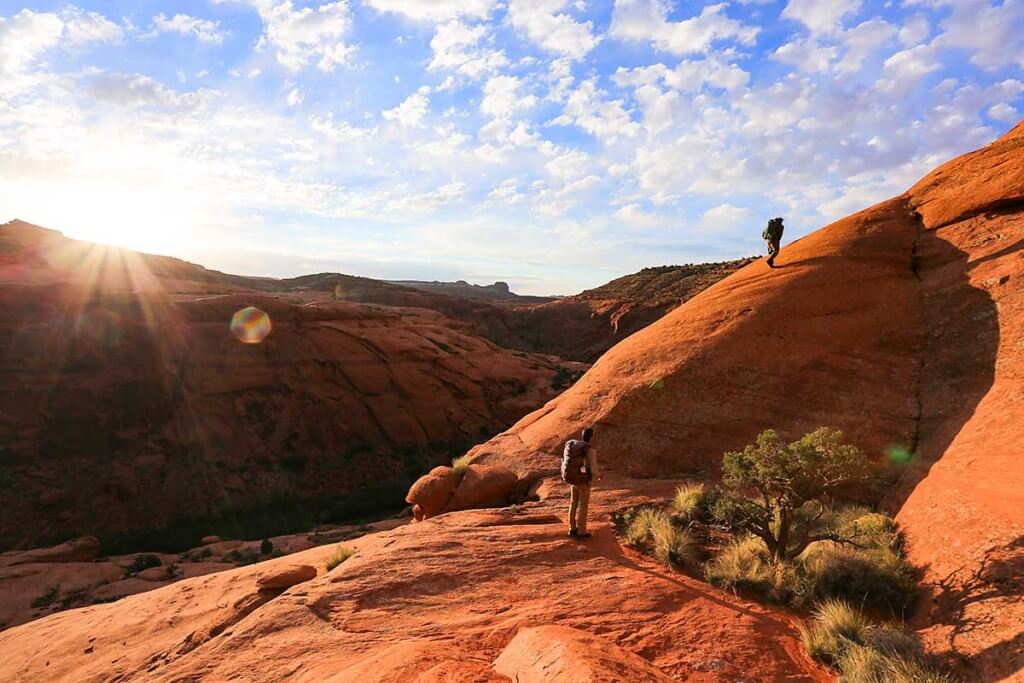
Author on a dawn climb out of the Escalante Canyon. Andrew Skurka waits to go next. photo: Don Wilson
- Proceed with caution! Make sure you can reverse your route. Even small, seemingly insignificant up-climbs or down-climbs of just 8-10 feet might be irreversible, forcing you to move on without a retreat.
- If you do decide to do more adventurous scrambling, a 40-50’, 6-7 mm rope can be a huge help to raise or lower backpacks. Without a backpack on, members of your party can more easily balance and safely climb short sections that would be otherwise impassible. This can greatly expand where you can go in canyons. [Again, use caution and always err on the side of safety when “climbing” in the canyons.]

Tarps are perfect for the desert with its low chance of rain. They are a great way to save weight. I only set mine up when there is a chance of rain, otherwise it stays in my pack. See: Recommended Tents, Tarps and other Shelters
- Flash Flood risk for less well traveled canyons: some moderately narrow “backpacking” canyons off the beaten path, may be more at risk for serious flash floods. These are not usually the big name canyons with lots of travelers. Choprock Canyon in the Escalante Grand Staircase is an example of moderately narrow “backpacking” canyon more at risk for flash floods.
- GPS use – See: How to use the iPhone as the Best Backpacking GPS. Contrary to the common statement “GPS doesn’t work in canyons,” I’ve had good success using my iPhone as a GPS when canyoneering. Obviously the deeper and narrower the canyon, the harder it is to get a position fix. But with a little smarts one can use it with reasonable success by opportunistically getting fixes in wider canyon sections or other areas with a better sky view. [And, do not rely on your GPS to navigate the canyons. It’s a convenience, not a substitute for navigation by map an compass and/or a crutch for poor navigation skills. This may be truer in canyons (with their iffy GPS reception) than almost anywhere.]
- Be safe out there!
Parting Photos
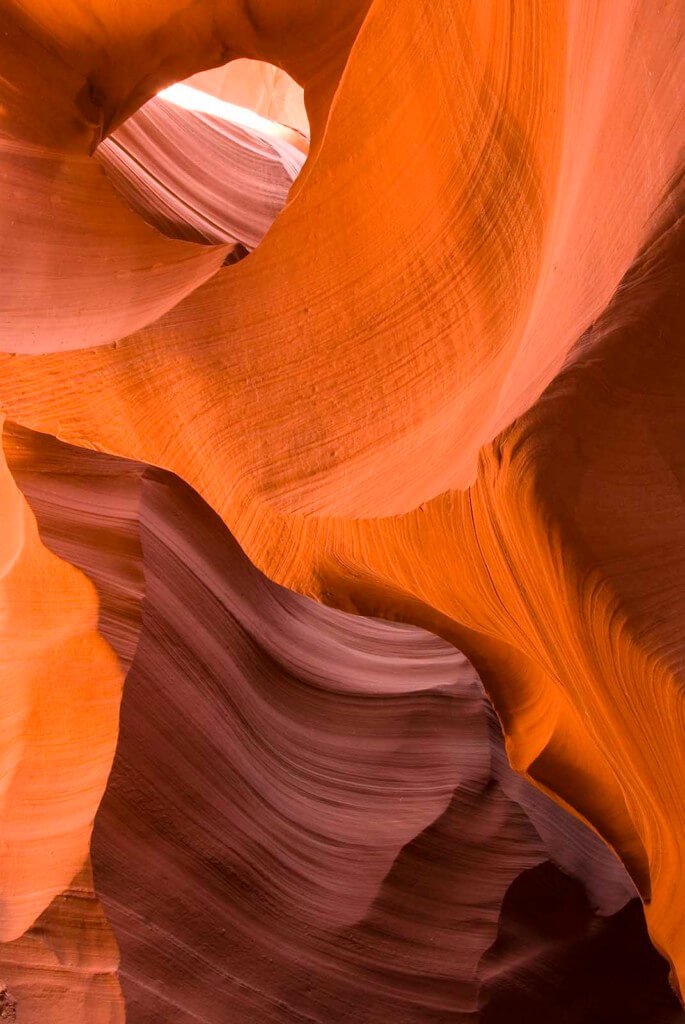
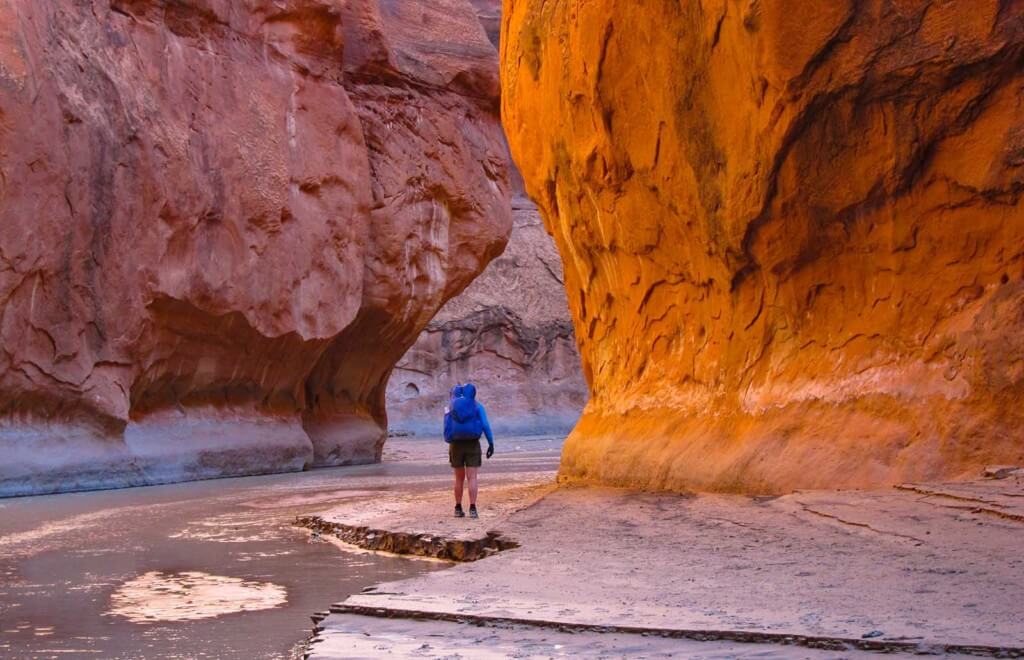
Perfect light: Brilliant oranges and reds from sunlight filtering into a canyon. For narrower canyons the “magic hour” for photography is not early morning or late evening. Usually it’s close to high noon with the sun directly over the canyon. Only then does the light penetrate, causing the sandstone to come alive and glow.
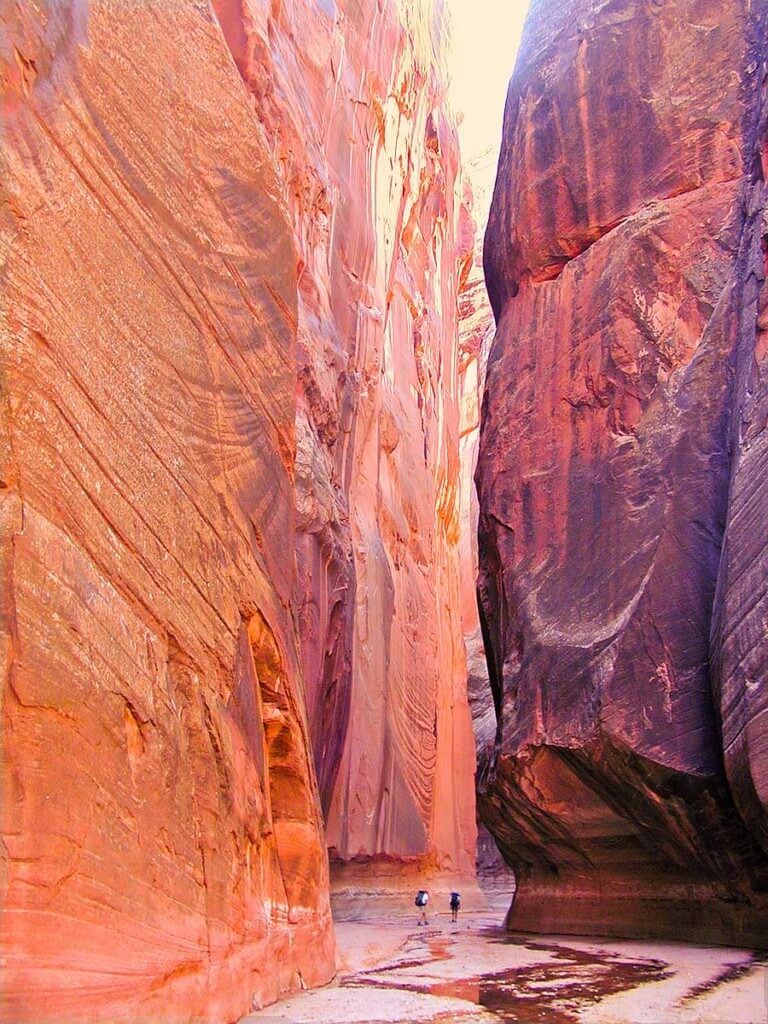
Buckskin Gulch. One of the longest, deepest and most spectacular slot canyons in the world. Hundreds of backpackers safely hike through this canyon every year.
Related Content
- What a technical canyoneering trip looks like: A Very Different High Route | Escalante Overland Route
Disclaimer
This post contains affilate links. If you make a purchase after clicking on the these links, a portion of the sale helps support this site at no additional cost to you. I do not receive compensation from the companies whose products are listed. For product reviews: unless otherwise noted, products are purchased with my own funds. I am never under an obligation to write a review about any product. Finally, this post expresses my own independent opinion.
When you haven’t backpacked in months & months, getting your systems dialed back in can be overwhelming and challenging. Between gear, food and logistics, it’s easy to lose track of things. But with these 12 tips for your first backpacking trip of the year you’ll quickly find your stride and confidence. A successful first trip of the season awaits you!
Related content | tips for your first backpacking trip of the year
- 9 Pound Full Comfort Lightweight Backpacking Gear Checklist
- Best Backpacking Food | simple and nutritious
- Quick and Efficient Training for Backpacking and Hiking
- Benefits of Early Spring Backpacking
12 tips for your first backpacking trip of the year – make it easy – have fun!
Getting ready for a backpacking trip is not rocket science or brain surgery. Use the following tips to make it a lot easier to pack and get out on that first backpacking trip of the year. And this is supposed to be fun — even the pre-trip preparation!
1. Pack to a Gear List!
There are any number of good checklists for bringing the right gear. Print one out and use a pencil to check off each item. If you have a spare room (or even the living room) lay things out clearly in groups; sleeping gear (tent, sleeping bag, sleeping pad) in one area, clothing in another, cooking gear in another, etc. When it’s laid out like this I find it substantially easier to make sure I have exactly what I need.
Related content
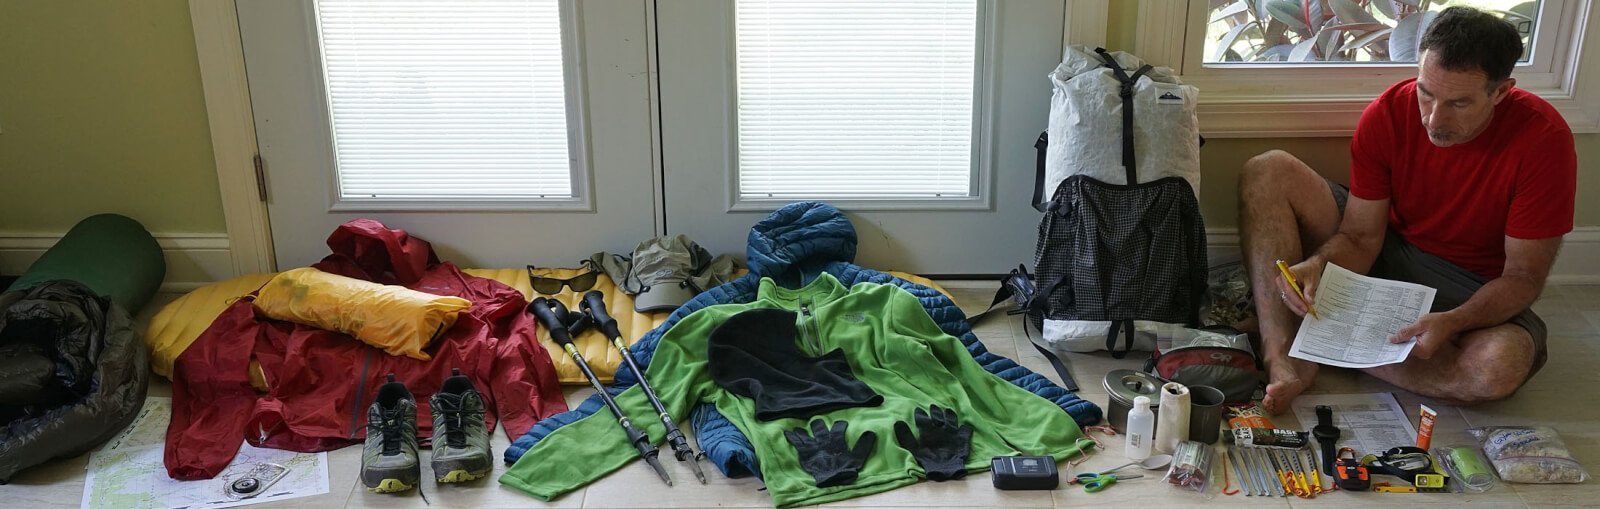
Make it fast and easy to pack all the right stuff and forget nothing: Use a gear checklist and lay things out clearly in groups in a room dedicated to the task. I usually leave stuff laid out until I leave for my trip.
2. Don’t go crazy spending money on a bunch of new Gear
I suggest that you only buy a new piece of gear if you really need it and know exactly what you want. Otherwise, borrow from friends or rent gear until you have enough information to make a good decision. Early season trips are a great way to gather information about what gear works best for you — and what doesn’t work and needs to be replaced. That being said, if you know what you want, early season sales are a great place to look for stuff on closeout or steep discount. For instance:
- Cheap Lightweight Backpacking Gear
- REI Member Rewards Event: Members save 20% on one full-price item and one REI Garage item
- Campsaver.com: Huge Spring 20/20 Sale. Save 20% Around The Site Coupon Code 4UTWNTY
- or full time discounters like Sierra Trading Post
3. Keep Your Food Simple
Almost all the food you need for a backpacking trip is at your local supermarket or in your kitchen cabinets at home. Nuts, PB&Js, Chocolate, Dried Fruit, Energy bars etc. And for a three day trip you don’t need to vary food all that much. Alison and I usually eat most of the same food each day for short trips which keeps things easy and simple. Again packing to a Food List helps. Many meals can be made at home with commonplace ingredients. We have a number of simple and easy to make meal recipes here. For those who don’t want to make their own meals, there are some simple and healthy freeze dried meals that work great like this Black Beans & Rice. We doctor it up into one of our favorite dinners by adding grated cheddar cheese, corn chips and possibly some hot sauce. The recipe is here.
Bonus tip: As a reality check, weigh all your food before the trip. It should add up to 1.5 to around 1.8 pounds/person/day. If it’s outside these limits, something is likely wrong.
Related content
- Best Backpacking Food | simple and nutritious – great food ideas as well as nutrition guidelines
- Backpacking Food List for 7 days – easily adjusted to a 2 or 3 day early season trip
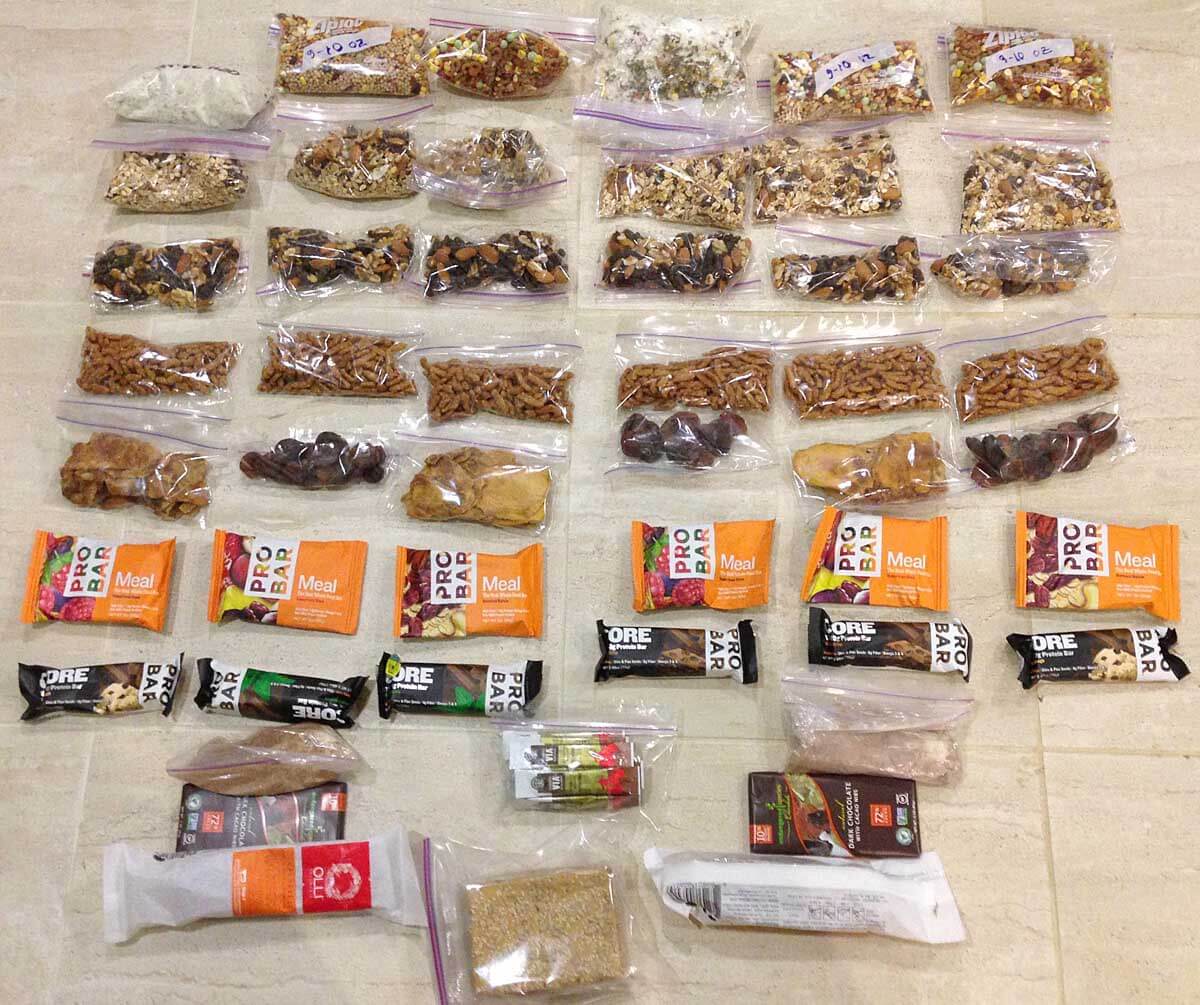
A simple and quickly assembled set of food for a 6 to 7 day trip. Aligning food in rows per/day helps to organize and provides a useful check that you’ve packed correctly. Almost all the food was purchased at Whole Foods and our Local Supermarket.
4. Don’t wait until the last minute to assemble gear and food!
Have all your gear sorted at least three days before your trip start. That way if you can’t find an important item you’ll still have time to go to a local store or order it from Amazon Prime. (It’s always something small and essential you can’t find like a headlamp, compass, pot, or fuel bottle…) And this will also allow you to make sure everything fits in your pack. Note: If you might order gear from cottage manufacture’s (I do), you’ll need to order 6 -8 weeks in advance.
5. Do some pre-tip hikes | Use the socks and shoes you intend to wear on the trip
Related content
If you buy new shoes and socks do it weeks before your trip so you can have some time to use them—at least walking around the neighborhood. This is the #1 way to prevent blisters! Note: Get trail runners! They’re light, easy on you feet and will make your trip a more fun. Don’t forget to use your trekking poles on your hikes. Our favorite trekking poles are the $40 Cascade Mountain Tech Carbon Trekking Poles. They are as good but 1/3 the price of the best trekking poles.

Altra Lone Peak shoes
Altra Lone Peak Trail Shoes, M’s & W’s @REI: These are Alison’s and my favorite backpacking and hiking shoes. These are the most comfortable shoe after a 30+ mile day on the trail. One key is the massive toe room that is so kind to trail-swollen feet at the end of the day. They are light and have a zero drop heel for a more natural stride. These come in both Men’s and Women’s models. Some of our favorite socks are SmartWool PhD Light Mini, Darn Tough 1/4 UL w cushion or DeFeet Wolleators.
6. Get a Weather Report
This will give you some peace of mind that you will be warm safe and dry. That is, the weather report will let you pack a tent, clothing, and sleeping bag, etc. appropriate for actual weather conditions. (Note: For most trips of 3 days or less, this weather report should be fairly accurate. But, If you are going to the mountains make sure you get a mountain forecast as mountains tend to be cooler and wetter than lower areas.)
Related content
- For weather weenies: the NOAA hourly weather graph is among the most informative & accurate
- Weather Underground has one of the best & easiest to understand 10-day forecasts.
7. Bring a book, some tunes (with earbuds!), podcasts or other nighttime diversions
It’s human nature not to sleep the best your first night out and early season nights can be long . Having something to entertain, distract and relax you can be a big help to getting to sleep early.
Related content
Fun fact: when sleeping in a new place the human brain alternately sleeps one side of the brain less than the other. This keeps you more alert while you sleep—presumably to keep you safer in a strange place. But this makes it harder to get to sleep and a lighter sleep once you are asleep.
- How to use your Smartphone as the Best Backpacking GPS
- 10 hacks and accessories for better smartphone hiking photography
- Best Satellite Messenger inReach vs SPOT?
- Best Lightweight Backpacking Electronics Gear
- Best Backpacking Cameras 2018
Always Bring a Backup Battery!
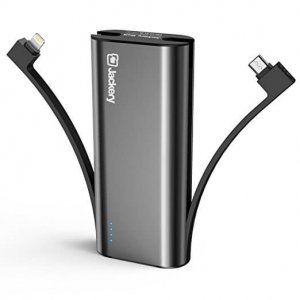
With its built-in cables the Jackery Bolt can charge a lightening device and micro-USB device at the same time.
Yeah, it seems like just about everything needs some juice these days. And many people are using their smartphones as their primary navigation device. As such, it’s a huge bummer if you drain the battery all the way down. (always bring a set of paper maps and real compass tho!) My three favorite lightweight and high capacity USB backup batteries are:
- Jackery Bolt 6000 mAh USB Battery (pictured right)- With two built in cables (lightening & micro-USB) it will charge just about any backcountry electronics. It has a faster charging rate than the EasyAcc below but has slightly less overall capacity.
- EasyAcc 6000mAh USB Battery This has slightly more capacity (tested) than the Jackery battery but has a slower charging rate & only a built micro-USB cable (altho you can attach your own lightening cable to charge an iPhone). It can charge a large phone like a Galaxy S7 about 1.4x and a smaller phone like an iPhone 7 2.3x.
- Anker PowerCore 10000 (only 6.4 oz) this is the lightest option if you need to recharge your electronics a lot. It can charge a large phone like a Galaxy S7 ~2.5x and a smaller phone like an iPhone 7 ~3.5x. Its limitation is that it only has one USB port for a cable.
- And of course for a SPOT messenger and many headlamps a spare set of lithium AAA batteries.
8. Evaluate the following before your trip
- Prior to the trip, setup your tent*, sleeping bag, and sleeping pad in the backyard or a local park. Preferably with your hiking partner. This makes sure you have all the parts and pieces and everybody knows what they are supposed to do. Inspect the tent, rain fly and floor for any damage. Get into the tent and lie down side by side and make sure everything is copacetic, air pads don’t leak etc. Do you feel comfortable enough to get a good night’s sleep? Is the tent too small and claustrophobic? Early season has longer nights and the possibility of spring rains so you might be in the tent for a while. As such it’s nice to have enough room. [*Note: it really helps to have the tent setup instructions. If you don’t have them you can usually download them online for your tent or one close to it.]
- Fire up your backpacking stove and heat some water. Make sure your fuel canister is full.
- Check that your water filter pumps water easily and/or that your water treatment chemicals are in date.
- Try on your clothing and make sure it still fits, doesn’t have rips and tears and doesn’t smell funny. [yeah, occasionally I put away unwashed clothing!]
9. Keep your Trip Short
A 2 to 3 day weekend trip is likely the best option for your first trip of the season. And don’t overreach on distance. Most of us haven’t reached our peak conditioning early season. Keeping the miles reasonably short will make walking fun and prevent temper flare-ups from exhausted trip members. In addition, since it’s the first trip for the year — you’ll want to be in camp with plenty of time to set up the tent, collect water, cook dinner. An added benefit of the shorter hiking days is that you’ll likely have time to savor a sunset over a cup of hot chocolate.
10. Keep your trip local
There are far less logistic issues with arranging a local trip. And shorter travel time to and from trip trailheads leaves you more time to enjoy the backcountry. Also, it’s likely a local area you are familiar with, making many things easier. And while early season has fewer backpackers, you may still have other campers at the most desirable campsites. My suggestion is to embrace the company and make friends with your fellow outdoor enthusiasts — enjoy the evening. [There will be plenty of time for longer more aggressive trips later in the year where you can have your solitude.]
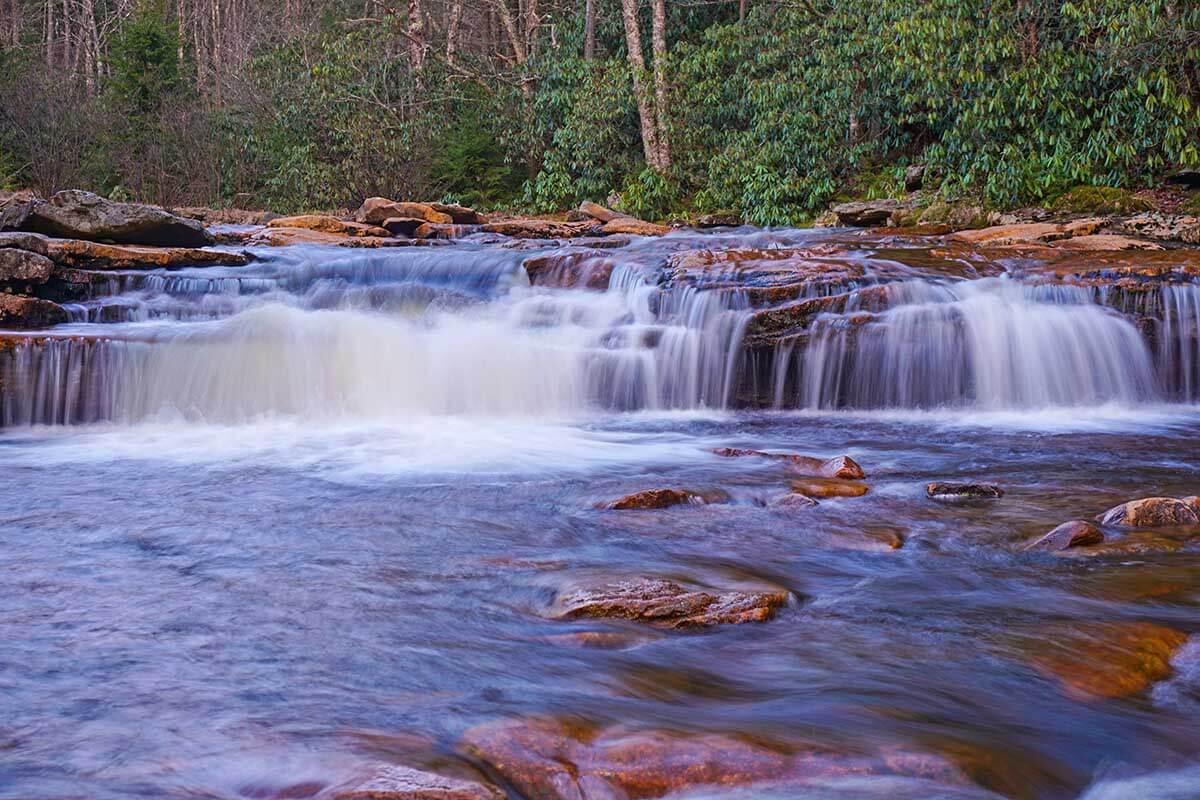
There are many local options for lovely areas to backpack and camp. This beautiful waterfall in Dolly Sods is by an extremely popular backcountry campsite easily accessable to people from the Washington DC Area. Even in early spring, you may have company. My suggestion is to embrace the company and make friends with your fellow, like minded outdoor enthusiasts.
11. Don’t Worry So Much About Wet and Cold
If you have the right gear (see gear list below) you’ll do fine. And a local trip in a more controlled area is the perfect place to practice and get good experience in these conditions. Finally, if for some reason things do get intolerable, it’s likely not all that far to hike out to the car.
Related content
- Top Mistakes Using the Layering System – How to Stay Warmer and Drier
- Rain Jacket Durability | How to Select the Best Durable Rain Jacket
- Guide to Lightweight Down Jackets and Pants for Backpacking
- The Art of Sleeping Warm | A Guide to Sleeping Bags and Quilts
- Why You Won’t Freeze or Starve Backpacking
12. Take notes on what worked and what didn’t work
After the trip, change out gear and modify your technique as required. If you do need new gear, don’t wait until the last minute to buy it before your next trip. Clean and wash your gear after the trip and then properly store it in a dry area.
Closing Thought – Embrace Your Mistakes!
One of the main purposes of an early season trip is to shake-out your gear and technique. As such, it’s OK, even desirable to make mistakes. Better to make your small blunders in a safe, controlled local place than on your big destination trip of the year. That way you can start that trip on the John Muir Trail ready to roll, with your kit and technique dialed in.
Bonus Tip – Keep your Trip Fun
The overarching principle for this post is to keep your trip and trip planning as enjoyable as possible. Alison and I have one rule for every trip: If either of us is NOT having fun it’s time to stop and make a NEW plan. That is, a plan that puts FUN back into the trip.
Wishing you a great start to the backpacking season, -Adventure Alan
Disclaimer
This post contains affilate links. If you make a purchase after clicking on the these links, a small portion of the sale helps support this site at no additional cost to you. I do not receive compensation from the companies whose products are listed. For product reviews: unless otherwise noted, products are purchased with my own funds. I am never under an obligation to write a review about any product. Finally, this post expresses my own independent opinion.
Many stunning outdoor photos are shot with smartphones. BUT most are no accident. The photographer used good basic techniques & inexpensive gear to get that great photo. The good news is that you too can do this with the 10 following hacks and accessories for better smartphone hiking photography.
The Newest Smartphone Cameras Kick Ass!
The new iPhones (and other high-end smartphones like the Google Pixel) are intensely applying “computational photography” (sophisticated software image processing) to significantly improve photos. This includes dynamic range (ability to handle large differences from the lightest to darkest parts of the photo), color, contrast, texture, and even focus to their photos.
The improvements can be dramatic. So much so, that many times the photos from the new smartphones often look better than photos from much larger “traditional” DSLR cameras. It may take a lot of editing of photos from a traditional camera to clearly see the benefits of a larger sensor. That being said, this article will help you get the very best out your smartphone camera.
The best hiking camera is the one you have with you. For me, that most often is my iPhone. I used my iPhone 6+ to quickly grab a spur of the moment shot of my wife cat napping on warm November afternoon. [And my new iPhone X would have taken an even better photo!]
10 Hacks and Accessories for better smartphone hiking photography
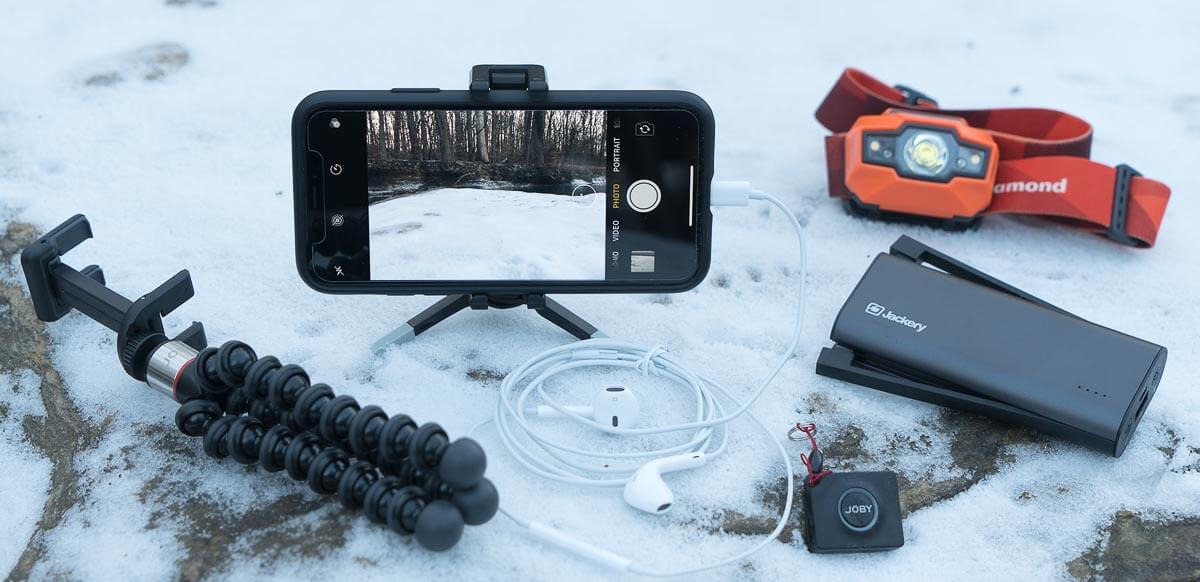 Basic Smartphone Photography Accessories L to R: [Joby GripTight Tripod at (REI) or new JOBY GripTight ONE GP Stand] both better for larger phones & are more adjustable), iPhone X on a JOBY GripTight ONE Micro Stand (smaller & lighter), Apple headset used as a remote shutter release, a Bluetooth Smartphone Camera Remote Shutter (Joby), Jackery Bolt 6000 mAh USB Battery (keeps phone charged for days of use), Black Diamond Headlamp (gets you safely to and from the magic light of dawn & dusk for superior photos).
10 Hacks and Accessories for better smartphone hiking photography
For only $25 and some basic technique, you can take far better photos with your iPhone or Android.
- Take the photo! Don’t ever think your smartphone camera is holding you back.
As hockey great Wayne Gretzky says, “you miss 100% of the shots you don’t take.” The same applies to photography, maybe more so. Grab your smartphone and start shooting. Some of my best photos were taken on a lark. An “I wonder what this will look like attitude” pays off! - Clean your camera lens. It’s likely filthy! That layer of grime will make every photo worse.
- Clean with just your breath and a quality lens cloth like a MagicFiber Microfiber Cleaning Cloth.
- Avoid any case covers over your lens (unless absolutely necessary).
- Get an App for manual control of your camera. Camera+ is a personal favorite for it’s ease of use and power. It also has decent photo editing capabilities.
- For iPhone: Camera+ , or Manual, or VSCO, or ProCamera, or ProCam 4 – Manual Camera
- For Android: Open Camera (free), Camera FV-5, and VSCO
- Note that your Camera App doesn’t need to be complicated or hard to use. All you really want is control over ISO, shutter speed and focus area. This is mostly for shooting off the tripod in the magic light of dawn and dusk. [Ideally, you want to manually set focus and a low ISO (around 32) to get the best images.]
- Tip: Get the best quality photo negatives from your smartphone. If you will be doing serious editing of your photos (see #9 below) then use your camera app to also save in RAW format.
- Get a small tripod: This eliminates camera shake, and blurry photos in low light.
- Also take way better better selfies! (See more on this below.)
- Larger tripods: Joby GripTight GorillaPod Tripod (REI) or Amazon
new JOBY GripTight ONE GP Stand – Flexible Universal Smartphone Stand for Large Smartphones - Smaller tripods: Joby GripTight Micro Stand (REI) or Amazon
new JOBY GripTight ONE Micro Stand -Super Compact Stand for Smartphones - Or improvise a “natural” tripod. Jump to section on this below.
- Get a remote shutter button: This prevents photo blur when you press your camera to take a photo (the camera moves/vibrates while touching it). It’s also fabulous for high quality selfies (e.g. without your face smashed into the phone see more on this below).
- Bluetooth Smartphone Camera Remote Shutter
- Or use the 2 or 10 second timer setting for your smartphone camera
- Or a little known free feature: Your iPhone wired headphone set works as a remote shutter button. Just press the ‘+,’ volume up button to take a photo!
- Get closer to your subject and fill the frame (if you can).
- Closer is almost always better! So walk, scramble or climb closer to your subject.
- DON’T USE YOU CAMERA’S ZOOM! (unless you have one of the new dual lens cameras like the iPhone 7+, 8+ or X. Then go ahead and use that ‘2x’ button.)
- All your smartphone’s “zoom” function does is pre-crop your photo. You aren’t getting any more pixels or resolution than if you just cropped it yourself. As such, you might just as well have the additional area around your subject in case you want to use it later.
- Try and shoot with the sun behind you, or around 90 degrees from the sun (sun to your left or right.)
- If you shoot into the sun, light will fall directly onto your camera lens. This will create washed out low contrast photos lacking in color and detail.
- If you absolutely need to shoot into the sun… you can try and shade the lens with your hand, but this can be difficult to do and still tap the shutter button. Sometimes a friend’s hand is a big help.
- Take a breath and carefully REVIEW YOUR PHOTO after taking it! You’ll likely not get a 2nd chance, so make sure it’s right.
- Sharpness: Enlarge your photo and scan it. Is everything you want in focus, especially critical areas like people faces/eyes & foreground detail?
- Exposure: Correct overall exposure? Is there some detail in both shadows and highlights?
- Dim Light Problems: Any camera shake (overall photo blur) from a low shutter speed? Smudging, poor color and other nastiness from a high ISO?
- People: Eyes open? Good expression? Awkward position, clothing malfunction?
- Extraneous Objects: Any odd objects in the photos. E.g. trekking poles you left in the foreground, piece of garbage, somebody photobombing, etc.? Also, make sure you didn’t inadvertently cut off something critical like the top of a mountain.
- Use a good photo editing app like Snapseed to dramatically improve the look of your photos. Spending just a few minutes editing can transform a so-so photo to something special. Many of these programs are free and simple to use.
- My personal favorite is Snapseed but some apps like Camera+ also have decent editors.
- And of course Lightroom Mobile is good if you already own one of the Adobe Creative Cloud Photo Plans. But some people may not like the subscription fees.
- Tip: Use your camera app to also save in RAW format to give you the most latitude to edit your photos. The RAW file has more dynamic range (ability to capture a larger range of lights to darks without losing detail). E.g. clouds and other light objects will still have good detail while the normal (JPEG or HEIF) files will not.
- Manage your battery life and carry a backup battery.
- Manage your battery life. Nothing is worse than having an incredible photo opportunity in front of you and pulling out a dead smartphone. With good battery management I get 7 days on trail use hiking with my iPhone. Read more on battery management here.
The best batteries for charging smartphones are: - The 5 oz EasyAcc 6000mAh USB Battery. The highest capacity for its weight, it charges a smartphone 2 to 3 times. I use it on 7-14 day backpacking trips. It has a built-in micro-USB connector and you can connect a lightning cable to its USB port. So you can charge lightening and micro-USB devices at the same time.
- Jackery Bolt 6000 mAh USB Battery. This has faster charging and both micro-USB & lightning connectors. Downside is it has slightly less overall tested (vs. claimed) capacity than the EasAcc.
- Manage your battery life. Nothing is worse than having an incredible photo opportunity in front of you and pulling out a dead smartphone. With good battery management I get 7 days on trail use hiking with my iPhone. Read more on battery management here.
6 Bonus Hacks
Take the photo! Don’t ever think your smartphone camera is holding you back – I took this shot with a cheap 2011 point & shoot camera but my current iPhone X would have taken a better photo! The major point is that I had a camera and made the time to take the photo. [Pic is Canyonlands UT: An ugly storm of sleet & snow was about to break when a sudden opening in the clouds illuminated the bluff in front of me. I had less than 30 seconds to extract the camera from my pocket, get it out of a waterproof baggie and take the shot before the sun was gone and the heavens opened.]
- Take High Quality Selfies. Use one of the small tripods and a Bluetooth Smartphone Camera Remote Shutter. That way you and your friends can easily pose in a picturesque spot many feet from your phone and casually press the remote shutter to take a great photo!
- Shoot in the “golden hour” of dawn and dusk. This is when the pro’s shoot. Take the time when you get into camp to scout out some good areas to shoot at dawn and dusk. Then get there with plenty of time to setup and wait for the light show to unfold.
- A headlamp is a big help to hike there/setup in the dark, and/or to takedown and hike back in the dark. Use a good Headlamp with a dimming function so you can have low light for not blowing your eyes out when setting but also have a very bright light for hiking.
- Protect your smartphone in the field and save weight and money. Rather than bulky, awkward and expensive cases like an OtterBox Case, use the following items:
- A simple sub-$10 phone case like this Spigen Ultra Hybrid iPhone X Case or the same one for iPhone 7/8.
- Tempered Glass Screen Protector
- Pint Ziplock Freezer bag. I highly recommend using a Pint Ziploc Freezer Bag used to protect your smartphone from dust, scratches and water (effective, lighter and less expensive than elaborate waterproof cases! And it works well for other electronics.).
- Take dreamy blurred water photos. Using Apples new “LIVE” mode or using an app like Slow Shutter Cam. Note that you WILL need to use a tripod and a remote shutter button to get best results. (see above for gear details).
- Make your smartphone into the best hiking GPS going. See How to use your Smartphone as the Best Backpacking GPS.
Final Hack – Improvise a “Tripod” to Stabilize your Camera
You can get much of the benefit of a tripod to stabilize your smartphone by improvising a “tripod.” You can brace your smartphone up against a rock, tree, or even hold it against your trekking pole. Remember to squeeze off that shutter gently! Every bit of stability helps to get a sharp photo.
Or better yet, you can use folded garment (or other prop) on top of a rock, or fallen tree to make an improvised tripod/camera rest. Now that you are not holding the camera, remember to put the shutter release on a 2-second delay for sharpest results. But many times pressing the camera will bump it out of position or knock it over. In this case, use a bluetooth remote shutter release (or for iPhone users, remember that your headphones as a remote shutter button) see details in hacks above.
Additional Reading
Best Backpacking Cameras 2017 – This highly ranked article lays out the best gear and technique for larger, non-smartphone cameras.
How to use your Smartphone as the Best Backpacking GPS – This is the definitive article on how your smartphone can blow away the best dedicated GPS units from Garmin and other major GPS manufactures.
Disclaimer
This post contains affilate links. If you make a purchase after clicking on the these links, a portion of the sale helps support this site at no additional cost to you. I do not receive compensation from the companies whose products are listed. For product reviews: unless otherwise noted, products are purchased with my own funds. I am never under an obligation to write a review about any product. Finally, this post expresses my own independent opinion.
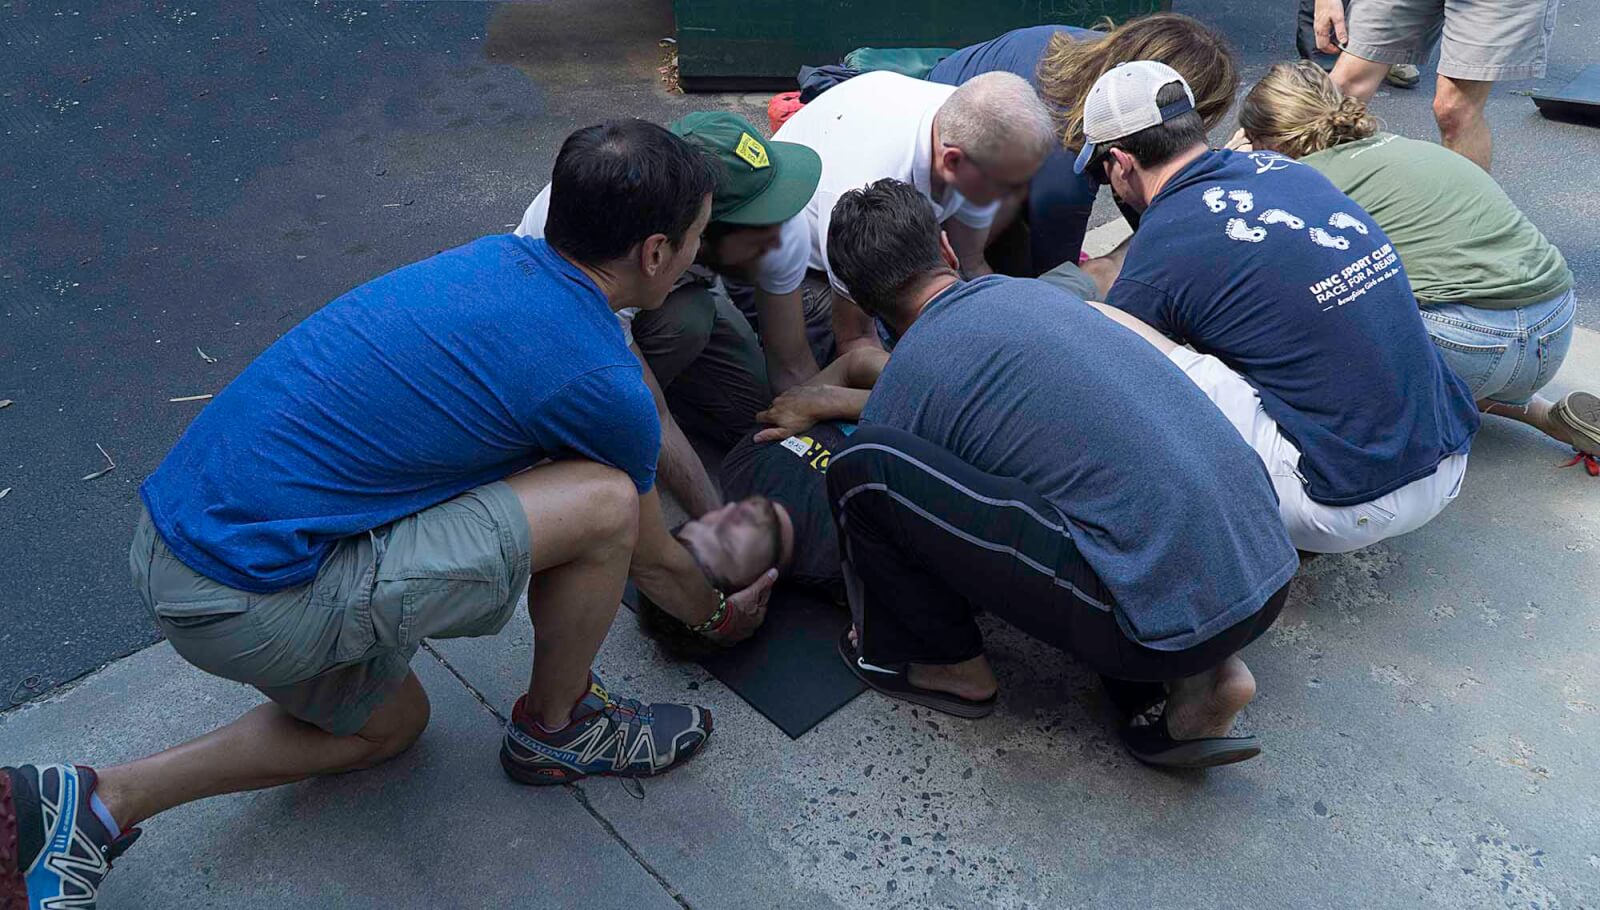
Knowing what to do in a medical emergency in the wilderness can make all the difference to someone in need. That someone might even be you! I was reminded of this as I refreshed my Wilderness First Aid (WFA) certification this past weekend. In fact, just a few years back I used my Wilderness First Aid skills in the Grand Canyon to assess a serious wilderness medical emergency and provide comfort and care to a patient in the middle of winter. I eventually coordinated an emergency helicopter evacuation via satphone. Take home message: stuff can and does happen in the backcountry, and YOU can make a difference!
| Note: Taking a Wilderness First Aid Course is easy! And it is as close as your local REI Store.
“In just two days, you will learn the knowledge, skills & ability to make sound decisions in an emergency.” |
Lead photo: Things can get pretty realistic in a WFA course. Our instructors did a convincing job of making my head look as if I’ve been struck by a large rock. My role was to “play” someone with a concussion. The rest of the group had to assess and figure out the problem using the standard WFA “Patient Assessment System.”
Why a Wilderness First Aid Course vs. “Regular” First Aid Course
- In a populated area you call 911 and until an EMT’s arrive, your job is to keep the injured person stable and alive—CPR, stop bleeding etc.
- In the wilderness, 911 is not usually an option & the EMTs aren’t coming right away. It may be a day or two until help arrives. You need to be a lot more self-reliant and make a lot of good decisions.
- As such, in the wilderness, you have more responsibilities: to figure out what’s wrong with the person, then treat, stabilize and care for them. Essentially, doing much of what EMTs would do.
- Wilderness First Aid focuses more on injuries likely to happen in the wilderness—hiking, backpacking, climbing, backcountry skiing, etc.
- You have far fewer first aid materials at hand vs. in a populated area. You need to learn how to re-purpose hiking, backpacking gear to bandage, splint, etc.
- The List of Wilderness First Aid Topics is in the last section of this article

Only 10g or 1/3 oz! The incredibly useful, light & compact NOLS Wildness First Aid Pocket Guide goes into my first aid kit on every trip. BUT! it’s meant to be a refresher for people who have taken the WFA course and are familiar with the material. It is far less useful if you haven’t taken the course.
The Easiest Way to Take a Wilderness First Aid Course
The short answer is at your local REI Store. This is where I did my WFA course last weekend. The course is run by REI in cooperation with NOLS Wilderness Medicine, the recognized leader in this area. REI makes it easy by hosting the NOLS instructors and providing a classroom and an outdoor area to practice various emergency scenarios. And I can’t say enough good things about the expertise, professionalism and teaching skills of our two NOLS instructors, Clemencia Caporale and Ryan Murphy.
How to Register for a WFA Course
Note: WFA courses fill up fast. As such, it’s always better to sign up early for courses. This is the voice of experience. I was a bit late scheduling this year, and by then my first two choices were already filled.
First Choice – Your local REI
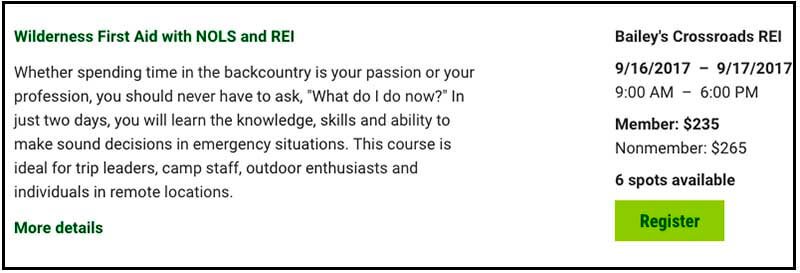
Go to WILDERNESS MEDICINE ACTIVITIES on the REI Site. Put in your zip code and look for courses titled “Wilderness First Aid with NOLS and REI”
If you don’t find a match, or don’t live near an REI store, you can try the NOLS Wilderness Medicine site. Here’s a link to NOLS Wilderness First Aid Courses. Finally, Landmark Learning (a NOLS affiliate) also offers Wilderness First Aid Classes
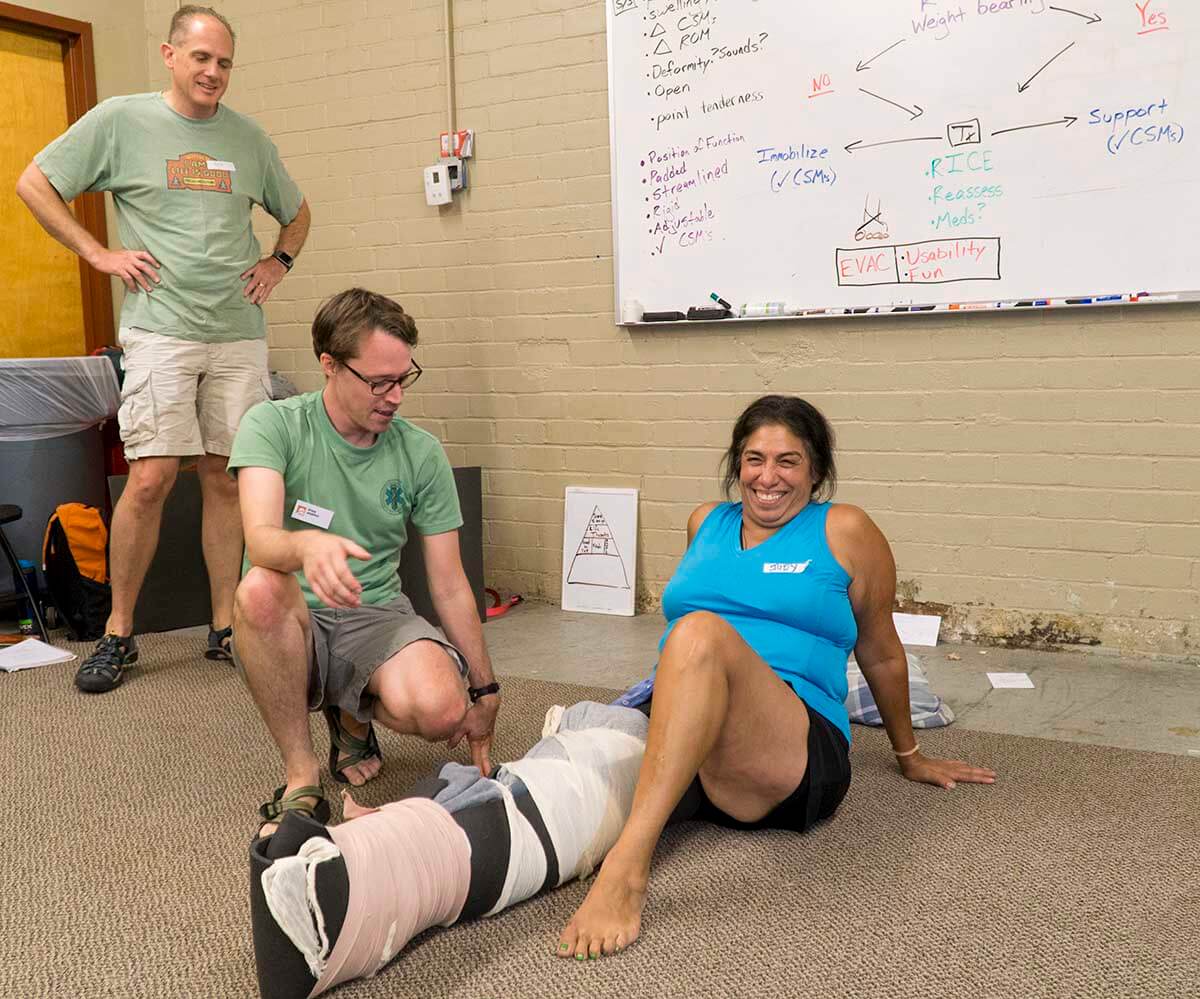
Instructor Ryan Murphy demonstrating an improvised splint for lower leg injury using materials you would have on hand backpacking. In this case, a sleeping pad and clothing. This is an unusable injury and she will not be walking out. [Course section on Musculoskeletal Injuries]
Major Topics of NOLS Wilderness First Aid Course
- Patient Assessment System (how to systematically figure out what’s wrong)
- Emergency and Evacuation Plans (when to stay put, when to evac., etc., including how to phone in a good “radio” report)
- Emergency Communications Devices – Strengths, Weaknesses, and Use
- Spine Injuries
- Head Injuries
- Shock (identifying and treating it)
- Wilderness Wound Management (Simple scrapes to deep gashes, & burns; Infection management)
- Musculoskeletal Injuries (sprains, muscle tears, dislocations and broken bones)
- Heat Illness (heat exhaustion, dehydration, heat stroke)
- Cold Injury (hypothermia, frostbite)
- Lightning (prevention and treatment)
- Altitude Illness
- Allergic Reactions, e.g. bee stings, food allergies, etc. (anaphylaxis and EpiPen training)
- Finally, figuring out the right First Aid Kit to carry.
Preparing to “BEAM*” carry an injured person to a safer and more comfortable area. This method of carrying keeps the patient’s neck and spine stabilized in case of a suspected spinal injury. No special equipment like a backboard is needed. [* BEAM stands for Body Elevation and Movement]
What to Expect
Duration: This course is two 8-hour days. Usually Saturday and Sunday. WFA courses are offered year round.
They usually start at 9am and finish at 6pm, with an hour lunch midday.
Cost: Approx. $215 to $265
Note: Many times there is also an optional CPR/AED course run Friday Night (most guiding programs require certification in both Wilderness First Aid and CPR/AED). You can also take CPR/AED separately—from your local Red Cross (tons of times and options).
The course is definitely “hands on.” You’ll learn the super-professional way to hands-on examine fellow participants—to find injuries, bleeding, take pulse, check for skin temperature, etc.—even carrying injured people and moving them to more comfortable positions. You’ll do a lot of realistic simulations and ask each other some interesting and sometimes blunt and detailed personal questions that you wouldn’t normally ask people. All of this is essential to provide the best care for your patient!
Dress for activity
Since you courses are year round and you’ll be outside some of the time, you’ll need to bring clothing appropriate for the weather (heat/sunshine, cold etc.). Also, you will be involved in a number first aid scenarios, many likely on the ground. As such, you may wish to bring an insulated pad or crazy creek chair for your comfort during these scenarios. This course uses stage blood for realistic scenarios, which may stain some fabrics. So wear clothing you do not mind getting dirty/stained. The classroom environment generally lends itself to casual clothes and a pair of comfy shoes or slippers. In summary, come equipped with a light daypack, your lunch and snack food, comfortable clothes, and enough insulation to keep you warm during the outside scenarios in colder weather.
Next Steps?
There is also a longer course, Wilderness First Responder (WFR), for folks who already know something about first aid and want to take their skills to a whole new level. If so, checkout the NOLS WILDERNESS FIRST RESPONDER (WFR) Course.
Conclusion
Remember that Wilderness First Aid matters! Not only for someone in your own party, or somebody else you come by that needs help—but also potentially yourself. You might think it will never happen to you our your group, but it can. And if it does, knowing those skills can literally mean the difference between life and death.
Want to practice good Leave No Trace (LNT) but keep your pack ultralight? No problem, this guide gives you some think-outside-the-box, ultralight (UL) options for LNT. It also covers areas of caution where UL backpackers need to pay special attention with regard to LNT. As such, this Ultralight Backpacker’s Guide to Leave No Trace covers specific UL gear and techniques that will keep the wilderness looking like wilderness & your pack weight low!
Lead photo: Thinking outside the box, a simple 10 oz. bivy sack might be your lightest and best LNT option. You can easily camp on ideal durable surfaces like this slickrock in Utah (which is great LNT!). In addition it’s super fast & easy to setup & take down. In contrast, many popular ultralight tents & shelters rely on numerous stakes and guy-lines for support and therefore are extremely difficult to pitch on solid rock! [Photo Alan Dixon]
Why Leave No Trace?
Standing atop Ryan’s Peak in the blazing heat of Joshua Tree National Park, I looked south over the vast desert of Joshua trees. The wind on the peak was the only sound as I happily chatted with my hiking partner on the way to the top. At the summit, we were alone, and it was easy to imagine we were explorers in a new land – the first eyes to look on the desert below.
| Far too often that magic moment is suddenly shattered when we see a strip of toilet paper waving about from under a nearby rock. |
The good news is that it isn’t difficult or a lot of work to dramatically reduce our impact when we hike or backpack. And it can be ultralight. With just a little effort, we can leave places just as we find them, and preserve magic moments for those that come after us — the essence of LNT. In summary, this article will give Ultralight Backpackers some of the gear and skills to be LNT ambassadors.
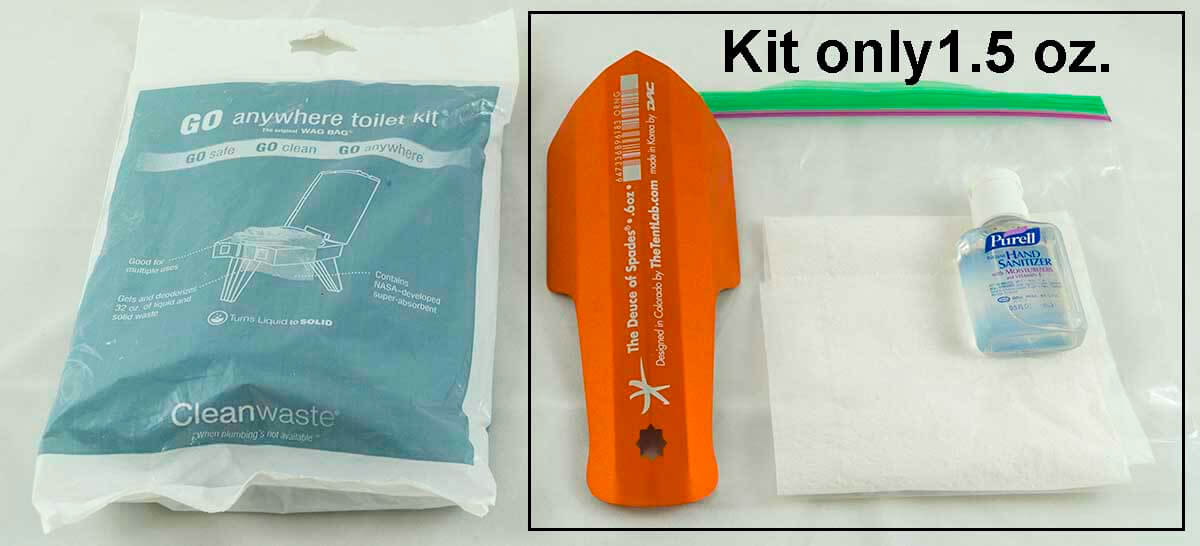
Keep that TP and poop from poking out of a shallow hole! An Ultralight Backpacker’s Caution: Using the heel of your shoe or a stick, it is very difficult to impossible to dig a correct LNT cathole. Better to carry the right UL tools for the job! Right: an 1.5 oz ultralight potty kit – Deuce of Spades Potty Trowel, minimal TP, and small (1/2 oz) bottle of Purell allow for good LNT Waste Disposal. Left: a “Wag bag” is a light sanitary solution for when regulations require you carry EVERYTHING out.
The Ultralight Backpacker’s Guide to Leave No Trace
This guide focuses only on select areas of LNT specific to Ultralight Backpacking. Specifically, options are proposed to keep pack weight low, or cautions (in red) where standard ultralight gear or practices might need to be modified for good LNT. As such, this is NOT an exhaustive treatise of all LNT guidelines. For a complete listing of the all 7 principles of Leave No Trace see the Appendix.
6 Select Areas of LNT Specific to Ultralight Backpacking
- A Table of Select Ultralight Gear for Leave No Trace
and then the specific topic areas of - Food Storage: Bear Canisters & Ursacks vs. Bear Bag Hanging in a Tree.
(Or why hanging your food in a tree is not great.) - Sanitation and Human Waste Disposal
- Low Impact Camping – Tents and Other Shelters (sometimes a challenge for Ultralight Backpackers)
- Low Impact UL Backpacking Footwear
- Respect Wildlife with a Long Zoom Camera — phone cameras get you do damn close!
1. Table of Select Ultralight Gear for Leave No Trace
| Item | Oz | $ | Comments |
|---|---|---|---|
| Sanitation and Potty Needs | |||
| Deuce of Spades Potty Trowel | 0.6 | $20 | Lightest effective trowel for digging catholes to bury human waste. See LNT Principle 3: Dispose of Waste Properly |
| Zerogram Cathole Trowel | 1.0 | $5 | Nice light stainless steel trowel. Great value. |
| GSI cathole Trowel | 2.9 | $5 | Low-cost, readily available. More comfortable handle but heavy. |
| Wag bag | 2.5 | $3 | When reg’s require you carry EVERYTHING out! e.g. Mt Whitney |
| Bears — LNT Food Storage | |||
| Note: Bear canisters and the Ursack are as easy as it gets to effectively protect your food vs. the far more difficult and less effective method of hanging a bear bag (see below) | |||
| Ursack S29.3 Bear Bag | 7.8 | $80 | Game changer! Same benefits as a bear canister but 5x lighter and much less bulky in your pack. Caution: Still pending approval in a few parks, e.g. Yosemite & Sequoia Kings Canyon. |
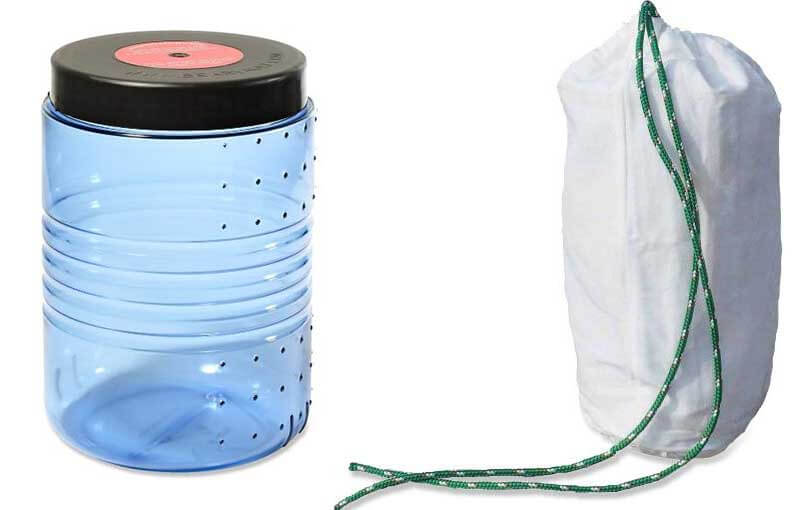
| Bear Vault BV500 canister | 41 | $80 | Low cost. Approved by almost all areas. Readily available. |
| Wild-Ideas Weekender | 31 | $288 | Lightest bear canister approved in most parks. Pricy tho. |
| Hang a Bear Bag (traditional, e.g PCT method) like MLD Pro Bear Bag Sys. |
4.1 | $10 to $50 |
Low cost & low weight. Not great for areas with bear problems. Time consuming & difficult to do correctly. Finally, by the time you hang it so bears can’t get it—you may not be able to get it. |
| Aloksak OP Sak 12.5″ x 20″ | 1.0 | $6 | Use with all methods for less food scent & animal attention |
| Tents for LNT | |||
| REI Quarter Dome 2 Tent | 53 | $349 | Lower cost freestanding tent with minimal staking needs. Easier to setup on hard, durable LNT surfaces like rock. |
| Big Agn. Copper Spur HV UL 2 | 44 | $450 | A lighter but more expensive freestanding tent. |
| Zpacks™ Duplex Flex Tent | 33 | $725 | 2 lb freestanding shelter! Crazy light. Pricy! (I haven’t tested it.) |
| Think Outside the Box LNT Shelter Options | |||
| Bivy Sack: Mountain Laurel Designs Superlight 1 per or 2 per | 8 | $175 | Low cost, low weight, no stakes. Fits into small areas where tents won’t. (may need to supplement with a UL tarp) |
| Hammock: Hennessy or Dutchware | 8 to 32 | $40 to med. | Great LNT. No ground contact. Expands campsite options into the woods. Many low weight. See: 7 Reasons Why Hammock Camping is Fantastic – How To Get Started |
| For Minimal Ground Damage Hiking — Light Shoes with low profile tread & soft soles | |||
| Trail running shoes: Altra Superior or Altra Lone Peak | 18 | $110 | Great shoes with soft soles and minimal tread. Light. Huge toe room. Super comfortable! |
| Brooks Cascadia Shoes | 24 | $130 | Slightly heaver and stiffer option with a snugger fit. |
| Respect Wildlife with a Long Zoom Camera — phone cameras mean you will have to get too damn close! | |||
| Panasonic Lumix DC-ZS70 super zoom camera | 11 | $480 | Low weight. Long, 720mm zoom lens brings wildlife to you. 25x further away than an iPhone! |
| Many compact zoom cameras | 8? | A 120 mm zoom keeps you 4x further away than an iPhone | |
2. Food Storage: Bear Canisters & Ursacks vs. Bear Bag Hanging in a Tree
Caution area for ultralight backpackers. Bear bag hangs, while light, are likely NOT the best option. An Ursack or Bear canister is likely better. Where allowed, Ursack S29.3 Bear Bag is the lightest, simplest and most effective choice. And, both the Ursack and canisters are also much faster and easier to use than a bear bag hang.
A bear canister like the BV-500 (L) or an Ursack (R) are the most reliable way to protect your food. In addition they are much easier and faster to use with fewer mistakes/failures vs. hanging a bear bag in a tree. And the sad truth is that by the time you hang a food bag in a tree so bears can’t get it, it is extremely likely that you won’t be able to get it down either!
The fastest, easiest and most effective way is to store your food in a bear canister. And a number of bear canisters are approved for food storage in almost all US parks. Bear canisters such as the (41 oz) Bear Vault BV500 Food Container (canister) canister seal tightly with a double locking mechanism for smart bears and small rodents. They also make great camp stools!
Where allowed by regulations, our first choice would likely be the much lighter and also quite effective alternative Ursack S29.3 Bear Bag. At only 7.8 oz. it is 5x lighter than the BV-500, less bulky and takes up far less pack space. Ursacks are literally bulletproof—even if a bear gets to your bag, it won’t be able to tear through to your food. The downside is that the Ursack is still not approved in a few National Parks like Yosemite and Sequoia Kings Canyon. And, if a bear does get a hold of an Ursack, it is possible (probable) the food inside might get a bit squashed.
Note: it is also possible for bears to batter rigid bear canisters and seriously damage the food if given time to get into the container. Or, since a canister isn’t anchored to a tree like the Ursack, if given time they can roll the bear canister to an area where you’ll never find it. Per the Sequoia & Kings Canyon page on Wilderness Food Storage: “You can often scare bears away by making loud noises and throwing objects before they get to your food. Be bold, but keep a safe distance and use good judgment. Never attempt to retrieve food from a bear. Never approach a bear or get near a cub.”
Hanging a Bear Bag
If the section above about Ursacks and canisters hasn’t convinced you, and if wilderness regulations permit, you may consider Hanging a Bear Bag in a tree. For better (or possibly worse) hanging food in bags out of reach of wildlife is an extremely common practice. Unfortunately, as hanging bear bags continues, bears and other wildlife are getting better and better at beating the bag. Bears have been known to cut them down or cooperate with each other to reach these bags. The irony of bear bagging is that when done properly, humans as well as animals struggle to retrieve the food inside. If you still want to hang a bear bag, there are a couple of things to consider:
- Do your research on the areas you’ll camp in to make sure there will be something to hang your bear bags from. It’s really hard to hang a bear bag in the desert or on coniferous pines.
- Decide which bear bag technique you want to use ahead of time. The PCT method and the double rope method are both effective in bear country.
- For more reading see Leave No Trace on Hanging a Bear Bag
3. Sanitation and Human Waste Disposal
Caution to UL Backpackers: the heel of your shoe, stick or another found object are NOT great tools to dig a deep enough or large enough cathole to properly bury human waste. Do yourself and other hikers a favor and carry a good potty trowel. How can you argue with a UL Potty Trowel that weighs only 0.6 oz!?

At 0.6 oz, the Deuce of Spades is one of the best and lightest potty trowels for UL backpackers.
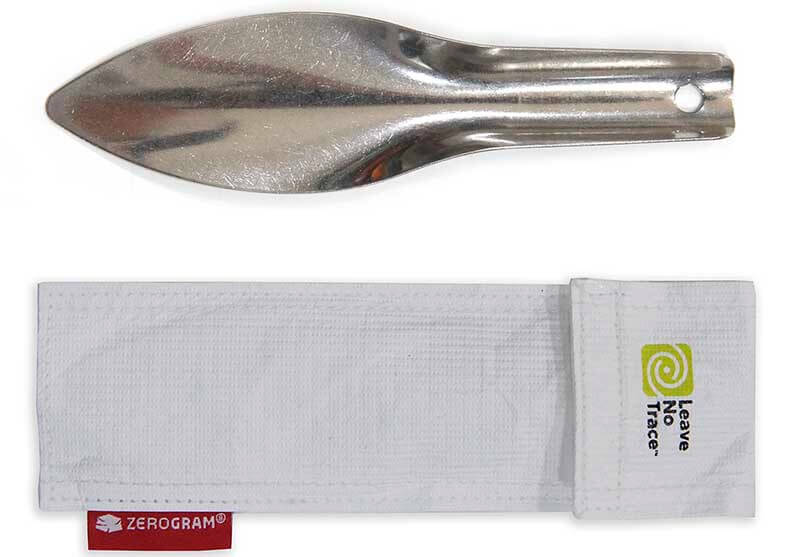
Another UL potty trowel is the 1.0 oz, stainless steel Zerogram Cathole Trowel.
Catholes and Potty Trowels
For every well-travelled campsite in the backcountry, there’s likely a space close by dotted with exposed toilet paper “blooms” and torn up moss. A common backcountry pooping practice, catholes can be easy and effective if used properly, but disruptive and harmful when poorly executed. For lightweight backpackers interested in catholing, the Deuce of Spades Trowel and the Zerogram Cathole Trowel are excellent potty trowel options.
The basic standards for backpacking human waste disposal are listed below (excerpted from: LNT Principle 3: Dispose of Waste Properly)
- Catholes must be 200 feet from trails and flowing water
- Catholes should be 6x6x6 inches in soil rich in organic material
- Accelerate the decomposition process by stirring with a stick before filling in the hole.
- You may need to carry out used toilet paper (but “Natural TP” is always OK). And it may be acceptable to bury certain types TP in your cathole in certain environments. But in unsuitable areas like the arid desert, the best practice is to carry your TP out. And it not a good idea to burn your TP. For more on TP use see: LNT Principle 3: Dispose of Waste Properly
When Regulations Require you Pack EVERYTHING Out!
In some areas, catholes are not acceptable as wilderness bathrooms. This is because, either the soil lacks bioactivity to break down feces, or because high traffic overwhelms the capacity of a space to accommodate everyone’s restroom needs. In these situations, hikers are obligated to pack it out. Some examples are the Grand Canyon, Mt. Whitney area in California, and Buckskin Gulch and Paria Canyon in Utah. In this case, The $3 – CleanWaste Wag Bag, RESTOP Wilderness Waste Containment Pouch and Biffy Bags are all effective and lightweight options for these trips. They can be used repeatedly and are leak proof.
4. Low Impact Camping – Tents and Other Shelters
Caution for UL backpackers. Many popular UL tents and shelters may NOT be a good option for camping on hard durable surfaces like rock, or even very hard and/or rocky soils. This is where you can think outside the box about your shelter.
Where to Camp for LNT
| First, if there are approved and established campsites the park wants you to camp at, use them as your first and best campsite option rather than finding your own. Otherwise, follow these 3 critical goals when finding an ideal LNT campsite: |
- Follow the 200 Rule: Highly impactful backpacking moments like cooking, sleeping, and pooping and sensitive environments like rivers and trails should be kept at least 200 feet from each other.
- Camp on the most durable surfaces possible. Slick rock and pine duff are good examples.
- Find how you fit into the environment: “Good campsites are found, not made.” That is, don’t cut away brush, dig trenches, pull out large rocks, bend down small trees or otherwise modify an area to fit your tent. When you leave, your campsite should look exactly as you found it.
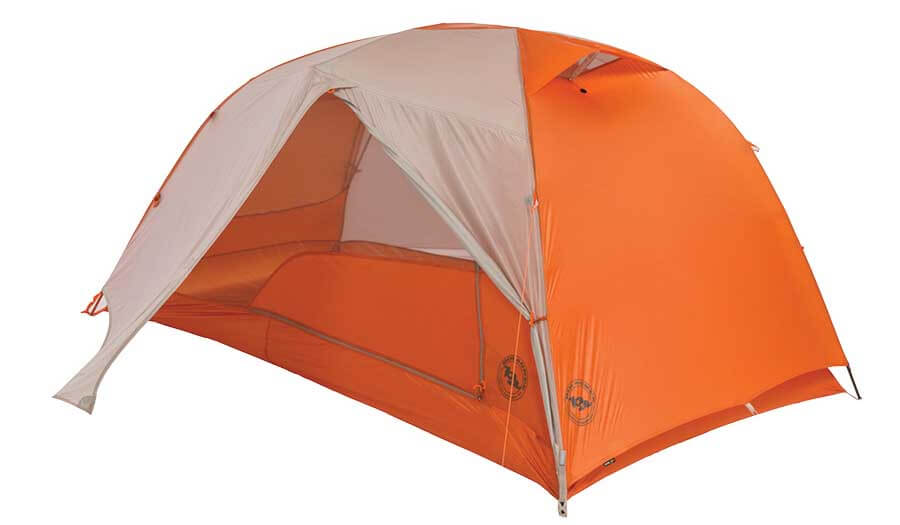
Big Agnes Copper Spur HV UL 2 tent at ~3 lb is a good UL choice for LNT: The main tent body is supported by poles and can be pitched without stakes on hard, durable surfaces like rock. [You may need a few rocks to anchor the rain fly tie-outs.]
Bivy Sack – A Very Light, Outside the Box LNT Option
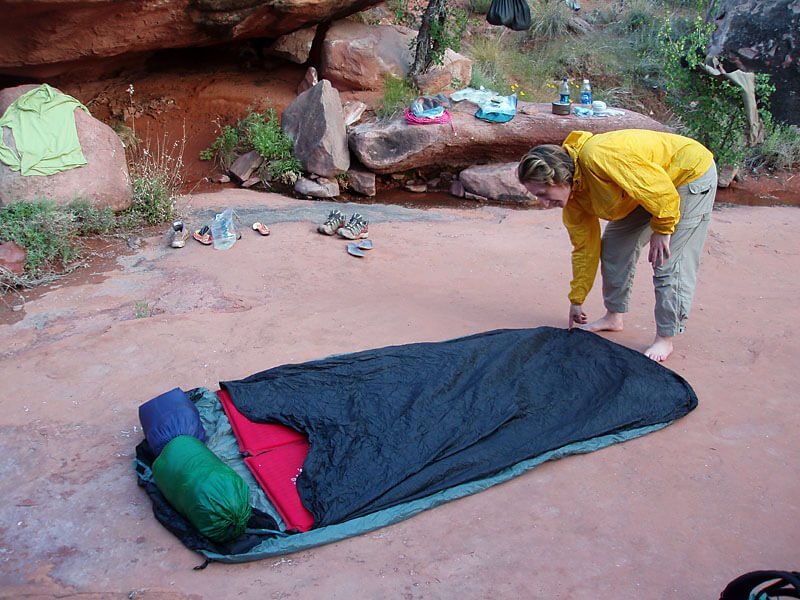
Only 10 oz (1/4 the weight of the tent above) a bivy sack is a super fast, super easy way to practice LNT camping. You can camp on the hardest of surfaces like this slickrock, but without the need for stakes. Setting it up and taking it down is a breeze. In addition, a bivy sack takes up the smallest area allowing you to squeeze into sites that would far too small for a tent.
Hammock Camping – Another UL, Outside the Box LNT Option
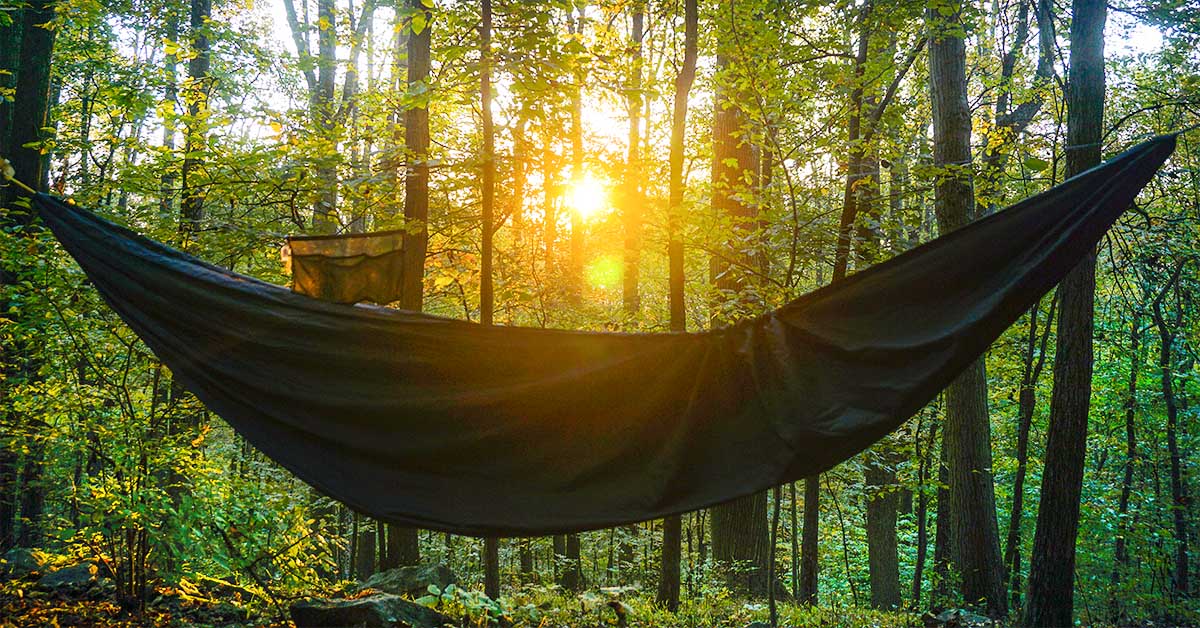
Sunrise hammock camping along the AT. Note that the hammock is directly over a sloping area covered with large rocks that would be un-campable with a tent.
Hammocks offer a fantastic LNT alternative to ground-based shelters like tents; there is no contact with sensitive terrain or wet ground. Also, hammocks can be used where durable terrain isn’t flat enough for an on-ground shelter like a tent. When camping with a hammock, it’s easy to avoid impacting trees, just use wide tree-straps 1″ to 1.5″. Almost all backpacking hammocks are sold with this type of strap. For more see Leave No Trace.org on Hammock Camping.
5. Low Impact UL Backpacking Footwear
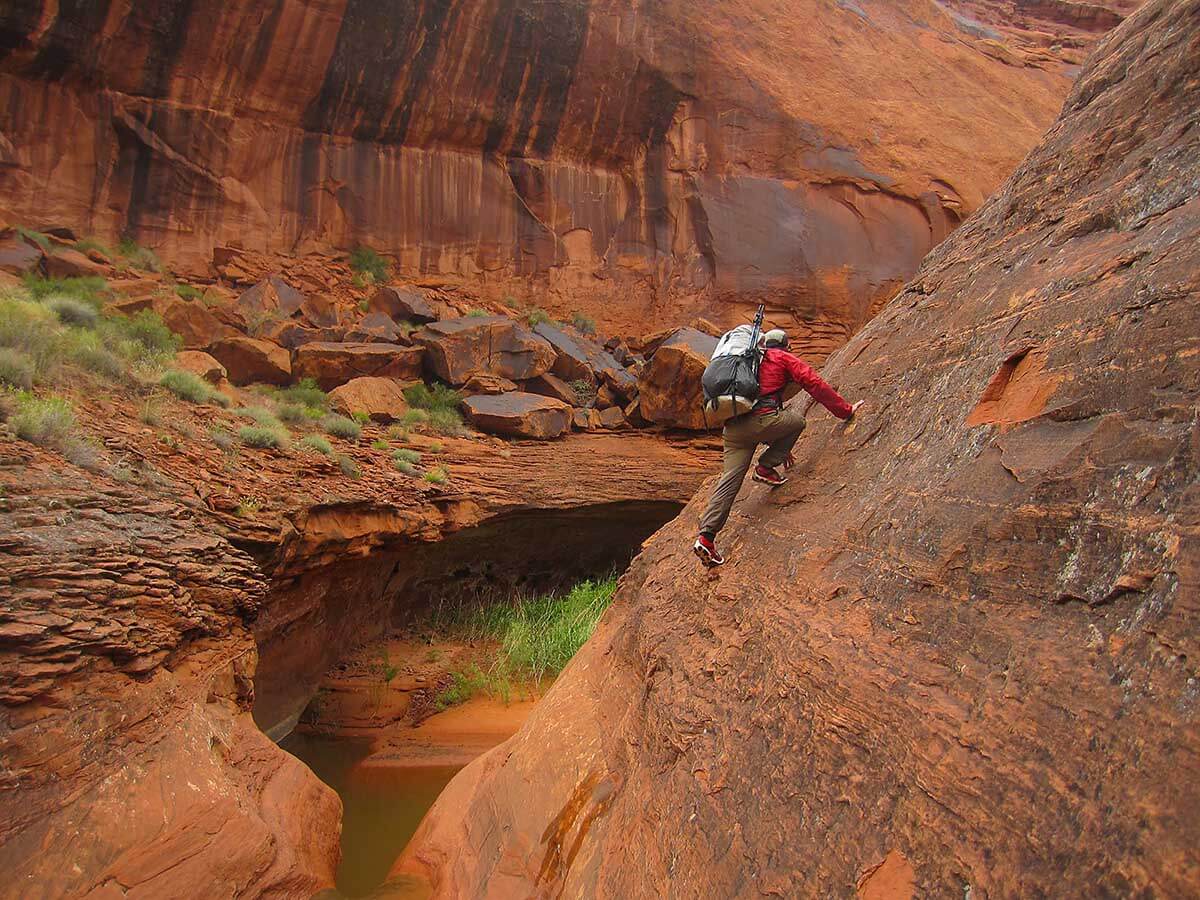
Think outside the box hiking shoes: Alan used very low profile tread, 9 oz UL “road running” shoes (Brooks Pureflow) on a 100 mile technical canyoneering trip (Escalante Overland Route), and to hike multiple 30+ days on the AT. Although they are called “road running” shoes, they obviously work great for backpacking, even on technically challenging terrain and wading.
Hiking on trail, ultralight backpackers have an LNT advantage. Using a very light set of gear like this 9 Pound Full Comfort UL Backpacking Gear List, ultralight hikers can move away from heavy, ankle supporting, deep-lugged boots to lighter, ecologically friendly shoes with low profile tread. These are great for minimizing the weight of footsteps and reducing ecological damage. If your pack is light enough, consider wearing trail running shoes with low profile treads like the Altra Superior Trail Running Shoes or the sturdier Lone Peaks. Most truly lightweight shoes implement low profile treads into their design, so finding the right low-trail-impact shoe shouldn’t be a challenge.
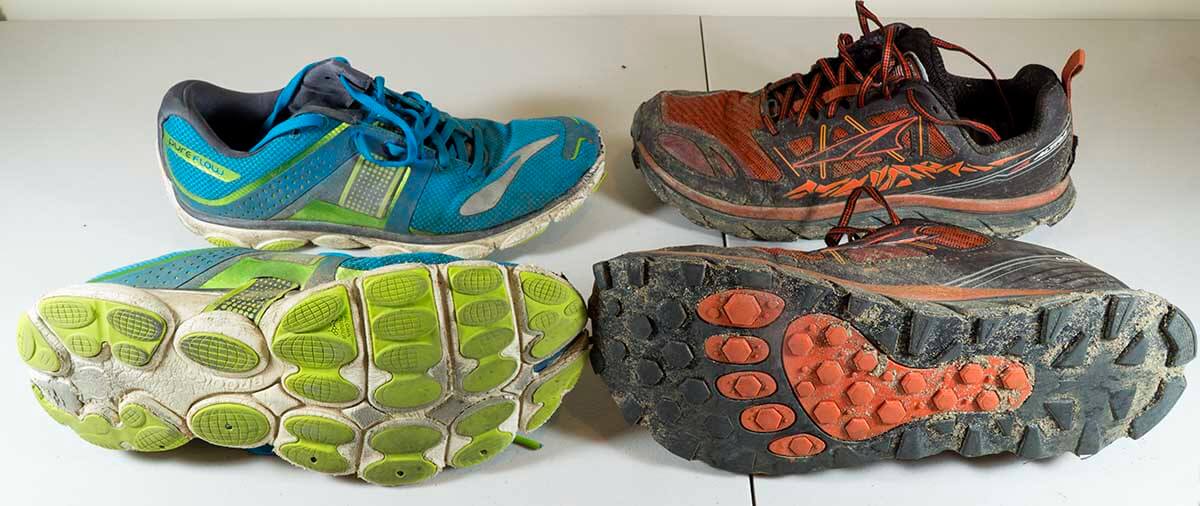
Two great ultralight backpacking shoes for LNT: (Left) The 9 oz Brooks PureFlow “road running” shoes. The minimal tread on the Pureflows works quite well almost all surfaces. On the (Right) the more mainstream, 10 oz. Altra Lone Peak Trail Running Shoes (R).
Travel on Durable Surfaces
Caution: Backpackers who travel off trail (and there are a number of UL’ers who do) must hold themselves to the highest standards of LNT hiking. Off trail treks through sensitive areas leads to degradation and development of trails—the end of off trail hiking in the area. But Ultralight backpackers are doubly fortunate in meeting this standard as lighter packs and higher energy allows them to find and navigate more durable terrain.
Durability is a key concept when deciding where to hike. Stay on established trails whenever possible. When off-trail, backpackers should spend as much time as possible on durable surfaces like rock, gravel, sand, mud, firm grasses on dry ground and temporary terrain like snow. And scrupulously avoid sensitive surfaces like wet meadows, biological crusts, and delicate vegetation.
The rut of the John Muir Trail on the left as it goes through the fragile meadows of Lyell Canyon. It is hardly Leave No Trace and besides being an eyesore it has significant environmental impact. Meadows and other wet areas are example of surfaces that are neither hard or durable. They are easily damaged by even moderate walking. The current convention is to route trails around meadows bogs and other fragile areas. This what the Yosemite Conservancy is doing with the John Muir Trial, rerouting it to higher ground above the meadows. Photo: courtesy the Yosemite Conservancy. Check out their site to learn more.
6. Respect Wildlife with a Long Zoom Camera
Caution to UL backpackers and anybody else photographing wildlife with cell phone cameras: In keeping with LNT Principle 6, Respect Wildlife, you should keep respectful distance from wild animals. A common pitfall is to try and get way too close with the wide angle lenses common on almost all phone cameras. Obviously you could get seriously injured, as in the recent fatal bear attack in West Milford, NJ.
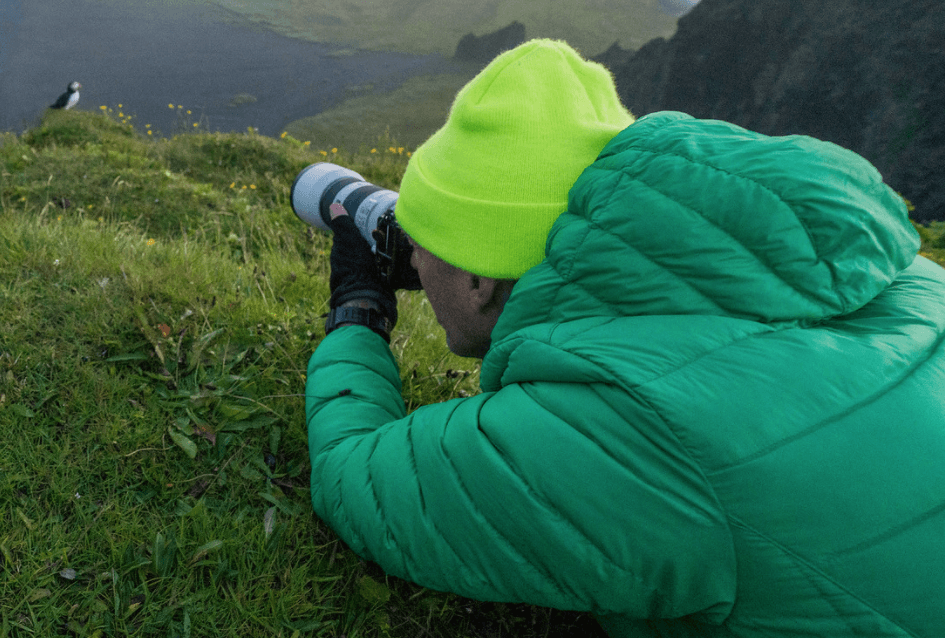
Using a telephoto lens to photograph wildlife: A telephoto lens brings wildlife to you. Here Alan is filling the camera frame with a telephoto lens. And it makes sense to lie on the ground, or conceal yourself behind rocks or vegetation, and move slowly to keep you presence discreet and not alarm wildlife. You’ll get better photos too! [photo: Colby Brown]
A few very light telephoto camera options are:
- Panasonic Lumix DC-ZS70 super zoom camera: Low weight. Long, 720mm zoom lens brings wildlife to you. 25x further away than an iPhone!
- Many inexpensive, compact zoom cameras have a 100mm to 120 mm equivilent zoom, which keeps you 4x further away than an iPhone. (Chances are, you may already own one.)
For more information on backpacking cameras and lenses see the Best Backpacking Cameras 2017 list and the 5 Most Important Features for a Backpacking Camera.
Appendix – Reference
Developed in the 1960s by the U.S.D.A. Forest Service, Leave No Trace principles were first designed to minimize the environmental and ecological impacts of outdoor activity in state parks. Even then with far fewer hikers than today, hikers & backpackers were having profound & long lasting negative impacts on beautiful areas. LNT is well known in outdoor circles thanks to decades of work by the Leave No Trace Organization. The original guidelines were outlined by the Forest Service in seven critical principles to leaving the path behind you unchanged.
The 7 principles of Leave No Trace
- Plan Ahead and Prepare
- Travel and Camp on Durable surfaces
- Dispose of Waste Properly
- Leave What You Find
- Minimize campfire impacts
- Respect Wildlife
- Be Considerate of Other Visitors
The brilliance of these guidelines is that they are universal & can be implemented regardless of budget, equipment, or experience. With that said, certain outdoor communities must lead the way as standard bearers & LNT innovators. Ultralight Backpackers have the skill & commitment necessary to fulfill this role as LNT ambassadors.
Disclaimer
This post contains affilate links. If you make a purchase after clicking on the these links, a portion of the sale helps support this site at no additional cost to you. I do not receive compensation from the companies whose products are listed. For product reviews: unless otherwise noted, products are purchased with my own funds. I am never under an obligation to write a review about any product. Finally, this post expresses my own independent opinion.
This article proposes a more realistic 13 Essentials that will better keep the modern hiker safe. This is because the Classic 10 Essentials (first proposed in the 1930’s) need an update for the 21st Century given the realities of a modern day hiker.
- First, a major conceptual trap of the traditional 10 Essentials is that they are all gear. I would counter that the two most important “essentials” are actually skill and knowledge items: 1) good trip planning and 2) the skill of staying found.
- Second, why should there be only 10?
- Third, why do none of the 10 Essentials take advantage of 21st century technology?
- And finally, some 10 Essentials are a bit arcane & don’t match the skills & habits of the modern hiker.
Lead photo: A “freak” summer blizzard in the Wind River Range. I was super grateful to have all my warm clothing, a bivy sack and 1/2 lb tarp. And even more appreciative I had the skills and knowledge to use them.
The 13 Essentials for the Modern HikerMy revised “essentials” are to help people be prepared for emergency situations outdoors. As such, it’s a good idea to bring them whenever you are in the backcountry—whether it’s just a long day hike, or a multi-day off-trail backpacking trip. The following 13 Essentials favors a pragmatic approach to bringing the right gear. First and foremost, it relies on your best piece of gear, what’s between your ears.
|
1 Trip Plan
Use what’s between your ears. More problems arise from poor planning and lack of information about a hike than from not bringing the right gear. So, whether you’re day-hiking or backpacking you should:
- Do your research on hiking distances, trail conditions, campsites and water ability. Good examples of this type of research are: Map kiosks/Information Centers at major trailheads or park publications like the excellent Zion Park Map and Guide, or guide books. Much of this info is now online.
- Then make an honest/realistic estimate of how far you’ll hike each day. Be conservative. You don’t want to end up stranded somewhere because you only hiked ¾ of the distance you expected. And in case you end up short, have a backup camp area with a water source.
- Get a weather report for your trip and then plan and pack gear for those conditions! Since 90% of hikers or backpackers take 90% their trips for 3 days or or less, this weather report should be quite accurate. My favorite weather app for both smartphone and desktop is Weather Underground.
- And once on your trip, you also need to watch the weather and be prepared to deal with “freak” weather. This is especially true in high western mountains where a summer blizzard is always possible. Even the lower elevation Appalachian Mountains can have some cold and severe weather in the warmer months. Usually park info sites will let you know what sorts of extreme weather might be possible. [Note: This does not necessarily mean going overboard with gear—just taking the right gear.]
- Leave a copy of your trip intineary with someone. See: How to make and use a Trip Itinerary.
2 Staying Found
Staying Found is the key navigation skill that experienced navigators always use but never mention.
| The highly effective, “Staying Found” approach to navigation is within the capability of all hikers. |
Good navigators rarely get lost because they have a good idea (Trip Plan) in their head of where they are going and what to expect. That is, they are vigilant and observant while they hike—always comparing what they see on the trail against the plan in their head. They continually monitor their progress and check for upcoming trail junctions, lakes, stream crossings, a steep climb, a section of bog & other features to confirm that they are on the right track. If they stray, they quickly identify & correct it. You should do likewise. It’s your first and best navigation “tool.”
3 Navigation Tools (not always paper map and compass)

(left) 21st century navigation tool: Gaia GPS App running on an iPhone. (right) Traditional nav tools: A fully featured compass with declination adjustment and paper USGS topographic map underneath. Both have pros and cons.
Important Note: I respectfully suggest that people read the Navigation Tools & Electronics Appendix carefully before commenting on this important topic. In particular, it covers the strengths and weaknesses of navigational tools, their proper use and the ways they can fail (yes, map & compass can “fail” too).
For Navigation – Take the tools you can actually use!
The first question that requires an honest answer is, “what navigational tools can I actually use?” Like having a bicycle but not knowing how to ride it, navigational tools (like a compass or USGS topographic map) without the knowledge to use them properly are not tremendously useful. It might even be dangerous if your are relying on them to navigate and keep you safe, but under false assumptions about your skills.
Topographic Map and Compass
If you are skilled with a map and compass, then take them. They are reliable, light, effective, inexpensive and don’t require batteries, or cell phone signal [I bring them on every trip.]
Alternatives to Topographic Map and Compass
But if you aren’t confident using a topographic map and compass there are alternatives. You might consider using tools that you are more familiar with and easier to operate— ones that you can reliably use in the field. Two options are:
- A Simple Hiking Map like the Zion Park Map and Guide and using Staying Found Navigation as described above. This is your first and best strategy even when you bring other navigational tools!
or - A Smartphone GPS App with dowloaded, Off-line Maps that does not need cell signal! (A quick test with your phone in airplane mode can determine if your App & maps work offline.)
A Smartphone GPS App Might be a Better Navigation Tool for Some Modern HikersMany traditionalists insist that a paper topographic map & compass are mandatory. But frankly, many modern recreational hikers may not have the map and compass skills to be able to rescue themselves using them. But they do have a lot of practice and skill navigating with their smartphones. And practice and familiarity are the key for successful use of a navigational tool! Therefore, properly used* a Smartphone GPS App might be a better option for some. [*Please see: Navigation Tools & Electronics Appendix for a caution and advice about using electronics in the backcountry, especially battery life management, backup batteries, and not relying on cell coverage.] |
Start of the JMT in Yosemite. Screen shot of NG Trails Illustrated Map using Gaia GPS on an iPhone. The beauty of a smartphone GPS App like Gaia GPS is that you have many map sources at your finger tips at no additional cost and weight. E.g. NG Trials Illustrated, full USGS 7.5′ TOPO maps, Satellite Imagery, and other specialized maps. [click to enlarge and see full map detail]
4 – Protection from Sun and Bug Transmitted Diseases, Like Lyme
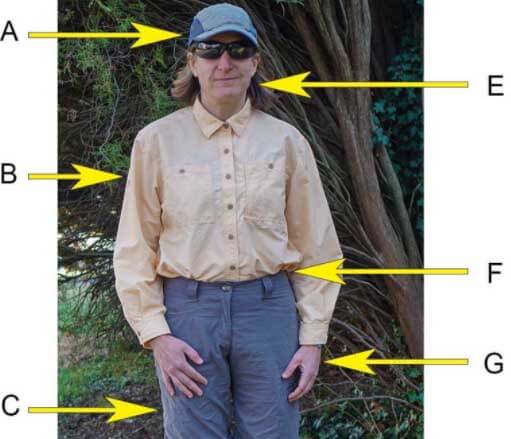
Full-coverage clothing is best for both sun and bug/disease prevention.
In addition to sun protection, I am adding bug protection to your basic trail needs. 2017 is forecast to be the worst year for tick/Lyme disease, and it’s only going to get worse in other parts of the US. Other diseases like Zika are also on the rise.
Your first and best option for sun and bug protection is appropriate full-coverage clothing like this. While chemical/skin applied sunscreen and bug repellants work (Picaradin Lotion is the most effective and long lasting without the problems associated with DEET) they are not nearly as long lasting or effective as sun & insect protective clothing and a good sunhat. And yes, wear those sunglasses. For more reading, see my piece on the Best Clothing & Repellants to Protect Yourself from Lyme and Zika.
5 – Insulation (extra clothing)
My warm clothing gets used on almost every trip. A good Down Jacket has saved my ass on numerous occasions such as a freak snowstorm on a summit, where I needed to stay warm enough to hike down to shelter and warmth. It’s also essential to keep an injured person warm until help arrives. Other invaluable pieces of warm clothing are a light rain jacket, warm hat and gloves like these.
While backup clothing is good, it’s usually best to first make the most of the clothes you are actually wearing. Towards that end, here’s a good piece on how best to use the clothes you are wearing: Top Mistakes Using the Layering System – How to Stay Warmer and Drier.
6 – Headlamp – A Good One!
You need a seriously bright and long lasting headlamp to make an emergency retreat or exit. An example of a good one is the Black Diamond Spot Headlamp (right). The Black Diamond Ion (center) is marginally OK but would be better for following behind someone with a brighter light. On the left, the Petzl e+LITE Headlamp while low-weight and great for camp, is not bright enough for hiking.
If an emergency retreat or exit is necessary, your headlamp should be bright enough and last long enough that you can safely hike and navigate all night. To do that, you need a seriously bright and long lasting headlamp— putting out a beam of 50-60+ meters for ~12+ hours. A headlamp like this is likely in the range of 3 to 4 ounces. Examples: Black Diamond Spot Headlamp (Note: you only need one this strong for a party of hikers. The others following behind the leader can use smaller lighter headlamps, e.g. Black Diamond Ion.) And a spare set of batteries is always an excellent idea.
7 – Emergency Shelter
Tarps & pyramid tarps provide tremendous shelter at a fraction of the weight & cost of a traditional tent. As such, they are light enough to be used as both a primary and/or emergency shelter. [Yes, another summer storm. This time the High Sierras.]
True bivy sacks like these also make good emergency shelters and even the light emergency bivy sacs are OK. I am not a big fan of the paper thin, mylar emergency blankets as they can’t really be staked out to provide a true shelter like a tarp. That being said, they are certainly better than nothing.
8 – First Aid Kit
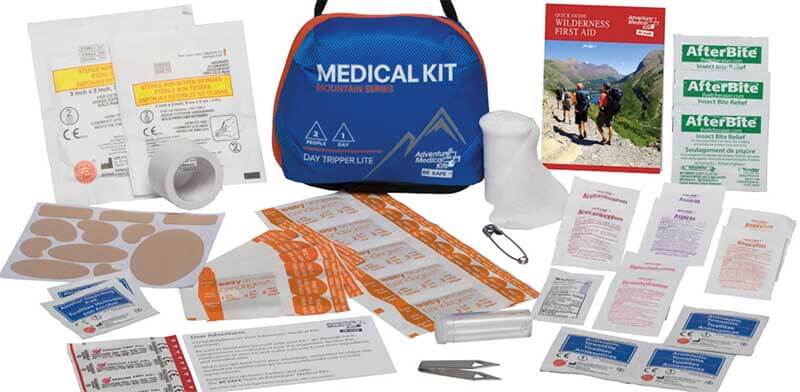
I prefer to assemble my own 3 oz First Aid Kit (see detailed list below) as I can do a better job for less weight than pre-packaged ones. My kit includes bandages, tape, gauze, wound wipes, antibacterial lotion, and OTC med’s like Tylenol, Benadryl, Sudafed, Nexium, Imodium. I also carry some Rx meds like antibiotics. But you can also buy a pre-packaged First Kid Kit like one of these.
Most of the injuries I have treated have been scrapes and cuts (abrasions and lacerations) and all I had to do was stop the bleeding (direct pressure, always) and clean it up and dress the wound. I rarely get blisters since I train in the same shoes and socks that I backpack in. Even so, I carry Leukotape Tape and tincture of benzoin to treat hot spots and mild/early blisters.
A small first aid guide/booklet (often included in kits) is a good idea. Or even better, take a Wilderness First Aid Course at REI, or from NOLS or Landmark Learning.
First Aid Kit | Detailed List
- Pain, fever inflammation | Naprosyn (Aleve), Ibuprofen, or Tylenol (fever) In ziplock pill bag available at pharmacies | 0.4 oz
- Foot/blister | Gauze + Leukotape Tape For taping over blisters, or pre-blister areas | 0.3 oz
- Foot/blister | Tincture of benzoin in micro-bottle. For getting tape or Bandaids to REALLY stick! | 0.2 oz
- Wound care | Bandaids + gel blister covers Assorted sizes – your preference | 0.5 oz
- Wound care | Antibact. packets + wound wipes. Wound cleansing, infection prevention | 0.4 oz
- Wound care | (12) 4×4″ gauze pads + 1 roll gauze Use duct tape to hold in place (from above – Repair Items)
- OTC meds | Benadryl, Sudafed, Nexium, Imodium, caffeine tablets. All in tablet/pill form | 0.4 oz
- Rx meds | Personal Dr’s Rx meds | 0.4 oz
- Pain serious | Dr’s Rx Painkiller. For serious injury, tooth abscess, etc. | 0.2 oz
- Storage/org | Bag Poly 5×8 to hold 1st Aid Kit 0.2 Keep size down. Can only put in what can fit in bag.
9 – Hydration (prudent amount of extra water)
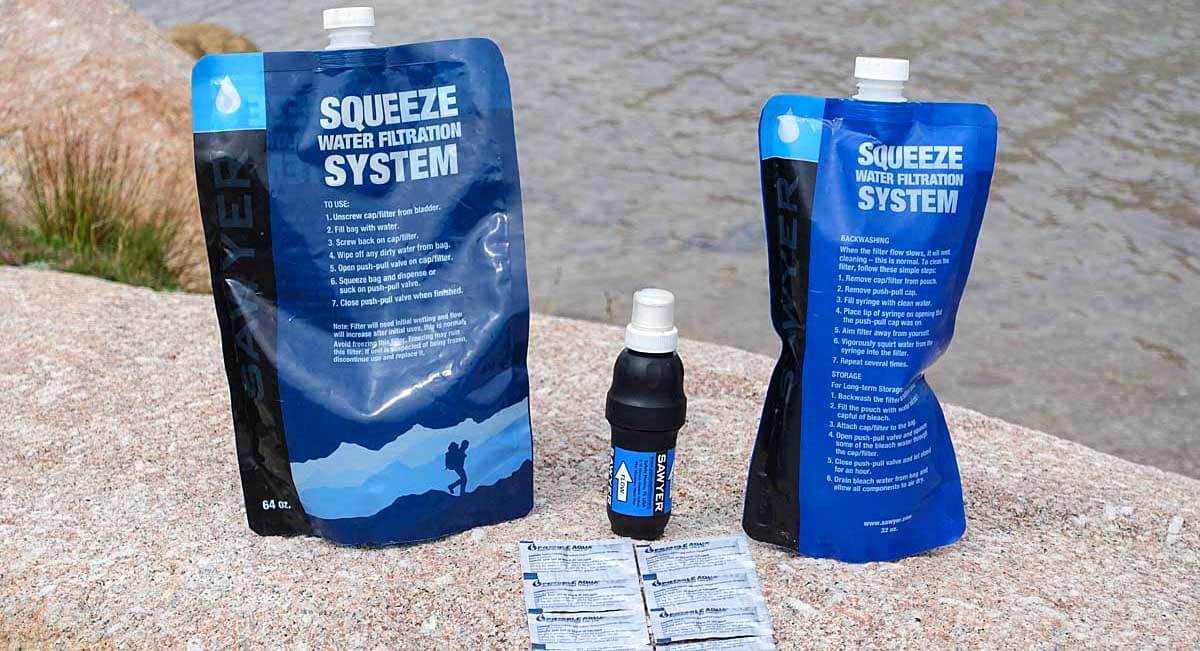
A light, inexpensive, fast and effective water purification and hydration system: Sawyer Squeeze Filter and Water Treatment Tablets
Yes, bring a prudent amount of extra water because human beings don’t do well without it. For hiking in the desert, extra water would likely be right after Navigation Tools on the essentials list. But for most hiking and backpacking in the US, water is usually available every few hours. With a filter like the Sawyer Squeeze you can drink immediately at water sources. This means both quick, effective hydration/purification and less water to carry. An even lighter alternative (and backup system for a filter) are Water Treatment Tablets.
You may be drinking more water than you need: The healthiest hydration strategy is to drink when thirsty. The saying “If you are thirsty, it’s already too late” and “If your urine is yellow, you are dehydrated” are myths. In fact, over hydration (hyponatremia) is becoming more of a risk than dehydration. I’ve extensively researched this topic with experts in sports hydration here: “The Best Hydration – Drink When Thirsty.”
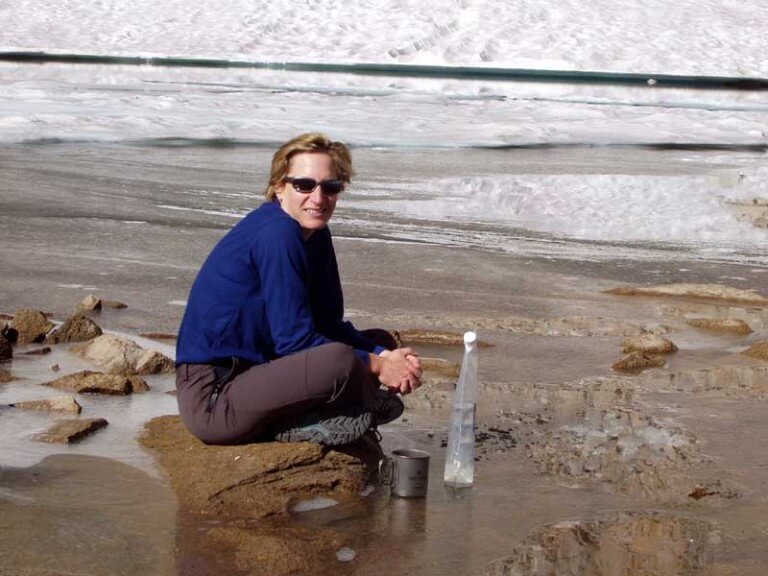
In cooler temps and/or where water is plentiful you may not need to carry as much extra water. Drink from the source, & you’ll likely not be thirsty by the time you reach the next water source. [But do know where your next water sources are.]
10 – SOS Device (satellite based, like inReach or SPOT)
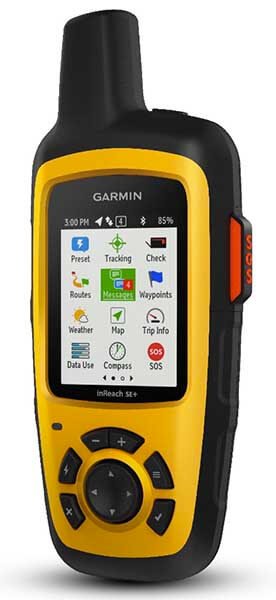
This is #10 because as noted earlier, prevention (having a plan, intelligently executing it), & having the right stuff (items 3 through 9) is your first & best way to stay out of trouble.
But even with the best planning and execution, stuff like a serious fall, an on-trail appendicitis, serious concussion, or a heart attack can happen. A SOS Tracking Device is the best and most reliable way to summon help in such an emergency. Two-way devices like a Garmin inReach allow you to get medical advice to care for and treat the injured party before help arrives. And they are a big help to arrange/coordinate a helicopter rescue potentially saving a life. For one thing, the EMTs know the exact nature of the emergency and come fully prepared. Read more on selecting SOS/Tracking Devices and their use.
Note: Another benefit of two-way devices like a Garmin inReach is to get in-the-field weather reports.
As of 2023, we recommend ZOLEO Satellite Communicator is our SOS device of choice.
11 – Nutrition

[Note: for a long day hike, 1 to 1.5 pounds of this nutritious food should work for most people]
It makes sense to bring an appropriate daily amount of food that is high in nutritional value and low in weight. (See: “How much daily food should I take?“) But unlike water, your body can go without food for much longer. Therefore, going overboard on too much extra food vs. a prudent amount is a trade off. Think of what other more useful gear for your safety you could bring for that same weight. For example, more warm clothes, a better shelter or an SOS device might contribute more to your safety. That being said, my favorite (extra/backup) foods are usually a high calorie energy bar, and homemade mix of dried fruit, nuts, and a few dark chocolate M&Ms. They are simple, fast, and don’t require cooking.
12 Repair Kit and Tools

While a repair kit is nice to have, I’m not sure it is a true essential. But it’s light so no big deal. I maintain my gear, inspect it before each trip and then treat it with care on the trail. Therefore, while I do carry a small repair kit, I rarely use it. And when I do it’s not for what I would consider an “essential” repair.
I carry a small pair of school scissors (technically part of my first aid kit) which are far more useful than a knife and they can be transported on an airplane. I also have duct tape, needle and dental floss, a few cable ties and a small tube of krazy glue and one of Aquaseal, along with a some Gear Aid Tenacious Tape. All together they weigh less than 3 ounces. For non-do-it-yourself folks, Gear Aid also has a nice pre-packed Repair Kit altho I wouldn’t take all of the items. And if you own a NeoAir sleeping pad, consider NeoAir patch kit.
13 – Fire (lighter/matches/fire-starters)
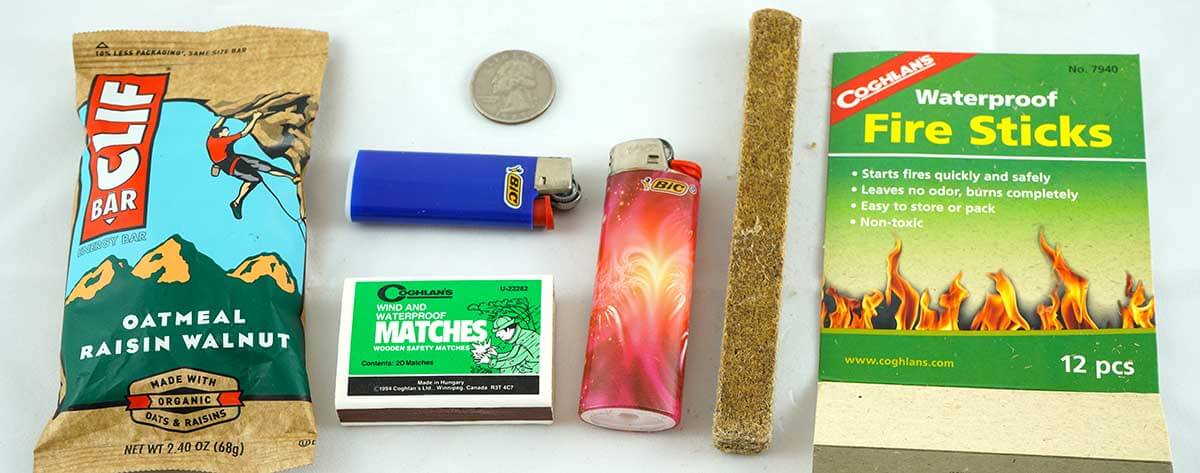
(right) Coghlans Fire Sticks are one of the easiest and safest fire starters to use. (center) A standard lighter is a first choice but Storm Matches are a good backup. (left) Most energy bar wrappers (mylar) also make great fire starters. And best of all I usually have a number of them in my trash bag.
While I do carry these fire starting items, they are last on this list. To this point, in over 40 years of hiking I have yet to use them in a dire emergency situation. Yes, I have started a fire a few times (where legal) to warm up and dry out a lot faster than getting into my sleeping bag in dry clothes—but this was more a comfort and convenience than an emergency. In contrast I’ve used my warm down jacket and my tarp a number of times for what I would consider to be an emergency or close to it. But my favorite fire starters, a lighter and energy bar wrapper (mylar), are already packed every trip so I have them by default.
Appendix – Navigation Tools & Electronics
A Critical Caution for Electronic ItemsNeither an electronic GPS App with maps, or a paper TOPO map will figure out the best off-trail route for you. In both cases you’ll need to understand what they show you. That is, you’ll need to be able to tell where things like impassible cliffs are, etc. And you still need to make in-field assessments of the best route while you hike off-trail.
Taking all this into account, electronic items are still serious tools that can do things that non-electronic tools cannot. |
Pick the Right Navigation Tools for YOU!
I’ve used USGS 7.5′ Topo maps and a traditional compass to navigate for over 40 years. Much of this off-trail, in difficult to navigate areas. They worked then and they still work now. BUT that doesn’t mean a traditional compass is the best navigational tool for all people.
I suggest that there is no perfect navigation tool. All have strengths and weaknesses. In the end its a personal choice. Select the right tools for you—tools that you have the skills to use and meet the navigational requirements for your trip. And whatever tools you decide on, you do need to know how to use them AND you’ll certainly want to bring a backup.
Paper Maps & Compass
a) Can I “use” a map and compass?
This is the first thing you should consider when deciding on the right navigation system for you. For example, can you can orient your map and compass to true north (taking into account declination), always find your location on the map, take a bearing to a point you want to navigate to, and then use the compass to sight and follow that bearing, taking into account elevation contours (reading Topo lines) and other physical features depicted on the map to make an informed decision on the best route. If not, you might want to 1) learn how to really use a map and compass and/or 2) consider a smartphone GPS App (or even a traditional GPS unit if you already have one).
b) What if you want to learn how use a map and compass?
If you want to learn map and compass skills, great. But to keep your newly learned map & compass skills sharp and effective, you’ll need to use them on a frequent basis. [Note: after teaching many people map and compass navigation, I’ve noticed a low retention rate for those that don’t regularly practice their map & compass skills each year.]
c) All types of navigation tools can fail – even maps
Contrary to what most say, paper maps and traditional compasses can “fail.” First, as stated earlier, many people are not proficient with them. This is a failure of sorts since the map and compass won’t deliver their intended function—and there are no backups to fix this. In addition, maps are accidentally left on a rock, they easily blow away in the wind, they mysteriously creep out of pack and pants pockets, and they can get ruined by water. A couple of times a year I pick up somebody’s full map-set that I found in the middle of the trail. Finally, compasses can be lost, misplaced or damaged (yes, I’ve had clients break a compass).
Smartphone GPS Apps
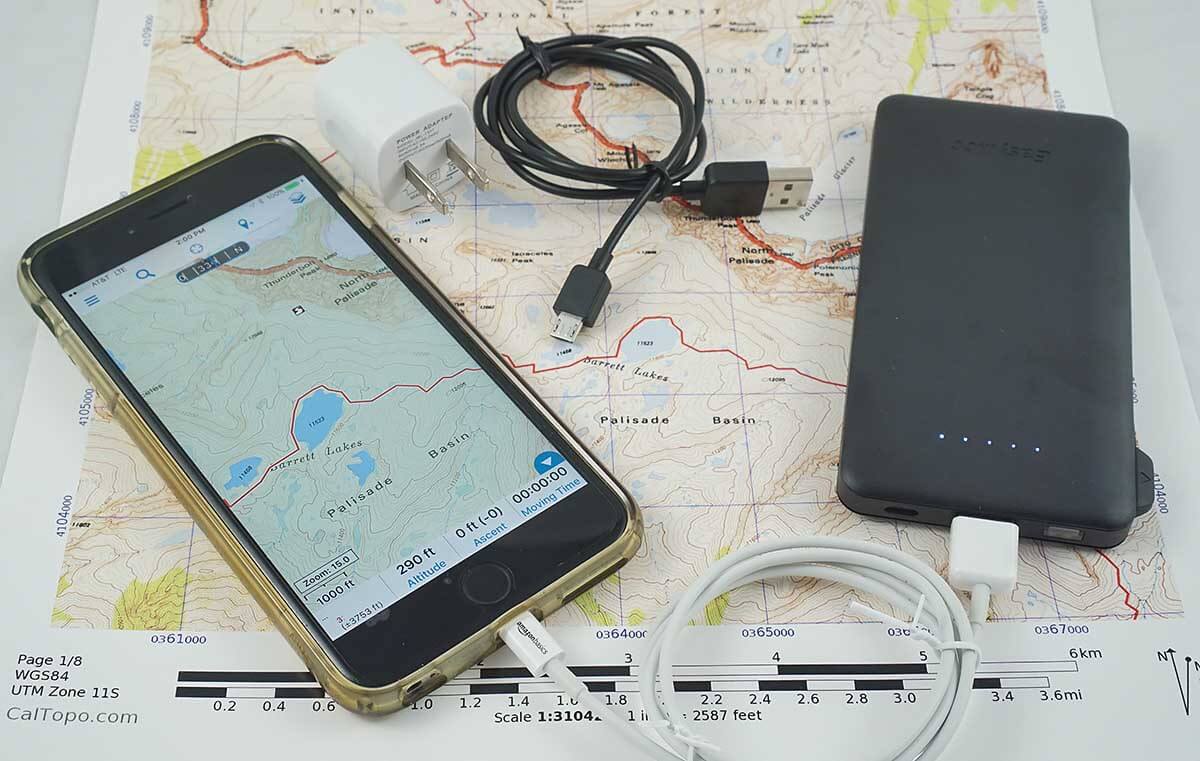
The EasyAcc battery on the right will recharge the iPhone 6 Plus two times. (The wall charger and micro-USB cable [top center] are only needed if you’ll have access to electricity mid-trip). See more in Best Lightweight Backpacking Electronics Gear.
Smartphone GPS apps (and traditional GPS units) work far better in low visibility conditions like white out and in the dark. I have navigated off of more than a few complex summits in complete whiteout with a GPS.
Finally, a big advantage of the smartphone GPS App is the maps are free and instantly downloadable. You can get superbly detailed maps for your hike in a matter of minutes. I’ve downloaded them from my motel room. In contrast, getting and/or printing paper maps is far more costly, time consuming and cumbersome (USGS 7.5 min Topo map are harder and harder to get).
Electronic Navigation Tools are not as unreliable as “experts” claim
- In five years of intense backcountry use my close hiking partners and I have never broken an iPhone or the GPS App. We’ve taken our iPhones on numerous packrafting trips in Alaska, winter rafting down the Grand Canyon, technical Canyoneering in Utah, climbing in the Wind Rivers and the Sierras, long hikes in the U.S.A, Turkey, Australia, Europe, and a canoe trip down the length of the Mighty Mississippi River. All without incident. No failures. No dead batteries.
- But as a backup, at least one hiking partner carries another smartphone with GPS App & offline maps. (sometimes even an alternate App and mapset).
- We do not need cell signal to use our GPS App.
- We get around 7 days of use before we need to recharge it—see more about iPhone/smartphone battery management.
- And a light USB battery gets us a couple more charges if we need them. The same USB battery charges all our other electronics like headlamps, cameras, and Garmin inReach. See more about field batteries for recharging electronics.
Always Bring a Backup Battery!It’s critical safety precaution to make sure your electronics are always available for use. My three favorite lightweight and high capacity USB backup batteries are:
|