This post answers two questions. First, why the point and shoot camera is dead for hikers? And second, what are the best cameras for hiking now that the point and shoot camera is dead?

Why the Point and Shoot Camera is Dead for Hikers

The point and shoot (p/s) camera is being squeezed into the grave from two sides. 1) on the inexpensive* side by constantly improving smartphone cameras. And 2) on the more expensive side by very light mirrorless, interchangeable-lens cameras. If photography is a serious objective of your trip, their near “pro-level” performance justifies their cost/weight vs. carrying just your smartphone.

* smartphone cameras are  “inexpensive/free,”  in the sense that you likely own a smartphone, thus there is no additional cost and weight since most hikers and backpackers are already carrying their  smartphone.

The Two Obvious Hiking Camera Options

1) You are satisfied with your smartphone camera

Therefore, a point and shoot (p/s) camera provides no additional benefit. The rapidly increasing capabilities, image quality (and video) of smartphone cameras are closing in on the performance of low to mid-range priced p/s cameras. Your current smartphone is essentially free* and no additional weight. Finally, you are likely an expert using your smartphone’s camera. It’s a perfectly valid option!

Point and Shoot Camera is Dead for Hikers

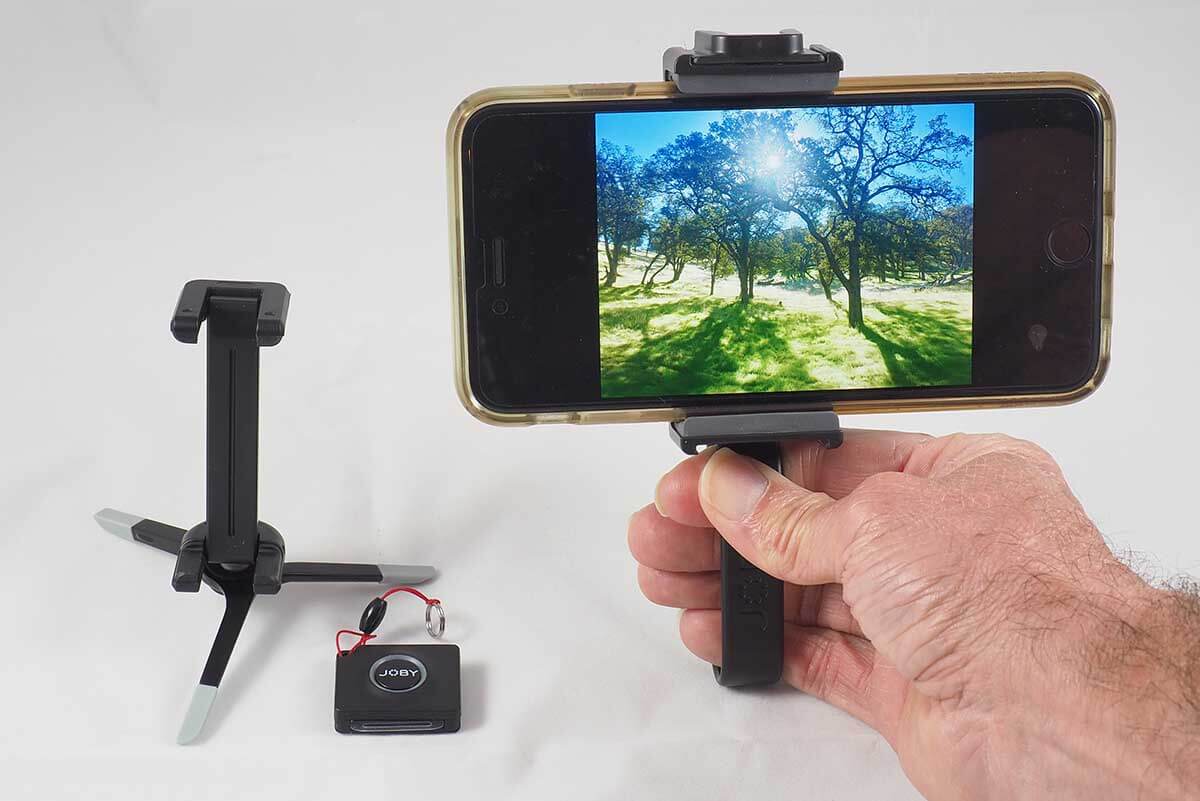
In good light smartphones take great pictures. In addition, there are a vast array of inexpensive accessories and apps/software to get the absolute best photos and video from your smartphone. Left JOBY GripTight Micro Stand. Right JOBY POV kit with bluetooth remote.

2) You want a camera that is significantly better than your smartphone

In this case you likely want better image quality, sharper lenses, an electronic viewfinder, more controls, etc. A p/s camera will not provide this! A light mirrorless, interchangeable-lens camera (mirrorless camera) will.  In fact, mirrorless cameras are approaching “pro image quality” at a fraction of the cost and weight of many “pro” cameras. E.g. the Sony a6000/a6500 or Olympus EM-10 Mark II.

Point and Shoot Camera is Dead for Hikers

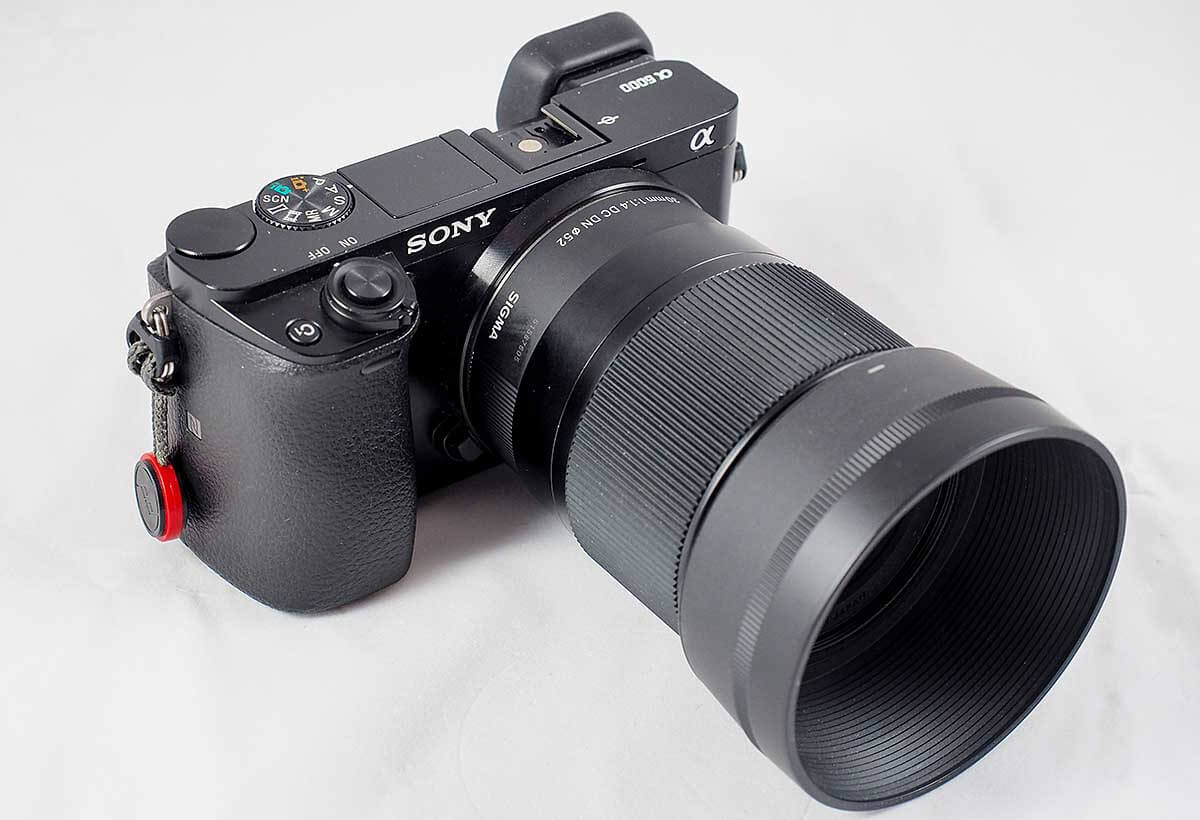
Class leading image quality for less weight: Sony a6000/a6500 camera with Sigma 30mm 1.4 DC DN Contemporary lens. This setup goes toe-to-toe with far heavier and more expensive APS-C (crop sensor) camera setups from Nikon and Canon.

Mirrorless Cameras are better “point and shoot” cameras than point and shoots

When you mount a light mirrorless camera on a quick release shoulder mount and put it in smart-auto mode, it’s faster and easier to use than a p/s camera. But you have all the benefits of interchangeable lenses and full camera control if you want. And of course, the image quality is in another league vs. a p/s camera.

For me, it’s all about the speed and ease of taking a photo. Since I changed to using the Peak Designs CapturePRO mounting system on the shoulder strap of my pack, I get 2 to 3 x more photos per trip. More than I ever got with a point and shoot camera in my pocket!


Note in the video how quickly and easily I put my pack on with my Sony a6000 mirrorless camera already attached to my shoulder strap with the Peak Designs CapturePRO. No camera spinning around and twisting up the shoulder strap.

The Bottom Line

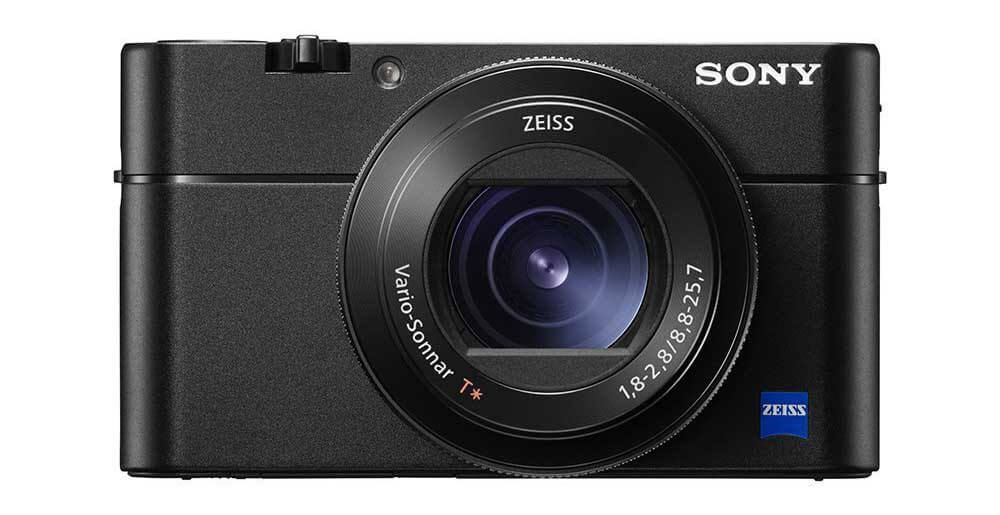
If you want something significantly better than your smartphone camera a p/s is not sufficiently better to justify its cost and weight. On the other hand, a mirrorless camera is substantially better than a smartphone camera and therefore its cost and weight are justifiable.  In addition, a mirrorless camera is far more versatile than a p/s (or even a 1″-type sensor camera). It is also an excellent general-purpose camera for use at home, nature photography with a long lens, for extended international travel (backpacking and non-backpacking), etc. This makes it a far better value than a p/s camera or even 1″-type sensor cameras like the Sony RX-100.

sony-a6000-kit-2

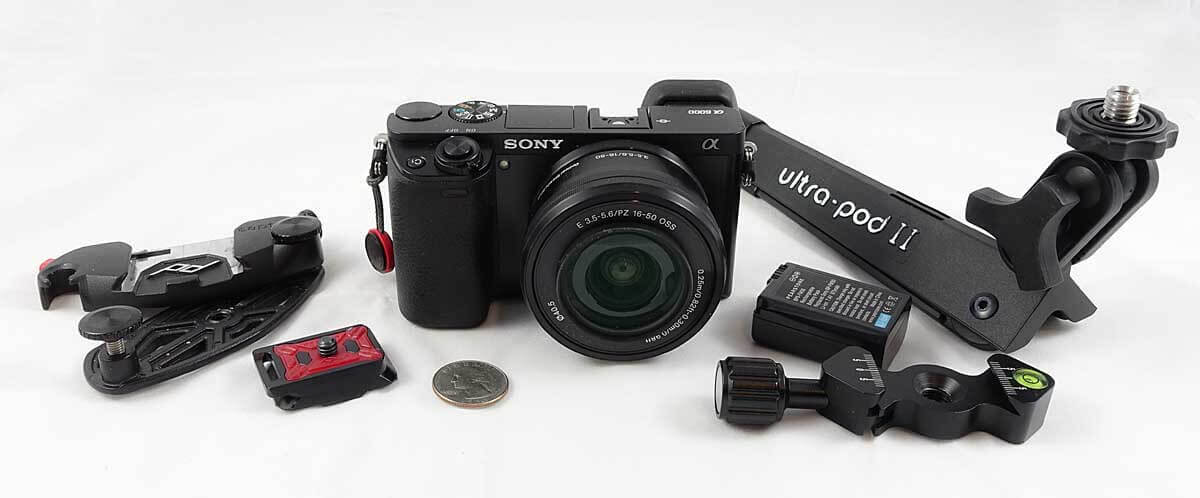
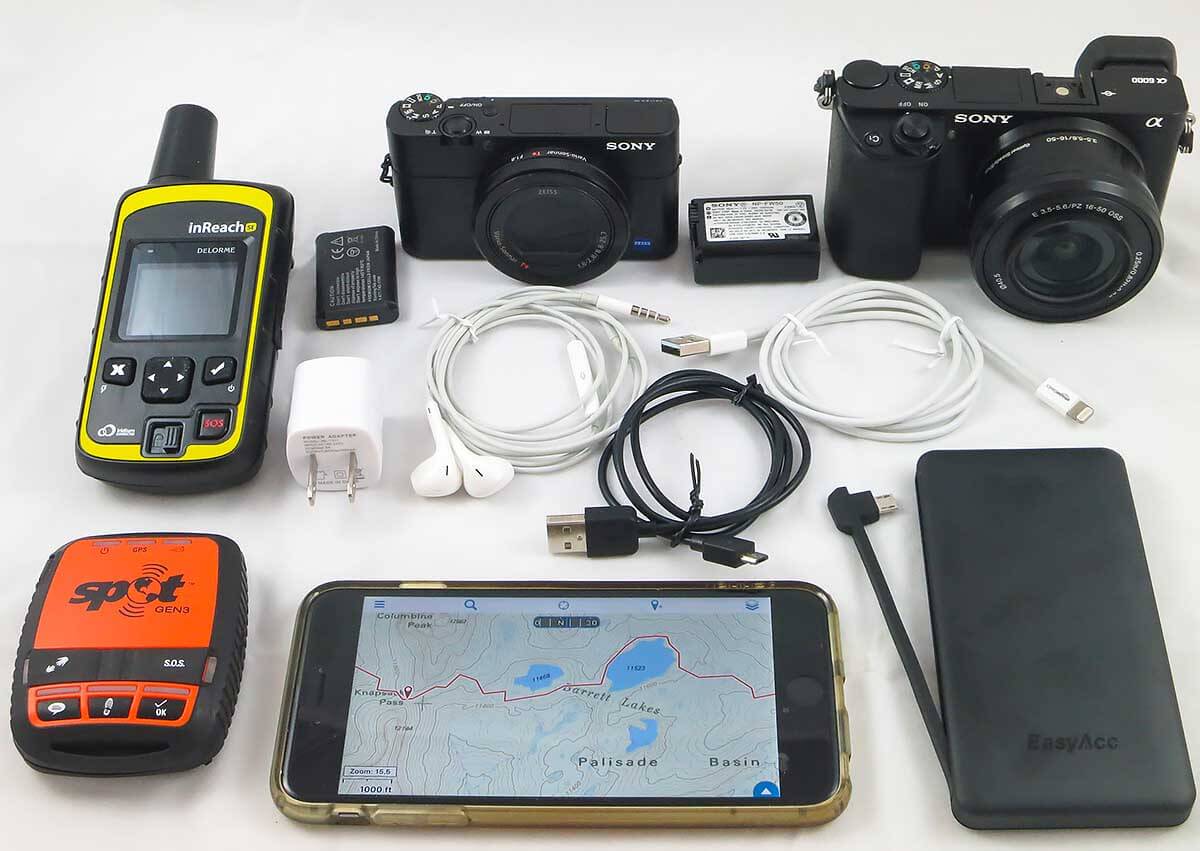
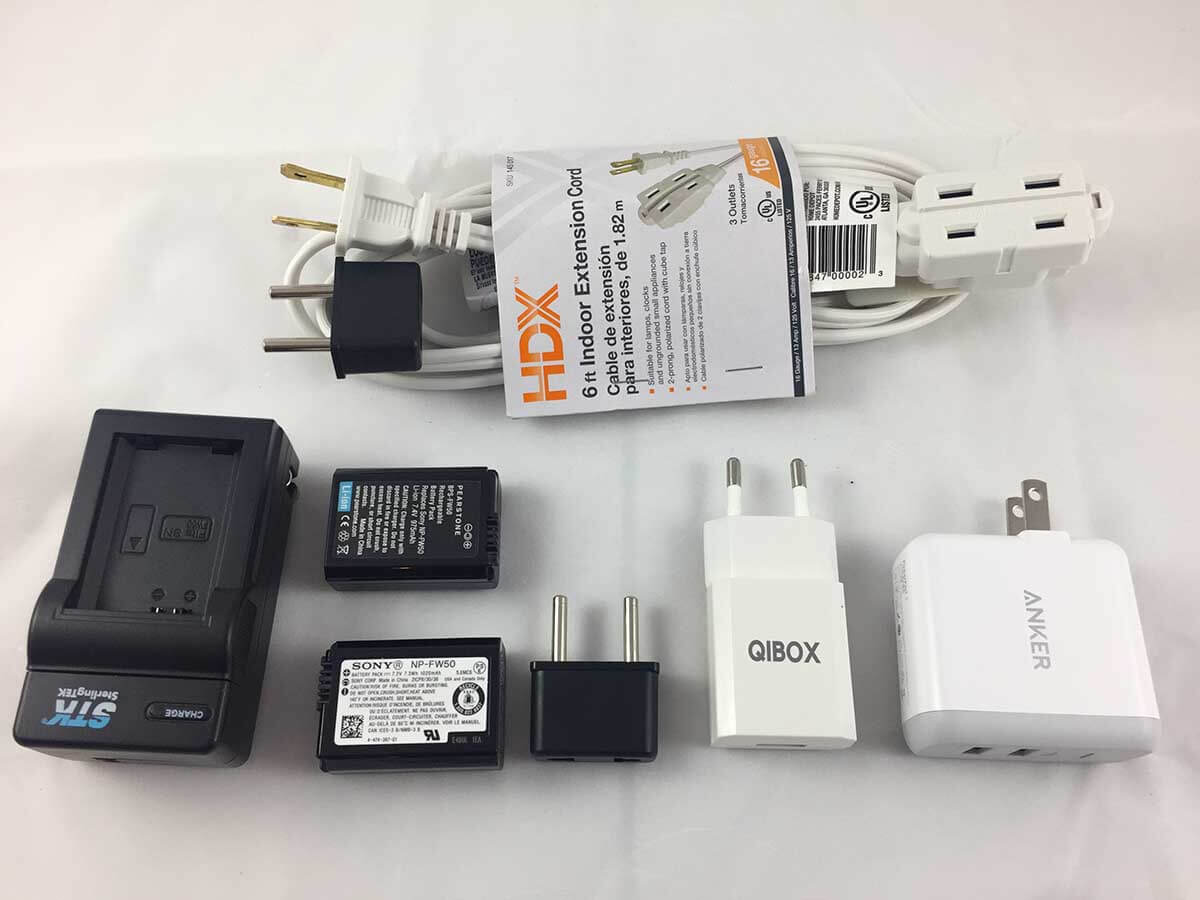
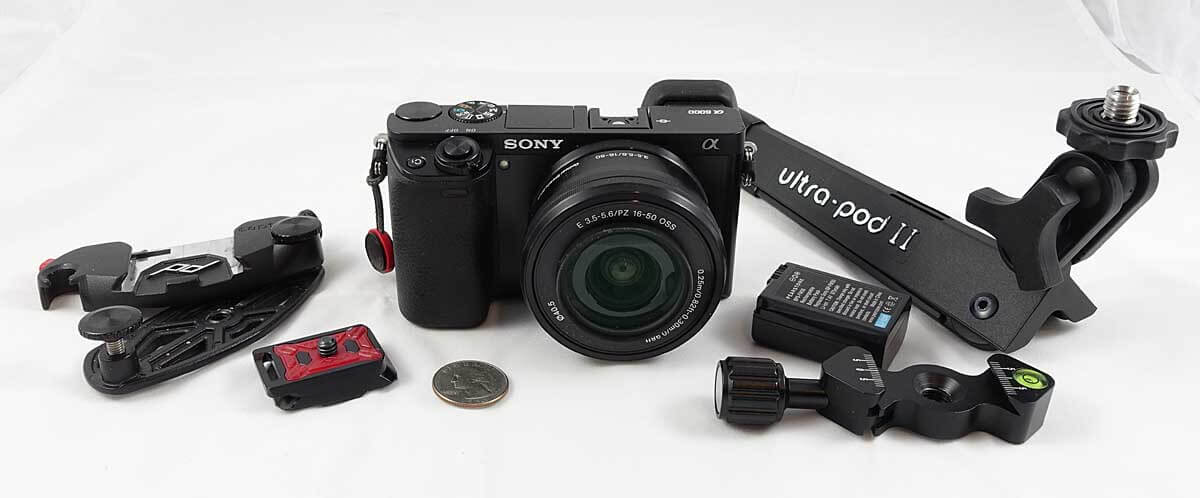
The full Sony a6000/a6500 kit: Peak Designs CapturePRO (mounts to backpack shoulder strap), Peak Designs Micro Plate (mounts to camera bottom), Pedco utra-pod II (small tripod), Sony NP-FW50 Battery, and Newer® Fish Bone quick release for tripod head.

What I Use Most of the Time

On most of my backpacking trips and on international travel, I carry both options:

Sony Lenses

Olympus Lenses

Sigma 30mm f/1.4 Contemporary lens sharp as it gets!
Sony SEL35F18 35mm f/1.8 sharp, fast, stabilized
Sigma 19mm f2.8 DN low cost, light
Sigma 30mm f2.8 DN sharp, low cost, light
kit Sony 16-50mm f/3.5-F5.6 decent, low $, light
Olympus 9-18mm f4.0-5.6 super wide, 5 oz!
Olympus 12-40mm f/2.8 PRO very sharp, environmentally sealed
Sigma 30mm f/1.4 prime. tack sharp, fast
kit Olympus 14-42mm f/3.5-5.6 IIR decent, low $, light
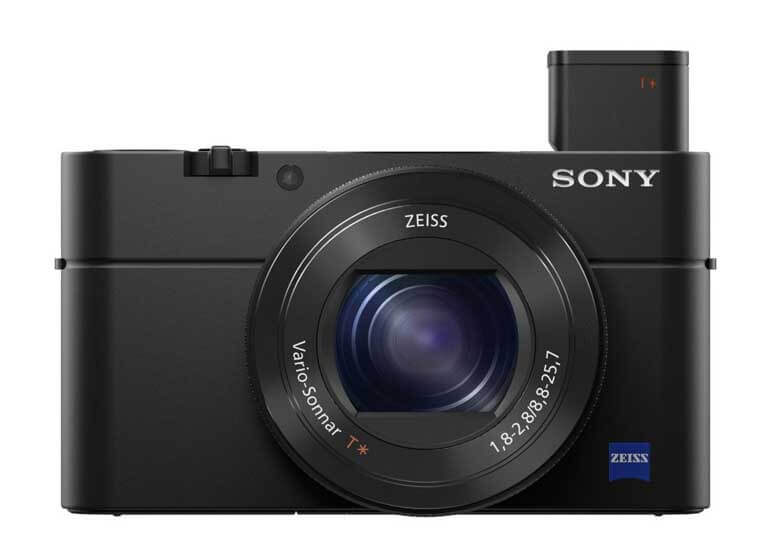
 

The Possible Exception to P/S Death

“Point and shoot like,” 1-inch-type sensor cameras, e.g. the Sony RX-100 series do perform significantly better than the best smartphone cameras. For some their smaller size and lower weight vs. a mirrorless camera is a godsend. As such, they occupy a valid but narrow niche between smartphone cameras and mirrorless cameras. But note that their image quality not quite as good as similarly priced mirrorless cameras that may weigh only a few ounces more. They are too large and heavy to be truly “pocketable.” And finally, their single lens is only about 1/3 as sharp as the best interchangeable camera lenses for mirrorless cameras like the Sigma 30mm f/1.4 Contemporary lens.

rx100-500h

Used without the inner-nest, the Sierra Designs High Route 1 FL Tent deserves a serious look as an innovative, 2-PERSON pyramid shelter. But if you frequently use the outer shelter and inner-nest together, you might consider other options. E.g. lighter 1-person shelters like the TarpTent Notch, or Mountain Laurel Designs Solomid XL; or roomier, freestanding 2-person “true-tents” like the REI Quarter Dome 2 or Big Agnes Copper Spur HV UL 2 Tent. Even so, the outer shell alone is a very nice pyramid shelter and Sierra Designs and Andrew Skurka deserve a lot of credit for thinking outside the box.

Quick Spec’s

  • The High Route 1 FL is a one-person, two-part shelter. An outer shell (pyramid shelter) and an inner-nest (bug net and floor). When combined they are the equivalent of a double walled tent.
  • Shelter has no poles. It uses two trekking poles for structure.
  • 2 lb 10 oz for: Outer shell, inner-nest, 8 stakes, 2 stuff sacks and cordage.
    2 lb 5 oz min. trail weight (less stakes & stuff sacks)

What is the Sierra Designs High Route 1 FL Tent?

The Sierra Designs High Route 1 FL Tent is really “a pyramid shelter with an inner-nest option.” More specifically, it’s a 2-apex pyramid, meaning that two poles support the shelter at two “pyramid peaks.” A 2-apex pyramid (vs. single apex) provides more vertical walls and therefore more usable living area (in this case enough room for two people). If you want, you can attach the inner-nest, which gives you a floor and mosquito protection. The downside is that this reduces living area (down to 1-person), and significantly increases the time and complexity of setup.

Sierra Designs High Route 1 FL Tent

Product shot that shows the integration of outer shell and inner-nest. The back of the “tent” is a mirror image of the front.

What’s Good

  • Used separately, I like the outer shell and even the inner-nest. A lot of thought went into their design.
  • In particular, the outer shell is an innovative pyramid shelter with lots of room. It could easily sleep 2 in a pinch. The vertical walls greatly increase usable room.
  • The High Route has one of the best implementations of using trekking poles to support a pyramid shelter. I really like that the poles are snug against the outside walls. This keeps them entirely out of the living area and door area. In addition it adds to the structural integrity of the vertical walls.
  • The dual doors and, two peak vents provide good ventilation.
  • Properly guyed out*, the High Route does well in strong winds. (*due to the vertical walls it’s a good idea to anchor the peak guylines with strong Y-stakes solidly in the ground)
  • It’s fairly easy to pitch due to its rectangular shape and using standard height trekking poles. (True only for the outer shell when used alone, i.e. no inner-nest.)
Sierra Designs High Route 1 FL Tent

The inner-nest (floor and bug netting) for the High Route can work as a stand-alone, stargazing shelter. The picture also better shows the dual apex design of the shelter. Note how the trekking poles are completely clear of the doors and living area.

What’s Not So Good

The High Route is less attractive when you combine the inner-nest with the outer shell

  • The combination is heavy for a 1-person non-freestanding tent that uses trekking poles for support.
  • In fact, the 1-person High Route is comparable in weight to some 2-person freestanding dome shelters that have a lot more interior room than the High Route and are easier setup. E.g the Big Agnes Copper Spur HV UL 2 Tent or even the comparably priced REI Quarter Dome 2 Tent. (Both have a newer steeper walled design that improves living area.)
  • And there are lighter 1 person pyramid with inner-nest shelters like the 27 oz TarpTent Notch, or Mountain Laurel Designs Solomid XL with InnerNest.
  • The High Route inner-nest halves your living area and increases overall weight. It also leaves scant “vestibule” area between the inner and outer tents.
  • I found attaching the inner-nest a bit awkward, fiddly, and time consuming. There’s lots of clipping and then tension adjustments at every point, since no shock-cordage is used. All this is done crouched on your knees, many times reaching across the tent.
Sierra Designs High Route 1 FL Tent

Oblique view of the High Route showing the near vertical front wall, and the two apexes of the shelter. The rear wall (not visable) is a mirror image of the front wall you can see. Due to the vertical it’s a good idea to stake out the front guyline to the apex (lower left guline in photo) with a solid Y-stake if you expect strong winds.

Summary

When used without the inner-nest, theSierra Designs High Route 1 FL Tent is worth a serious look. It is an innovative pyramid shelter that would likely work for two people. It even has dual doors! It’s made roomier by vertical walls and getting the trekking poles out of the living area. At about 12 oz per person (body less stakes is ~24 oz), it’s a reasonably light option for two people.

It’s a shame that Sierra Designs doesn’t sell just the outer shell (pyramid shelter portion) separately like other manufactures, e.g. Hyperlite Mountain GearMountain Laurel Designs and TarpTent. But if you can get the High Route on sale at around $240, you could just buy the whole thing and leave the inner-nest at home.

But, if you think you’ll use the  High Route outer shelter and inner-nest together most of the time, you might consider another shelter. Either lighter pyramid shelter with inner-nest combos from Hyperlite Mountain Gear, or the 27 oz TarpTent Notch and Mountain Laurel Designs Solomid XL with InnerNest. Or just getting a 2-person, freestanding, double-walled dome tent like the  Big Agnes Copper Spur HV UL 2 Tent or the REI Quarter Dome 2 Tent, which is the same price, sleeps two and is only ½ pound heavier.

Detailed Technical Specifications

My measurements

  • 2 lb 10 oz for: Outer shell, inner-nest, 8 stakes, 2 stuff sacks and cordage
  • 24 oz Outer Shell (pyramid), 15 oz Inner-Nest
    _____________________________________

* Technical Specifications (Sierra Designs)

  • Minimum Weight: 2 lbs 5 oz / 1.05 kg
  • Packaged Weight: 2 lbs 12 oz / 1.25 kg
  • Number of Doors: 2
  • Number of Gear Closets: Internal Storage
  • Gear Storage Area (Tarp Area – Nest Area): 17.3 ft2 / 1.61 m2 (more of a narrow area around the perimeter than a vestibule)
  • Interior Area (Tarp): 36 ft2 / 3.34 m2
  • Interior Area (Nest): 18.8 ft2 / 1.75 m2
  • Internal Peak Height (Tarp): 48 in / 122 cm
  • Internal Peak Height (Nest): 43 in / 109 cm
  • Awning Height: 38.5 in / 98 cm
  • Length (Tarp): 108 in / 274 cm
  • Width (Tarp): 48 in / 122 cm
  • Length (Nest): 90 in / 229 cm
  • Width (Nest): 30 in / 76 cm

* from the Sierra Designs Site, on the “TECH SPECS” tab

Most people know about Aron Ralston of “127 hours,” who cut his arm off to save his life. A major take-away from this was that he should have left a Trip Plan with a friend. Something as simple as a short note saying where he was going and what to do if he wasn’t back on time would have gotten him help far sooner than 127 hours. This is why you should make a Trip Plan (even a very short one) and leave it with someone for every backpacking trip. [Picture above is the author about 12 miles from where Aron Ralston’s arm was pinned by a loose rock.]

You think disaster won’t happen on your trip – but you might be wrong

No matter how incredibly competent you are and how meticulously you’ve prepared for your trip, an accident or emergency can happen to just about anybody, at any time.  It happened to Aron Ralston with a random loose rock. And similarly random things have happened and will happen to many others. A fluke accident, a flare up of a pre-existing medical condition, or even the odd event like an appendicitis, or acute altitude sickness, etc. can change your trip from fun to damage-control-mode in an instant.

The Life you Save Might be your Own!   or Why you Should Make a Trip Plan

If you make a Trip plan you stand a much better chance of getting help or a rescue.
And stuff can happen. Personally in the last 5 years:

  • I’ve participated in an immediate, life-threatening helicopter evacuation (not my bad).
  • Received in-field medical instruction on how to lance an abscessed tooth though the gum with a pocket knife (yes, my tooth!).
  • And locally we had a backpacker die, due in part to not having a Trip Plan and therefore, not getting rescued in time.

Finally, even if you don’t do it for yourself (or your loved ones!), make a Trip Plan as a courtesy to the Search and Rescue Personnel that may need to come look for you. These folks are mostly volunteer and it’s not respectful to have them spend countless days and hours searching for a missing person with little or no information.

What’s in this Article

The main purpose of this article is to make it fast and easy to make an effective Trip Plan. That way you’ll always do it!

What’s not in this Article

The 3 Most Important Elements for a Trip Plan

It’s far better you make short Trip Plan than to not make one at all. In that vein, a Trip Plan needn’t be a lengthy or complicated.

Here are the 3 Most Important Elements for any Trip Plan:

  1. The Route
    • Time and location of your trip start, and time and location of your trip end
    • Your route between the trip start and trip end (and where you plan to camp each day)
  2. Notifications
    • The time and method you’ll notify your trip-tracking-emergency-contact that you are out safely
    • The time your trip-tracking-emergency-contact should notify the authorities that you are a no-show/missing (providing local emergency contact info, Park, SAR, Sheriff etc. very helpful)
  3. Emergency Contact: Leave the Trip Plan with a trusted person (your trip-tracking-emergency-contact)

For Aron Ralson, communicating this minimal amount of information via an email, text or phone call to a friend (in all of 1-2 minutes) would have likely had him rescued within 24 hours.

Why You Should Make a Trip Plan

When you’re traveling off-trail in terrain like this it’s good to have a Full Trip Plan Document. On the Southern Sierra High Route. [photo Don Wilson]

Example Trip Plans – for you to fill out and use

Below is how to create your own Trip Plan from a Simple Trip Plan (“low risk” trips. e.g. hiking on the Appalachian Trail) to a Full Trip Plan (“high(er)” risk trips, e.g. dropped into Alaska by bush plane a zillion miles from anywhere). Note: Everybody has their own take on what is a risky trip. A low risk trip to one person may seem crazy risky to another person. As such, “Low Risk,” “Moderate Risk” and “High Risk” are in parenthesis for the rest of this article.

A Simple Trip Plan

When might you use a Simple Trip Plan?

As stated previously, it’s far better you make short Trip Plan than to not make one at all. But here are some instances where a Simple Trip Plan might work well:

  • Local weekend trip on good trails or other familiar, relatively safe area that you know well
  • Usually less than a day to hike out if you have a problem, and usually a lot of other hikers around
  • A more adventurous, higher risk day hike
  • Your trip-tracking-emergency-contacts know you well and know your skill-set/abilities. They are already be familiar with tracking your previous trips and use of standard communications protocols for inReach, SPOT, mobile phones etc. (So no need for a lengthy reiteration of this.)

Example Trip: Section hike of the Appalachian trail with a friend (not solo) in seasonable weather

Example of a Simple Trip Plan

The following is an example of a Simple Trip Plan. It takes the form of a short email to your trip-tracking-emergency-contacts. Obviously, if you want to include more information you can certainly use the more detailed template document, Full Trip Plan Document for Moderate to High Risk Trips (next box below), and fill it out with the information you feel is necessary and important for your trip.


To: Trip-tracking-emergency-contacts
Subject: Monitoring of our AT Section Hike, Harper’s Ferry to Harrisburg PA. Low key trip. Not expecting problems.

  • ITINERARY: May xx to May yy. Hike on the Appalachian Trail from Harper’s Ferry WV (starting evening of May xx) to Duncannon PA (late in the day May yy) where we’ll call to let you know we are out safe by dark.
  • Approx. route is mapped here: http://caltopo.com/m/xxxwe’ll be taking the inReach (in 10 min tracking mode) here https://share.delorme.com/xx and our cell phones which should have intermittent coverage most of the way.
  • If you don’t hear from us by 11pm last day (May yy) notify local authorities that we are a no-show.

[Note that this quickly covers all of the “3 most important elements for a Trip Plan” in an email format]


A Full Trip Plan for “Moderate Risk” and “High Risk” Trips

A Full Trip Plan is a lot more work! It includes things like the gear you are bringing including pictures of your shoe tread & tent; detailed information about each party member including wilderness experience, skills (including medical), personal medical history, etc.; extensive information about the communications electronics you are brining (including communication protocols between hikers and the emergency contacts), URLs for a map of the route, etc., etc. As such, you might not want to include all this information for a basic trip.

When might you use a Full Trip Plan?

The following are some things to contemplate when you decide how “risky” your trip is and how much information you want to include in your Trip Plan:

  • You are traveling solo
  • Backpacking in a more remote area that you are not as familiar with
  • A longer duration trip 4-7 days or more
  • Likely 2 or more days to hike out for help if you have a problem
  • Might have off trail travel, scrambling, skiing, technical climbing, whitewater river travel, winter conditions or other features that significantly increase risk vs. walking on good trails in fair weather
  • May use an SOS/Tracking Device (inReach or SPOT)
  • And for very remote and/or technical trips might include a Satellite Phone in your kit

“Moderate Risk” Trip Example: Week-long hike in the Sierra Nevada with a mixture of some on-trail travel and some off-trail side trips with sections of up to class 3 travel (scrambling on rocks using hands as well as feet—no rope needed).

“High Risk” Trip Example: 1) A week-long technical canyoneering trip (class 5 rock climbing) in a remote and mostly untraveled desert canyon system. 2) Getting dropped in by float plane to white water pack-raft and climb in Alaska above the Arctic Circle. In these cases there will be more detailed trip information and likely use of a Sat. Phone.

Full Trip Plan Document for Moderate to High Risk Trips – a template to fill out and use

Template document – Full Trip Plan for Moderate to High Risk TripsThis is a link. Click to open Template.

  • Note to user: This is a Template Document. Copy the text from this Google Document Template and paste it into your own document editor (MS Word, Google Docs, etc.) . Then fill it out (edit it) to contain the correct information for your trip.
  • The information in this Template is extensive and intended for a “high(er) risk” trip
  • For a more “moderate risk” trip some of this info may not be needed. Omit/modify at your discretion.
  • This covers integration of your Trip Plan with a DeLorme inReach or SPOT Satellite GPS Messenger – and also uses of a  Satellite Phone

Selecting an Emergency Contact to Give Your Trip Plan to

Here are some important factors to consider when selecting an emergency contact (trip-tracking-emergency-contact):

  • Level headed and reliable. For me this is usually a close family member or one of my trusted hiking/climbing partners. I trust them to seriously monitor my trips and in an emergency do the right thing without drama.
  • Familiarity with the area. If I am pack-rafting in Alaska I want someone that is familiar with the terrain and challenges of white water packrafting and land travel above the Arctic Circle. If I am on a Technical Canyoneering trip in Utah, I want someone experienced in canyon travel to be my emergency contact. With less specialized and technical terrain, there are far more people eligible to be emergency contacts.
  • Responsiveness. In this day and age, especially for higher risk trips we might be communicating  indirectly or directly with our emergency contact. This could be indirectly via location-check-ins or tracks from devices like a SPOT or inReach. Or it can be directly like text messages from an iReach or a call form a Sat. Phone. I want my contact to closely monitor these communications and quickly respond to things like an emergency, or if my trip track hasn’t moved in 24 hours and I haven’t notified them as to why. Or just to reply to my request for a weather update before climbing, etc.

The limitations of a Trip Plan and SOS Devices

Sometimes a timely rescue is not possible. A Trip Plan and/or a SOS Device like the DeLorme inReach and the SPOT Satellite Messenger is not the solution to everything. I have been in some extremely bad situations where rescue was not feasible even if I had sent out an SOS. As they say, the best rescue is self-rescue. And to state the obvious, Goal One is not needing rescue in the first place. So be sensible and safe out there.

Finally, a SOS device should never be considered a license to do silly things or take unnecessary risks.

Why You Should Make a Trip Plan

A shoe tread picture for a Trip Plan Document. My Altra Lone Peak 3.0 trail running shoes.


This best lightweight backpacking electronics gear is supremely functional, but is also light, low-cost, practical, and durable. It is the gear I take backpacking. This post has many Tips on How to Effectively Use this Gear.

This is part 1 of a 3 part series

  1. On Trail – Best Lightweight Backpacking Electronics Gear (this article)
  2. Best SOS/Tracking/Satellite Communication devices and their use
  3. Off Trail – Best Lightweight Electronics for before/after your trip—town, hotel, airports, plane etc.
    and options for a light “Mobile Office” as well as electronics for International Trips (coming soon)
    See section below for a quick summary of Travel Electronics For Use in Hotels and Airports Etc.
Best Lightweight Backpacking Electronics Gear

This is the gear that I take backpacking. Clockwise from bottom left: iPhone 6 Plus with light protective case, DeLorme inReach SE, Apple headphones, Amazon Lightning cable, *Sony a6000 camera with spare battery, and backup USB Battery.

*Note: I cover cameras like the Sony a6000/a6300 in a my post, Best Lightweight Backpacking Cameras.

On Trail – Best Lightweight Backpacking Electronics Gear

Here is a summary of the key components of the best lightweight backpacking electronics gear list.  A detailed table with all the components and weights is further down in this article.

  • $0* Smartphone – 7 oz with case (*cost is zero since I already own a smartphone)
    A large screen smartphone is the premiere, lightweight,  multi-functional device. It’s easily the best mapping GPS and navigational tool. A large screen smartphone (iPhone 6 Plus or Samsung Galaxy s6/s7) running an app like Gaia GPS is superior to conventional GPS units in almost every way. I get around 7 days normal trail use out of my iPhone 6 Plus before recharging. See: How to use your Smartphone as the Best Backpacking GPS.
    As a multi-functional tool, my iPhone has electronic maps (more functionality & covering far more area than paper ones), electronic trail guides, waypoints & mileage tables, field guides for birds and plants (e.g. Sibley Birds). It’s also a decent camera and video recorder, trail note journal, e-book reader, audio book and music player for relaxing and getting to sleep at night.
  • ~$20 USB battery – 5 to 6.5 oz (see below for options)
    Forget solar chargers, take a high-capacity USB battery to recharge your electronics mid-trip. (Note: For most trips of one week or less, a USB battery is lighter, less expensive and less fuss and bother than a solar panel.)
  • (optional) $150-$280 +service, SOS/tracking device – 5 to 7 oz
    Take a SOS/tracking device like a 6.9 oz DeLorme inReach or the 4.8 oz SPOT Satellite GPS Messenger. (I use inReach on most trips.) I will discuss SOS/tracking devices and their use in more detail in a future article.
Best Lightweight Backpacking Electronics Gear

Yes, a Smartphone is the best backpacking GPS out there! Pictured is the iPhone version of backpacking electronics. The USB battery on the right will recharge the iPhone 6 Plus two times. (The wall charger and micro-USB cable [top center] are only needed if you’ll have access to electricity mid-trip)

Always Bring a Backup Battery!

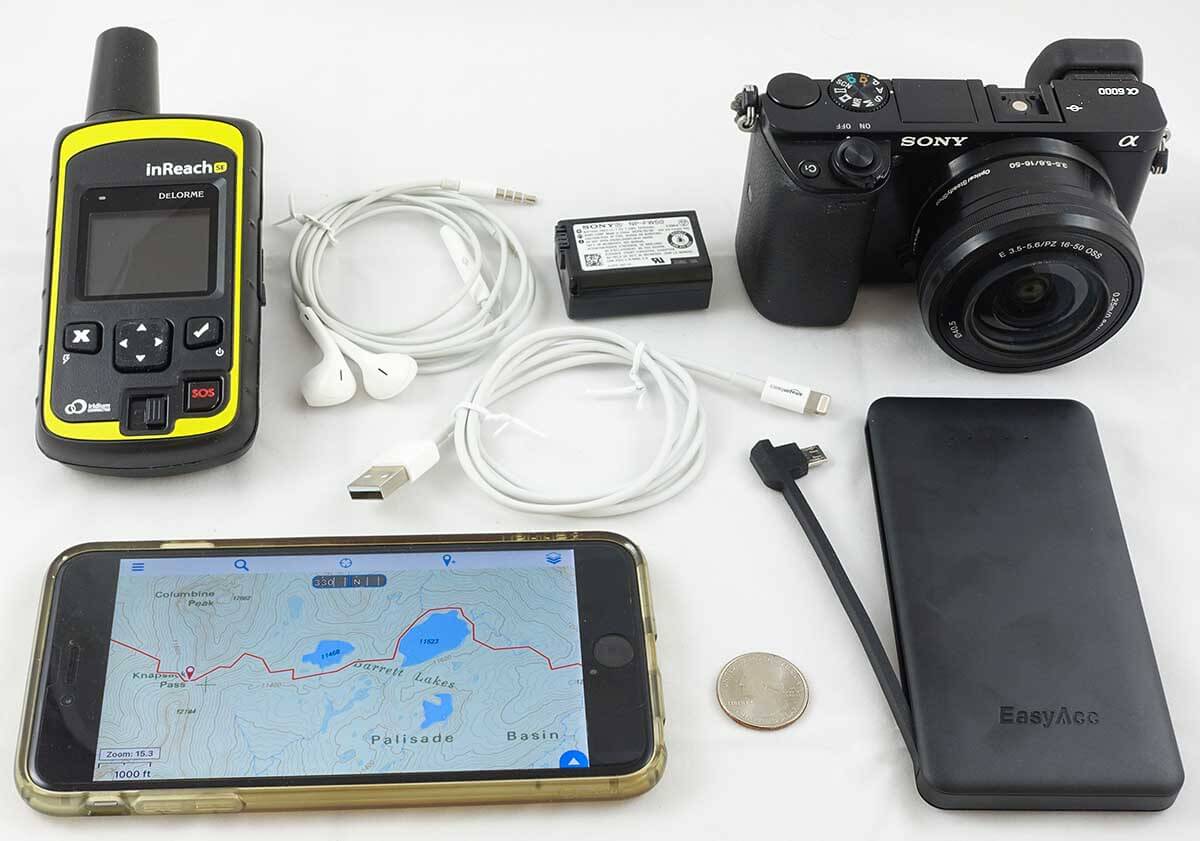
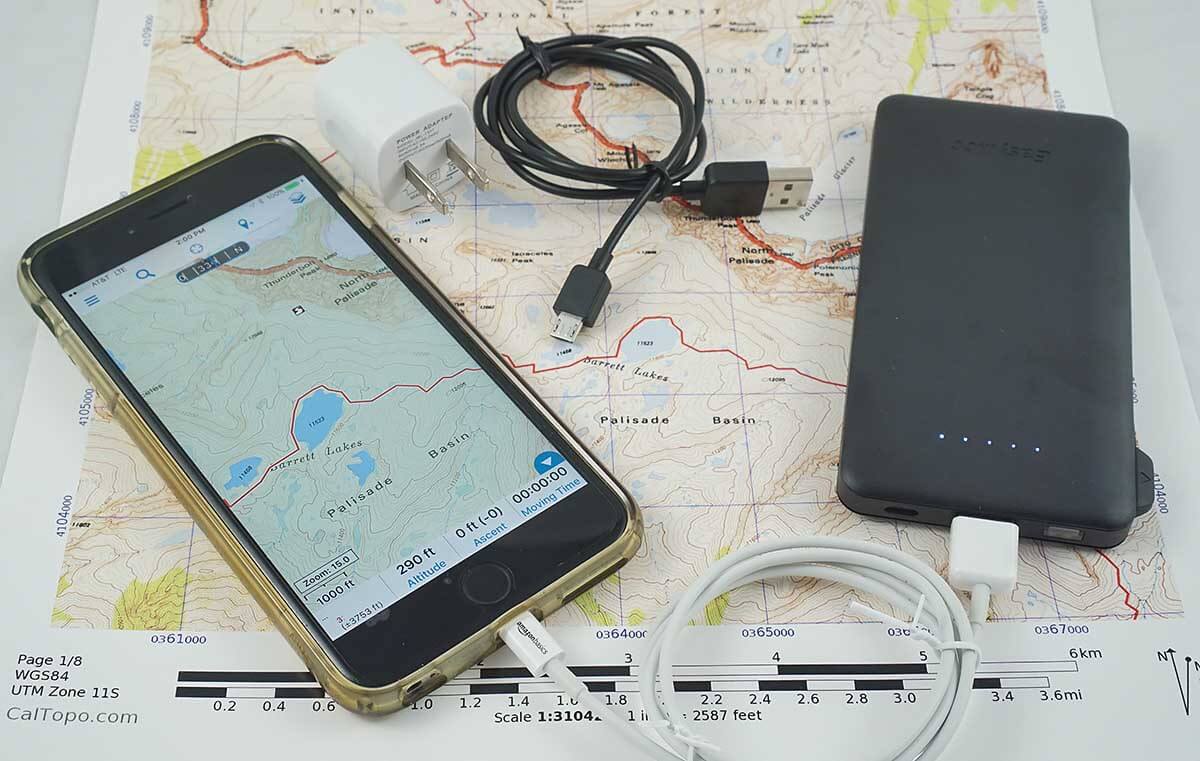
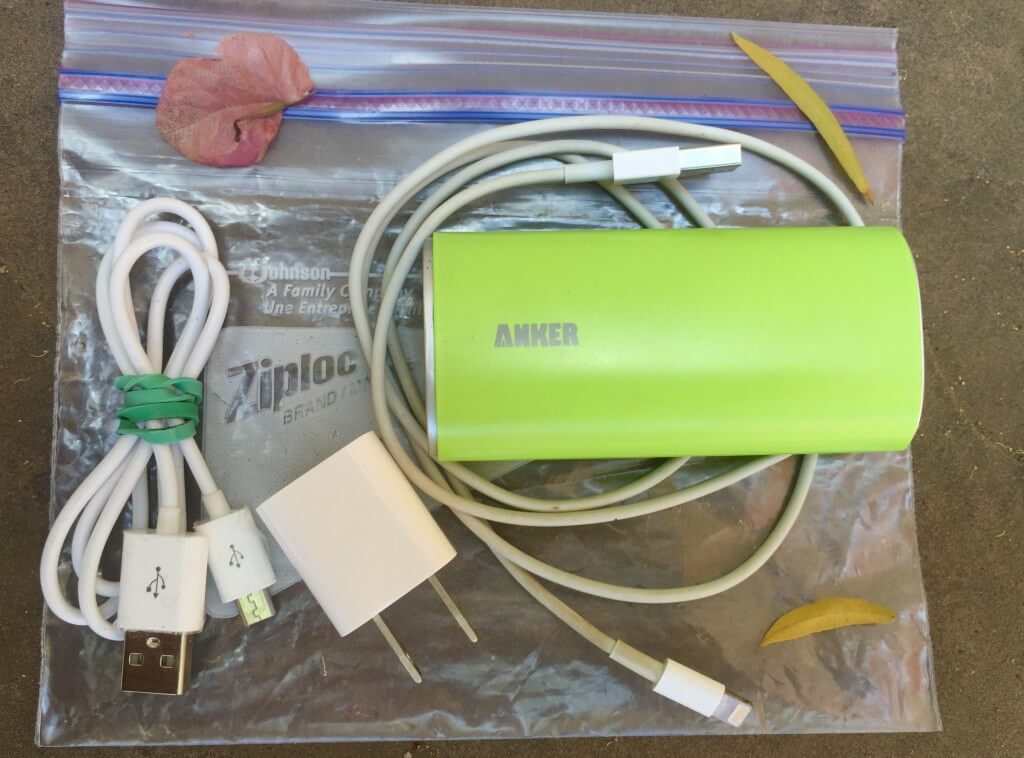
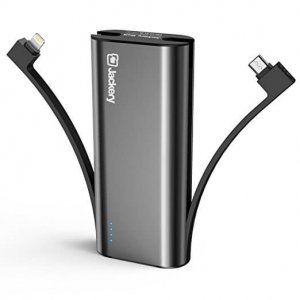
It’s critical safety precaution to make sure your electronics are always available for use. My three favorite lightweight and high capacity USB backup batteries are:
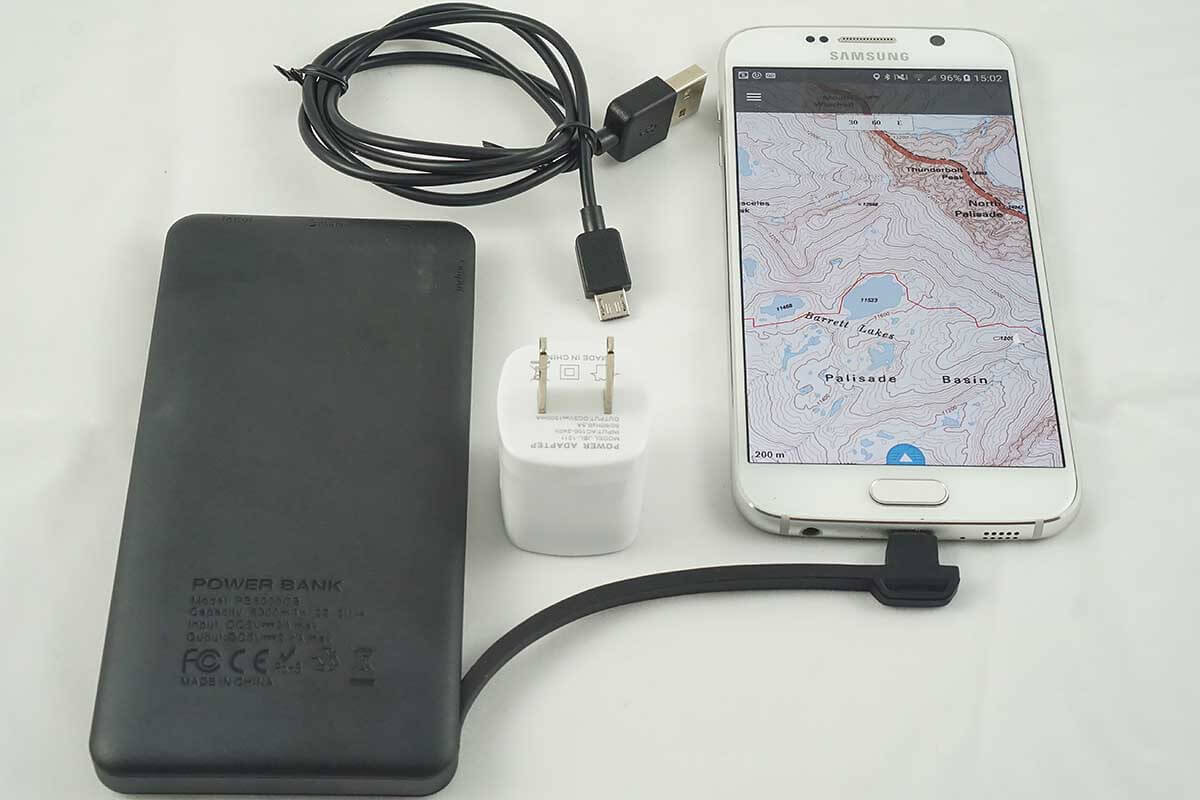
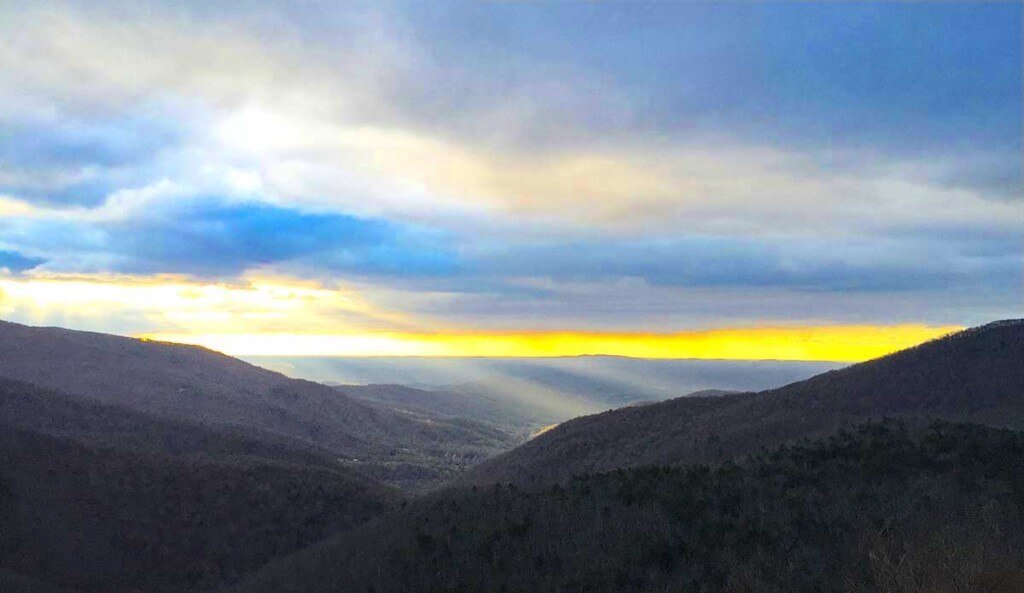
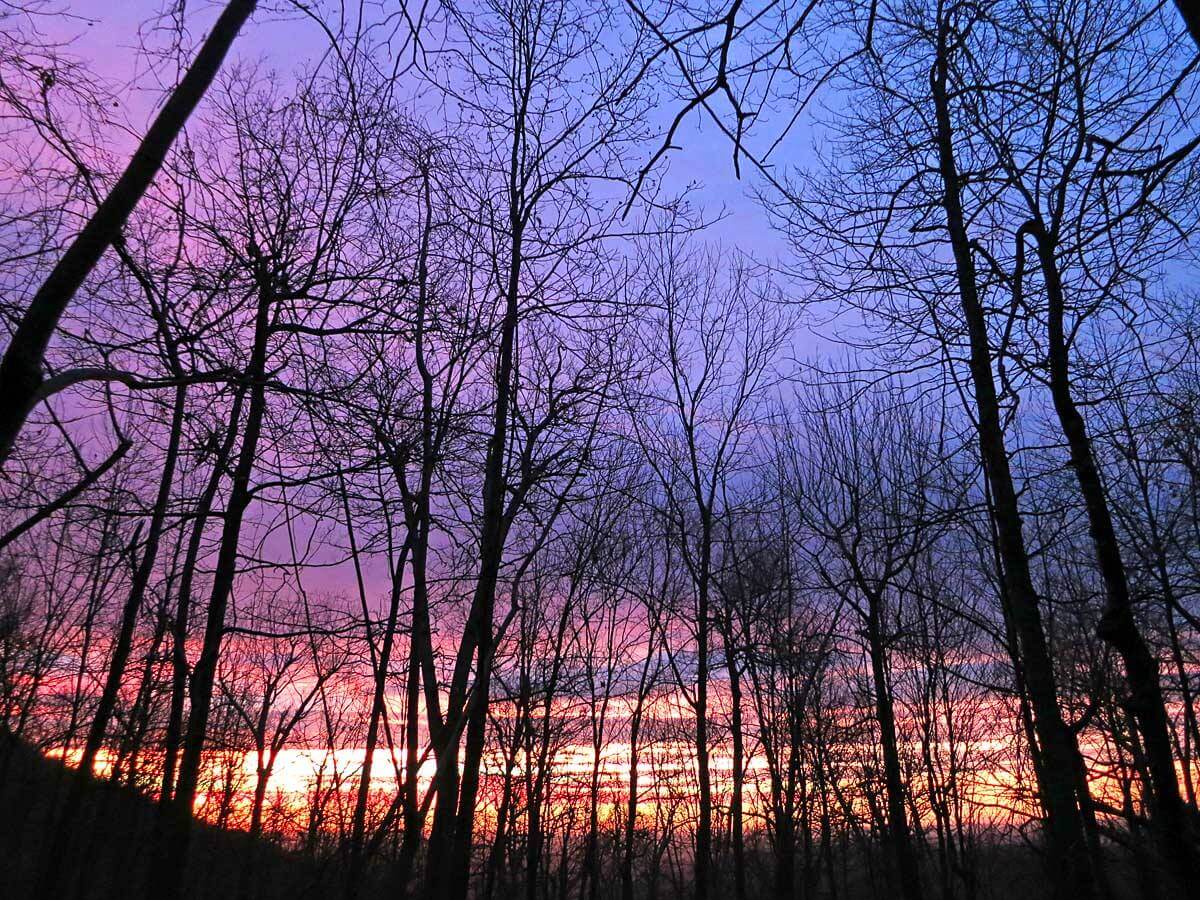
  1. Jackery Bolt 6000 mAh USB Battery (pictured right)- With two built in cables (lightening & micro-USB) it will charge just about any backcountry electronics. It has a faster charging rate than the EasyAcc below but has slightly less overall capacity.
  2. EasyAcc 6000mAh USB Battery This has slightly more capacity (tested) than the Jackery battery but has a slower charging rate & only a built micro-USB cable (altho you can attach your own lightening cable to charge an iPhone). It can charge a large phone like a Galaxy S7 about 1.4x and a smaller phone like an iPhone 7 2.3x.
  3. Anker PowerCore 10000 (only 6.4 oz) this is the lightest option f you need to recharge your electronics a lot.  It can charge a large phone like a Galaxy S7 ~2.5x and a smaller phone like an iPhone 7 ~3.5x. Its limitation is that it only has one USB port for a cable.
  4. And of course for a SPOT messenger and many headlamps a spare set of lithium AAA batteries.


Gear List Table – Best Lightweight Backpacking Electronics

Note: all blue text in the table below is a link to more detail for the item.

.

Best Lightweight Backpacking Electronics Gear

The Samsung Galaxy s6/s7 version of backpacking electronics. The USB battery on the left will recharge a Galaxy s6/s7 two times. For most trips, all you need is the battery and your Galaxy Phone—no extra cables needed! (The wall charger and micro-USB cable [top center] are needed when you’ll have electricity mid-trip.)

Tips for Selecting a Battery

Quick Review: If you take an iPhone 6, or iPhone 6 Plus and replicate the gear in my kit including the USB backp battery, you should get around 7 days of on-trail use. This assumes “smart use” of the gear, i.e. use it but don’t over-use it. See article on iPhone battery conservation.

  1. How long can your electronics go without charging? Pre-trip, you’ll need to do a bit of testing to see how long each one of your backpacking electronics will last with your normal use on trail. E.g I know I get about 6-10 days normal use from my iPhone 6 Plus. That’s daily “smart use” of the GPS, reading electronic maps and trip info/guides, etc. along with some listening to Audiobooks at night. See article on battery conservation for using an iPhone on-trail.
  2. Find out how many mAh it takes to charge each of your devices—Smartphone, inReach, Kindle, etc. E.g. an iPhone 6s Plus or Samsung s6 takes approx. 2,750 mAh (milli-Amp-hours), a Delorme inReach 2,450 mAh, and a Kindle Paperwhite 1,420 mAh.
  3. Select a proper capacity (mAh) battery. Using the information from 1 and 2 above, calculate how much mAh of battery capacity you’ll need for your trip. For example, the EasyAcc USB Battery (5,500 mAh, tested capacity) will charge an iPhone 6s about three times, an iPhone 6s Plus or Samsung Galaxy s6 about twice, and a DeLorme inReach about twice. For me, it has enough capacity to keep my entire lightweight backpacking electronics gear going for about a week. (My iPhone 6 Plus might/or might not need a partial charge, and my inReach may need a full charge mid-trip if I run it in tracking mode while I hike. That will still leave me some battery to spare.)
  4. See “Always Bring a Backup Battery!” box (above) for some specific battery recommendations.
Best Lightweight Backpacking Electronics Gear

Recharging opportunity for the Pacific Crest and John Muir trails at Tuolumne Meadows, Yosemite: Want to see just how many people actually take electronics in the backcountry? Check out any recharging station along a major trail. Clustered around every available outlet will be a rats nest of tangled wires, phones, USB batteries, and cameras. Next to that will be a bunch of trail-gritty backpackers eating ice cream and drinking coffee, beer or cokes waiting for their electronics to charge.

Tips for Selecting Cabling and Wall Chargers

  1. Figure out your cabling needs
    No apple products – you may get by with just the micro-USB cable already attached to the many USB batteries. (Note: a longer, 3ft u-USB cable may be more convenient. e.g. you can use your electronics more easily while they charge.)
    Yes Apple products – you’ll need a USB to Lightning cable like this AmazonBasics Lightning Cable.
  2. If you will have opportunity to recharge mid-trip, you’ll need a USB wall charger  and a cable to connect to battery/electronics. For most USB batteries you’ll need a micro-USB cable to recharge it (either the usually short one provided with it, or preferably a more useful 3ft u-USB cable).
  3. If recharging opportunities are frequent (e.g. hut to hut trips), you may be able to get by with a smaller capacity battery. With frequent enough access to electricity a Generic 1.5 USB wall charger and cable will recharge your electronics.

Why is this the Best Lightweight Backpacking Electronics Gear?

Large Screen Smartphone

  • For starters, a Smartphone running GAIA GPS just works. It’s better and less expensive than traditional backpacking GPS units like a Garmin.
  • My friends and I have taken iPhones (as a mapping GPS) on numerous pack-rafting trips in Alaska, winter rafting down the Grand Canyon, technical Canyoneering in Utah, climbing in the Wind Rivers and the Sierras, long hikes in the U.S.A, Turkey, Australia, Europe, and a canoe trip down the length of the Mighty Mississippi River. In almost every way a smartphone running GAIA GPS is superior to traditional mapping GPS units such as the Garmin.
  • iPhones can operate 7 to 10 days of “normal trail use” before needing a recharge.
  • As a multi-functional tool, a smartphone also has electronic maps, electronic trail guides, waypoints & mileage tables, field guides for birds and plants (e.g. Sibley Birds). It’s also a decent camera and video recorder, trail note journal, e-book reader, audio book and music player for relaxing and getting to sleep at night.
  • Finally, a large screen Smartphone like the iPhone 6 Plus or Samsung Galaxy s6/s7 are more useful than smaller screens. You can see a lot more of your GPS map, guide book pages, etc., making it easier to use and far more practical than a smaller phone screens or smaller tradtional GPS unit screens like a Garmin.
image

A LIGHT CHARGING KIT: Pictured from left to right: micro-USB cable for both charging micro-USB devices and your USB backup battery; 1 amp Apple USB wall charger; Apple Lightning cable, a lime green USB Backup battery (not a current model tho), and underneath a Pint Ziplock Freezer Bag to stow everything.

SOS/Tracking Devices and Sat Phones

Best Lightweight Backpacking Electronics Gear

Satellite Com Devices: For most trips, the DeLorme inReach is easily the best value. From left to right: Iridium 9555 SatPhone, DeLorme inReach, Iridium GO! and lower right SPOT Gen3. All of these devices have 2-way com with the exception of the SPOT.

Let me preface this by saying that in the last 5 years I used 2-way Satellite Com devices to:

  1. Initiate an urgent and immediate evacuation (less than 2 hours) via helicopter for a life-threatening medical situation. I was in satellite communication with park personnel to assess the situation, and provide first responder care.  During the course of our communications, the Park made the decision for the medical evacuation via helicopter.
  2. Receive medical instruction on how to lance a horribly abscessed tooth via the gum with a pocket knife (from an Emergency Medicine Doctor and a Dentist)

So my personal take on this issue is that stuff can and will happen. I cannot begin to predict what will happen, where it will happen, or to whom it will happen. Who would expect that a healthy trip member would start having a heart attack or a horribly abscessed tooth in the middle of a 10 day trip? What I do know is that my carrying one of these devices potentially saved at least one life and one tooth and as such, I will continue to carry one.

I realize tracking devices and sat phones can be a contentious topic.  As such, I am not suggesting to know what is best for others. I leave it up to each backpacker to make their own decisions.

all-electronics-1200

See also: “Best SOS, Tracking, and Emergency Communications Devices for Backpacking

Travel Electronics For Use in Hotels and Airports Etc.

Key items are a $2 extension cord that when combined with a cheap 2-prog travel adapter gives you 3 US style outlets. I find that the Anker 2 port (2 amp each) charger is fast and dependable. And in truth, the QIBOX charger is not as good as a 2 amp US charger with the cheap 2 prong travel adapter.

Key items are a $2 extension cord that when combined with a cheap 2-prog travel adapter (Ceptics USA to Europe Asia Plug Adapter) gives you 3 US style outlets. I find that the Anker 2 port (2.4 amp each) charger is fast and dependable. And in truth, the QIBOX charger is not as good as a 2 amp US charger with the cheap 2 prong travel adapter. [On the far left is batter charger for my Sony a6000 camera and two camera batteries.]

These tasty and nutritious backpacking meal recipes are healthier, have more calories and cost less than commercial, freeze dried backpacking meals. Keep it simple — there are enough nutritious backpacking meal recipes here to provide sufficient daily variety to keep meals fun and interesting. But there aren’t so many recipes that I spend too much time buying ingredients and assembling a large inventory of gourmet meals. I’d rather spend my time hiking than fussing with food.

Note: This is a companion piece to my top rated post, Best Backpacking Food – simple and nutritious – veggie and omnivore friendly which has more detailed info on nutrition and backpacking food choices.

Photo: Author eating dinner in the Alaska Range – credit: Andrew Skurka

You make Adventure Alan & Co possible. When purchasing through links on our site, we may earn an affiliate commission at no additional cost to you. Here’s why you can trust us.

Meal Rotation Planner — Nutritious Backpacking Meal Recipes

Keep it simple — I rotate 2 to 3 meal options for each trip. This provides enough food variety on the trail. By limiting meals to 2 to 3 nutritious backpacking meal recipes, I simplify food purchasing and meal prep.

Backpacking Meal Planner – example of a 3-day rotation
Day Breakfast Lunch Dinner
1 None: eat large one off-trail #1 Wrap+cheese & mustard (fruit #1) #1 Rice+beans w chips+cheese
2 #1 Muesli #2 Bison+sesame stix (dried fruit #2) #2 Couscous curry
3 #2 Hot oatmeal/cream-o-wheat #3 Crackers+almond butter (fruit #3) #3 Chili mac
4 #3 Grape-Nuts + strawberries #1 Wrap+cheese & mustard (fruit #1) #1 Rice+beans w chips+cheese
#1 Muesli #2 Bison+sesame stix (dried fruit #2) #2 Couscous curry
6 #4 Quick breakfast meal bar #3 Crackers+almond butter (fruit #3) None: eat large one off-trail

If you don’t already have one get an inexpensive kitchen scale that weighs up to 11 pounds (5 Kg). Almost all the ingredients are measured by weight for these recipes.

Nutritious Backpacking Meal Recipes

If you don’t already have one get an inexpensive kitchen scale that weighs up to 11 pounds (5 Kg). Almost all the ingredients are measured by weight for these recipes.

Breakfast Recipes

The following are nutritious and filling breakfasts that should keep a spring in your step until lunch! They have healthy fats and a good amount of protein. Note that the table below is in scrollable window. Please scroll down to see all the recipes Or you can see ALL THE RECIPES full page here, as a Google Sheet

Dinner mid-way up Mt. Olympus, Olympic Peninsula Washington State.

Dinner mid-way up Mt. Olympus, Olympic Peninsula, Washington State.

Dinner Recipes

The following are nutritious backpacking dinner recipes. These are filling meals at around 700-800 calories per serving! They have healthy fats and a good amount of protein. Note that the table below is in scrollable window. Please scroll down to see all the recipes Or you can see ALL THE DINNER RECIPES on a full page here, as a Google Sheet

Nutritious Backpacking Meal Recipes

Rehydrating in a Ziplock bag makes cleanup much easier. Especially nice in “dry” camps. You usually use less fuel as you kill your stove as soon as the water boils. Downside is that the meal does not rehydrate as well as when it’s cooked in the pot, and rehydration can take longer. A long handled spoon pictured here helps reach into deep baggies without getting your fingers covered in food.

Dessert and Hot Drink Recipes

The following are just few ideas for desserts and after dinner drinks. Note that the table below is in scrollable window. Please scroll down to see all the recipes Or you can see ALL THE DINNER RECIPES full page here, as a Google Sheet

Nutritious Backpacking Meal Recipes

Cooking a meal in the pot does a better job of rehydrating a meal. Especially if you let it simmer for a few minutes after a boil. Downside is that the pot is harder to clean, especially with cheese. And food can burn to the pot bottom if you aren’t careful. (photo: Andrew Skurka)

Rice And Beans With Cheese And Tortilla Chips

Use these healthy freeze dried Black Beans & Rice (available at REI) or at Amazon. Open the meal bag and add 2 oz of Just Hot Veggies or any of Just Tomatoes FD veggies.

Then separately package in ziplock snack baggies:

  • 3-4 oz cheddar cheese (cubed or shredded)
  • 2 oz of lightly salted tortilla chips of your choice (lightly crushed)

Place both the cheese and chip baggies back in the meal bag and reseal it.

Meal Prep Directions

  • pour 17 to 18 oz hot water into the meal packet and set aside to re-hydrate
  • after about 5 minutes, stir in cheese
  • when full hydrated (about 10 min), crumble tortilla chips over the top and enjoy!

Note: eat in packet with long spoons unless you want to be scraping cheese out of your pot and/or bowls for some time.

Nutritious Backpacking Meal Recipes

Dinner in a remote canyon in the Escalante Grand Staircase.

That’s the total weight of everything in my backpack—gear, food, water, and stove fuel. I used that 10 pound backpack to hike 100 miles (plus a few more) of the Appalachian Trail through Shenandoah National Park in 3 days. No fair weather hiking, it was more late winter than early spring conditions—rain, sleet, light snow and hard freezes at night. I think I am very close to dialing in a Light Pack that is also supremely efficient at covering long trail miles*.

But more important, I thoroughly enjoyed myself. I was warm, happy and comfortably cruising along one of the most spectacular ridge lines on the east. The kooky weather made for great entertainment and some spectacular views. (Scan through the photos below for a few of them.)

* Anyone can adopt the techniques I used to reduce wasted time and become a more efficient hiker. Even if long trail miles is not your goal, this gives you more time to enjoy the great views, take photographs, fish, or get some extra swimming in a lake rather than fiddling with your gear.


And just to be clear: My 34 miles/day average on the AT through Shenandoah National Park is far from super speedy. The fabulous Heather (Anish) Anderson averaged 42 miles per day on her record setting, unsupported AT through-hike last year. And my guess is that each year, more than a few hardy through-hikers cover the Park in 3 days as well. Nonetheless, I’m happy with my hike given the unusually cool and wet weather and short daylight hours of early April.

This a three part series:

  1. My 2007 attempt to section hike the 102 miles of the AT Trail through Shenandoah National Park in three days (I came up short)
  2. My March 2016 plans: Practical Light Gear List Appalachian Trail to use better gear and techniques
  3. And this April 2016 report of my successful completion of the 102 miles of the AT in SNP in three days.
10 Pound Backpack to Hike 100 Miles

Lots of kooky weather created some spectacular views. That’s the Shenandoah Valley almost 3,000 feet below me.

Why it Worked this Time – 10 Pound Backpack to Hike 100 Miles

In previous posts, I’ve discussed coming up short in my 2007 attempt to section hike the 102 miles and 22,000 feet of elevation gain of the Appalachian Trail through Shenandoah National Park in 3 days. So what were the keys to succeed this time even though the weather was more challenging:

  • Focus on efficiency—no wasting time: Running out of daylight was the major reason why I came up short in 2007. Minutes matter. Less wasted time equals more time to hike in the limited daylight of early spring. Just a few minutes wasted per hour adds up to 10 miles over 3 days.
  • Gear: I chose practical but light gear, with a focus on zero fiddle-factor (= no time wasting).
    For a full discussion of this as well as the gear list see: Practical Light Gear List Appalachian Trail
  • In this post I discuss two major gear choices, my 11 oz backpack and my 2.8 lb sleep system, and how they contributed to the efficiency (lack of time wasting) of my hike.
  • Adjustments for crap weather: As they say, “when we make plans Nature laughs.” Here’s the last minute gear adjustments I made for unusually wet and cold trip weather: Major Adjustments for Cold Weather
  • Shakedown trip: Two weekends prior, Alison and I did a 3 day Early Spring Backpacking Trip in cold and wet conditions with the gear I intended to use on the hike. On that trip we put in a hard and fast 22 mile day. In addition, in previous winters I tested my very cold weather hammock gear at 12°F (-11°C) so I had a tried and true light winter hammock quilt system ready to go.
  • Food: I used my usual 3-day-trip strategy—bring a small amount of very high calorie and nutritious food. I ate a huge breakfast before I started hiking on day 1, and a huge dinner when I came out on day 3. To save time, I ate much of my food while walking. See: Best Backpacking Food – simple and nutritious – veggie and omnivore friendly
  • Water: I drank when thirsty following current advice from experts in the field of sports hydration. The AT with its frequent springs and streams lends itself to a drink at source and not carry water strategy. I was not thirsty between water sources. But more important, I spent less time collecting/purifying water and making fewer side trips to springs (= more time to hike). I felt healthy and fine and woke each day ready to hike another 34 miles. See: Drink When Thirsty – Myths and Facts about Hydration.
  • Training: Listed next to last, but certainly among the most important contributors to trip success. It was critical to be in good hiking shape from the get-go; I didn’t have the luxury of hiking 850 trail miles to season-up, like North Bound through-hikers that started at Springer Mountain, GA.  I followed my own 2 day a week training schedule, Quick and Efficient Training for Backpacking. I couldn’t, in training, match my longest expected day (36 miles with 15,000 feet of elevation change). I did my best with a a few fast and hilly 20+ mile hikes pre trip.
  • Fun: And last but certainly most important is enjoying the trip. Yes, I had fun. Sometimes more “fun” than I wanted, but for the most part I thoroughly enjoyed myself. The Blue Ridge put on a spectacular show with weather fronts rolling through. With more time, I would have happily picked up food in Waynesboro and kept on heading south.
rainbow-1200x

Rain sometimes brings dramatic views. A late evening squall passes over me, heading east towards Washington DC. It’s nowhere near as warm as it looks. Much of the squall was horizontal sleet.

Efficiency – No Time Wasting

Running out of daylight was the major reason why I came up short in 2007. While you can hike in the dark under headlamp it is neither as fast nor as efficient as hiking in daylight. Rather, you have to slow down to miss rocks and other irregularities in the trail. In addition, it is much harder to follow the trail after dark. It is also easy to loose the trail—and re-finding the trail is a huge loss of time. That’s why all the speed records on the AT are done in the middle of the summer with the most daylight.

Minutes matter. This overarching goal trumps everything else. Less wasted time equals more time to hike in the limited daylight of early spring. Just a few minutes wasted per hour can add up to 10 miles over 3 days. So I did whatever I could do with gear choices and technique to be hiking as much as possible during each hour, and spending the least amount of time stopped or fiddling with things.

Note: time wasting has far more universal impacts than just trying to make trail miles. For instance, if you’ve just spent a lot of money and your precious vacation time to take a big trip, wouldn’t you rather spend your time enjoying the great views, taking photographs, fishing, or getting some extra swimming in a lake rather than fiddling with your gear? I will cover this topic, “Backpacking Time Wasters and Time Savers” in an upcoming post.

10 Pound Backpack to Hike 100 Miles

Gear – 10 Pound Backpack to Hike 100 Miles

This is not a fringe gear list. I want to be safe. I hate being wet, cold and uncomfortable. I want a good night’s sleep. This gear list does all of that. In fact I’d wager that I am warmer, more comfortable, have more living area, and sleep better than most campers. For a complete discussion on gear selection and a Complete Gear List see my previous post: Practical Light Gear List Appalachian Trail.

Each minute of daylight hiking time is precious and once squandered cannot be recovered. As such I chose practical but light gear, with a focus on zero fiddle-factor (time wasting). If gear was lighter but took away from my hiking time (or sleeping time) it was out. I’ll use my backpack and sleep system selection rationale as examples.

Backpack

  • The Mountain Laurel Designs Burn Backpack’s Cuben Fiber construction is plenty durable. I don’t have to waste time trying to handle it gently, or to not scrape it against brush or rocks. (vs. the single rear pocket, no hipbelt, 3.8 ounce spinnaker fabric pack I used in 2007)
  • The Burn’s numerous pockets save time as I rarely need to take the pack off to get what I need. Most often, I can do this while continuing to walk. From the two side pockets and two shoulder strap pockets, I can instantly access my most-used-gear and all of my day’s food. Rainwear is in the rear pocket and accessible in less than 10 seconds. Most days I don’t need to go into the main pack-bag during the day—which is good since that’s a lot of time wasted.
  • The Cuben Fiber main pack-bag with a roll top closure is virtually waterproof. Combine that with stowing my quilts and down jacket in Cuben Fiber stuff sacks and I don’t need to do anything different when it rains, just keep hiking. So my backpack is always packed the same, regardless of weather. No messing around taking on and off pack covers (imperfect rain protection anyway) or fussing with pack liners, both of which are a pain and waste time.
  • It has a simple and light hipbelt capable of supporting at least 15 to 20 pounds.
10 Pound Backpack to Hike 100 Miles

Fortunately, in previous winter trips I had tested my very cold weather hammock gear down to 12°F (-11°C). So I had a solid and very light winter hammock quilt system ready to go. One I had complete confidence would give me a great night’s sleep.

Sleeping System

  • Getting a good night’s sleep was essential to putting in back to back long days on the trail. My body needed rest to recover and get up and do it all over again the next day. Any impediment to getting my recovery was “time wasted.” This was arguably more important than wasted hiking time.
  • I need a light sleep system that I know will give me great sleep every night! One that I will relax and start to doze off minutes after I lie down and know that I will sleep soundly for the rest of the night.
  • For me on the AT this is clearly an 8 oz hammock paired with warm down quilts and a cuben fiber tarp. Read more here: Hammock camping article. Hammock Camping Part I: Advantages & disadvantages versus ground systems
  • Another advantage of a hammock on the AT, hammock camping equates to more miles hiked at the end of the day vs. sleeping on the ground.
  • Why? Sleeping in a hammock dramatically increases suitable campsites on the AT. With a hammock all I need to camp is two trees—the ground below is largely irrelevant. That means I can hike until dusk without the risk of being in un-campable terrain. (Since much of the AT is sloped and rocky it’s not suitable for ground camping.)
  • So if I were ground sleeping I would likely need to stop hiking sooner than dusk to camp. I.e. I need to stop at the last shelter or campground that I could comfortably make before dark. Thus I might miss an hour or more of available daylight to hike.
Blue rRdge at dawn. The name is self-explanatory.

Blue Ridge at dawn

Adjustments for Challenging Weather – when we make plans Nature laughs

I was hoping for pleasant spring conditions—sunny and in the 60s during the day with crisp sleeping temps in the 40s at night. Unfortunately, this was the weather I got. It would be even colder than this at higher elevations along the Blue Ridge in the park with temperatures likely dropping into the low 20s and rain becoming wind-blown sleet. Life is like that sometimes.

Wx report-600

My major changes were:

  1. do the hike in 3 vs. 4 days
  2. take warmer, +20F hammock quilts but with trimmer dimensions to save weight
  3. take a bit warmer clothes; a down jacket vs. down vest, and to add a light fleece shirt that I wore the whole  hike.

Click here to see Major Changes for Winter Wx full page, as a Google Sheet

5lb-lightweight-winter-change-AT

Click on table image above to see it full page with working links.

Mostly rain and mist all day along the ridge

Mostly rain and mist all day along the ridge

Original (non winter modified) Practical Light Gear List

For a complete discussion on gear selection and a Complete Gear List see my previous post: Practical Light Gear List Appalachian Trail.

Original (non winter modified)5 Pound Practical Light Gear List
Click here see it full page, as a Google Sheet

5-lb-practical lighweight

. Click on gear list table image to see full gear list sheet

Another stunning sunrise on the Blue Ridge

Another stunning sunrise on the Blue Ridge.

Water – Drink to Thirst

x

Drink to Thirst: Collecting water from springs right by the trail saves time. Drinking at the source with a Sawyer Filter means that I don’t have to carry water. I found I could easily hike to the next trailside water source without becoming thirsty.

Shakedown Trip – test out gear and legs

Shakedown trip: Two weekends before Alison and I did a 3 day trip in cold and wet spring conditions with the gear I intended to use on the hike. We got 35 degree rain, and hard freezes at night. My gear performed well and I made only a few adjustment prior to the Shenandoah. We also did one hard and fast 22 mile day to see test fitness, leg strength and endurance.

Backpacking Spring Training

Gear testing on a shakedown trip: Warm and snug in our hammocks sheltered in grove of pines. It was 35 degrees spitting rain when we went to bed and dropped to 25 degrees by the next morning. My hammock setup is on the left: Dutchware Netless Hammock with Dutchware suspension/hardware, Hammock Gear (HG) top & bottom quilts, and HG Cuben Hex Tarp.

Parting Shot – 10 Pound Backpack to Hike 100 Miles

And yes, there was some sunshine on this trip.

And yes, there was sunshine on this trip.

This is an excellent Method to Manage Hammock Tarp Doors. It’s fast and simple to use. It keeps the tarp doors neatly and securely out of the way in dry weather or when you are getting in and out of the hammock. But it quickly secures the tarp doors if needed—like when a rain storm quickly moves in. This is a great do-it-yourself DIY project—instructions are below.

I learned about this Method to Manage Hammock Tarp Doors from David Meck of Hammeck at a fall hammock hang along the Appalachian Trail in PA. After the hammock hang, David kindly sent me some photos of his setup. (BTW my wife, Alison currently uses an Envy-S Hammeck.)

If this post interests you you might also like these two gear lists that feature hammock camping:

Practical Light Gear List Appalachian Trail (5-6 lb) and 8 Pound – Appalachian Trail Gear List and this three part intro to hammock camping: Hammock Camping Part I: Advantages & disadvantages versus ground systems

This is a Great DIY Project 

Materials

Notes

  • You need to appropriately alternate male and female clips ends. Clips need to correctly mate in both open-and-stowed position (Picture 1), & in the closed position (Picture 3 & Picture 5) .
  • Use about 3 ft. of shock cord attached to each clip. This is a starting point as tarps are different.

Instructions – Method to Manage Hammock Tarp Doors

The instructions on how to setup this “Method to Manage Hammock Tarp Doors” are in the photo captions below. The tarp pictured is a Hammock Gear Standard Cuben Fiber Tarp with doors

Method to Manage Hammock Tarp Doors

Photo 1: This shows the attachment points for the door cordage and hardware. On the top, each door corner’s D-ring has about 3 feet of shock cord tied to it with a clip at the other end. The two door clips fasten to each other in the middle, “Detail,” to secure the doors in the open-and-stowed position. The bottom two arrows indicate where clips are attached to lower D-rings (these are used to secure the doors in the closed position). [Photo D. Meck]

hammock-doors-1-1200

Photo 2: Detail of Photo 1 showing the Safety Side Release Buckle clips securing the doors in the open-and-stowed position. Note that you need to make sure you have the right female-male connections to work in both open-and-stowed position (Picture 1), & in the closed position (Picture 3 & Picture 5). [Photo D. Meck]

hammock-doors-2-1200

This shows the left door closed and attached to the mating clip on the opposite side of the tarp (yellow arrow on lower right). On the lower left arrow you can see the hanging clip for the opposite (right) door that is currently in the open-and-stowed position. In the upper right you can see the two right-hand-side doors clipped in the open-and-stowed position. [Photo D. Meck]

hammock-doors-4-1200

Photo 4: Detail of Photo 3 showing the shock cord and clip from the left (left arrow) door secured to the clip in the lower right. [Photo D. Meck]

hammock-doors-5-1200

Photo 5: Shows both doors closed and secured to clips on the opposite tarp side (yellow arrows). [Photo D. Meck]


Update April 2016: I successfully completed this hike in 3 days.
See my trip report 10 Pound Backpack to Hike 100 Miles.
That’s the total weight of everything in my backpack—gear, food, water, and stove fuel. I used that 10 pound backpack to hike 102 with 22,000 feet of elevation gain of the Appalachian Trail through Shenandoah National Park in 3 days. No fair weather hiking, it was more late winter than early spring conditions—rain, sleet, light snow and hard freezes at night. I think I am very close to dialing in a Light Pack that is also supremely efficient at covering long trail miles. I used most of the gear listed below.

Practical Light Gear List Appalachian Trail

Practical Light Gear List Appalachian Trail
Just how light can you go on backpacking gear for the AT and still be an efficient hiker…

I believe this “5 Pound Practical Ultralight Backpacking Gear List” is very close to the lower weight limit of gear to efficiently walk long days on the AT (section hiking or through hiking) without sacrificing comfort, functionality or miles hiked per day. For me Practical Light is sub 12 pound total pack weight (gear, food, water & fuel) to do a ~100 mile section of the AT without resupply.

Overview of Practical Light Gear List Appalachian Trail

2016 Sequel to 2.4 Pound Extreme Ultralight Backpacking on the AT
This spring I am going test my “Practical Light Gear List Appalachian Trail” by re-hiking my 2.4 Pound Extreme Ultralight Backpacking on the AT in Shenandoah National Park. The objective in 2016 will be to answer the question, “*What is Practical Light on the Appalachian Trail?” Well, at least answer the question for me. I am already close to dialing-in this final kit. I tested a beta version of this new kit last Fall on an AT section hike from Harper’s Ferry WV to Pine Grove Furnace PA. I was very happy with the results. I was pulling 25 to 30 mile days without a lot of effort, and I was not lacking in either comfort or functional gear. Stay tuned for a a post hike trip report this Spring…

Summary of changes from ‘07 to 2016

  • Pack under 12 pounds to hike 100 miles with food, water and fuel included. This should not compromise comfort or happiness. But also, my gear should maximize trail miles covered per day. That is, the lightest pack is not the only factor to efficiently hiking the most miles per day. For my other considerations see: *But what exactly is Practical Light on the Appalachian Trail?
  • More durable pack – less time fiddling around trying not to rip pack. More pockets to minimize hiking time lost when diving into the main pack body for something in the middle of the day. Inherently near-waterproof = less time dealing with rainproofing pack and gear in iffy weather.
  • Warmer quilt – to assure a good night’s sleep and full recovery from a long day of hiking. Trimmer dimensions, lighter fabrics keep weight similar to ‘07 quilt.
  • Hammock Camping = more miles per day than ground sleeping. For my rationale on why hammock get you more miles per day see: Hammock Camping Part I: Advantages & disadvantages versus ground systems
  • But! I realize that there is nothing wrong with ground sleeping—it’s a great and very light system. And I know that I am unlikely to convince many (most?) backpackers to depart from traditional camping on the ground. So I’ve included excellent, light ground sleeping gear on the list below.
  • Upgrades to new lighter/better equipment not available in ‘07. Sprinkled in a few more (light!) creature comforts – to keep me sane and happy on the trail.

5 Pound Practical Light Gear List

Click here see it full page, as a Google Sheet

5-lb-practical lighweight

. Click on gear list table image to see full gear list sheet

Why we hike the AT. Glorious sunset from MacAfee Knob. [Photo Karan Girdhani]

Why I hike the AT. To view glorious sunsets like this one from MacAfee Knob. My primary goal is not to cover the most miles per day. [Photo Karan Girdhani]

Discussion of Practical Light Gear for the Appalachian Trail

It’s been almost nine years since I wrote 2.4 Pound Extreme Ultralight Backpacking on the Appalachian Trail in ‘07. Now when I look to optimize my gear, my primary objective is to maximize trail miles with the minimum of effort—not to get the lowest possible pack weight. I call this “Practical Light.”

*But what exactly is Practical Light on the Appalachian Trail? Obviously the interpretation of “practical” is key. We’ve all heard the term “Stupid Light” bantered around but what is the opposite? Smart Light would work as an opposite but it implies a level of hubris some not want to take on. Practical seems a more humble word. Nobody is going to say you are arrogant for just being practical.

For me “Practical Light on the Appalachian Trail” is:

Practical Light on the Appalachian Trail is the gear and food that will maximize trail miles (dawn to dusk hiking) with the minimum of effort for an AT section hike or through hike. (Emphasis on efficient.)


Obviously a very light pack is still a significant contributor towards that goal, but it’s not the only one. Other factors that I consider for maximizing trail miles are:

  • This is not a suffer fest! My first priority is to enjoy myself—that’s why I am out there—not just to cover trail miles. It just turns out that I really enjoy hiking dawn to dusk (as long as I am hiking at my own moderate pace).
  • How well can I sleep and recover from a dawn to dusk day of hiking?
  • Will my gear allow me to camp where I want when I reach the end of my optimal hiking day? I.e. I do not want to be being tied to camping at just AT shelters or the few other areas with flat campable ground.
  • Carrying enough food and the right food to sustain dawn to dusk hiking. 1.7 lb per day of nutritions, high calorie food.
  • Minimizing water carried (while still staying well hydrated). Key here is to filter and drink at the source.
  • No “high-futz/fiddle factor gear” that would reduce my available hiking time

If I compromise any of these to lighten my pack, my gear is no longer practical. That is, I am likely to hike fewer miles per day by cutting weight in this manner.

OLYMPUS DIGITAL CAMERA

While my 2.4 pounds of gear worked fine on ’07, I believe that a few more pounds of gear and food would have allowed me to hike even further and enjoy the trip more.

A change in perspective: In ‘07 I only covered gear but did not include the food and water I carried. In this iteration I will include considerations on food and water and include their weights—since this is what will actually be on my back . E.g. I will carry a 3 oz water filter. While that will increase my base pack weight over ’07, my total pack weight will be less since the filter allows me to drink immediately from water sources. I do not intend to carry a drop of water on the trail.

Dutchware Half-Wit Hammock

For my 2016 Hike I will be taking a hammock very similar to this Dutchware in 1.0 Hexon but less the bug netting. It’s incredibly comfortable, ensuring a good night’s sleep. The drab hammock colors, and camo Hammock Gear under-quilt keep me unobtrusive. If I am 100 feet off the trail, I am essentially invisible. [Photo: beta version of this my AT kit last Fall on an a section hike from Harper’s Ferry WV to Pine Grove Furnace PA]

Highlights of Gear Changes for 2016

Sleeping  To: Hammock camping  From: on the ground with a foam pad

New Old Rationale
Dutchware 11 ft. Single Layer Hammock – Hexon 1.0 fabric N/A Hammock camping = more miles per day & more comfortable! See advantages of hammocks
Hammock Gear Phincubator Under-Quilt, (60″ no need for pad under feet) 800fp down, 0.67 oz fabric GossamerGear Foam Sleeping Pad (Torso) Underquilt serves same purpose for a hammock as pad for ground sleepers. More comfort than a full-sized NeoAir
Hammock Gear “+30” Burrow Top Quilt. Trimmed dimensions, 800fp down, 0.67 oz fabric Jacks R Better Stealth (down quilt) Jack’s is still a great quilt. HG is a bit lighter, and I can wrap it around me in camp. I also spec’ed the HG quilt to be warmer so I’d sleep well.
Hammock Gear Cuben Hex Tarp Oware 1.5 cuben Cat Tarp More coverage to keep gear dry in the rain and cut optimized for hammock use


Bottom line: For me hammock camping equates to more miles hiked at the end of the day vs. sleeping on the ground. Why? Sleeping in a hammock dramatically increases suitable campsites on the AT. With a hammock all I need to camp is two trees—the ground below is largely irrelevant. That means I can hike until dusk without the risk of being in un-campable terrain. (Since much of the AT is sloped and rocky it’s not suitable for ground camping. So if I were ground sleeping I would likely need to stop hiking sooner than dusk to camp. I.e. I need to stop at the last shelter or campground that I could comfortably make before dark. Thus I might miss an hour or more of available daylight to hike.) There are many more advantages to hammock camping like a great sleep each night that allows me to more fully recover from a long day of hiking, and the option to avoid crowded, noisy, and heavily impacted campsites. Read more here: Hammock camping article. Hammock Camping Part I: Advantages & disadvantages versus ground systems

And there is nothing wrong with ground camping! If I were to ground camp, my sleeping system would remain quite similar to my ‘07 trip. Although I would use some model of NeoAir for a ground pad. Just getttin’ too old to get a great night’s sleep on a thin foamie! And as with the hammock camping, I would spec’ out a warmer quilt so that I would be guaranteed a good sleep. But with newer, lighter fabrics and trimmer dimensions that warmer quilt weighs less than my ‘07 one. Oh, and I would also take a down vest to wear around camp.

mld burnPack
To: 11 oz Mountain Laurel Designs Burn in Cuben. More durable, more pockets, inherently waterproof
From: 3.8 ounce spinnaker fabric pack: Gossamer Gear Whisper

While the Gossamer Gear Whisper Pack performed fine and I didn’t rip in ‘07, there were a few things that made me look for a similar pack but with more durable fabric and more pockets. 1) the Whisper’s pack fabric was so delicate that I was always looking out not to snag it on something; locating a soft, non-sharp place to put it down and sometimes resting it on the top of my feet when I couldn’t quickly find one. This fiddling takes away hiking time and distracts me from enjoying other things. 2a) while still light, the two quilts for hammock camping (top and bottom) takes a bit more volume in a pack than a single quit/sleeping bag–the Whisper is not quite up to that storage. 2b) even with sufficient volume, I would have my reservations that the seams will hold with such delicate fabric when I stuff two quilts into a pack. 3) the pack had no side pockets to store food and a water bottle, etc. in a more accessible location. Digging into the main pack added fiddle time that took away from hiking time. 4) the Cuben Fiber on the MLD Burn is inherently near-waterproof = less time dealing with rainproofing pack and gear in iffy weather.

NB. Gossamer gear now makes the 9 oz Murmur pack which addresses most of these issues except for pack volume. Altho the volume is fine for ground campers with a single quilt, it’s a bit small to store two quilts for hammock campers. And it is not as waterproof or durable as a cuben fiber pack.

pat-down-vestWarm Camp Clothing  To: a down vest From: nothing! (or rather a quilt worn in camp as a poncho)

Since my quilts are now non-poncho versions (although I can still wrap it around me in camp like a blanket). I have have added a down vest for walking around/being more mobile in camp and for early starts on cold mornings.

AT-midpoint-sm

Midway on the AT. From my section hike last fall where I evaluated a beta kit of Practical Light Gear for the AT. With a few exceptions, I will use most of that gear this Spring.

Sunrise from my hammock, Shenandoah National Park.

Sunrise from my hammock, Shenandoah National Park.

A sudden opening in the clouds illuminates a lone tree and a small outcrop overlooking Loch Marie in Wester Ross. The summit of Slioch (left) is still shrouded in mist at midday. [Handheld with Olympus E-520 and stock 14-42mm f/3.5-5.6 Zuiko ED Zoom lens.] This photo looks great enlarged to 14x19.

A sudden opening in the clouds illuminates a lone tree and a small outcrop overlooking Loch Marie in Wester Ross. The summit of Slioch (left) is still shrouded in mist at midday. [Handheld with 16 oz, mirrorless digital SLR camera (like this) with its stock zoom lens. ] This photo looks great enlarged to 14×19.

Purpose: This article addresses the selection of a lightweight backpacking camera and photo gear. In particular, you will understand the tradeoffs of camera size and weight vs. image quality.

sony-a6000-kit

The 16 ounce Sony a6000 with the right $200 prime lens (Sigma 30mm f2.8 DN), can produce image quality challenging the Canon 5D. Pictured is my full Sony a6000 backpacking kit: Sony a6000 Mirrorless Camera w (kit 16-50mm lens or alternate lens), Peak Designs CapturePRO (mounts to backpack shoulder strap), Peak Designs Micro Plate (mounts to camera bottom), Pedco Ultrapod II (small tripod), Sony NP-FW50 Battery (spare), Newer® Fish Bone quick release for tripod head.

Camera Item Oz Comments
Camera SLR
crop format
Sony a6000 w kit 16-50mm lens*
new model: Sony a6300
16.0 Among lightest 24mp APS-C cameras. With the right lens, image quality approaching Canon 5D
Lens alt/add’l Sony SEL35F18 35mm f/1.8 Prime Fixed Lens w hood (6.2) Fast, superb resolution, normal lens w image stabilization. Use dawn & dusk. Possibly w/o tripod!
Lens alt/add’l Sigma 19mm f2.8 DN, w hood (6.1) For landscape. Light, inexpensive, sharper at 19mm than the a6000 16-50mm kit lens
Lens alt/add’l Sigma 30mm f2.8 DN, w hood (5.7) Only $199! Superb resolution. Lightweight.
Battery spare Sony NP-FW50 Battery (1.5) Alt less $: Wasabi Power Battery (2-Pack) & Charger
Mount Peak Designs CapturePRO 110g 3.8 Take more photos! Fast access to camera!
Attaches to backpack shoulder strap
Mount Peak Designs Micro Plate 25g 0.8 Needed to clear a6000’s hinged LCD screen
Tripod SLR Pedco ultra-pod II 114g, 4.0 oz For small mirrorless SLR cameras
Tripod mount Newer® Fish Bone quick release for tripod head 51g, 1.8 oz For quick attachment of camera with Peak Designs Micro Plate (alt = Desmond DLVC-50)
Protection Gallon Freezer ZipLoc To protect camera gear from rain
TOTAL 20.6 ounces

xx

A recent photo shot in Dolly Sods Wildness with the 16 oz Sony a6000 mirrorless digital SLR camera and its stock zoom lens (listed in table above).

Lightweight Backpacking Camera Selection 101 – Why Sensor Size Matters

If you don’t want to go into all the gory details at this point you can just jump to a discussion of the Lightweight backpacking cameras I use.

Lightweight Backpacking Camera

My three lightweight backpacking cameras L to R: Canon PowerShot S100 (current model s120), Sony a6000 w kit 16-50mm lens (new model: Sony a6300), Sony RX100iii (current model RX100iv). With each increase in size, weight and cost you get higher quality images, but at expense pocket-ability and rapid access to the camera for a quick shot. (photo taken with my iPhone 6+)

While some point and shoot lightweight backpacking cameras may produce quite serviceable photos, don’t expect professional quality images from a camera with a sensor* the size of your little fingernail and a lens the size of a snap pea. It would be great if a 5 oz Point and Shoot (P/S) compact camera produced images close to the quality of images from a 3 ½ pound digital SLR (DSLR) camera and lens combination like a Canon 5D and 24-105mm f/4L IS lens. But camera sensor and lens size has significant impact on image quality. In summary: better image quality requires a larger sensor, which in turn requires a larger camera body and a larger lens, and ultimately a heavier camera.

Since we can’t bypass laws of physics (sensor* and lens size), each backcountry photographer will need to find a satisfactory compromise between camera size/weight and image quality.

* Sensor is the device in a digital camera that electronically captures the image. It performs the same function as film in old style film cameras.

5 Most Important Features for a Backpacking CameraAlso see 5 Most Important Features for a Backpacking Camera

Alert! as a backpacker you are not well served by mainstream camera reviews like DPReview. That is, the 5 Most Important Features for a Backpacking Camera are quite different than those for a general use camera in mainstream reviews. Hear are the major differences.

Major factors to consider for image/photo quality

  • Larger sensors produce better image quality: (see Table of Sensor Sizes and Pixel Densities below)
    A P/S camera has a sensor 5% the size of the full-frame sensor of a camera like the Canon 5D. If each camera has the same number of pixels, then the pixels on the P/S camera will need to be 5% the size of the full-frame camera’s pixels in order to fit on the smaller sensor. So each P/S pixel can only gather 5% of the light of a full-frame sensor pixel—sometimes only a few photons per pixel (yes literally down to the photon level!). Without going into gritty detail, the close pixel spacing and limited light gathering ability of smaller sensors leads to less resolution/sharpness (for the same pixel count), less dynamic range (especially problems with clipped highlights, i.e. entirely white areas without detail), less color saturation, more noise, decreased ISO performance, and ultimately lower image quality.
  • Lens size matters: A larger sensor requires a larger lens to cover the larger sensor area. In addition, there is a limit to how precisely one can shape a small lens (e.g. a P/S camera lens). Due to the immense popularity P/S cameras and digital video recorders, there have been astonishing advancements in the optical quality of small molded plastic lenses. Nonetheless, the best optical quality is still from precisely ground glass lenses. These are the lenses used for for mid-size-semi-pro-sensors (approx. 30-40% of 35mm coverage) to full frame sensors (100% of 35mm coverage). Larger lenses do cost a lot more. A top quality lens might cost between $800 to several thousand dollars. But there are bargains to be had with some gems in the $200 to $500 range (e.g.Sigma’s Art Series prime lenses). And even some quite good zoom kit lenses.
  • Intended print size or use of images: If you intend to use the camera to produce 800 pixel snaps for your webpage, a good P/S camera should to the trick (although you will still a reduction in dynamic range, and color accuracy). But if you intend to frame large prints, you will be disappointed with the results from a P/S camera. To get sharp 16×20 or larger prints, with good color and tonality you’ll need at least a mid-size-semi-pro-sensor camera (approx. 30-40% of 35mm coverage) with a high quality lens—something like the Sony a6000.

Finally, there are no takeovers for backpacking photography. A small sensor P/S camera is extremely unlikely to produce a high quality enlargement no matter how fabulous the shot. Photoshopping is unlikely to make significant improvements. Think hard before you commit to a smaller sensor camera.


Killer Point and Shoot Cameras for backpacking

The Sony is a DP Review Editors Pick and in a class to itself for image quality for a light and compact camera. But it is quite expensive.

The Sony is  in a class to itself for image quality for a light & compact camera.

Some great, almost pocketable, 11 ounce “point and shoot” cameras produce superb images. The major disadvantage is high cost.


Mirrorless crop format cameras are probably your best option for serious photography

You best option for serious backpacking photography is probably one of the inexpensive mirrorless crop format camera (APS, APC, μ4/3) like current Sony a6000. The best of these cameras approach full-format SLR picture quality in a light, compact camera with interchangeable lenses. By doing away with a SLR mirror and viewfinder, but retaining the larger sensor and lenses of an SLR, you significantly reduce weight and bulk but retain picture quality. The 16 ounce Sony a6000 with the right $200 prime lens (Sigma 30mm f2.8 DN), can produce image quality challenging the Canon 5D.

sony-a6000-kit

Canon 5D challenger: The 16 ounce Sony a6000 (new model: Sony a6300) with the right $200 prime lens (Sigma 30mm f2.8 DN), can produce image quality challenging the Canon 5D. Above is the full Sony a6000 backpacking kit use: Peak Designs CapturePRO (mounts to backpack shoulder strap), Peak Designs Micro Plate (mounts to camera bottom), Pedco Ultrapod II (small tripod), Sony NP-FW50 Battery, and Newer Fish Bone quick release for tripod head.

And I admit, even I am tempted from time to time to carry a Canon 5D into the backcountry for its superb resolution and image quality! Note: The full-format mirrorless Sony a7 is starting to make inroads into the serious professional photo market. Even here photographers are finally getting tired of the weight and bulk DSLRs.

Lightweight backpacking camera

Sunrise Escalante River, Olympus E-30 and stock 14-42mm f/3.5-5.6 Zuiko ED Zoom lens. This photo looks great enlarged to 14×19. I just got done looking at the pictures my friend took with a compact P/S camera vs. the pictures I took a few weeks earlier in the same area with an Olympus DSLR with a 4/3 sensor (about nine times larger sensor). The P/S pictures are ”muddier“ and not nearly as sharp. The colors are muted and there is less tonal range. There are lots of pictures with detailess dark shadows or white (not blue) sky, sometimes both in the same shot. True, my friend still has a nice (and serviceable) photo record of her trip but most of these photos are not technically worthy of an 8×10 enlargement. Some of the shots, if they were taken with a better camera would make excellent enlargements worthy of framing. Bottom line—larger camera, larger sensor, better picture.

Cameras and Their Sensor Sizes

The following is a list of some cameras and their sensor sizes.
As a rough estimate, the lower the pixel density (mp/cm2) the higher the image quality of the camera.

Lightweight backpacking camera

Note: the example cameras in this are a bit dated, but the message is still good. Altho, now over 5 years later sensor technology has improved to the point where a current crop sensor camera like the Sony a6000 out-performs a 5-year-old, full-format DSLR.

Pixel density counts, but there may still be significant image quality differences between cameras with sensors of similar pixel densities (although probably not enough to jump camera classes). These differences in image quality are usually due to improved sensor technology and improved camera image processing. E.g.:

  • Even though it has a higher pixel density, the new Olympus E-620 has almost 1.0 EV more highlight range than the older E-520. But it still doesn’t have the RAW headroom (dynamic range) or high ISO performance of the best, mid-sized sensor APC/APC cameras (e.g. Nikon D300 or Canon Rebel XSi), let alone a full 35mm sized sensor camera (e.g Canon 5D mk2 or Nikon D700).
  • The Canon PowerShot G10 performs considerably better against compact cameras than its extremely high 34 mp/cm2 pixel density might indicate. But its 10x higher pixel density cannot match the image quality of the mid-sized APC/APS and 4/3 sensor cameras like the Canon Rebel XSi or Olympus E-620.
  • The improved technology of the Canon 5D Mk II (sensor and image processing) has better image quality (but not by a lot) over the older and lower pixel density 5D. And at 21 vs. 12.7 mega pixel the Mk II has more resolution. But the 2.4 mp/cm2 Canon 5D Mk II does not have near the RAW headroom (dynamic range) of the 1.5 mp/cm2 Nikon D700.

Available Lenses: Their Quality and Their Weight

Larger sensors require larger lenses. Larger lenses are heavier, and significantly more expensive to make. In particular it is quite difficult to make an inexpensive, high quality full frame (35mm) lens for cameras like the Canon 5D. This is where the smaller, high quality midsized sensor lenses like the Olympus Zuiko μ4/3 format lenses really shine. For the Sony a6000 there are some incredible deals with Sigma’s Art Series prime lenses. So make sure you check out the availability of high quality lightweight lenses before committing to a particular camera line. Sometimes, the lenses are significantly more important for weight and image quality than the camera body. And it is likely that you will own and use the lenses far longer than a given camera body.


Quick ways to reduce backpack weight

Moving fast and light along the spectacular ridge line of the GR20 in Corsica. A minimal pack (and good pre-trip training) enabled Alison and I to do a 16 day trip in under 8 days. Pictured – the award winning Hyperlite Mountain Gear 2400 Southwest Pack

You make Adventure Alan & Co possible. When purchasing through links on our site, we may earn an affiliate commission at no additional cost to you. Here’s why you can trust us.

Quick ways to reduce backpack weight. A few may surprise you…

  1. Look at The Big Three: Backpack, Tent/shelter, and Sleep System (sleeping bag, sleeping pad, and ground cloth). You stand to lose a bunch of weight from these: as much as 10 to 12 pounds.
    1. Take a Backpack that weighs less than two pounds. See our: Best Backpacks for Backpacking and Hiking
    2. Take a Tent that weighs less than two pounds. See our: Best Backpacking Tents | Lightweight & Ultralight
    3. Take a Sleeping bag that that weighs less than 1.5 pounds. See our: Buyers Guide to Lightweight Backpacking Quilts & Sleeping Bags
    4. Look at our 9 Pound Full Comfort Lightweight Backpacking Gear List for more ideas for gear to save weight.
      Nine pounds of backpacking gear is all a hiker needs to be safe and warm. Or simply put, this list has better backpacking gear. For over a decade it’s been tested, refined, and updated to reflect only the best and most current backpacking gear now available in 2019. So, if you want to reduce pack weight without reducing comfort, look no further! The hiking gear in this guide is suitable for all 3-season conditions on trips around the world, from Alaska, to Patagonia, to Utah.
  2. Look on The Backpacking Food Page to save a ton of weight at zero cost
  3. Get a weather report (the NOAA hourly weather graph is among the most informative and accurate)—then pack for those conditions! Since 90% of backpackers take 90% their trips for 3 days or or less, this weather report should be quite accurate for the short time you are out. This will let you pack a tent, clothing, and sleeping bag appropriate for actual conditions. It will also deter you from taking inappropriate, “what-if-the-worst-happens!” gear, e.g. 6 pound tent, and a +10F sleeping bag for a balmy weather trip on the Appalachian Trail.
  4. Don’t take extra clothing. e.g. don’t take any more clothing than you can wear at one time.
  5. Take less: Be disciplined and leave a few items at home that you haven’t used in the last three trips. Put stuff like sunscreen and trail soap in smaller containers.
  6. Extra Credit: Browse The Gear Lists Page for other ideas and examples to save weight. This will give you a good examples of what type of gear is available and what is a reasonable weight for that type of gear, e.g. around 6-8 ounces for a rain jacket, or around 1.0 ounce for a pocket knife. Think hard if your gear is 2 to 3x heavier than the examples on these lists.
  7. Read my The Best Hydration — Drink When Thirsty. Use a Sawyer Squeeze Water Filter to drink at the source (lake, stream, etc.). Then only carry a sensible amount to get to your next known water source. I.e. it makes no sense to carry 3 liters of water, almost 7 pounds, when your next water source is only two hours away.
  8. Remember to have fun! That will at least, lighten your spirit and mood.

How Do I Start?

  • Ground yourself in reality: Get all your stuff together and weigh it. If you’re like most conventional hikers, your equipment will weigh around 30 pounds, possibly higher.
  • Get individual weights for your heavier items like tents and backpacks. For stuff in the range of a few pounds or less you’ll want to buy an inexpensive digital scale that weighs up to 10 pounds.
  • See what you can leave at home. Anything you don’t bring is free weight reduction. Think hard about this one. Do you really need it?
  • Put together a spreadsheet (or at least a list) with all your equipment weights. This is an indispensable analysis tool.
  • Try to figure out where you’ll get the most “bang for the buck.” e.g. figure out how much a new item costs and divide that by the amount of weight it will save you over your old equipment. Target the items that give you the most weight loss for the fewest dollars.
  • Buy on Sale: Don’t try to purchase all your new equipment right away. Many items regularly go on sale or are closed out. Watch carefully over the course of a year and you could save 30 to 70 percent on your equipment.